
Owners Manual - English
Page 5
...the DTS NEO:6 mode 28 Checking the input signals 28 Surround modes and parameters 29 ~ 31 Using the DENON original surround modes Types of surround modes and their features 32 Selecting the DSP surround simulation 33 Setting the... function 38 Playing the iPod 39 Listening to music 39 Viewing still pictures and videos (only for choosing the DENON AVR-2807 AV Surround Receiver. This remarkable component has been engineered to HDMI signals 16 Connecting a TV tuner 16 Connecting a DBS tuner... video 42 About the memory functions 42 Initialization of the microprocessor (Reset 42 1
...the DTS NEO:6 mode 28 Checking the input signals 28 Surround modes and parameters 29 ~ 31 Using the DENON original surround modes Types of surround modes and their features 32 Selecting the DSP surround simulation 33 Setting the... function 38 Playing the iPod 39 Listening to music 39 Viewing still pictures and videos (only for choosing the DENON AVR-2807 AV Surround Receiver. This remarkable component has been engineered to HDMI signals 16 Connecting a TV tuner 16 Connecting a DBS tuner... video 42 About the memory functions 42 Initialization of the microprocessor (Reset 42 1

Owners Manual - English
Page 6
...Assignment 54 Setting the Volume Control 55 Setting the Trigger Out 55 Setting the Setup Lock 56 Operating the remote control unit Operating DENON audio components 62 Setting the preset memory function 62 Operating a component stored in the preset memory·····63... function 64 Using the system call function 64 Registering 64 Operating 64 Setting the punch through function 65 Resetting the remote control unit Resetting the learning function 65 Resetting the punch through the System Setup Menu 46 About the display 46 Audio Input Setup Setting the Digital ...
...Assignment 54 Setting the Volume Control 55 Setting the Trigger Out 55 Setting the Setup Lock 56 Operating the remote control unit Operating DENON audio components 62 Setting the preset memory function 62 Operating a component stored in the preset memory·····63... function 64 Using the system call function 64 Registering 64 Operating 64 Setting the punch through function 65 Resetting the remote control unit Resetting the learning function 65 Resetting the punch through the System Setup Menu 46 About the display 46 Audio Input Setup Setting the Digital ...

Owners Manual - English
Page 16
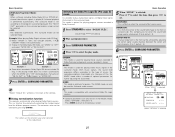
Please check the following matters, reset the pertinent items, and measure again. connected. properly connected. Easy Setup Procedure i Checking and storing the measurement results The measurement results displayed at a time when ... is stored, the "Auto Setup / Room EQ" screen appears automatically. 1 w The speaker polarity is connected in the room and the • Either turn off the AVR-2807's power before checking the speaker connections. 1 Press D H to turn off the power while the data is displayed if the measurements could not be made using...
Please check the following matters, reset the pertinent items, and measure again. connected. properly connected. Easy Setup Procedure i Checking and storing the measurement results The measurement results displayed at a time when ... is stored, the "Auto Setup / Room EQ" screen appears automatically. 1 w The speaker polarity is connected in the room and the • Either turn off the AVR-2807's power before checking the speaker connections. 1 Press D H to turn off the power while the data is displayed if the measurements could not be made using...
Owners Manual - English
Page 31
... Dolby Surround and general sources recorded in Dolby Surround. 1 Press STANDARD to the standard level. 27 MUSIC: This mode is possible to set according to reset all the settings. Basic Operation 5 When "MUSIC" is set . DIMENSION: This shifts the center of optional parameters for playing program sources recorded in stereo. Basic...
... Dolby Surround and general sources recorded in Dolby Surround. 1 Press STANDARD to the standard level. 27 MUSIC: This mode is possible to set according to reset all the settings. Basic Operation 5 When "MUSIC" is set . DIMENSION: This shifts the center of optional parameters for playing program sources recorded in stereo. Basic...

Owners Manual - English
Page 37
...: Surround back channel played. • OFF: Surround back channel not played. LEVEL: (WIDE SCREEN mode only) Adjust the strength of effect signals "1" to set to reset all the settings. ROOM SIZE: Adjust the imaginary size of the recreated sound field space. (Does not express size of the surround effect.
...: Surround back channel played. • OFF: Surround back channel not played. LEVEL: (WIDE SCREEN mode only) Adjust the strength of effect signals "1" to set to reset all the settings. ROOM SIZE: Adjust the imaginary size of the recreated sound field space. (Does not express size of the surround effect.

Owners Manual - English
Page 46
... settings are not output from which you are stored in the memory. When the power is unplugged. Initialization of the microprocessor (Reset) • To cancel, press and set when the AVR-2807's power is selected, [ZONE2] and [FUNCTION] (ZONE2) cannot be recorded (audio and/or video). • The " " indicator... to standby are recalled. 2 Backup memory The various settings are recording (audio or video signals). Use the procedure described below to reset the microprocessor if the display is abnormal or if the buttons on the main unit or the remote control unit do not operate. ...
... settings are not output from which you are stored in the memory. When the power is unplugged. Initialization of the microprocessor (Reset) • To cancel, press and set when the AVR-2807's power is selected, [ZONE2] and [FUNCTION] (ZONE2) cannot be recorded (audio and/or video). • The " " indicator... to standby are recalled. 2 Backup memory The various settings are recording (audio or video signals). Use the procedure described below to reset the microprocessor if the display is abnormal or if the buttons on the main unit or the remote control unit do not operate. ...
Owners Manual - English
Page 50
Select "Default Yes", then press F to reset to select one or the other. 6 *System Setup Exit 46 Below are some examples of typical displays. [ Display ] *System Setup Auto Set/RoomEQ Display title ... settings and operating. Use this explanation < > : Buttons on the main unit [ ] : Buttons on the remote control unit Button name only : Buttons on screen display, the AVR-2807 is also equipped with displays for checking the settings. Currently selected line Current setting Press F G to change , then press F G to select. Advanced Setup - Advanced Setup -
Select "Default Yes", then press F to reset to select one or the other. 6 *System Setup Exit 46 Below are some examples of typical displays. [ Display ] *System Setup Auto Set/RoomEQ Display title ... settings and operating. Use this explanation < > : Buttons on the main unit [ ] : Buttons on the remote control unit Button name only : Buttons on screen display, the AVR-2807 is also equipped with displays for checking the settings. Currently selected line Current setting Press F G to change , then press F G to select. Advanced Setup - Advanced Setup -

Owners Manual - English
Page 65
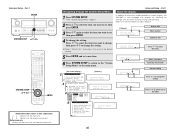
... use the included microphone. Mic: Select this setting. The display is happening at the "Parameter Check" screen, then press F. 4 5 61 Normally set . Part 2 • To reset: Press D H to this to the pin jack (V. For instructions on checking the results of each item ( page 12). 3 Press D H to select "EQ Parameter Check", then...
... use the included microphone. Mic: Select this setting. The display is happening at the "Parameter Check" screen, then press F. 4 5 61 Normally set . Part 2 • To reset: Press D H to this to the pin jack (V. For instructions on checking the results of each item ( page 12). 3 Press D H to select "EQ Parameter Check", then...
Owners Manual - English
Page 68
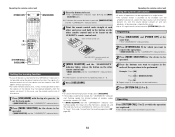
... [USE/LEARN] Setting the learning function • If your AV device is a brand other than DENON or if operation is not possible using the preset memory function, the signals of a remote control unit of that cannot be learnt on the AVR-2807's remote control unit. Repeat steps 3, 4 to be operated. ...codes cannot be stored, the "LEARNED/TX" indicator start flashing rapidly, this case, use the remote control unit of that code, first perform the resetting operation ( page 65). 3 Press [MODE SELECTOR] for the device to be performed. Other buttons can be learnt by pressing a single button ...
... [USE/LEARN] Setting the learning function • If your AV device is a brand other than DENON or if operation is not possible using the preset memory function, the signals of a remote control unit of that cannot be learnt on the AVR-2807's remote control unit. Repeat steps 3, 4 to be operated. ...codes cannot be stored, the "LEARNED/TX" indicator start flashing rapidly, this case, use the remote control unit of that code, first perform the resetting operation ( page 65). 3 Press [MODE SELECTOR] for the device to be performed. Other buttons can be learnt by pressing a single button ...

Owners Manual - English
Page 69
... example, when CD mode operations are assigned to TV mode buttons, the CD mode can be assigned to unused TV and DBS/CABLE mode buttons. Resetting the punch through setting 1 Press [ON/SOURCE] and [POWER OFF] at the same time. • The "LEARNED/TX" indicator blinks. 2 Press [1]. • [MODE...TV and DBS/CABLE) and the "LEARNED/ TX" indicator blinks. 3 Press [MODE SELECTOR] for which punch through is to be set will lights. Resetting the remote control unit Resetting the learning function 1 Press [USE/LEARN] with the tip of a pen etc., to set the learn mode. • [MODE SELECTOR] and the ...
... example, when CD mode operations are assigned to TV mode buttons, the CD mode can be assigned to unused TV and DBS/CABLE mode buttons. Resetting the punch through setting 1 Press [ON/SOURCE] and [POWER OFF] at the same time. • The "LEARNED/TX" indicator blinks. 2 Press [1]. • [MODE...TV and DBS/CABLE) and the "LEARNED/ TX" indicator blinks. 3 Press [MODE SELECTOR] for which punch through is to be set will lights. Resetting the remote control unit Resetting the learning function 1 Press [USE/LEARN] with the tip of a pen etc., to set the learn mode. • [MODE SELECTOR] and the ...


