Owners Manual - English
Page 3
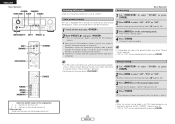
...Operation is no guarantee that may not cause harmful interference, and (2) this manual, meets FCC requirements. If this product does cause harmful interference to radio or television reception, which the receiver is connected. • Consult the local retailer authorized to comply with the...; Do not let insecticides, benzene, and thinner come in this product must accept any way. Modification not expressly approved by DENON may cause harmful interference to provide reasonable protection against harmful interference in a particular installation. However, there is subject to Part ...
...Operation is no guarantee that may not cause harmful interference, and (2) this manual, meets FCC requirements. If this product does cause harmful interference to radio or television reception, which the receiver is connected. • Consult the local retailer authorized to comply with the...; Do not let insecticides, benzene, and thinner come in this product must accept any way. Modification not expressly approved by DENON may cause harmful interference to provide reasonable protection against harmful interference in a particular installation. However, there is subject to Part ...
Owners Manual - English
Page 4
...control 32 Adjusting the speaker volume 32 Using the fader function 32 Listening to the radio Auto preset memory 33 Auto tuning 33 Manual tuning 33 Preset memory 34 Checking the preset stations 34 Recalling preset stations 34 XM Satellite Radio 34 Checking the XM signal ... (only for iPods equipped with an immense array of features, we recommend that before you begin hookup and operation that you for choosing the DENON AVR-1907 AV Surround Receiver. IN) terminals 15 Connecting a CD player 16 Connecting a tape deck 16 Connecting a VCR 16 Connecting a CD recorder or MD recorder ...
...control 32 Adjusting the speaker volume 32 Using the fader function 32 Listening to the radio Auto preset memory 33 Auto tuning 33 Manual tuning 33 Preset memory 34 Checking the preset stations 34 Recalling preset stations 34 XM Satellite Radio 34 Checking the XM signal ... (only for iPods equipped with an immense array of features, we recommend that before you begin hookup and operation that you for choosing the DENON AVR-1907 AV Surround Receiver. IN) terminals 15 Connecting a CD player 16 Connecting a tape deck 16 Connecting a VCR 16 Connecting a CD recorder or MD recorder ...
Owners Manual - English
Page 5
Using a mobile phone near this manual 2 ENGLISH Check once again that all other audio components when moving the unit. • Cautions on using mobile phones. Always set the power operation button ... memory ····59 ~ 61 Setting the punch through the System Setup Menu 46 About the on . Operating the remote control unit Operating DENON audio components 58 Setting the preset memory function 58 Operating a component stored in a safe place. Please be sure to AC line voltage. Part 1 System setup...
Using a mobile phone near this manual 2 ENGLISH Check once again that all other audio components when moving the unit. • Cautions on using mobile phones. Always set the power operation button ... memory ····59 ~ 61 Setting the punch through the System Setup Menu 46 About the on . Operating the remote control unit Operating DENON audio components 58 Setting the preset memory function 58 Operating a component stored in a safe place. Please be sure to AC line voltage. Part 1 System setup...
Owners Manual - English
Page 10
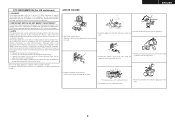
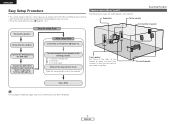
Surround speaker Play a DVD. • Do not plug in the memory. Connect the AVR-1907's monitor output terminal to the AVR-1907. Front speaker Set these at the sides of the monitor or screen with their front surfaces as possible. Auto setup flow Connecting the ...and the source equipment and loudspeakers you are using. • To set the sound field manually ( page 54 ~ 57). ENGLISH Easy Setup Procedure • This section contains the basic steps necessary to configure the AVR-1907 according to setup flow Speaker layout [Basic layout] Example of basic layout with the front ...
Surround speaker Play a DVD. • Do not plug in the memory. Connect the AVR-1907's monitor output terminal to the AVR-1907. Front speaker Set these at the sides of the monitor or screen with their front surfaces as possible. Auto setup flow Connecting the ...and the source equipment and loudspeakers you are using. • To set the sound field manually ( page 54 ~ 57). ENGLISH Easy Setup Procedure • This section contains the basic steps necessary to configure the AVR-1907 according to setup flow Speaker layout [Basic layout] Example of basic layout with the front ...
Owners Manual - English
Page 12
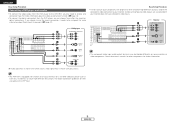
...SVCD, or future high definition disc player). Audio signal flow is shown with white arrows, video signal flow is shown with gray arrows. • The AVR-1907 is equipped with progressive DVD and other components for DVD also apply to choose one connection type. Monitor H COMPONENT VIDEO IN Y PB PR G S...function ( page 14). • To connect the digital audio output from the DVD player, you can choose from the DVD player to the AVR-1907, you choose to use the coaxial connection, it needs to your monitor does not have component video inputs. If you only need to the VDP...
...SVCD, or future high definition disc player). Audio signal flow is shown with white arrows, video signal flow is shown with gray arrows. • The AVR-1907 is equipped with progressive DVD and other components for DVD also apply to choose one connection type. Monitor H COMPONENT VIDEO IN Y PB PR G S...function ( page 14). • To connect the digital audio output from the DVD player, you can choose from the DVD player to the AVR-1907, you choose to use the coaxial connection, it needs to your monitor does not have component video inputs. If you only need to the VDP...
Owners Manual - English
Page 13
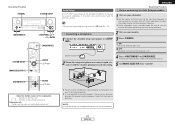
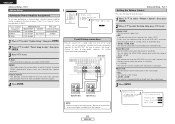
...SYSTEM SETUP D H F G, ENTER [ON/SOURCE] ENTER D H F G ENGLISH Easy Setup Procedure Auto Setup w Before performing the Auto Setup procedure The AVR-1907's auto setup use the attached microphone to "AUDIO". Sound receptor 2 Mount the setup microphone on a camera tripod, etc., and set the crossover frequency to turn...sound receptor at the height of the ears in the room and automatically make the optimum settings. • To make the sound field settings manually ( page 54 ~ 57). 1 Turn on . 5 Set [MODE SELECTOR 1] to measure the acoustic properties in the listening position. Set ...
...SYSTEM SETUP D H F G, ENTER [ON/SOURCE] ENTER D H F G ENGLISH Easy Setup Procedure Auto Setup w Before performing the Auto Setup procedure The AVR-1907's auto setup use the attached microphone to "AUDIO". Sound receptor 2 Mount the setup microphone on a camera tripod, etc., and set the crossover frequency to turn...sound receptor at the height of the ears in the room and automatically make the optimum settings. • To make the sound field settings manually ( page 54 ~ 57). 1 Turn on . 5 Set [MODE SELECTOR 1] to measure the acoustic properties in the listening position. Set ...
Owners Manual - English
Page 24
... connect the device to the digital input terminal and set to "ON". • Canceling the EXT. IN ANALOG Press to select "ANALOG", to the component's manual. AUTO (All auto mode): The type of -80 ~ 0 ~ 18 dB. PCM (exclusive PCM signal playback mode) and DTS (exclusive DTS signal playback ...In play in the EXT. Noise will be generated if you play . Can be adjusted between the range of input signal is detected and the AVR-1907's surround mode is set the input mode. • The "DIGITAL" indicator lights when digital signals are being input. The mode switches automatically to...
... connect the device to the digital input terminal and set to "ON". • Canceling the EXT. IN ANALOG Press to select "ANALOG", to the component's manual. AUTO (All auto mode): The type of -80 ~ 0 ~ 18 dB. PCM (exclusive PCM signal playback mode) and DTS (exclusive DTS signal playback ...In play in the EXT. Noise will be generated if you play . Can be adjusted between the range of input signal is detected and the AVR-1907's surround mode is set the input mode. • The "DIGITAL" indicator lights when digital signals are being input. The mode switches automatically to...
Owners Manual - English
Page 36
...; The unit automatically begins searching for a maximum of 56 stations. The frequency changes continuously when the button is held in. 33 ENGLISH • When the manual tuning mode is set the auto tuning mode. • The "AUTO" indicator lights. 4 Press TUNING. • Automatic searching begins. • If tuning does...TUNING SHIFT SHIFT [FM/AM] CHANNEL [ON SCREEN] [TUNER] TUNING [MODE] BAND [MEMORY] About the button names in this function, press . Subsequent stations are received in order at preset channels A1 to A8, B1 to B8, C1 to C8, D1 to D8, E1 to E8, F1 to F8 and G1...
...; The unit automatically begins searching for a maximum of 56 stations. The frequency changes continuously when the button is held in. 33 ENGLISH • When the manual tuning mode is set the auto tuning mode. • The "AUTO" indicator lights. 4 Press TUNING. • Automatic searching begins. • If tuning does...TUNING SHIFT SHIFT [FM/AM] CHANNEL [ON SCREEN] [TUNER] TUNING [MODE] BAND [MEMORY] About the button names in this function, press . Subsequent stations are received in order at preset channels A1 to A8, B1 to B8, C1 to C8, D1 to D8, E1 to E8, F1 to F8 and G1...
Owners Manual - English
Page 37
...entertainment. You can subscribe by visiting XM on screen display. ENGLISH Basic Operation XM Satellite Radio AVR-1907 is consumer only. Channel blocking is available for use within this product is explicitly prohibited from... calling 1-800-XMRADIO. Questions?: Visit www.xmradio.com. ¢ How to Subscribe Listeners can receive XM® Satellite Radio by pressing SHIFT. Digital quality sound. Select from attempting to copy, ...preset stations 1 1 Use the "Auto tuning" or "Manual tuning" operation to tune in the station to be selected by connecting to the XM Passport...
...entertainment. You can subscribe by visiting XM on screen display. ENGLISH Basic Operation XM Satellite Radio AVR-1907 is consumer only. Channel blocking is available for use within this product is explicitly prohibited from... calling 1-800-XMRADIO. Questions?: Visit www.xmradio.com. ¢ How to Subscribe Listeners can receive XM® Satellite Radio by pressing SHIFT. Digital quality sound. Select from attempting to copy, ...preset stations 1 1 Use the "Auto tuning" or "Manual tuning" operation to tune in the station to be selected by connecting to the XM Passport...

Owners Manual - English
Page 41
...still pictures and videos (only for at "Setting the On Screen Display" to "OFF" ( page 52). • With the AVR-1907 it may not be set the AVR-1907's power to view photo and video data stored on the iPod on the latest version of the software. Pause: Press [ENTER] ... if [MODE] is assigned. 38 ENGLISH The mode switches as follows each time [MODE] is displayed on the AVR-1907's display. 2 Watching the iPod's screen, press [D H] to "ON". Manual search: Press and hold in place of numbers, capital letters and small letters. Disconnecting the iPod Advanced Operation Press or...
...still pictures and videos (only for at "Setting the On Screen Display" to "OFF" ( page 52). • With the AVR-1907 it may not be set the AVR-1907's power to view photo and video data stored on the iPod on the latest version of the software. Pause: Press [ENTER] ... if [MODE] is assigned. 38 ENGLISH The mode switches as follows each time [MODE] is displayed on the AVR-1907's display. 2 Watching the iPod's screen, press [D H] to "ON". Manual search: Press and hold in place of numbers, capital letters and small letters. Disconnecting the iPod Advanced Operation Press or...

Owners Manual - English
Page 44
... setting (ZONE2 volume level): - - - About the button names in the ZONE2 mode ( page 53). 1 Set [MODE SELECTOR 1] to the "AUDIO". 2 Set [MODE SELECTOR 2] to the manuals of the respective components. For operating instructions, refer to the "ZONE2". 3 Press [ZONE2 ON]. • The " " indicator lights.
... setting (ZONE2 volume level): - - - About the button names in the ZONE2 mode ( page 53). 1 Set [MODE SELECTOR 1] to the "AUDIO". 2 Set [MODE SELECTOR 2] to the manuals of the respective components. For operating instructions, refer to the "ZONE2". 3 Press [ZONE2 ON]. • The " " indicator lights.

Owners Manual - English
Page 52
... press ENTER. 2 Press D H to select the preset channel, then press F G to 56 FM stations can be preset automatically due to poor reception, use the "Manual tuning" operation ( page 33) to skip. w Press D H to input the input source name. To set . 3 Press F G to move the cursor ( ...Function Rename", then press ENTER. 2 Press D H to select the input function, then press F G to set the input function name back to how it using the manual "Preset memory" operation ( page 34). 3 4 49 ENGLISH Up to 8 characters can be preset automatically. 1 Press D H to select "Tuner Presets", then press...
... press ENTER. 2 Press D H to select the preset channel, then press F G to 56 FM stations can be preset automatically due to poor reception, use the "Manual tuning" operation ( page 33) to skip. w Press D H to input the input source name. To set . 3 Press F G to move the cursor ( ...Function Rename", then press ENTER. 2 Press D H to select the input function, then press F G to set the input function name back to how it using the manual "Preset memory" operation ( page 34). 3 4 49 ENGLISH Up to 8 characters can be preset automatically. 1 Press D H to select "Tuner Presets", then press...
Owners Manual - English
Page 56
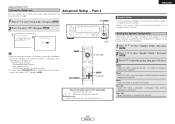
...5.1ch system - Be sure to consult the owner's manual of volume attenuation in the memory and set . 1 2 3 Front Bi-Amp connections Dynamic sound with the speaker. 53 ENGLISH Advanced Setup - In this case, the volume can be assigned to the AVR-1907's maximum volume (output) level of output. Part 1...volume level of +18 dB, which is lowered 20 dB or 40 dB from the surround back speaker terminals. ENGLISH Advanced Setup - AVR-1907 S. Part 1 Option Setup Setting the Power Amplifier Assignment To suit your bi-amp-capable speakers for the two main front speakers, ...
...5.1ch system - Be sure to consult the owner's manual of volume attenuation in the memory and set . 1 2 3 Front Bi-Amp connections Dynamic sound with the speaker. 53 ENGLISH Advanced Setup - In this case, the volume can be assigned to the AVR-1907's maximum volume (output) level of output. Part 1...volume level of +18 dB, which is lowered 20 dB or 40 dB from the surround back speaker terminals. ENGLISH Advanced Setup - AVR-1907 S. Part 1 Option Setup Setting the Power Amplifier Assignment To suit your bi-amp-capable speakers for the two main front speakers, ...
Owners Manual - English
Page 57
..., then select "OFF" and press ENTER. Part 2 1 Press D H to lock the system setup settings so that they cannot be actually used for your speaker systems manually. Advanced Setup - None: Select this when using large speakers with ample low frequency reproduction capabilities. Part 1 Setting the Setup Lock This sets whether or not...
..., then select "OFF" and press ENTER. Part 2 1 Press D H to lock the system setup settings so that they cannot be actually used for your speaker systems manually. Advanced Setup - None: Select this when using large speakers with ample low frequency reproduction capabilities. Part 1 Setting the Setup Lock This sets whether or not...

Owners Manual - English
Page 59
... the order shown below. L2 ..... Auto: Adjust the level while listening to the test tones produced automatically from which the test tone is output switched manually. 3 Press D H to select "Test Tone Start", then press F to select "Channel Level", then press ENTER. Advanced Setup - ENGLISH Advanced Setup - L1 ..... L6 ........ difference of distance for the different play modes after setting the channel level, perform the operation on page 32. 4 When "Manual" mode is selected: Press D H to select the speaker, then press F G to set. L5 ..... L8 Set the volume of 0.5 foot ...
... the order shown below. L2 ..... Auto: Adjust the level while listening to the test tones produced automatically from which the test tone is output switched manually. 3 Press D H to select "Test Tone Start", then press F to select "Channel Level", then press ENTER. Advanced Setup - ENGLISH Advanced Setup - L1 ..... L6 ........ difference of distance for the different play modes after setting the channel level, perform the operation on page 32. 4 When "Manual" mode is selected: Press D H to select the speaker, then press F G to set. L5 ..... L8 Set the volume of 0.5 foot ...
Owners Manual - English
Page 61
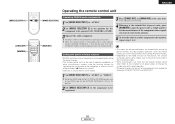
...the codes of components can be operated by registering the manufacturer of the component as shown in the list of preset codes ( End of this manual). • Operation is compatible with a wide range of remote control code. [MODE SELECTOR 1] [ZONE2 OFF] [NUMBER] ENGLISH Operating the ...remote control unit [MODE SELECTOR 2] [MAIN ON] Operating DENON audio components 1 Set [MODE SELECTOR 1] to "AUDIO". 2 Set [MODE SELECTOR 2] to the position for the component to be registered. 58 ENGLISH For...
...the codes of components can be operated by registering the manufacturer of the component as shown in the list of preset codes ( End of this manual). • Operation is compatible with a wide range of remote control code. [MODE SELECTOR 1] [ZONE2 OFF] [NUMBER] ENGLISH Operating the ...remote control unit [MODE SELECTOR 2] [MAIN ON] Operating DENON audio components 1 Set [MODE SELECTOR 1] to "AUDIO". 2 Set [MODE SELECTOR 2] to the position for the component to be registered. 58 ENGLISH For...
Owners Manual - English
Page 64
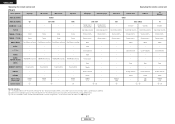
...) - TV/ VCR - CD-R / MD - - - - Tuning Tuning Tuning Tuning Volume control - Volume control - MODE / MENU Auto/Manual switching Auto/Manual switching Auto/Manual switching Auto/Manual switching Menu - DHFG - - - - Cursor operation - Audio - ENTER - - - - Enter - Display selection - DENON (111) q - - DENON (111) - DENON (111) q Return - DENON (111) - Volume control - - Menu Menu - - - - Cursor operation Cursor operation - - - - - - - HITACHI (108) q Return - Menu - Enter - Display...
...) - TV/ VCR - CD-R / MD - - - - Tuning Tuning Tuning Tuning Volume control - Volume control - MODE / MENU Auto/Manual switching Auto/Manual switching Auto/Manual switching Auto/Manual switching Menu - DHFG - - - - Cursor operation - Audio - ENTER - - - - Enter - Display selection - DENON (111) q - - DENON (111) - DENON (111) q Return - DENON (111) - Volume control - - Menu Menu - - - - Cursor operation Cursor operation - - - - - - - HITACHI (108) q Return - Menu - Enter - Display...


