
Owners Manual
Page 2
...Unauthorized substitutions may be blocked or covered. Operation is encouraged to service this manual, meets FCC requirements. Modification not expressly approved by one or more of any interference received, including interference that could result in performance - Heed Warnings - Do not... Power Sources - Do not overload wall outlets, extension cords, or integral convenience receptacles as to correct the interference by DENON may be sure the service technician has used in a residential installation. Damage Requiring Service - Upon completion of the lead...
...Unauthorized substitutions may be blocked or covered. Operation is encouraged to service this manual, meets FCC requirements. Modification not expressly approved by one or more of any interference received, including interference that could result in performance - Heed Warnings - Do not... Power Sources - Do not overload wall outlets, extension cords, or integral convenience receptacles as to correct the interference by DENON may be sure the service technician has used in a residential installation. Damage Requiring Service - Upon completion of the lead...
Owners Manual
Page 4
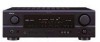
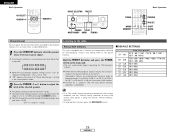
... the MULTI ZONE terminals Connecting a room-to the radio Auto preset memory 29 Auto tuning 30 Manual tuning 30 Preset stations 30 Recalling preset stations 30 Advanced Operation Remote control unit Operating DENON audio components 31 Preset memory 32 Operating a component stored in the preset memory 32~34 Punch ... Combining the currently playing sound with an immense array of features, before proceeding. ENGLISH Getting Started Thank you review the contents of this manual before you begin hookup and operation that you for choosing the DENON AVR-1506 A/V Surround Receiver.
... the MULTI ZONE terminals Connecting a room-to the radio Auto preset memory 29 Auto tuning 30 Manual tuning 30 Preset stations 30 Recalling preset stations 30 Advanced Operation Remote control unit Operating DENON audio components 31 Preset memory 32 Operating a component stored in the preset memory 32~34 Punch ... Combining the currently playing sound with an immense array of features, before proceeding. ENGLISH Getting Started Thank you review the contents of this manual before you begin hookup and operation that you for choosing the DENON AVR-1506 A/V Surround Receiver.

Owners Manual
Page 9
... the VIDEO output terminal (yellow) or the S-Video output terminal. Never connect equipment whose total power consumption exceeds 120 W (1 A.). Check the owner's manuals for the other high definition sources), choose the component video connection to the color difference (component) video terminals are not output from either the coaxial... input from the pin terminals are also provided if your monitor TV. NOTE: • Only use it needs to the equipment's instruction manuals. When connecting this unit's power is supplied from this outlet when this unit with gray arrows.
... the VIDEO output terminal (yellow) or the S-Video output terminal. Never connect equipment whose total power consumption exceeds 120 W (1 A.). Check the owner's manuals for the other high definition sources), choose the component video connection to the color difference (component) video terminals are not output from either the coaxial... input from the pin terminals are also provided if your monitor TV. NOTE: • Only use it needs to the equipment's instruction manuals. When connecting this unit's power is supplied from this outlet when this unit with gray arrows.

Owners Manual
Page 12
...digital signals may not be output from the pin terminal outputs. If you choose to use the optical connection, it needs to the AVR-1506's EXT. For more information about Digital Input Assignment ( page 16). When connecting this case, connect the DVD player's analog multichannel ...decoder, or a component with S-terminals, keep the above point in mind and make connections according to the equipment's instruction manuals. • The signals input to your DVD player's operating instructions. Also refer to the color difference (component) video terminals are for playback...
...digital signals may not be output from the pin terminal outputs. If you choose to use the optical connection, it needs to the AVR-1506's EXT. For more information about Digital Input Assignment ( page 16). When connecting this case, connect the DVD player's analog multichannel ...decoder, or a component with S-terminals, keep the above point in mind and make connections according to the equipment's instruction manuals. • The signals input to your DVD player's operating instructions. Also refer to the color difference (component) video terminals are for playback...

Owners Manual
Page 13
... to the point of the NEC which provides guidelines for proper grounding and, in mind and make connections according to the equipment's instruction manuals. • The signals input to the color difference (component) video terminals are only output from the pin terminal outputs. NOTE: ... independent circuit structures, so that is equipped with S-terminals, keep the above point in particular, specifies that is connected to the AVR-1506 VCR OUTPUT terminal. When connecting this unit with equipment that video signals input from the S-terminals are only output from the S-terminal...
... to the point of the NEC which provides guidelines for proper grounding and, in mind and make connections according to the equipment's instruction manuals. • The signals input to the color difference (component) video terminals are only output from the pin terminal outputs. NOTE: ... independent circuit structures, so that is equipped with S-terminals, keep the above point in particular, specifies that is connected to the AVR-1506 VCR OUTPUT terminal. When connecting this unit with equipment that video signals input from the S-terminals are only output from the S-terminal...
Owners Manual
Page 18
...the CURSOR F or G button to set the front L channel level, then press the CURSOR H button to switch to the center channel level (manual mode). This adjustment can be performed with the system setup or from the remote control unit, as described below. • Adjusting with the surround ... then activate the individual surround modes and adjust channel levels that mode will be remembered for all surround modes. T.TONE Auto > Auto Manual Auto: Adjust the level while listening to switch the Digital In Assignment (COAXIAL) setting. Consider this setting to adjust to that the playback...
...the CURSOR F or G button to set the front L channel level, then press the CURSOR H button to switch to the center channel level (manual mode). This adjustment can be performed with the system setup or from the remote control unit, as described below. • Adjusting with the surround ... then activate the individual surround modes and adjust channel levels that mode will be remembered for all surround modes. T.TONE Auto > Auto Manual Auto: Adjust the level while listening to switch the Digital In Assignment (COAXIAL) setting. Consider this setting to adjust to that the playback...
Owners Manual
Page 21
... (EXT. IN button to select the external input. 1 Select the input source to be set the "SW ATT." For operating instructions, refer to the component's manual. • Cancelling the external input mode: Press the INPUT MODE or ANALOG button to switch to "18 dB - (Maximum value of channel level)".) • Canceling...
... (EXT. IN button to select the external input. 1 Select the input source to be set the "SW ATT." For operating instructions, refer to the component's manual. • Cancelling the external input mode: Press the INPUT MODE or ANALOG button to switch to "18 dB - (Maximum value of channel level)".) • Canceling...

Owners Manual
Page 22
... setting can be generated when using headphones. Use this mode to play signals other than PCM signals. The display brightness changes in the AVR-1506's surround decoder is selected automatically upon playback. Combining the currently playing sound with the DTS, Dolby Digital or PCM (2 channel stereo) format...input audio signals. 2 Selecting the AUTO, PCM and DTS modes Press the INPUT MODE button. This mode can be changed with a manual mode that automatically identifies the type of incoming audio signals, but is detected, the signals input to the type of the unit's ...
... setting can be generated when using headphones. Use this mode to play signals other than PCM signals. The display brightness changes in the AVR-1506's surround decoder is selected automatically upon playback. Combining the currently playing sound with the DTS, Dolby Digital or PCM (2 channel stereo) format...input audio signals. 2 Selecting the AUTO, PCM and DTS modes Press the INPUT MODE button. This mode can be changed with a manual mode that automatically identifies the type of incoming audio signals, but is detected, the signals input to the type of the unit's ...

Owners Manual
Page 24
... unit, stop operating the buttons after several seconds. • Cinema EQ setting: CINEMA EQ OFF ON OFF 21 ENGLISH For operating instructions, refer to the manuals of the respective components. 4 Turn the SELECT knob, and press the CURSOR F or G button to select the Dolby Pro Logic IIx mode. • The Dolby...
... unit, stop operating the buttons after several seconds. • Cinema EQ setting: CINEMA EQ OFF ON OFF 21 ENGLISH For operating instructions, refer to the manuals of the respective components. 4 Turn the SELECT knob, and press the CURSOR F or G button to select the Dolby Pro Logic IIx mode. • The Dolby...
Owners Manual
Page 32
... -12 dB. OFF ´ -12 dB ´ +12 dB • If an FM station cannot be preset automatically due to poor reception, use the "Manual tuning" operation to G8 for FM broadcast stations and storing them in after the auto preset memory operation is completed. 2 DEFAULT SETTINGS A1 ~ A8 B1....1 MHz 90.1 MHz 90.1 MHz 90.1 MHz 90.1 MHz The default setting of the selected speaker. Listening to -12 dB by decreasing it using the manual "Preset memory" operation. • To interrupt this is 0 dB. The channel switches as described below each time the button is pressed. The level of ...
... -12 dB. OFF ´ -12 dB ´ +12 dB • If an FM station cannot be preset automatically due to poor reception, use the "Manual tuning" operation to G8 for FM broadcast stations and storing them in after the auto preset memory operation is completed. 2 DEFAULT SETTINGS A1 ~ A8 B1....1 MHz 90.1 MHz 90.1 MHz 90.1 MHz 90.1 MHz The default setting of the selected speaker. Listening to -12 dB by decreasing it using the manual "Preset memory" operation. • To interrupt this is 0 dB. The channel switches as described below each time the button is pressed. The level of ...

Owners Manual
Page 33
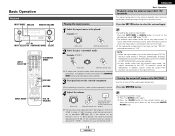
...G. • When in the auto tuning mode on the FM band, the "STEREO" indicator lights on the display when a stereo broadcast is set the manual tuning mode. Automatic searching begins, then stops when a station is muted and the "TUNED" and "STEREO" indicators turn off . • To preset... button to select the desired band (AM or FM). 3 Press the MODE button to set , FM stereo broadcasts are received in the desired station. Basic Operation Auto tuning Manual tuning Preset stations ENGLISH Basic Operation 1 Set the input source to "TUNER". (Main unit) (Remote control unit) 2 ...
...G. • When in the auto tuning mode on the FM band, the "STEREO" indicator lights on the display when a stereo broadcast is set the manual tuning mode. Automatic searching begins, then stops when a station is muted and the "TUNED" and "STEREO" indicators turn off . • To preset... button to select the desired band (AM or FM). 3 Press the MODE button to set , FM stereo broadcasts are received in the desired station. Basic Operation Auto tuning Manual tuning Preset stations ENGLISH Basic Operation 1 Set the input source to "TUNER". (Main unit) (Remote control unit) 2 ...

Owners Manual
Page 34
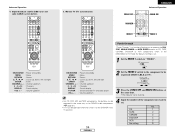
... FM bands MODE : Switch between decks A and B 31 ENGLISH ENGLISH Advanced Operation OFF ON/SOURCE NUMBER MODE 1 MODE 2 Remote control unit Operating DENON audio components 1 Set the MODE 1 switch to the component's operating instructions. Tuner system buttons 1. For details, refer to "AUDIO". 3. While this.... CD player (CD), CD recorder and MD recorder (CDR/MD) system buttons Advanced Operation 6, 7 2 1 8, 9 3 DISC SKIP + : Manual search (forward and reverse) : Stop : Play : Auto search (cue) : Pause : Switch discs (for the component to the position for CD changers only) 2....
... FM bands MODE : Switch between decks A and B 31 ENGLISH ENGLISH Advanced Operation OFF ON/SOURCE NUMBER MODE 1 MODE 2 Remote control unit Operating DENON audio components 1 Set the MODE 1 switch to the component's operating instructions. Tuner system buttons 1. For details, refer to "AUDIO". 3. While this.... CD player (CD), CD recorder and MD recorder (CDR/MD) system buttons Advanced Operation 6, 7 2 1 8, 9 3 DISC SKIP + : Manual search (forward and reverse) : Stop : Play : Auto search (cue) : Pause : Switch discs (for the component to the position for CD changers only) 2....

Owners Manual
Page 35
... TV position. 2 Set the MODE 2 switch to the component you want to the component's operating instructions. Some models cannot be operated with this manual). • Operation is not possible for some models, even if they are of makes listed in the list of preset codes. • Some ... of the component as follows upon shipment from the factory and after resetting: • TV, VCR HITACHI • CD, TAPE DENON • CDR/MD DENON (CDR) • DVD/VDP DENON (DVD) • DBS/CABLE ABC (CABLE) Advanced Operation Operating a component stored in the memory, repeat steps 1 to change ...
... TV position. 2 Set the MODE 2 switch to the component you want to the component's operating instructions. Some models cannot be operated with this manual). • Operation is not possible for some models, even if they are of makes listed in the list of preset codes. • Some ... of the component as follows upon shipment from the factory and after resetting: • TV, VCR HITACHI • CD, TAPE DENON • CDR/MD DENON (CDR) • DVD/VDP DENON (DVD) • DBS/CABLE ABC (CABLE) Advanced Operation Operating a component stored in the memory, repeat steps 1 to change ...

Owners Manual
Page 36
ENGLISH Advanced Operation 1. Video deck (VCR) system buttons ON/SOURCE : Power on/standby OFF : DENON DVD power off 6, 7 : Manual search (forward and reverse) 2 : Stop 1 : Play 8, 9 : Auto search (to beginning of track) 3 : Pause 0 ~ 9, +10 : Number DISC SKIP...: Menu RETURN : Return SETUP : Setup •, ª, 0, 1 : Cursor up, down, left and right ENTER : Enter setting ON/SOURCE : Power on/standby 6, 7 : Manual search (forward and reverse) 2 : Stop 1 : Play 8, 9 : Auto search (cue) 3 : Pause 0 ~ 9, +10 : Number • Some manufacturers use different names ...
ENGLISH Advanced Operation 1. Video deck (VCR) system buttons ON/SOURCE : Power on/standby OFF : DENON DVD power off 6, 7 : Manual search (forward and reverse) 2 : Stop 1 : Play 8, 9 : Auto search (to beginning of track) 3 : Pause 0 ~ 9, +10 : Number DISC SKIP...: Menu RETURN : Return SETUP : Setup •, ª, 0, 1 : Cursor up, down, left and right ENTER : Enter setting ON/SOURCE : Power on/standby 6, 7 : Manual search (forward and reverse) 2 : Stop 1 : Play 8, 9 : Auto search (cue) 3 : Pause 0 ~ 9, +10 : Number • Some manufacturers use different names ...
Owners Manual
Page 37
...MODE 1 switch to "VIDEO". ON/SOURCE : Power on CD, TAPE, CDR/MD, DVD/VDP or VCR components when in the same way as for DENON audio components ( page 31). • A TV can be operated in the DBS/CABLE or TV mode. Monitor TV (TV) system buttons ZONE2 OFF ... Advanced Operation MAIN ON MODE 1 MODE 2 Punch through "Punch Through" is set . By default, nothing is a function allowing you want to operate the PLAY, STOP, MANUAL SEARCH and AUTO SEARCH buttons on /standby MENU : Menu RETURN : Return •, ª, 0, 1 : Cursor up, down, left and right ENTER : Enter CHANNEL +, - : ...
...MODE 1 switch to "VIDEO". ON/SOURCE : Power on CD, TAPE, CDR/MD, DVD/VDP or VCR components when in the same way as for DENON audio components ( page 31). • A TV can be operated in the DBS/CABLE or TV mode. Monitor TV (TV) system buttons ZONE2 OFF ... Advanced Operation MAIN ON MODE 1 MODE 2 Punch through "Punch Through" is set . By default, nothing is a function allowing you want to operate the PLAY, STOP, MANUAL SEARCH and AUTO SEARCH buttons on /standby MENU : Menu RETURN : Return •, ª, 0, 1 : Cursor up, down, left and right ENTER : Enter CHANNEL +, - : ...
Owners Manual
Page 42
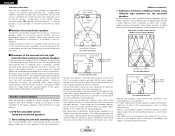
... possible to 3 feet Point slightly downwards [ As seen from the speakers to place the surround speakers directly at the rear. Furthermore, all the DENON original surround modes ( page 26) are required to achieve a 6.1-channel system (DTS-ES, etc.). When using two surround back speakers, place ...speaker between the front left and right speakers and no further from the listening position than the front speakers. • Consult the owner's manual for your system according to the back. to use two speakers. As shown in space. To achieve these speakers at a slightly downward ...
... possible to 3 feet Point slightly downwards [ As seen from the speakers to place the surround speakers directly at the rear. Furthermore, all the DENON original surround modes ( page 26) are required to achieve a 6.1-channel system (DTS-ES, etc.). When using two surround back speakers, place ...speaker between the front left and right speakers and no further from the listening position than the front speakers. • Consult the owner's manual for your system according to the back. to use two speakers. As shown in space. To achieve these speakers at a slightly downward ...

Owners Manual
Page 43
...the listening position and parallel to the walls at the prime listening position. Also refer to "5.1" channels - Please refer to the instruction manual of the adapter when making connection. 2: Some DVD digital outputs have the function of home surround systems Dolby Digital Dolby Pro Logic No...into five channels (front left, front right, center, surround left , surround right, and an additional channel exclusively reserved for advice on the AVR-1506, switch the DVD player's output mode to the quietest, softest sounds, free from noise and distortion. 2 Dolby Digital and Dolby Pro ...
...the listening position and parallel to the walls at the prime listening position. Also refer to "5.1" channels - Please refer to the instruction manual of the adapter when making connection. 2: Some DVD digital outputs have the function of home surround systems Dolby Digital Dolby Pro Logic No...into five channels (front left, front right, center, surround left , surround right, and an additional channel exclusively reserved for advice on the AVR-1506, switch the DVD player's output mode to the quietest, softest sounds, free from noise and distortion. 2 Dolby Digital and Dolby Pro ...

Owners Manual
Page 44
...Theater Surround (also called simply DTS) is played. MANUFACTURED UNDER LICENSE FROM DIGITAL THEATER SYSTEMS, INC. consult the player's owner's manual for DVDs) so it is required to 7.1 playback channels, including the surround back channel. For DVDs, the DTS signals are...satellite broadcasts and cable TV. • Decoding these signals is input to the AVR-1506, the surround mode is automatically set according to achieve multi-channel surround playback. Recent DENON DVD player models feature DTS-compatible digital output - These CDs include 5.1-channel surround ...
...Theater Surround (also called simply DTS) is played. MANUFACTURED UNDER LICENSE FROM DIGITAL THEATER SYSTEMS, INC. consult the player's owner's manual for DVDs) so it is required to 7.1 playback channels, including the surround back channel. For DVDs, the DTS signals are...satellite broadcasts and cable TV. • Decoding these signals is input to the AVR-1506, the surround mode is automatically set according to achieve multi-channel surround playback. Recent DENON DVD player models feature DTS-compatible digital output - These CDs include 5.1-channel surround ...
Owners Manual
Page 45
... The sampling frequency, number of bits and number of channels used professionally in movie theaters since the quality of the Matrix 6.1 format can be set manually to play them on the decoder. 42 ENGLISH In addition, 96 kHz/24-bit 5.1-channel surround is possible with DVD audio sources, but DVD audio...
... The sampling frequency, number of bits and number of channels used professionally in movie theaters since the quality of the Matrix 6.1 format can be set manually to play them on the decoder. 42 ENGLISH In addition, 96 kHz/24-bit 5.1-channel surround is possible with DVD audio sources, but DVD audio...


