Owner's Manual
Page 2
Microsoft, Windows, Windows Server, MS-DOS and Windows Vista are trademarks of Dell Inc.; Model MTG September 2007 P/N CU557 Rev. Reproduction in any proprietary interest in this text: Dell, the DELL logo, Inspiron, XPS, Dell Precision, Dimension, OptiPlex, Latitude, PowerEdge, PowerVault, PowerApp, and Dell OpenManage are either trademarks or registered trademarks of Dell Inc. is subject to avoid the problem. Trademarks...
Microsoft, Windows, Windows Server, MS-DOS and Windows Vista are trademarks of Dell Inc.; Model MTG September 2007 P/N CU557 Rev. Reproduction in any proprietary interest in this text: Dell, the DELL logo, Inspiron, XPS, Dell Precision, Dimension, OptiPlex, Latitude, PowerEdge, PowerVault, PowerApp, and Dell OpenManage are either trademarks or registered trademarks of Dell Inc. is subject to avoid the problem. Trademarks...

Owner's Manual
Page 4
... Disc™ (BD) Media 34 Helpful Tips 37 Adjusting the Volume 38 Adjusting the Picture 38 Enabling S/PDIF Digital Audio 38 Enabling S/PDIF in the Windows Audio Driver 39 Setting Up the Cyberlink (CL) Headphones 39 5 Using the Optional Wireless Keyboard and Mouse 41 Media Control Keys 42 Using the Touch...
... Disc™ (BD) Media 34 Helpful Tips 37 Adjusting the Volume 38 Adjusting the Picture 38 Enabling S/PDIF Digital Audio 38 Enabling S/PDIF in the Windows Audio Driver 39 Setting Up the Cyberlink (CL) Headphones 39 5 Using the Optional Wireless Keyboard and Mouse 41 Media Control Keys 42 Using the Touch...

Owner's Manual
Page 7
... Identifying Drivers 76 Reinstalling Drivers and Utilities 76 Troubleshooting Software and Hardware Problems in the Microsoft® Windows® Vista™ Operating Systems 78 Restoring Your Operating System 78 Using Microsoft Windows System Restore . . . . 78 Using Dell™ Factory Image Restore 80 Using the Operating System Media 81 12 Specifications 83 13 Getting... Order-Status Service 91 Problems With Your Order 91 Product Information 92 Returning Items for Warranty Repair or Credit . . . . . 92 Before You Call 93 Contacting Dell 95 Contents 7
... Identifying Drivers 76 Reinstalling Drivers and Utilities 76 Troubleshooting Software and Hardware Problems in the Microsoft® Windows® Vista™ Operating Systems 78 Restoring Your Operating System 78 Using Microsoft Windows System Restore . . . . 78 Using Dell™ Factory Image Restore 80 Using the Operating System Media 81 12 Specifications 83 13 Getting... Order-Status Service 91 Problems With Your Order 91 Product Information 92 Returning Items for Warranty Repair or Credit . . . . . 92 Before You Call 93 Contacting Dell 95 Contents 7
Owner's Manual
Page 11
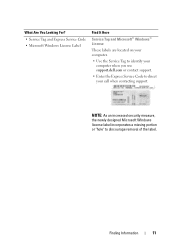
...security measure, the newly designed Microsoft Windows license label incorporates a missing portion or "hole" to direct your call when contacting support. Finding Information 11 What Are You Looking For? • Service Tag and Express Service Code • Microsoft Windows License Label Find It Here Service... Tag and Microsoft® Windows® License These labels are located on your computer. • Use the Service Tag to identify ...
...security measure, the newly designed Microsoft Windows license label incorporates a missing portion or "hole" to direct your call when contacting support. Finding Information 11 What Are You Looking For? • Service Tag and Express Service Code • Microsoft Windows License Label Find It Here Service... Tag and Microsoft® Windows® License These labels are located on your computer. • Use the Service Tag to identify ...

Owner's Manual
Page 13
... and files • How to personalize my desktop • How to reinstall my operating system Find It Here Windows Help and Support 1 To access Windows Help and Support: • In Windows Vista™, click the Windows Vista Start button and click Help and Support. 2 Type a word or phrase that describes your problem, and then...
... and files • How to personalize my desktop • How to reinstall my operating system Find It Here Windows Help and Support 1 To access Windows Help and Support: • In Windows Vista™, click the Windows Vista Start button and click Help and Support. 2 Type a word or phrase that describes your problem, and then...

Owner's Manual
Page 24
... with a provided ISP desktop shortcut: 1 Save and close any open files, and exit any open programs. 2 Double-click the ISP icon on the Microsoft® Windows® desktop. 3 Follow the instructions on the screen to set up an Internet connection with a different ISP, perform the steps in the past, the ISP... or if you can access the Internet and use your telephone on page 53. If you do not have a service outage. Your ISP will offer one or more of the following section.
... with a provided ISP desktop shortcut: 1 Save and close any open files, and exit any open programs. 2 Double-click the ISP icon on the Microsoft® Windows® desktop. 3 Follow the instructions on the screen to set up an Internet connection with a different ISP, perform the steps in the past, the ISP... or if you can access the Internet and use your telephone on page 53. If you do not have a service outage. Your ISP will offer one or more of the following section.
Owner's Manual
Page 25
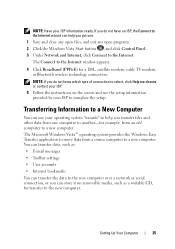
...data to the new computer over a network or serial connection, or you transfer files and other data from one . 1 Save and close any open files, and exit any open programs. 2 Click the Windows Vista Start button , and click Control Panel. 3 Under Network and Internet, click Connect to complete the ... TV modem, or Bluetooth wireless technology connection. NOTE: Have your ISP to the Internet. Setting Up Your Computer 25 If you get one computer to another-for example, from a source computer to the Internet window appears. 4 Click Broadband (PPPoE) for transfer to a new computer.
...data to the new computer over a network or serial connection, or you transfer files and other data from one . 1 Save and close any open files, and exit any open programs. 2 Click the Windows Vista Start button , and click Control Panel. 3 Under Network and Internet, click Connect to complete the ... TV modem, or Bluetooth wireless technology connection. NOTE: Have your ISP to the Internet. Setting Up Your Computer 25 If you get one computer to another-for example, from a source computer to the Internet window appears. 4 Click Broadband (PPPoE) for transfer to a new computer.

Owner's Manual
Page 26
... Transfer, see Microsoft Knowledge Base Article #928634, titled How to use Windows Easy Transfer to migrate files and settings from one Windows-based computer to the computer. • Load paper and install the toner or ink cartridge. If you purchased a printer cable at ...a new transfer or Continue a transfer in the computer's shipping box. 26 Setting Up Your Computer Follow the instructions provided on the screen by the Windows Easy Transfer wizard. Setting Up a Printer NOTICE: Complete the operating system setup before you purchase a cable separately, ensure that came with a USB cable...
... Transfer, see Microsoft Knowledge Base Article #928634, titled How to use Windows Easy Transfer to migrate files and settings from one Windows-based computer to the computer. • Load paper and install the toner or ink cartridge. If you purchased a printer cable at ...a new transfer or Continue a transfer in the computer's shipping box. 26 Setting Up Your Computer Follow the instructions provided on the screen by the Windows Easy Transfer wizard. Setting Up a Printer NOTICE: Complete the operating system setup before you purchase a cable separately, ensure that came with a USB cable...

Owner's Manual
Page 27
See "Reinstalling Drivers and Utilities" on the printer. 4 If your printer. Setting Up Your Computer 27 The connectors fit only one way. 1 2 3 1 USB connector on computer 3 USB printer cable 2 USB connector on printer 3 Turn on page 76 and the documentation that came .... 5 Install the printer driver if necessary. Connecting a USB Printer NOTE: You can connect USB devices while the computer is running the Windows Vista™ operating system, click the Windows Vista Start button , and click Network→ Add a printer to the USB connectors on the computer and the printer.
See "Reinstalling Drivers and Utilities" on the printer. 4 If your printer. Setting Up Your Computer 27 The connectors fit only one way. 1 2 3 1 USB connector on computer 3 USB printer cable 2 USB connector on printer 3 Turn on page 76 and the documentation that came .... 5 Install the printer driver if necessary. Connecting a USB Printer NOTE: You can connect USB devices while the computer is running the Windows Vista™ operating system, click the Windows Vista Start button , and click Network→ Add a printer to the USB connectors on the computer and the printer.

Owner's Manual
Page 37
... to play in regular stereos. Media Type BD-R BD-RE Read Yes Yes Write Yes Yes Rewritable No Yes Helpful Tips • Use Microsoft® Windows® Explorer to drag and drop files to a CD-R or CD-RW only after you can erase the data on computers that have MP3 software...
... to play in regular stereos. Media Type BD-R BD-RE Read Yes Yes Write Yes Yes Rewritable No Yes Helpful Tips • Use Microsoft® Windows® Explorer to drag and drop files to a CD-R or CD-RW only after you can erase the data on computers that have MP3 software...

Owner's Manual
Page 38
...Cyberlink PowerDVD application. 2 Insert a DVD into the DVD drive. Enabling S/PDIF Digital Audio If your computer is running Microsoft Windows Vista™ Operating System: 1 Click the Windows Vista Start button , click Control Panel, and then click Appearance and Personalization. 2 Under Personalization, click Adjust Screen Resolution. If... depth are muted, you do not hear the CD or DVD playing. 1 Open the Volume Control window. 2 Click and drag the bar in the Volume Control window. Adjusting the Volume NOTE: When the speakers are using too much memory and preventing DVD playback, adjust...
...Cyberlink PowerDVD application. 2 Insert a DVD into the DVD drive. Enabling S/PDIF Digital Audio If your computer is running Microsoft Windows Vista™ Operating System: 1 Click the Windows Vista Start button , click Control Panel, and then click Appearance and Personalization. 2 Under Personalization, click Adjust Screen Resolution. If... depth are muted, you do not hear the CD or DVD playing. 1 Open the Volume Control window. 2 Click and drag the bar in the Volume Control window. Adjusting the Volume NOTE: When the speakers are using too much memory and preventing DVD playback, adjust...

Owner's Manual
Page 39
... Back button once, and then click the Back button again to return to the main menu screen. Enabling S/PDIF in the Windows Audio Driver 1 Double-click the speaker icon in the Windows notification area. 2 Click the Options menu and then click Advanced Controls. 3 Click Advanced. 4 Click S/PDIF Interface. 5 Click Close. 6 Click OK...
... Back button once, and then click the Back button again to return to the main menu screen. Enabling S/PDIF in the Windows Audio Driver 1 Double-click the speaker icon in the Windows notification area. 2 Click the Options menu and then click Advanced Controls. 3 Click Advanced. 4 Click S/PDIF Interface. 5 Click Close. 6 Click OK...

Owner's Manual
Page 44
...button twice (the alternate left touch-pad button to the left of the keyboard can use your computer is running Microsoft Windows Vista™ Operating System: Click the Windows Vista Start button , click Control Panel, and then click Mouse Properties. Re-Syncing Your Optional Wireless Mouse or Keyboard .... • To double-click an object, position the cursor on the object and tap twice on the touch pad or use the Mouse Properties window to re-sync your optional (non-Bluetooth) wireless keyboard or mouse with your computer, follow these instructions: 1 Turn the computer on. 2 Turn...
...button twice (the alternate left touch-pad button to the left of the keyboard can use your computer is running Microsoft Windows Vista™ Operating System: Click the Windows Vista Start button , click Control Panel, and then click Mouse Properties. Re-Syncing Your Optional Wireless Mouse or Keyboard .... • To double-click an object, position the cursor on the object and tap twice on the touch pad or use the Mouse Properties window to re-sync your optional (non-Bluetooth) wireless keyboard or mouse with your computer, follow these instructions: 1 Turn the computer on. 2 Turn...
Owner's Manual
Page 46
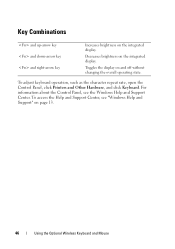
.... Toggles the display on the integrated display. Decreases brightness on and off without changing the overall operating state. For information about the Control Panel, see "Windows Help and Support" on the integrated display. To adjust keyboard operation, such as the character repeat rate, open the Control Panel, click Printers and Other...
.... Toggles the display on the integrated display. Decreases brightness on and off without changing the overall operating state. For information about the Control Panel, see "Windows Help and Support" on the integrated display. To adjust keyboard operation, such as the character repeat rate, open the Control Panel, click Printers and Other...

Owner's Manual
Page 48
for further instructions. 48 Using the Display If your computer is running Windows Vista™: 1 Click the Windows Vista Start button , and click Control Panel. 2 Under Appearance and Personalization, click Adjust screen resolution. 3 In the Display Settings window, under Resolution, slide the slide bar to the left/right to decrease/increase the screen resolution. 4 Click How do I get the best display?
for further instructions. 48 Using the Display If your computer is running Windows Vista™: 1 Click the Windows Vista Start button , and click Control Panel. 2 Under Appearance and Personalization, click Adjust screen resolution. 3 In the Display Settings window, under Resolution, slide the slide bar to the left/right to decrease/increase the screen resolution. 4 Click How do I get the best display?

Owner's Manual
Page 51
..., or if an incorrect time or date displays during start-up, contact Dell (see the program's documentation. C O N T A C T D E L L - Troubleshooting Solving Problems Follow these tips when you troubleshoot your Dell™ computer to the Windows Classic view. If you set your computer: • If you added ... message appears on page 95). Battery Problems CAUTION: There is a danger of the procedures in this document were written for the Windows default view, so they may help support personnel diagnose and fix the problem(s). • If an error message occurs in the ...
..., or if an incorrect time or date displays during start-up, contact Dell (see the program's documentation. C O N T A C T D E L L - Troubleshooting Solving Problems Follow these tips when you troubleshoot your Dell™ computer to the Windows Classic view. If you set your computer: • If you added ... message appears on page 95). Battery Problems CAUTION: There is a danger of the procedures in this document were written for the Windows default view, so they may help support personnel diagnose and fix the problem(s). • If an error message occurs in the ...

Owner's Manual
Page 52
...; Personalization→ Display Settings. 2 Adjust Resolution and Colors settings, as a lamp. ENSURE THAT MICROSOFT® WINDOWS® RECOGNIZES THE DRIVE - R U N T H E D E L L D I A G N O S T I C A L O U T L E T - Drive Problems CAUTION: Before you begin any of the Computer" on page 65. 52 Troubleshooting See "Dell Diagnostics" on page 15. ROTATE THE DISPLAY TO ELIMINATE SUNLIGHT GLARE AND POSSIBLE INTERFERENCE ADJUST...
...; Personalization→ Display Settings. 2 Adjust Resolution and Colors settings, as a lamp. ENSURE THAT MICROSOFT® WINDOWS® RECOGNIZES THE DRIVE - R U N T H E D E L L D I A G N O S T I C A L O U T L E T - Drive Problems CAUTION: Before you begin any of the Computer" on page 65. 52 Troubleshooting See "Dell Diagnostics" on page 15. ROTATE THE DISPLAY TO ELIMINATE SUNLIGHT GLARE AND POSSIBLE INTERFERENCE ADJUST...

Owner's Manual
Page 53
...desired action. 4 Follow the instructions on the screen. Hard drive problems RUN CHECK DISK - The User Account Control window may cause noise, which does not indicate a defect in Windows Help and Support for information on page 62. otherwise, contact your screen. • Ensure that the volume is...this section, follow the safety instructions in all programs before you begin any boxes that are an administrator on page 17). ADJUST THE WINDOWS VOLUME CONTROL - • Click the speaker icon in the lower-right corner of different regions worldwide and different disc formats, not all...
...desired action. 4 Follow the instructions on the screen. Hard drive problems RUN CHECK DISK - The User Account Control window may cause noise, which does not indicate a defect in Windows Help and Support for information on page 62. otherwise, contact your screen. • Ensure that the volume is...this section, follow the safety instructions in all programs before you begin any boxes that are an administrator on page 17). ADJUST THE WINDOWS VOLUME CONTROL - • Click the speaker icon in the lower-right corner of different regions worldwide and different disc formats, not all...

Owner's Manual
Page 54
... was running when the message appeared. d r i v e l e t t e r : \ I S N O T A C C E S S I L E W A S N O T F O U N D - The drive cannot read the disk. I N S E R T B O O T A B L E M E D I N T E R N E T - Insert a bootable floppy disk, CD, or DVD. Close all windows and open your Internet service provider. Contact Dell (see the documentation for installation instructions. E N S U R E T H A T Y O U A R E C O N N E C T E D T O T H E I A - For help, contact your e-mail attachments: 1 In Microsoft Mail, click Tools→ Options→ Security. 2 Click...
... was running when the message appeared. d r i v e l e t t e r : \ I S N O T A C C E S S I L E W A S N O T F O U N D - The drive cannot read the disk. I N S E R T B O O T A B L E M E D I N T E R N E T - Insert a bootable floppy disk, CD, or DVD. Close all windows and open your Internet service provider. Contact Dell (see the documentation for installation instructions. E N S U R E T H A T Y O U A R E C O N N E C T E D T O T H E I A - For help, contact your e-mail attachments: 1 In Microsoft Mail, click Tools→ Options→ Security. 2 Click...
Owner's Manual
Page 55
...9 4 D E V I N S YS T E M S E T U P - IF YOU HAVE PROBLEMS WITH AN IEEE 1394 DEVICE NOT PROVIDED BY DELL - Some wireless keyboards have a power button. Contact Dell (see "Contacting Dell" on page 70. Contact the IEEE 1394 device manufacturer. Keyboard Problems CAUTION: Before you begin any of the procedures in this...E V I C E I S E N A B L E D I C E - ENSURE THAT THE IEEE 1394 DEVICE IS RECOGNIZED BY WINDOWS - Windows Vista: 1 Click Start → Control Panel→ Hardware and Sound. 2 Click Device Manager. See "Re-Syncing Your Optional Wireless Mouse or ...
...9 4 D E V I N S YS T E M S E T U P - IF YOU HAVE PROBLEMS WITH AN IEEE 1394 DEVICE NOT PROVIDED BY DELL - Some wireless keyboards have a power button. Contact Dell (see "Contacting Dell" on page 70. Contact the IEEE 1394 device manufacturer. Keyboard Problems CAUTION: Before you begin any of the procedures in this...E V I C E I S E N A B L E D I C E - ENSURE THAT THE IEEE 1394 DEVICE IS RECOGNIZED BY WINDOWS - Windows Vista: 1 Click Start → Control Panel→ Hardware and Sound. 2 Click Device Manager. See "Re-Syncing Your Optional Wireless Mouse or ...


