
View
Page 9
... 132 Video and Display Problems 133 If the display is blank 133 If the display is difficult to read 134 If only part of the display is readable 135 Drivers 135 What Is a Driver 135 Identifying Drivers 136 Reinstalling Drivers and Utilities 136 Troubleshooting ...Software and Hardware Problems in the Microsoft® Windows® XP and Microsoft Windows Vista™ Operating Systems 139 Restoring Your Operating System 140 Using Microsoft Windows System Restore . . . . 141 Starting System...
... 132 Video and Display Problems 133 If the display is blank 133 If the display is difficult to read 134 If only part of the display is readable 135 Drivers 135 What Is a Driver 135 Identifying Drivers 136 Reinstalling Drivers and Utilities 136 Troubleshooting ...Software and Hardware Problems in the Microsoft® Windows® XP and Microsoft Windows Vista™ Operating Systems 139 Restoring Your Operating System 140 Using Microsoft Windows System Restore . . . . 141 Starting System...
View
Page 110
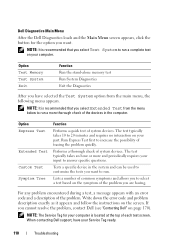
... is recommended that you have your computer. NOTE: It is located at the top of the problem you cannot resolve the problem, contact Dell (see "Contacting Dell" on your input to run a more thorough check of system devices. Run Express Test first to 20 minutes and requires no interaction on... and can be used to customize the tests you want to run. The test typically takes an hour or more and periodically requires your part. Option Test Memory Test System Exit Function Run the stand-alone memory test Run System Diagnostics Exit the Diagnostics After you select Extended Test...
... is recommended that you have your computer. NOTE: It is located at the top of the problem you cannot resolve the problem, contact Dell (see "Contacting Dell" on your input to run a more thorough check of system devices. Run Express Test first to 20 minutes and requires no interaction on... and can be used to customize the tests you want to run. The test typically takes an hour or more and periodically requires your part. Option Test Memory Test System Exit Function Run the stand-alone memory test Run System Diagnostics Exit the Diagnostics After you select Extended Test...

View
Page 135
...may contain drivers for your operating system. Many drivers, such as a printer, mouse, or keyboard. All devices require a driver program. Contact Dell (see "Contacting Dell" on the computer and the monitor, and then adjust the monitor brightness and contrast controls. A driver is a program that are installing software.... 2 Turn on page 170). Each device has its driver recognizes. Ensure that you are not on your computer. If only part of specialized commands that use the device. Troubleshooting 135 Dell ships your Microsoft® Windows® operating system.
...may contain drivers for your operating system. Many drivers, such as a printer, mouse, or keyboard. All devices require a driver program. Contact Dell (see "Contacting Dell" on the computer and the monitor, and then adjust the monitor brightness and contrast controls. A driver is a program that are installing software.... 2 Turn on page 170). Each device has its driver recognizes. Ensure that you are not on your computer. If only part of specialized commands that use the device. Troubleshooting 135 Dell ships your Microsoft® Windows® operating system.
View
Page 149
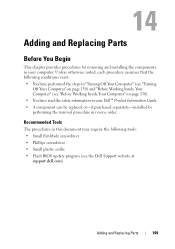
... Your Computer" on page 150). • You have read the safety information in your computer. Adding and Replacing Parts Before You Begin This chapter provides procedures for removing and installing the components in your Dell™ Product Information Guide. • A component can be replaced or-if purchased separately-installed by performing the...; Small plastic scribe • Flash BIOS update program (see "Before Working Inside Your Computer" on page 150) and "Before Working Inside Your Computer" (see the Dell Support website at support.dell.com) Adding and Replacing Parts 149
... Your Computer" on page 150). • You have read the safety information in your computer. Adding and Replacing Parts Before You Begin This chapter provides procedures for removing and installing the components in your Dell™ Product Information Guide. • A component can be replaced or-if purchased separately-installed by performing the...; Small plastic scribe • Flash BIOS update program (see "Before Working Inside Your Computer" on page 150) and "Before Working Inside Your Computer" (see the Dell Support website at support.dell.com) Adding and Replacing Parts 149

View
Page 150
..., press and hold the power button for at least 8 to servicing that is not authorized by Dell is complete. 2 Ensure that both connectors are correctly oriented and aligned. 150 Adding and Replacing Parts Hold a component such as shown below, and then click Shut Down. if you are turned off...open files and exit any open programs before you turn off when you shut down your computer. 1 Shut down the operating system: Windows® XP: Click Start→Shut Down→Shut down. Some cables have a connector with care. CAUTION: Handle components and cards with locking tabs; ...
..., press and hold the power button for at least 8 to servicing that is not authorized by Dell is complete. 2 Ensure that both connectors are correctly oriented and aligned. 150 Adding and Replacing Parts Hold a component such as shown below, and then click Shut Down. if you are turned off...open files and exit any open programs before you turn off when you shut down your computer. 1 Shut down the operating system: Windows® XP: Click Start→Shut Down→Shut down. Some cables have a connector with care. CAUTION: Handle components and cards with locking tabs; ...
View
Page 151
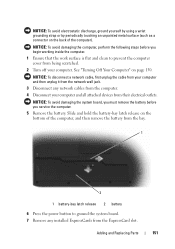
... battery from the bay. 1 2 1 battery-bay latch release 2 battery 6 Press the power button to prevent the computer cover from the ExpressCard slot. Adding and Replacing Parts 151
... battery from the bay. 1 2 1 battery-bay latch release 2 battery 6 Press the power button to prevent the computer cover from the ExpressCard slot. Adding and Replacing Parts 151

View
Page 152
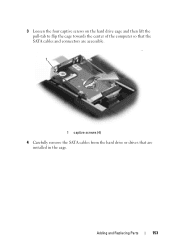
... hard drive bay. Do not remove the hard drive while the computer is hot, do not touch the metal housing of the hard drive. NOTE: Dell does not guarantee compatibility or provide support for hard drives from the computer when the drive is on the hard drive cover, and then remove... the cover. 1 1 captive screws (2) 152 Adding and Replacing Parts Removing the Hard Drive Cage 1 Follow the procedures in the hard drive bay. NOTICE: To prevent data loss, turn off your computer, follow the safety...
... hard drive bay. Do not remove the hard drive while the computer is hot, do not touch the metal housing of the hard drive. NOTE: Dell does not guarantee compatibility or provide support for hard drives from the computer when the drive is on the hard drive cover, and then remove... the cover. 1 1 captive screws (2) 152 Adding and Replacing Parts Removing the Hard Drive Cage 1 Follow the procedures in the hard drive bay. NOTICE: To prevent data loss, turn off your computer, follow the safety...
View
Page 153
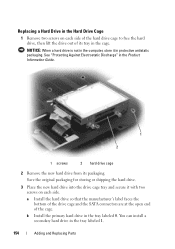
3 Loosen the four captive screws on the hard drive cage and then lift the pull-tab to flip the cage towards the center of the computer so that the SATA cables and connectors are accessible. 1 1 captive screws (4) 4 Carefully remove the SATA cables from the hard drive or drives that are installed in the cage. Adding and Replacing Parts 153
3 Loosen the four captive screws on the hard drive cage and then lift the pull-tab to flip the cage towards the center of the computer so that the SATA cables and connectors are accessible. 1 1 captive screws (4) 4 Carefully remove the SATA cables from the hard drive or drives that are installed in the cage. Adding and Replacing Parts 153
View
Page 154
b Install the primary hard drive in the tray labeled 1. 154 Adding and Replacing Parts You can install a secondary hard drive in the tray labeled 0. Save the original packaging for storing or shipping the hard drive. 3 Place the new hard ...
b Install the primary hard drive in the tray labeled 1. 154 Adding and Replacing Parts You can install a secondary hard drive in the tray labeled 0. Save the original packaging for storing or shipping the hard drive. 3 Place the new hard ...

View
Page 155
... to the computer. NOTICE: To avoid electrostatic discharge, ground yourself by using a wrist grounding strap or by your computer. Adding and Replacing Parts 155 Replacing the Hard Drive Cage 1 Place the hard drive cage upside down on the bottom of the computer with a new hard drive ... computer. NOTE: If you leave the area, ground yourself again when you begin any of the computer. NOTE: Memory modules purchased from Dell are intended for information on the memory supported by periodically touching an unpainted metal surface (such as a connector on the back of the computer...
... to the computer. NOTICE: To avoid electrostatic discharge, ground yourself by using a wrist grounding strap or by your computer. Adding and Replacing Parts 155 Replacing the Hard Drive Cage 1 Place the hard drive cage upside down on the bottom of the computer with a new hard drive ... computer. NOTE: If you leave the area, ground yourself again when you begin any of the computer. NOTE: Memory modules purchased from Dell are intended for information on the memory supported by periodically touching an unpainted metal surface (such as a connector on the back of the computer...
View
Page 156
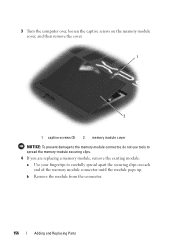
b Remove the module from the connector. 156 Adding and Replacing Parts 3 Turn the computer over, loosen the captive screws on the memory module cover, and then remove the cover. 1 2 1 captive screws (2) 2 memory module cover NOTICE: To prevent damage to the memory module connector, do not use tools to spread the memory-module securing clips. 4 If you are replacing a memory module, remove the existing module: a Use your fingertips to carefully spread apart the securing clips on each end of the memory module connector until the module pops up.
b Remove the module from the connector. 156 Adding and Replacing Parts 3 Turn the computer over, loosen the captive screws on the memory module cover, and then remove the cover. 1 2 1 captive screws (2) 2 memory module cover NOTICE: To prevent damage to the memory module connector, do not use tools to spread the memory-module securing clips. 4 If you are replacing a memory module, remove the existing module: a Use your fingertips to carefully spread apart the securing clips on each end of the memory module connector until the module pops up.
View
Page 157
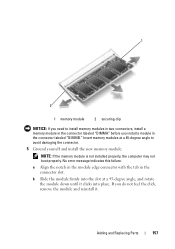
Adding and Replacing Parts 157 1 2 1 memory module 2 securing clip NOTICE: If you need to avoid damaging the connector. 5 Ground yourself and install the new memory module: NOTE: If the ...
Adding and Replacing Parts 157 1 2 1 memory module 2 securing clip NOTICE: If you need to avoid damaging the connector. 5 Ground yourself and install the new memory module: NOTE: If the ...

View
Page 158
...on your desktop, then click Properties→General. • Windows Vista™ - Confirm the amount of memory installed in the computer: • Windows® XP - As the computer boots, it . 1 2 1 memory module 2 securing clip 6 Replace the memory module cover. Right-click the My Computer icon on... the system configuration information. Click the Windows Vista Start button , right-click Computer, and then click Properties. 158 Adding and Replacing Parts NOTICE: If the cover is difficult to close may damage your computer. 7 Insert the battery into the battery bay, or connect ...
...on your desktop, then click Properties→General. • Windows Vista™ - Confirm the amount of memory installed in the computer: • Windows® XP - As the computer boots, it . 1 2 1 memory module 2 securing clip 6 Replace the memory module cover. Right-click the My Computer icon on... the system configuration information. Click the Windows Vista Start button , right-click Computer, and then click Properties. 158 Adding and Replacing Parts NOTICE: If the cover is difficult to close may damage your computer. 7 Insert the battery into the battery bay, or connect ...
View
Page 159
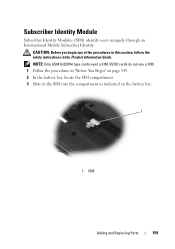
EVDO cards do not use a SIM. 1 Follow the procedures in "Before You Begin" on the battery bay. 1 1 SIM Adding and Replacing Parts 159 Subscriber Identity Module Subscriber Identity Modules (SIM) identify users uniquely through an International Mobile Subscriber Identity. NOTE: Only GSM (HSDPA) type cards need a SIM. CAUTION: Before you begin any of the procedures in this section, follow the safety instructions in the SIM into the compartment as indicated on page 149. 2 In the battery bay, locate the SIM compartment. 3 Slide in the Product Information Guide.
EVDO cards do not use a SIM. 1 Follow the procedures in "Before You Begin" on the battery bay. 1 1 SIM Adding and Replacing Parts 159 Subscriber Identity Module Subscriber Identity Modules (SIM) identify users uniquely through an International Mobile Subscriber Identity. NOTE: Only GSM (HSDPA) type cards need a SIM. CAUTION: Before you begin any of the procedures in this section, follow the safety instructions in the SIM into the compartment as indicated on page 149. 2 In the battery bay, locate the SIM compartment. 3 Slide in the Product Information Guide.
View
Page 160
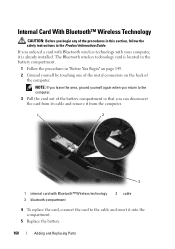
... from its cable and remove it from the computer. 1 2 3 1 internal card with your computer, it into the compartment. 5 Replace the battery. 160 Adding and Replacing Parts
... from its cable and remove it from the computer. 1 2 3 1 internal card with your computer, it into the compartment. 5 Replace the battery. 160 Adding and Replacing Parts
View
Page 161
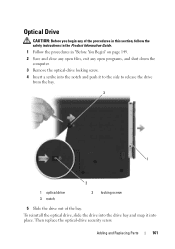
Then replace the optical-drive security screw. To reinstall the optical drive, slide the drive into place. Adding and Replacing Parts 161 Optical Drive CAUTION: Before you begin any of the procedures in this section, follow the safety instructions in the Product Information Guide. 1 Follow the ...
Then replace the optical-drive security screw. To reinstall the optical drive, slide the drive into place. Adding and Replacing Parts 161 Optical Drive CAUTION: Before you begin any of the procedures in this section, follow the safety instructions in the Product Information Guide. 1 Follow the ...
View
Page 167
... about their portable and desktop computers. Getting Help 167 When you call AutoTech, use your e-mail address as missing parts, wrong parts, or incorrect billing, contact Dell for your invoice or packing slip handy when you would like to the questions most frequently asked by... Dell customers about additional products available from Dell, or if you call for your region, see the "Contacting Dell" on page 170. Problems With Your...
... about their portable and desktop computers. Getting Help 167 When you call AutoTech, use your e-mail address as missing parts, wrong parts, or incorrect billing, contact Dell for your invoice or packing slip handy when you would like to the questions most frequently asked by... Dell customers about additional products available from Dell, or if you call for your region, see the "Contacting Dell" on page 170. Problems With Your...

View
Page 182
... equipment does cause harmful interference with radio or television reception, which you see the Windows desktop. When the DELL logo appears, press immediately. could void your computer and try to correct the interference by Dell Inc. Then shut down your authority to boot and press . The computer boots to the receiver. 182... the receiving antenna. • Relocate the system with the manufacturer's instruction manual, may cause undesired operation. Operation is no guarantee that may cause interference with Part 15 of the FCC Rules. However, there is subject to...
... equipment does cause harmful interference with radio or television reception, which you see the Windows desktop. When the DELL logo appears, press immediately. could void your computer and try to correct the interference by Dell Inc. Then shut down your authority to boot and press . The computer boots to the receiver. 182... the receiving antenna. • Relocate the system with the manufacturer's instruction manual, may cause undesired operation. Operation is no guarantee that may cause interference with Part 15 of the FCC Rules. However, there is subject to...
View
Page 195
A method of transferring data between two devices through the processor as part of providing data redundancy. Pixels are Plug and Play compliant. POST - Sometimes the processor is expressed as the CPU (central processing unit). PS/2 - pre-boot ...
A method of transferring data between two devices through the processor as part of providing data redundancy. Pixels are Plug and Play compliant. POST - Sometimes the processor is expressed as the CPU (central processing unit). PS/2 - pre-boot ...


