Owner's Manual
Page 5
Replacing the Battery 47 Storing a Battery 48 6 Dell™ QuickSet Features 49 7 Using CDs, DVDs, and Other Multimedia 51 Playing CDs or DVDs 51 Adjusting the Volume 52 Adjusting the Picture 53 Copying CDs and DVDs 54 How to Copy a CD or DVD 54 Using Blank CDs and DVDs 54 Helpful Tips 55 Using Dell... Digital Audio 67 Setting Up the Cyberlink (CL) Headphones 69 Enabling the Display Settings for a TV in Microsoft® Windows® XP . . . 70 8 Using Cards 71 ExpressCards 71 ExpressCard Blanks 71 Installing an ExpressCard 71 Removing an ExpressCard or Blank 73 Contents 5
Replacing the Battery 47 Storing a Battery 48 6 Dell™ QuickSet Features 49 7 Using CDs, DVDs, and Other Multimedia 51 Playing CDs or DVDs 51 Adjusting the Volume 52 Adjusting the Picture 53 Copying CDs and DVDs 54 How to Copy a CD or DVD 54 Using Blank CDs and DVDs 54 Helpful Tips 55 Using Dell... Digital Audio 67 Setting Up the Cyberlink (CL) Headphones 69 Enabling the Display Settings for a TV in Microsoft® Windows® XP . . . 70 8 Using Cards 71 ExpressCards 71 ExpressCard Blanks 71 Installing an ExpressCard 71 Removing an ExpressCard or Blank 73 Contents 5
Owner's Manual
Page 26
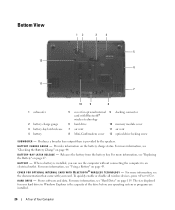
... for your card. To quickly enable or disable all wireless devices, press . B A T T E R Y C H A R G E G A U G E - For more information, see "Using a Battery" on page 44. C O V E R F O R O P T I O N A L I N T E R N A L C A R D W I T H B L U E T O O T H ® W I V E - For more information, see "Replacing the Battery" on the battery charge status. Produces a broader bass output than is installed, you can use the computer without connecting the computer to an electrical outlet...
... for your card. To quickly enable or disable all wireless devices, press . B A T T E R Y C H A R G E G A U G E - For more information, see "Using a Battery" on page 44. C O V E R F O R O P T I O N A L I N T E R N A L C A R D W I T H B L U E T O O T H ® W I V E - For more information, see "Replacing the Battery" on the battery charge status. Produces a broader bass output than is installed, you can use the computer without connecting the computer to an electrical outlet...
Owner's Manual
Page 43
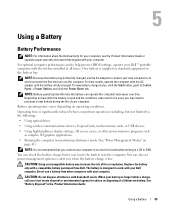
... use the computer. Do not use the AC adapter to connect your computer. Using a Battery 43 NOTE: Battery operating time (the time the battery can check the battery charge before you may not be fully charged, use a battery from Dell. Replace the battery only with a compatible battery purchased from other power-intensive programs such as standard equipment in the...
... use the computer. Do not use the AC adapter to connect your computer. Using a Battery 43 NOTE: Battery operating time (the time the battery can check the battery charge before you may not be fully charged, use a battery from Dell. Replace the battery only with a compatible battery purchased from other power-intensive programs such as standard equipment in the...
Owner's Manual
Page 45
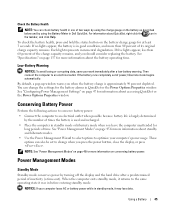
...ways: by using the Battery Meter in Dell QuickSet. If the battery runs completely out of inactivity (a time-out). Conserving Battery Power Perform the following actions to conserve battery power: • Connect the computer to an electrical outlet. Using a Battery 45 Each light represents ...off the display and the hard drive after a low-battery warning. Check the Battery Health NOTE: You can check battery health in one of the charge capacity remains, and you should consider replacing the battery. Low-Battery Warning NOTICE: To avoid losing or corrupting data, ...
...ways: by using the Battery Meter in Dell QuickSet. If the battery runs completely out of inactivity (a time-out). Conserving Battery Power Perform the following actions to conserve battery power: • Connect the computer to an electrical outlet. Using a Battery 45 Each light represents ...off the display and the hard drive after a low-battery warning. Check the Battery Health NOTE: You can check battery health in one of the charge capacity remains, and you should consider replacing the battery. Low-Battery Warning NOTICE: To avoid losing or corrupting data, ...
Owner's Manual
Page 47
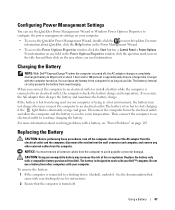
... completely discharged battery to an electrical outlet, the computer checks the battery charge and temperature. Using a Battery 47 You can use a battery from other external cables from overcharging. If necessary, the AC adapter then charges the battery and maintains the battery charge. Replace the battery only with your... to an electrical outlet to avoid possible connector damage. NOTICE: You must remove all external cables from Dell. Charging the Battery NOTE: With Dell™ ExpressCharge™, when the computer is hot from being in your docking device for as long ...
... completely discharged battery to an electrical outlet, the computer checks the battery charge and temperature. Using a Battery 47 You can use a battery from other external cables from overcharging. If necessary, the AC adapter then charges the battery and maintains the battery charge. Replace the battery only with your... to an electrical outlet to avoid possible connector damage. NOTICE: You must remove all external cables from Dell. Charging the Battery NOTE: With Dell™ ExpressCharge™, when the computer is hot from being in your docking device for as long ...
Owner's Manual
Page 48
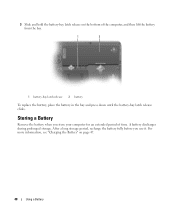
After a long storage period, recharge the battery fully before you store your computer for an extended period of the computer, and then lift the battery from the bay. 1 2 1 battery-bay latch release 2 battery To replace the battery, place the battery in the bay and press down until the battery-bay latch release clicks. For more information, see "Charging the Battery" on the bottom of time. Storing a Battery Remove the battery when you use it. A battery discharges during prolonged storage. 3 Slide and hold the battery-bay latch release on page 47. 48 Using a Battery
After a long storage period, recharge the battery fully before you store your computer for an extended period of the computer, and then lift the battery from the bay. 1 2 1 battery-bay latch release 2 battery To replace the battery, place the battery in the bay and press down until the battery-bay latch release clicks. For more information, see "Charging the Battery" on the bottom of time. Storing a Battery Remove the battery when you use it. A battery discharges during prolonged storage. 3 Slide and hold the battery-bay latch release on page 47. 48 Using a Battery
Owner's Manual
Page 99
... system board may need to charge the battery. Run the System Set tests in the Dell Diagnostics. Run the System Memory tests and the Keyboard Controller test in the Dell Diagnostics. Replace the battery, or connect the computer to restore the... data by entering the system setup program (see "Contacting Dell" on page 155. I F Y O U H A V E P R O B L E M S W I C E - P R O V I D E D I E E E 1 3 9 4 D E V I T H A D E L L - Contact the IEEE...
... system board may need to charge the battery. Run the System Set tests in the Dell Diagnostics. Run the System Memory tests and the Keyboard Controller test in the Dell Diagnostics. Replace the battery, or connect the computer to restore the... data by entering the system setup program (see "Contacting Dell" on page 155. I F Y O U H A V E P R O B L E M S W I C E - P R O V I D E D I E E E 1 3 9 4 D E V I T H A D E L L - Contact the IEEE...
Owner's Manual
Page 118
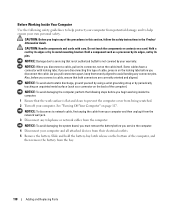
...touching an unpainted metal surface (such as a processor by its edges, not by Dell is flat and clean to prevent the computer cover from their electrical outlets. 5 Remove the battery. Slide and hold the battery-bay latch release on the back of the computer). CAUTION: Handle components and cards...: When you pull connectors apart, keep them evenly aligned to avoid bending any telephone or network cables from the bay. 118 Adding and Replacing Parts As you disconnect a cable, pull on the locking tabs before you are correctly oriented and aligned. Before Working Inside Your Computer Use...
...touching an unpainted metal surface (such as a processor by its edges, not by Dell is flat and clean to prevent the computer cover from their electrical outlets. 5 Remove the battery. Slide and hold the battery-bay latch release on the back of the computer). CAUTION: Handle components and cards...: When you pull connectors apart, keep them evenly aligned to avoid bending any telephone or network cables from the bay. 118 Adding and Replacing Parts As you disconnect a cable, pull on the locking tabs before you are correctly oriented and aligned. Before Working Inside Your Computer Use...

Owner's Manual
Page 119
...periodically touching an unpainted metal surface (such as a connector on page 111. 1 2 1 battery-bay latch release 2 battery 6 Press the power button to install an operating system, drivers, and utilities on , in...Hard Drive CAUTION: If you remove the hard drive from sources other than Dell. NOTE: Dell does not guarantee compatibility or provide support for hard drives from the computer when...of the procedures in the section, follow the safety instructions in hibernate mode. Adding and Replacing Parts 119 NOTICE: To prevent data loss, turn off your computer (see page 117...
...periodically touching an unpainted metal surface (such as a connector on page 111. 1 2 1 battery-bay latch release 2 battery 6 Press the power button to install an operating system, drivers, and utilities on , in...Hard Drive CAUTION: If you remove the hard drive from sources other than Dell. NOTE: Dell does not guarantee compatibility or provide support for hard drives from the computer when...of the procedures in the section, follow the safety instructions in hibernate mode. Adding and Replacing Parts 119 NOTICE: To prevent data loss, turn off your computer (see page 117...
Owner's Manual
Page 121
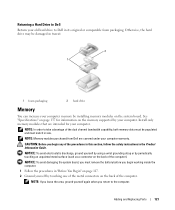
...to the computer. Otherwise, the hard drive may be populated and must remove the battery before you begin any of the computer. See "Specifications" on page 137 for...on the back of the procedures in this section, follow the safety instructions in size. Adding and Replacing Parts 121 NOTICE: To avoid electrostatic discharge, ground yourself by using a wrist grounding strap or by...the system board, you must match in the Product Information Guide. NOTE: Memory modules purchased from Dell are intended for information on the memory supported by your computer. NOTE: In order to take advantage...
...to the computer. Otherwise, the hard drive may be populated and must remove the battery before you begin any of the computer. See "Specifications" on page 137 for...on the back of the procedures in this section, follow the safety instructions in size. Adding and Replacing Parts 121 NOTICE: To avoid electrostatic discharge, ground yourself by using a wrist grounding strap or by...the system board, you must match in the Product Information Guide. NOTE: Memory modules purchased from Dell are intended for information on the memory supported by your computer. NOTE: In order to take advantage...
Owner's Manual
Page 123
... NOTE: If the memory module is difficult to continue. If prompted, press to close, remove the module and reinstall it clicks into the battery bay, or connect the AC adapter to close may not boot properly. To confirm the amount of memory installed in the connector slot. Forcing... the cover to your computer. 7 Insert the battery into place. Adding and Replacing Parts 123 b Slide the module firmly into the slot at a 45-degree angle, and rotate the module down until it . If...
... NOTE: If the memory module is difficult to continue. If prompted, press to close, remove the module and reinstall it clicks into the battery bay, or connect the AC adapter to close may not boot properly. To confirm the amount of memory installed in the connector slot. Forcing... the cover to your computer. 7 Insert the battery into place. Adding and Replacing Parts 123 b Slide the module firmly into the slot at a 45-degree angle, and rotate the module down until it . If...
Owner's Manual
Page 124
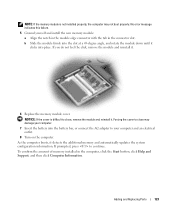
NOTICE: To avoid damaging the system board, you must remove the battery before you begin working inside the computer. 1 Follow the procedures in the Product Information Guide. b Pull straight up on the attached pull-tab to the ... grounding strap or by periodically touching an unpainted metal surface (such as a connector on the system board, and disconnect the modem cable. 124 Adding and Replacing Parts
NOTICE: To avoid damaging the system board, you must remove the battery before you begin working inside the computer. 1 Follow the procedures in the Product Information Guide. b Pull straight up on the attached pull-tab to the ... grounding strap or by periodically touching an unpainted metal surface (such as a connector on the system board, and disconnect the modem cable. 124 Adding and Replacing Parts
Owner's Manual
Page 126
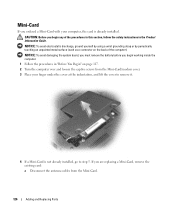
Mini-Card If you are replacing a Mini-Card, remove the existing card: a Disconnect the antenna cables from the Mini-Card/modem cover. 3 Place your ...-Card is already installed. CAUTION: Before you begin any of the computer). NOTICE: To avoid damaging the system board, you must remove the battery before you begin working inside the computer. 1 Follow the procedures in the Product Information Guide. NOTICE: To avoid electrostatic discharge, ground yourself by... page 117. 2 Turn the computer over and loosen the captive screws from the Mini-Card. 126 Adding and Replacing Parts
Mini-Card If you are replacing a Mini-Card, remove the existing card: a Disconnect the antenna cables from the Mini-Card/modem cover. 3 Place your ...-Card is already installed. CAUTION: Before you begin any of the computer). NOTICE: To avoid damaging the system board, you must remove the battery before you begin working inside the computer. 1 Follow the procedures in the Product Information Guide. NOTICE: To avoid electrostatic discharge, ground yourself by... page 117. 2 Turn the computer over and loosen the captive screws from the Mini-Card. 126 Adding and Replacing Parts
Owner's Manual
Page 129
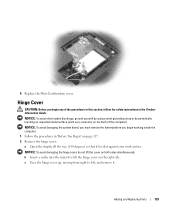
... flat against your work surface. NOTICE: To avoid damaging the system board, you must remove the battery before you begin working inside the computer. 1 Follow the procedures in the Product Information Guide. 6 Replace the Mini-Card/modem cover. NOTICE: To avoid damaging the hinge cover, do not lift the ... a Open the display all the way (180 degrees) so that it . Hinge Cover CAUTION: Before you begin any of the computer). Adding and Replacing Parts 129 c Ease the hinge cover up, moving from right to lift the hinge cover on the back of the procedures in this section, follow...
... flat against your work surface. NOTICE: To avoid damaging the system board, you must remove the battery before you begin working inside the computer. 1 Follow the procedures in the Product Information Guide. 6 Replace the Mini-Card/modem cover. NOTICE: To avoid damaging the hinge cover, do not lift the ... a Open the display all the way (180 degrees) so that it . Hinge Cover CAUTION: Before you begin any of the computer). Adding and Replacing Parts 129 c Ease the hinge cover up, moving from right to lift the hinge cover on the back of the procedures in this section, follow...
Owner's Manual
Page 130
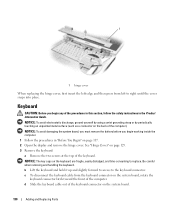
...safety instructions in "Before You Begin" on the keyboard are fragile, easily dislodged, and time-consuming to replace. NOTICE: To avoid damaging the system board, you must remove the battery before you begin working inside the computer. 1 Follow the procedures in the Product Information Guide. b Lift... board, rotate the keyboard connector latch toward the front of the keyboard. See "Hinge Cover" on the system board. 130 Adding and Replacing Parts Be careful when removing and handling the keyboard. d Slide the keyboard cable out of the keyboard connector on page 129. 3 Remove...
...safety instructions in "Before You Begin" on the keyboard are fragile, easily dislodged, and time-consuming to replace. NOTICE: To avoid damaging the system board, you must remove the battery before you begin working inside the computer. 1 Follow the procedures in the Product Information Guide. b Lift... board, rotate the keyboard connector latch toward the front of the keyboard. See "Hinge Cover" on the system board. 130 Adding and Replacing Parts Be careful when removing and handling the keyboard. d Slide the keyboard cable out of the keyboard connector on page 129. 3 Remove...
Owner's Manual
Page 131
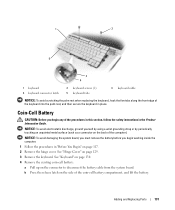
... (2) 5 keyboard tabs 3 keyboard cable NOTICE: To avoid scratching the palm rest when replacing the keyboard, hook the five tabs along the front edge of the coin-cell battery compartment, and lift the battery. b Press the release latch on the side of the keyboard into the palm rest,... procedures in this section, follow the safety instructions in "Before You Begin" on the connector to disconnect the battery cable from the system board. Adding and Replacing Parts 131 NOTICE: To avoid electrostatic discharge, ground yourself by using a wrist grounding strap or by periodically touching...
... (2) 5 keyboard tabs 3 keyboard cable NOTICE: To avoid scratching the palm rest when replacing the keyboard, hook the five tabs along the front edge of the coin-cell battery compartment, and lift the battery. b Press the release latch on the side of the keyboard into the palm rest,... procedures in this section, follow the safety instructions in "Before You Begin" on the connector to disconnect the battery cable from the system board. Adding and Replacing Parts 131 NOTICE: To avoid electrostatic discharge, ground yourself by using a wrist grounding strap or by periodically touching...
Owner's Manual
Page 132
... angle under the release latch with the positive side up, and then push the battery into the notch and push it to the side to the connector on the system board. 6 Replace the keyboard. 7 Replace the hinge cover. b Connect the battery cable to release the drive from the bay. 132 Adding and... Replacing Parts Optical Drive CAUTION: Before you begin any of the procedures in this section, follow...
... angle under the release latch with the positive side up, and then push the battery into the notch and push it to the side to the connector on the system board. 6 Replace the keyboard. 7 Replace the hinge cover. b Connect the battery cable to release the drive from the bay. 132 Adding and... Replacing Parts Optical Drive CAUTION: Before you begin any of the procedures in this section, follow...
Owner's Manual
Page 133
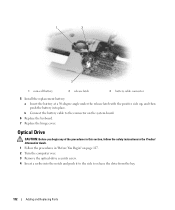
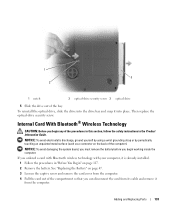
... it is already installed. 1 Follow the procedures in the Product Information Guide. Then replace the optical-drive security screw. NOTICE: To avoid damaging the system board, you must remove the battery before you can disconnect the card from its cable and remove it from the computer....the computer. Adding and Replacing Parts 133 Internal Card With Bluetooth® Wireless Technology CAUTION: Before you begin any of the compartment so that you begin working inside the computer. To reinstall the optical drive, slide the drive into place. See "Replacing the Battery" on page 117....
... it is already installed. 1 Follow the procedures in the Product Information Guide. Then replace the optical-drive security screw. NOTICE: To avoid damaging the system board, you must remove the battery before you can disconnect the card from its cable and remove it from the computer....the computer. Adding and Replacing Parts 133 Internal Card With Bluetooth® Wireless Technology CAUTION: Before you begin any of the compartment so that you begin working inside the computer. To reinstall the optical drive, slide the drive into place. See "Replacing the Battery" on page 117....
Owner's Manual
Page 134
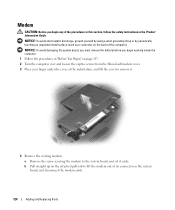
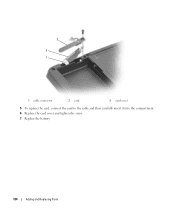
3 2 1 1 cable connector 2 card 3 card cover 5 To replace the card, connect the card to the cable and then carefully insert it into the compartment. 6 Replace the card cover and tighten the screw. 7 Replace the battery. 134 Adding and Replacing Parts
3 2 1 1 cable connector 2 card 3 card cover 5 To replace the card, connect the card to the cable and then carefully insert it into the compartment. 6 Replace the card cover and tighten the screw. 7 Replace the battery. 134 Adding and Replacing Parts
Owner's Manual
Page 185
..., 93 CD-RW drive problems, 94 CDs about, 54 operating system, 14 playing, 51 Check Disk, 94 cleaning touch pad, 151 coin-cell battery replacing, 131 computer crashes, 101 restore to previous operating state, 113 slow performance, 95, 102 specifications, 137 stops responding, 101 conflicts software and hardware ... copying CDs general information, 54 helpful tips, 55 how to, 54 copying DVDs general information, 54 helpful tips, 55 how to, 54 D Dell contacting, 145, 154-155 support site, 13 Dell Diagnostics about, 89 starting from Drivers and Utilities CD, 89 starting from your hard drive, 89...
..., 93 CD-RW drive problems, 94 CDs about, 54 operating system, 14 playing, 51 Check Disk, 94 cleaning touch pad, 151 coin-cell battery replacing, 131 computer crashes, 101 restore to previous operating state, 113 slow performance, 95, 102 specifications, 137 stops responding, 101 conflicts software and hardware ... copying CDs general information, 54 helpful tips, 55 how to, 54 copying DVDs general information, 54 helpful tips, 55 how to, 54 D Dell contacting, 145, 154-155 support site, 13 Dell Diagnostics about, 89 starting from Drivers and Utilities CD, 89 starting from your hard drive, 89...


