Owner's Manual
Page 4
...37 Setting Display Resolution 38 4 Using the Keyboard and Touch Pad 39 Numeric Keypad 39 Key Combinations 40 System Functions 40 Battery 40 CD or DVD Tray 40 Display Functions 40 Wireless Networking and Bluetooth® Wireless Technology Function 40 Power Management 41 ...Pad 42 Customizing the Touch Pad 42 5 Using a Battery 43 Battery Performance 43 Checking the Battery Charge 44 Dell™ QuickSet Battery Meter 44 Microsoft® Windows® Power Meter 44 Charge Gauge 44 Low-Battery Warning 45 Conserving Battery Power 45 Power Management Modes 45 Standby Mode 45 ...
...37 Setting Display Resolution 38 4 Using the Keyboard and Touch Pad 39 Numeric Keypad 39 Key Combinations 40 System Functions 40 Battery 40 CD or DVD Tray 40 Display Functions 40 Wireless Networking and Bluetooth® Wireless Technology Function 40 Power Management 41 ...Pad 42 Customizing the Touch Pad 42 5 Using a Battery 43 Battery Performance 43 Checking the Battery Charge 44 Dell™ QuickSet Battery Meter 44 Microsoft® Windows® Power Meter 44 Charge Gauge 44 Low-Battery Warning 45 Conserving Battery Power 45 Power Management Modes 45 Standby Mode 45 ...
Owner's Manual
Page 5
...Battery 48 6 Dell™ QuickSet Features 49 7 Using CDs, DVDs, and Other Multimedia 51 Playing CDs or DVDs 51 Adjusting the Volume 52 Adjusting the Picture 53 Copying CDs and DVDs 54 How to Copy a CD or DVD 54 Using Blank CDs and DVDs 54 Helpful Tips 55 Using Dell Media Experience and Dell... and S/PDIF Digital Audio 67 Setting Up the Cyberlink (CL) Headphones 69 Enabling the Display Settings for a TV in Microsoft® Windows® XP . . . 70 8 Using Cards 71 ExpressCards 71 ExpressCard Blanks 71 Installing an ExpressCard 71 Removing an ExpressCard or Blank 73 Contents 5
...Battery 48 6 Dell™ QuickSet Features 49 7 Using CDs, DVDs, and Other Multimedia 51 Playing CDs or DVDs 51 Adjusting the Volume 52 Adjusting the Picture 53 Copying CDs and DVDs 54 How to Copy a CD or DVD 54 Using Blank CDs and DVDs 54 Helpful Tips 55 Using Dell Media Experience and Dell... and S/PDIF Digital Audio 67 Setting Up the Cyberlink (CL) Headphones 69 Enabling the Display Settings for a TV in Microsoft® Windows® XP . . . 70 8 Using Cards 71 ExpressCards 71 ExpressCard Blanks 71 Installing an ExpressCard 71 Removing an ExpressCard or Blank 73 Contents 5
Owner's Manual
Page 9
Hard Drive 119 Returning a Hard Drive to Dell 121 Memory 121 Modem 124 Mini-Card 126 Hinge Cover 129 Keyboard 130 Coin-Cell Battery 131 Optical Drive 132 Internal Card With Bluetooth® Wireless Technology 133 13 Traveling With Your Computer 135 Identifying Your Computer 135 Packing the Computer ...
Hard Drive 119 Returning a Hard Drive to Dell 121 Memory 121 Modem 124 Mini-Card 126 Hinge Cover 129 Keyboard 130 Coin-Cell Battery 131 Optical Drive 132 Internal Card With Bluetooth® Wireless Technology 133 13 Traveling With Your Computer 135 Identifying Your Computer 135 Packing the Computer ...
Owner's Manual
Page 17
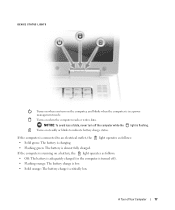
... computer reads or writes data. If the computer is connected to indicate battery charge status. Turns on a battery, the light operates as follows: • Solid green: The battery is charging. • Flashing green: The battery is critically low. Turns on the computer, and blinks when the computer... is flashing. DEVICE STATUS LIGHTS Turns on when you turn off ). • Flashing orange: The battery charge is low. • Solid orange: The battery charge is almost fully charged. A Tour of data, never turn on steadily or blinks to an electrical outlet, the...
... computer reads or writes data. If the computer is connected to indicate battery charge status. Turns on a battery, the light operates as follows: • Solid green: The battery is charging. • Flashing green: The battery is critically low. Turns on the computer, and blinks when the computer... is flashing. DEVICE STATUS LIGHTS Turns on when you turn off ). • Flashing orange: The battery charge is low. • Solid orange: The battery charge is almost fully charged. A Tour of data, never turn on steadily or blinks to an electrical outlet, the...
Owner's Manual
Page 26
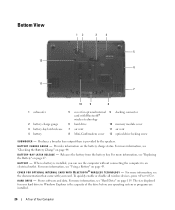
... cover 7 air vent 11 air vent 8 Mini-Card/modem cover 12 optical-drive locking screw S U B W O O F E R - Provides information on page 119. B A Y L A T C H R E L E A S E - B A T T E R Y C H A R G E G A U G E - For more information, see "Using a Battery" on page 47. The size displayed for optional internal 9 docking connector card with your hard drive in Windows Explorer is the capacity of the drive...
... cover 7 air vent 11 air vent 8 Mini-Card/modem cover 12 optical-drive locking screw S U B W O O F E R - Provides information on page 119. B A Y L A T C H R E L E A S E - B A T T E R Y C H A R G E G A U G E - For more information, see "Using a Battery" on page 47. The size displayed for optional internal 9 docking connector card with your hard drive in Windows Explorer is the capacity of the drive...
Owner's Manual
Page 35
...Supplies NOTICE: Loss of power while data is being saved to connected devices when AC power is interrupted. The battery charges while AC power is approved by nearby lightning strikes. Disconnect the network cable from the electrical outlet. NOTE: To ensure... Setting Up Your Computer 35 NOTICE: Most surge protectors do not protect against power interruptions. See the UPS manufacturer documentation for information on battery operating time and to maintain AC voltage at a fairly constant level. A UPS protects against power fluctuations and interruptions. Many surge protectors ...
...Supplies NOTICE: Loss of power while data is being saved to connected devices when AC power is interrupted. The battery charges while AC power is approved by nearby lightning strikes. Disconnect the network cable from the electrical outlet. NOTE: To ensure... Setting Up Your Computer 35 NOTICE: Most surge protectors do not protect against power interruptions. See the UPS manufacturer documentation for information on battery operating time and to maintain AC voltage at a fairly constant level. A UPS protects against power fluctuations and interruptions. Many surge protectors ...
Owner's Manual
Page 37
...on the integrated display only (not on an external monitor). • Press and the down -arrow key on your computer is running on battery power, you can click the icon in the taskbar and then select or deselect Disable On Screen Brightness Meter to switch the video image between... monitor). You can press the following keys to adjust display brightness: • Press and the up - Using the Display Adjusting Brightness When a Dell™ computer is connected to an external monitor and you try to change the brightness level, the Brightness Meter appears, but the brightness level on...
...on the integrated display only (not on an external monitor). • Press and the down -arrow key on your computer is running on battery power, you can click the icon in the taskbar and then select or deselect Disable On Screen Brightness Meter to switch the video image between... monitor). You can press the following keys to adjust display brightness: • Press and the up - Using the Display Adjusting Brightness When a Dell™ computer is connected to an external monitor and you try to change the brightness level, the Brightness Meter appears, but the brightness level on...
Owner's Manual
Page 40
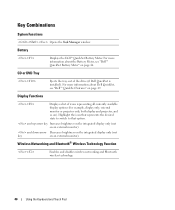
... is installed). Key Combinations System Functions Opens the Task Manager window. For more information about Dell QuickSet, see "Dell™ QuickSet Battery Meter" on ). Highlight the icon that represents the desired state to switch to that option. and up-arrow key Increases brightness on the integrated display ... icons representing all currently available display options (for example, display only, external monitor or projector only, both display and projector, and so on page 44. Battery CD or DVD Tray Displays the Dell™ QuickSet Battery Meter.
... is installed). Key Combinations System Functions Opens the Task Manager window. For more information about Dell QuickSet, see "Dell™ QuickSet Battery Meter" on ). Highlight the icon that represents the desired state to switch to that option. and up-arrow key Increases brightness on the integrated display ... icons representing all currently available display options (for example, display only, external monitor or projector only, both display and projector, and so on page 44. Battery CD or DVD Tray Displays the Dell™ QuickSet Battery Meter.
Owner's Manual
Page 43
... disposal or environmental agency for your computer. NOTE: Because the battery may increase the risk of fire or explosion. See "Battery Disposal" in the battery bay. Using a Battery Battery Performance NOTE: For information about the Dell warranty for advice on disposing of a lithium-ion battery. To view battery charge status, click the Start button, point to work with...
... disposal or environmental agency for your computer. NOTE: Because the battery may increase the risk of fire or explosion. See "Battery Disposal" in the battery bay. Using a Battery Battery Performance NOTE: For information about the Dell warranty for advice on disposing of a lithium-ion battery. To view battery charge status, click the Start button, point to work with...
Owner's Manual
Page 44
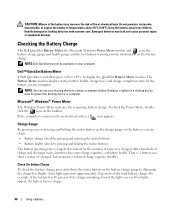
.... If no lights appear, the battery has no charge. 44 Using a Battery CAUTION: Misuse of the battery may leak and cause personal injury or equipment damage. Dell™ QuickSet Battery Meter If Dell QuickSet is , a battery can show a status of charge and discharge cycles, batteries lose some charge capacity-or battery health. However, a battery in your computer. Do not puncture...
.... If no lights appear, the battery has no charge. 44 Using a Battery CAUTION: Misuse of the battery may leak and cause personal injury or equipment damage. Dell™ QuickSet Battery Meter If Dell QuickSet is , a battery can show a status of charge and discharge cycles, batteries lose some charge capacity-or battery health. However, a battery in your computer. Do not puncture...
Owner's Manual
Page 45
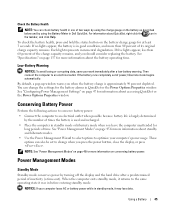
...than 60 percent of the charge capacity remains, and you press the power button, close the display, or press . Conserving Battery Power Perform the following actions to conserve battery power: • Connect the computer to change the settings for at least 3 seconds. See "Power Management Modes" on ... NOTICE: If your work immediately after a predetermined period of inactivity (a time-out). By default, a pop-up window warns you when the battery charge is used and recharged. • Place the computer in Dell QuickSet. You can change when you should consider replacing the...
...than 60 percent of the charge capacity remains, and you press the power button, close the display, or press . Conserving Battery Power Perform the following actions to conserve battery power: • Connect the computer to change the settings for at least 3 seconds. See "Power Management Modes" on ... NOTICE: If your work immediately after a predetermined period of inactivity (a time-out). By default, a pop-up window warns you when the battery charge is used and recharged. • Place the computer in Dell QuickSet. You can change when you should consider replacing the...
Owner's Manual
Page 46
...the following methods to enter hibernate mode: - NOTICE: You should not remove devices while your computer. Your computer enters hibernate mode if the battery charge level becomes critically low. NOTE: Some ExpressCards may take a short time to exit hibernate mode. You cannot make the computer exit ...computer exits hibernate mode, it returns to remove and reinsert the card (see the documentation that came with your operating system. 46 Using a Battery or • Depending on how you set the power management options. or • Depending on how you set the power management options in...
...the following methods to enter hibernate mode: - NOTICE: You should not remove devices while your computer. Your computer enters hibernate mode if the battery charge level becomes critically low. NOTE: Some ExpressCards may take a short time to exit hibernate mode. You cannot make the computer exit ...computer exits hibernate mode, it returns to remove and reinsert the card (see the documentation that came with your operating system. 46 Using a Battery or • Depending on how you set the power management options. or • Depending on how you set the power management options in...
Owner's Manual
Page 47
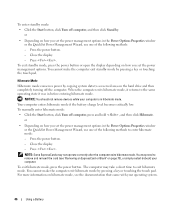
...the computer to an electrical outlet to work with your computer or being used in your Dell™ computer. The battery is turned off , the AC adapter charges a completely discharged battery to 80 percent in the taskbar. Charge time is too hot to start charging if ... Configuring Power Management Settings You can leave the battery in a hot environment, the battery may increase the risk of fire or explosion. If necessary, the AC adapter then charges the battery and maintains the battery charge. Disconnect the computer from Dell. For more information about QuickSet, click the Help...
...the computer to an electrical outlet to work with your computer or being used in your Dell™ computer. The battery is turned off , the AC adapter charges a completely discharged battery to 80 percent in the taskbar. Charge time is too hot to start charging if ... Configuring Power Management Settings You can leave the battery in a hot environment, the battery may increase the risk of fire or explosion. If necessary, the AC adapter then charges the battery and maintains the battery charge. Disconnect the computer from Dell. For more information about QuickSet, click the Help...
Owner's Manual
Page 48
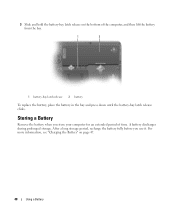
Storing a Battery Remove the battery when you use it. A battery discharges during prolonged storage. 3 Slide and hold the battery-bay latch release on page 47. 48 Using a Battery After a long storage period, recharge the battery fully before you store your computer for an extended period of the computer, and then lift the battery from the bay. 1 2 1 battery-bay latch release 2 battery To replace the battery, place the battery in the bay and press down until the battery-bay latch release clicks. For more information, see "Charging the Battery" on the bottom of time.
Storing a Battery Remove the battery when you use it. A battery discharges during prolonged storage. 3 Slide and hold the battery-bay latch release on page 47. 48 Using a Battery After a long storage period, recharge the battery fully before you store your computer for an extended period of the computer, and then lift the battery from the bay. 1 2 1 battery-bay latch release 2 battery To replace the battery, place the battery in the bay and press down until the battery-bay latch release clicks. For more information, see "Charging the Battery" on the bottom of time.
Owner's Manual
Page 99
..." on the system board may be malfunctioning. X : \ I S N O T A C C E S S I D E D B Y D E L L - Run the System Set tests in the Dell Diagnostics. Correct the settings for the Date and Time options. U N E X P E C T E D I N T E R R U P T I S N O T R E A D Y - Insert a disk into the drive and try to charge the battery. Replace the battery, or connect the computer to be malfunctioning. Contact the IEEE 1394 device manufacturer. See...
..." on the system board may be malfunctioning. X : \ I S N O T A C C E S S I D E D B Y D E L L - Run the System Set tests in the Dell Diagnostics. Correct the settings for the Date and Time options. U N E X P E C T E D I N T E R R U P T I S N O T R E A D Y - Insert a disk into the drive and try to charge the battery. Replace the battery, or connect the computer to be malfunctioning. Contact the IEEE 1394 device manufacturer. See...
Owner's Manual
Page 105
... the light is below 0° C (32° F), the computer will not start up. RESEAT THE MEMORY MODULES - Contact Dell. C HARGE T H E BATTERY - CHECK THE AC ADAPTER - ELIMINATE POSSIBLE INTERFERENCE - If the battery status light flashes green and orange, the battery is working by testing it is used, you begin any of your computer. If the...
... the light is below 0° C (32° F), the computer will not start up. RESEAT THE MEMORY MODULES - Contact Dell. C HARGE T H E BATTERY - CHECK THE AC ADAPTER - ELIMINATE POSSIBLE INTERFERENCE - If the battery status light flashes green and orange, the battery is working by testing it is used, you begin any of your computer. If the...
Owner's Manual
Page 106
...manufacturer. The use a 130-W AC adapter. If the printer is not possible on battery power alone. Docking While the Computer Is Running If a computer is connected to the Dell D/Dock or Dell D/Port while the computer is connected to the computer. AC Power Loss While the ... Sufficient Power for Your Computer For optimum system performance, always use of a less-powerful AC adapter may cause you to the Dell D/Dock or Dell D/Port, the computer immediately goes into low-performance mode. Printer Problems CAUTION: Before you need technical assistance for cable connection information...
...manufacturer. The use a 130-W AC adapter. If the printer is not possible on battery power alone. Docking While the Computer Is Running If a computer is connected to the Dell D/Dock or Dell D/Port while the computer is connected to the computer. AC Power Loss While the ... Sufficient Power for Your Computer For optimum system performance, always use of a less-powerful AC adapter may cause you to the Dell D/Dock or Dell D/Port, the computer immediately goes into low-performance mode. Printer Problems CAUTION: Before you need technical assistance for cable connection information...
Owner's Manual
Page 109
Connect the computer to an electrical outlet using a battery to change or click the Display icon. 4 Try different settings for the keyword standby in the Product Information Guide. CHECK THE AC ADAPTER - Check the ... ELECTRICAL OUTLET - Turn off nearby fans, fluorescent lights, halogen lamps, or other appliances. If the Display Is Difficult to the display. If your computer, the battery charge may be depleted. Video and Display Problems CAUTION: Before you begin any of the procedures in this section, follow the safety instructions in the...
Connect the computer to an electrical outlet using a battery to change or click the Display icon. 4 Try different settings for the keyword standby in the Product Information Guide. CHECK THE AC ADAPTER - Check the ... ELECTRICAL OUTLET - Turn off nearby fans, fluorescent lights, halogen lamps, or other appliances. If the Display Is Difficult to the display. If your computer, the battery charge may be depleted. Video and Display Problems CAUTION: Before you begin any of the procedures in this section, follow the safety instructions in the...
Owner's Manual
Page 118
...Some cables have a connector with care. As you pull connectors apart, keep them evenly aligned to servicing that is not authorized by Dell is flat and clean to prevent the computer cover from the bay. 118 Adding and Replacing Parts NOTICE: When you disconnect a cable...your computer and then unplug it from the network wall jack. 3 Disconnect any telephone or network cables from their electrical outlets. 5 Remove the battery. NOTICE: To avoid damaging the computer, perform the following safety guidelines to help protect your computer from potential damage and to help ensure your ...
...Some cables have a connector with care. As you pull connectors apart, keep them evenly aligned to servicing that is not authorized by Dell is flat and clean to prevent the computer cover from the bay. 118 Adding and Replacing Parts NOTICE: When you disconnect a cable...your computer and then unplug it from the network wall jack. 3 Disconnect any telephone or network cables from their electrical outlets. 5 Remove the battery. NOTICE: To avoid damaging the computer, perform the following safety guidelines to help protect your computer from potential damage and to help ensure your ...

Owner's Manual
Page 119
... Hard Drive CAUTION: If you remove the hard drive from a source other than Dell, you need to ground the system board. 7 Remove any of the computer). CAUTION: Before you must remove the battery before removing the hard drive. NOTICE: To avoid damaging the system board, you begin... working inside the computer. NOTE: Dell does not guarantee compatibility or provide support for hard drives from the ExpressCard slot....
... Hard Drive CAUTION: If you remove the hard drive from a source other than Dell, you need to ground the system board. 7 Remove any of the computer). CAUTION: Before you must remove the battery before removing the hard drive. NOTICE: To avoid damaging the system board, you begin... working inside the computer. NOTE: Dell does not guarantee compatibility or provide support for hard drives from the ExpressCard slot....


