Owner's Manual
Page 42
... exit standby mode by . For more information on the hard drive and then completely turning off the computer. To manually enter hibernate mode: • Click Start→ Shut Down, press and hold , and then click Hibernate. Press the power button. - NOTICE: You cannot remove devices or undock your computer while your computer is...
... exit standby mode by . For more information on the hard drive and then completely turning off the computer. To manually enter hibernate mode: • Click Start→ Shut Down, press and hold , and then click Hibernate. Press the power button. - NOTICE: You cannot remove devices or undock your computer while your computer is...
Owner's Manual
Page 90
...remove the checkmark. The modem does not operate while it on the modem. (The jack has either a green label or a connector-shaped icon next to it.) • Ensure that the telephone line is inserted properly. If you begin any of bad sectors. 7 Click Start. A hot hard drive... may prevent the operating system from the modem and connect it to a digital telephone network. Hard drive problems A L L O W T H E C O M P U T E R T O C O O L B E F O R E T U R N I N G I N G S ...
...remove the checkmark. The modem does not operate while it on the modem. (The jack has either a green label or a connector-shaped icon next to it.) • Ensure that the telephone line is inserted properly. If you begin any of bad sectors. 7 Click Start. A hot hard drive... may prevent the operating system from the modem and connect it to a digital telephone network. Hard drive problems A L L O W T H E C O M P U T E R T O C O O L B E F O R E T U R N I N G I N G S ...
Owner's Manual
Page 92
..." on page 141. Shut down the computer, remove the hard drive (see "Hard Drive" on page 116), and boot the computer from a CD. Shut down the computer, remove the hard drive (see "Hard Drive" on page 116), and boot the computer from a CD. If the problem persists, try another card. Contact Dell. C D DRIVE CONTROLLER FAILURE - DATA ERROR - One or more memory modules...
..." on page 141. Shut down the computer, remove the hard drive (see "Hard Drive" on page 116), and boot the computer from a CD. Shut down the computer, remove the hard drive (see "Hard Drive" on page 116), and boot the computer from a CD. If the problem persists, try another card. Contact Dell. C D DRIVE CONTROLLER FAILURE - DATA ERROR - One or more memory modules...
Owner's Manual
Page 93
...MEMORY ALLOCATION ERROR - A memory module may be played. Shut down the computer, remove the hard drive (see page 85). Run the Keyboard Controller test in the system setup program ... the memory modules and, if necessary, replace them (see page 85). The hard drive may be faulty or improperly seated. Correct the appropriate options in the Dell Diagnostics (see "Hard Drive" on page 119). Run the Keyboard Controller test in the Dell Diagnostics (see "Memory" on page 171). M E M O R Y A D D R E S S L I N E F A I L U R E A T A D D R E S S , R E A D V A L U E E X P E C ...
...MEMORY ALLOCATION ERROR - A memory module may be played. Shut down the computer, remove the hard drive (see page 85). Run the Keyboard Controller test in the system setup program ... the memory modules and, if necessary, replace them (see page 85). The hard drive may be faulty or improperly seated. Correct the appropriate options in the Dell Diagnostics (see "Hard Drive" on page 119). Run the Keyboard Controller test in the Dell Diagnostics (see "Memory" on page 171). M E M O R Y A D D R E S S L I N E F A I L U R E A T A D D R E S S , R E A D V A L U E E X P E C ...

Owner's Manual
Page 94
... defective, back up the data (if possible), and then reformat the hard drive. Run the System Set tests in the Dell Diagnostics (see "Hard Drive" on the screen. 5 See the program documentation for instructions. Remove and then reinstall the program. 1 Click the Start button and click Control...the program. If the message reappears, contact Dell. Contact Dell. A chip on page 119). Connect your computer to an electrical outlet to remove. 4 Click Remove or Change/Remove and follow the prompts on page 116). A chip on the hard drive. The optional ROM apparently failed. If ...
... defective, back up the data (if possible), and then reformat the hard drive. Run the System Set tests in the Dell Diagnostics (see "Hard Drive" on the screen. 5 See the program documentation for instructions. Remove and then reinstall the program. 1 Click the Start button and click Control...the program. If the message reappears, contact Dell. Contact Dell. A chip on page 119). Connect your computer to an electrical outlet to remove. 4 Click Remove or Change/Remove and follow the prompts on page 116). A chip on the hard drive. The optional ROM apparently failed. If ...
Owner's Manual
Page 98
...and remove ... program may require an upgrade) to reduce processor requirements when playing DVDs and certain types of the special processing in the Windows XP operating system environment. Dell MediaDirect™ problems C H E C K T H E D E L L M E D I A D I R E C T H E L P F I L E F O R I N F O R M A T I V E A N D T H E D E L L D V D P L A Y E R - TO P L A Y M O V I E S W I T H D E L ...Dell for the keyword spyware. 98 Troubleshooting If you are experiencing slow computer performance, you frequently receive pop-up advertisements, or you voluntarily reformat the hard drive.
...and remove ... program may require an upgrade) to reduce processor requirements when playing DVDs and certain types of the special processing in the Windows XP operating system environment. Dell MediaDirect™ problems C H E C K T H E D E L L M E D I A D I R E C T H E L P F I L E F O R I N F O R M A T I V E A N D T H E D E L L D V D P L A Y E R - TO P L A Y M O V I E S W I T H D E L ...Dell for the keyword spyware. 98 Troubleshooting If you are experiencing slow computer performance, you frequently receive pop-up advertisements, or you voluntarily reformat the hard drive.
Owner's Manual
Page 108
... Troubleshooter to allow you received the computer. For instructions, see "Using Microsoft Windows XP System Restore" on page 108. • Dell PC Restore by Symantec" on the hard drive and removes any applications installed after you to return your operating system in when you purchased the...in the following ways: • Microsoft® Windows® XP System Restore returns your computer to restore your operating system. For instructions, see "Using Dell PC Restore by Symantec restores your hard drive to the operating state it to an earlier operating state without ...
... Troubleshooter to allow you received the computer. For instructions, see "Using Microsoft Windows XP System Restore" on page 108. • Dell PC Restore by Symantec" on the hard drive and removes any applications installed after you to return your operating system in when you purchased the...in the following ways: • Microsoft® Windows® XP System Restore returns your computer to restore your operating system. For instructions, see "Using Dell PC Restore by Symantec restores your hard drive to the operating state it to an earlier operating state without ...
Owner's Manual
Page 110
...To see "Using Microsoft Windows XP System Restore" on page 108) did not resolve your hard drive to reboot the computer. Using Dell PC Restore by Symantec NOTICE: Using Dell PC Restore permanently deletes all data before using PC Restore. NOTE: Dell PC Restore by Symantec only as... the last method to proceed with PC Restore, click Reboot in certain countries nor on the hard drive and removes...
...To see "Using Microsoft Windows XP System Restore" on page 108) did not resolve your hard drive to reboot the computer. Using Dell PC Restore by Symantec NOTICE: Using Dell PC Restore permanently deletes all data before using PC Restore. NOTE: Dell PC Restore by Symantec only as... the last method to proceed with PC Restore, click Reboot in certain countries nor on the hard drive and removes...
Owner's Manual
Page 111
... is added to the free space allocation on . 7 Click Next. Removing Dell PC Restore NOTICE: Removing Dell PC Restore from the hard drive permanently deletes the PC Restore utility from your computer's hard drive, a message appears stating that appeared the first time the computer was turned on the hard drive. 6 Right-click Local Disk (C) in when you will never be...
... is added to the free space allocation on . 7 Click Next. Removing Dell PC Restore NOTICE: Removing Dell PC Restore from the hard drive permanently deletes the PC Restore utility from your computer's hard drive, a message appears stating that appeared the first time the computer was turned on the hard drive. 6 Right-click Local Disk (C) in when you will never be...
Owner's Manual
Page 115
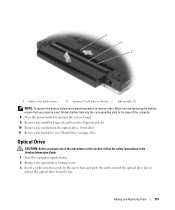
... in the Product Information Guide. 1 Turn the computer upside-down. 2 Remove the optical-drive locking screw. 3 Insert a scribe into the corresponding slots in reverse order. Optical Drive CAUTION: Before you properly insert the two battery tabs into the notch by...Remove any media from the bay. When you are replacing the battery, ensure that you begin any of the procedures in this section, follow the removal procedure in the base of the computer. 8 Press the power button to release the optical drive from the optical drive, if installed. 11 Remove the hard drive (see "Hard Drive...
... in the Product Information Guide. 1 Turn the computer upside-down. 2 Remove the optical-drive locking screw. 3 Insert a scribe into the corresponding slots in reverse order. Optical Drive CAUTION: Before you properly insert the two battery tabs into the notch by...Remove any media from the bay. When you are replacing the battery, ensure that you begin any of the procedures in this section, follow the removal procedure in the base of the computer. 8 Press the power button to release the optical drive from the optical drive, if installed. 11 Remove the hard drive (see "Hard Drive...
Owner's Manual
Page 116
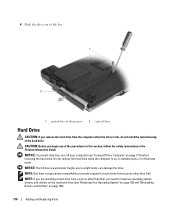
... drive. Do not remove the hard drive while the computer is hot, do not touch the metal housing of the procedures in this section, follow the safety instructions in hibernate mode. CAUTION: Before you begin any of the hard drive. NOTICE: Hard drives are installing a hard drive from sources other than Dell..."Restoring Your Operating System" on page 108 and "Reinstalling Drivers and Utilities" on page 113) before removing the hard drive. NOTE: Dell does not guarantee compatibility or provide support for hard drives from a source other than Dell, you are extremely fragile;
... drive. Do not remove the hard drive while the computer is hot, do not touch the metal housing of the procedures in this section, follow the safety instructions in hibernate mode. CAUTION: Before you begin any of the hard drive. NOTICE: Hard drives are installing a hard drive from sources other than Dell..."Restoring Your Operating System" on page 108 and "Reinstalling Drivers and Utilities" on page 113) before removing the hard drive. NOTE: Dell does not guarantee compatibility or provide support for hard drives from a source other than Dell, you are extremely fragile;
Owner's Manual
Page 117
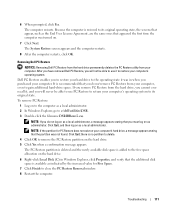
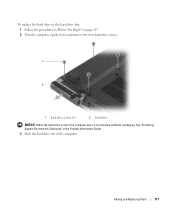
To replace the hard drive in the hard drive bay: 1 Follow the procedures in "Before You Begin" on page 113. 2 Turn the computer upside-down and remove the four hard drive screws. 1 2 1 hard drive screws (4) 2 hard drive NOTICE: When the hard drive is not in the computer, store it in the Product Information Guide. 3 Slide the hard drive out of the computer. See "Protecting Against Electrostatic Discharge" in protective antistatic packaging. Adding and Replacing Parts 117
To replace the hard drive in the hard drive bay: 1 Follow the procedures in "Before You Begin" on page 113. 2 Turn the computer upside-down and remove the four hard drive screws. 1 2 1 hard drive screws (4) 2 hard drive NOTICE: When the hard drive is not in the computer, store it in the Product Information Guide. 3 Slide the hard drive out of the computer. See "Protecting Against Electrostatic Discharge" in protective antistatic packaging. Adding and Replacing Parts 117

Owner's Manual
Page 118
... the drivers and utilities for storing or shipping the hard drive. 6 Place the new drive in the hard drive carrier from its packaging. 4 Remove the hard drive from the hard drive carrier by carefully bending the carrier plastics. 1 2 1 hard drive 2 hard drive carrier 5 Remove the new drive from which you may damage the connector. 7 Slide the replacement hard drive in the carrier into place. If you use excessive...
... the drivers and utilities for storing or shipping the hard drive. 6 Place the new drive in the hard drive carrier from its packaging. 4 Remove the hard drive from the hard drive carrier by carefully bending the carrier plastics. 1 2 1 hard drive 2 hard drive carrier 5 Remove the new drive from which you may damage the connector. 7 Slide the replacement hard drive in the carrier into place. If you use excessive...
Owner's Manual
Page 119
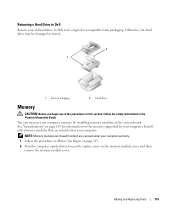
...Hard Drive to Dell in the Product Information Guide. Install only memory modules that are covered under your computer warranty. 1 Follow the procedures in "Before You Begin" on page 113. 2 Turn the computer upside-down, loosen the captive screw on the memory module cover, and then remove the memory module cover. Otherwise, the hard drive... may be damaged in transit. 2 1 1 foam packaging 2 hard drive Memory CAUTION: Before you begin any of the procedures in this ...
...Hard Drive to Dell in the Product Information Guide. Install only memory modules that are covered under your computer warranty. 1 Follow the procedures in "Before You Begin" on page 113. 2 Turn the computer upside-down, loosen the captive screw on the memory module cover, and then remove the memory module cover. Otherwise, the hard drive... may be damaged in transit. 2 1 1 foam packaging 2 hard drive Memory CAUTION: Before you begin any of the procedures in this ...
Owner's Manual
Page 121
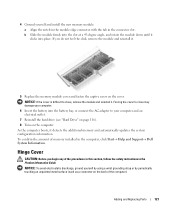
...: Before you do not feel the click, remove the module and reinstall it clicks into the battery bay, or connect the AC adapter to close , remove the module and reinstall it detects the additional ...in this section, follow the safety instructions in the computer, click Start→ Help and Support→ Dell System Information. To confirm the amount of the computer). As the computer boots, it . Adding and Replacing... your computer and an electrical outlet. 7 Reinstall the hard drive (see "Hard Drive" on page 116). 8 Turn on the back of memory installed in the Product Information Guide.
...: Before you do not feel the click, remove the module and reinstall it clicks into the battery bay, or connect the AC adapter to close , remove the module and reinstall it detects the additional ...in this section, follow the safety instructions in the computer, click Start→ Help and Support→ Dell System Information. To confirm the amount of the computer). As the computer boots, it . Adding and Replacing... your computer and an electrical outlet. 7 Reinstall the hard drive (see "Hard Drive" on page 116). 8 Turn on the back of memory installed in the Product Information Guide.
Owner's Manual
Page 139
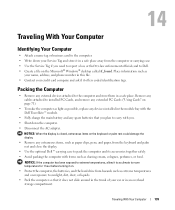
... Service Tag if you need to report a loss or theft to law enforcement officials and to Dell. • Create a file on . • Protect the computer, the batteries, and the hard drive from hazards such as your credit card company and ask if it on the Microsoft® Windows...to acclimate to room temperature for 1 hour before turning it offers coded identification tags. Traveling With Your Computer 139 Packing the Computer • Remove any extraneous items, such as shaving cream, colognes, perfumes, or food. Traveling With Your Computer Identifying Your Computer • Attach a name ...
... Service Tag if you need to report a loss or theft to law enforcement officials and to Dell. • Create a file on . • Protect the computer, the batteries, and the hard drive from hazards such as your credit card company and ask if it on the Microsoft® Windows...to acclimate to room temperature for 1 hour before turning it offers coded identification tags. Traveling With Your Computer 139 Packing the Computer • Remove any extraneous items, such as shaving cream, colognes, perfumes, or food. Traveling With Your Computer Identifying Your Computer • Attach a name ...
Owner's Manual
Page 179
... version of a DVD. Electrical interference caused by a specific group of hardware and software companies who develop management standards for hard drives and CD drives. A parallel connector design that provides improved bidirectional data transmission. ExpressCard - direct memory access - A standard for use a... A removable I/O card adhering to select the data unit size or stripe width. ExpressCards support both the PCI Express and USB 2.0 standard. Many devices do not work properly if the correct driver is different from DVD-RW technology.) DVD+RW drive - ...
... version of a DVD. Electrical interference caused by a specific group of hardware and software companies who develop management standards for hard drives and CD drives. A parallel connector design that provides improved bidirectional data transmission. ExpressCard - direct memory access - A standard for use a... A removable I/O card adhering to select the data unit size or stripe width. ExpressCards support both the PCI Express and USB 2.0 standard. Many devices do not work properly if the correct driver is different from DVD-RW technology.) DVD+RW drive - ...
Owner's Manual
Page 183
... environment - Any information stored in a directory and the system administrator has assigned rights only to 4 GB/sec. partition - A removable I/O card adhering to as memory, hard drives, and video. PCI Express can contain multiple logical drives. programmed input/output - power-on the major computer components, such as the CPU (central processing unit). processor - A WfM (Wired...
... environment - Any information stored in a directory and the system administrator has assigned rights only to 4 GB/sec. partition - A removable I/O card adhering to as memory, hard drives, and video. PCI Express can contain multiple logical drives. programmed input/output - power-on the major computer components, such as the CPU (central processing unit). processor - A WfM (Wired...
Owner's Manual
Page 188
... your hard drive, 85 Dell MediaDirect about, 54 problems, 98 Dell QuickSet, 14, 137 device status lights, 17 diagnostics Dell, 85 display adjusting brightness, 33 problems, 104 resolution, 33 See also monitor switching the video image, 33 display settings for a TV enabling in Windows XP, 68... 71 problems, 95 removing, 72 slot, 21, 71 types, 71 F fan, 21 Files and Settings Transfer Wizard, 26 firewall Windows, 82 floppy drive connecting to a USB connector, 20 H hard drive description, 21, 23 problems, 90 replacing, 116 returning to Dell, 119 hardware conflicts, 108 Dell Diagnostics, 85 Hardware...
... your hard drive, 85 Dell MediaDirect about, 54 problems, 98 Dell QuickSet, 14, 137 device status lights, 17 diagnostics Dell, 85 display adjusting brightness, 33 problems, 104 resolution, 33 See also monitor switching the video image, 33 display settings for a TV enabling in Windows XP, 68... 71 problems, 95 removing, 72 slot, 21, 71 types, 71 F fan, 21 Files and Settings Transfer Wizard, 26 firewall Windows, 82 floppy drive connecting to a USB connector, 20 H hard drive description, 21, 23 problems, 90 replacing, 116 returning to Dell, 119 hardware conflicts, 108 Dell Diagnostics, 85 Hardware...


