
XPS M1210 Owners Manual
Page 5
... Optional Camera 45 Accessing the Camera's Help File 45 Manually Adjusting the Camera Settings 46 Creating a Picture or a Video 46 7 Using Multimedia 49 Playing a CD or DVD 49 Adjusting the Volume 50 Adjusting the Picture 51 Copying CDs and DVDs 51 How to Copy a CD or DVD 51 Using Blank CDs and DVDs 52 Helpful Tips 53 Using Dell Media Experience and Dell MediaDirect 54 If the Computer Is Turned On or in Standby Mode...
... Optional Camera 45 Accessing the Camera's Help File 45 Manually Adjusting the Camera Settings 46 Creating a Picture or a Video 46 7 Using Multimedia 49 Playing a CD or DVD 49 Adjusting the Volume 50 Adjusting the Picture 51 Copying CDs and DVDs 51 How to Copy a CD or DVD 51 Using Blank CDs and DVDs 52 Helpful Tips 53 Using Dell Media Experience and Dell MediaDirect 54 If the Computer Is Turned On or in Standby Mode...
XPS M1210 Owners Manual
Page 13
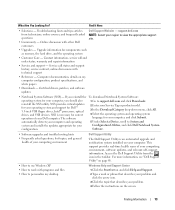
... an automated upgrade and notification system installed on the screen. Service call and order status, warranty, and repair information • Service and support - Certified drivers, patches, and software updates • Notebook System Software (NSS)- Upgrade information for your computer. If you should also reinstall the NSS utility. Access the Dell Support Utility from technicians; and frequently asked questions, hot topics, and general health of your computing environment Dell Support Utility The Dell Support Utility is necessary...
... an automated upgrade and notification system installed on the screen. Service call and order status, warranty, and repair information • Service and support - Certified drivers, patches, and software updates • Notebook System Software (NSS)- Upgrade information for your computer. If you should also reinstall the NSS utility. Access the Dell Support Utility from technicians; and frequently asked questions, hot topics, and general health of your computing environment Dell Support Utility The Dell Support Utility is necessary...
XPS M1210 Owners Manual
Page 15
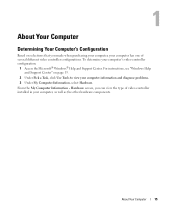
... and diagnose problems. 3 Under My Computer Information, select Hardware. About Your Computer Determining Your Computer's Configuration Based on page 13. 2 Under Pick a Task, click Use Tools to view your computer's video controller configuration: 1 Access the Microsoft® Windows® Help and Support Center. For instructions, see "Windows Help and Support Center" on selections that you can view the type of several different video controller configurations. About Your...
... and diagnose problems. 3 Under My Computer Information, select Hardware. About Your Computer Determining Your Computer's Configuration Based on page 13. 2 Under Pick a Task, click Use Tools to view your computer's video controller configuration: 1 Access the Microsoft® Windows® Help and Support Center. For instructions, see "Windows Help and Support Center" on selections that you can view the type of several different video controller configurations. About Your...

XPS M1210 Owners Manual
Page 21
...D E R - The light operates as some digital video cameras. I N - 1 M E D I G H T - For more information, see "Using Cards" on your computer. The computer ships with a plastic blank installed in -1 media memory card reader reads the following digital media memory cards: • Secure Digital (SD) card/SDIO • MultiMediaCard (MMC) • Memory Stick • Memory Stick PRO • xD-Picture Card I V E B A Y - You can install devices such as a DVD drive or other optical drive in -1 media memory card reader 3 IEEE 1394 connector 4 USB connectors (2) 5 video connector...
...D E R - The light operates as some digital video cameras. I N - 1 M E D I G H T - For more information, see "Using Cards" on your computer. The computer ships with a plastic blank installed in -1 media memory card reader reads the following digital media memory cards: • Secure Digital (SD) card/SDIO • MultiMediaCard (MMC) • Memory Stick • Memory Stick PRO • xD-Picture Card I V E B A Y - You can install devices such as a DVD drive or other optical drive in -1 media memory card reader 3 IEEE 1394 connector 4 USB connectors (2) 5 video connector...
XPS M1210 Owners Manual
Page 40
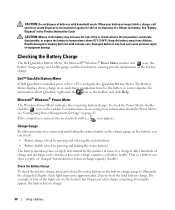
... about the Power Meter, see "Configuring Power Management Settings" on the taskbar. Check the Battery Charge To check the battery charge, press and release the status button on disposing of the total battery charge. See "Battery Disposal" in the Product Information Guide. Microsoft® Windows® Power Meter The Windows Power Meter indicates the remaining battery charge. If the computer is charged. For example, if four of the lights are on the battery charge. Charge Gauge...
... about the Power Meter, see "Configuring Power Management Settings" on the taskbar. Check the Battery Charge To check the battery charge, press and release the status button on disposing of the total battery charge. See "Battery Disposal" in the Product Information Guide. Microsoft® Windows® Power Meter The Windows Power Meter indicates the remaining battery charge. If the computer is charged. For example, if four of the lights are on the battery charge. Charge Gauge...
XPS M1210 Owners Manual
Page 51
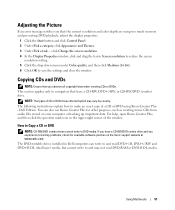
... of CD or DVD drives offered by Dell may not read DVD-RAM or DVD-R DL media. The following instructions explain how to make an exact copy of a CD or DVD using too much memory and preventing DVD playback, adjust the display properties. 1 Click the Start button and click Control Panel. 2 Under Pick a category, click Appearance and Themes. 3 Under Pick a task..., click Change the screen resolution. 4 In the Display Properties window, click and...
... of CD or DVD drives offered by Dell may not read DVD-RAM or DVD-R DL media. The following instructions explain how to make an exact copy of a CD or DVD using too much memory and preventing DVD playback, adjust the display properties. 1 Click the Start button and click Control Panel. 2 Under Pick a category, click Appearance and Themes. 3 Under Pick a task..., click Change the screen resolution. 4 In the Display Properties window, click and...
XPS M1210 Owners Manual
Page 68
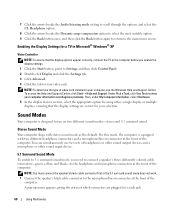
... Sound Mode To switch to 5.1 surround sound mode, you need to connect a speaker's three differently colored cable connectors-green, yellow, and black-to the headphone and microphone connectors at the front of video card installed in Microsoft® Windows® XP Video Controller NOTE: To ensure that the display settings are plugged in connector at the front of the computer. 7 Click the arrows beside the Audio listening mode setting to scroll through the options...
... Sound Mode To switch to 5.1 surround sound mode, you need to connect a speaker's three differently colored cable connectors-green, yellow, and black-to the headphone and microphone connectors at the front of video card installed in Microsoft® Windows® XP Video Controller NOTE: To ensure that the display settings are plugged in connector at the front of the computer. 7 Click the arrows beside the Audio listening mode setting to scroll through the options...
XPS M1210 Owners Manual
Page 91
... appeared. Follow the instructions on the screen to the Internet, your Internet service provider. AUXILIARY DEVICE FAILURE - Enable the Pointing Device option in the proper place, and used the correct pathname. See "Contacting Dell" on page 171). Ensure that is operating properly. The touch pad, track stick, or external mouse may require an upgrade) to scan the computer and remove spyware. For an external mouse, check the cable connection. If you are...
... appeared. Follow the instructions on the screen to the Internet, your Internet service provider. AUXILIARY DEVICE FAILURE - Enable the Pointing Device option in the proper place, and used the correct pathname. See "Contacting Dell" on page 171). Ensure that is operating properly. The touch pad, track stick, or external mouse may require an upgrade) to scan the computer and remove spyware. For an external mouse, check the cable connection. If you are...
XPS M1210 Owners Manual
Page 93
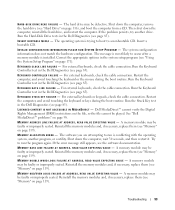
... again. For external keyboards, check the cable connection. For external keyboards or keypads, check the cable connection. M E M O R Y D O U B L E W O R D L O G I C F A I L U R E A T A D D R E S S , R E A D V A L U E E X P E C T I R E C T - Troubleshooting 93 L I C E N S E D C O N T E N T I S N O T A C C E S S I B L E I N M E D I A D I N G V A L U E - A memory module may be defective. Reinstall the memory modules and, if necessary, replace them (see page 85). The operating system is trying to boot to run is installed. HARD-DISK DRIVE READ FAILURE - KEYBOARD DATA LINE...
... again. For external keyboards, check the cable connection. For external keyboards or keypads, check the cable connection. M E M O R Y D O U B L E W O R D L O G I C F A I L U R E A T A D D R E S S , R E A D V A L U E E X P E C T I R E C T - Troubleshooting 93 L I C E N S E D C O N T E N T I S N O T A C C E S S I B L E I N M E D I A D I N G V A L U E - A memory module may be defective. Reinstall the memory modules and, if necessary, replace them (see page 85). The operating system is trying to boot to run is installed. HARD-DISK DRIVE READ FAILURE - KEYBOARD DATA LINE...
XPS M1210 Owners Manual
Page 94
... the Windows error-checking utility to restore the data by entering the system setup program. Connect your computer to an electrical outlet to open is your boot device, ensure that you want to remove. 4 Click Remove or Change/Remove and follow the prompts on page 141. 94 Troubleshooting See "Contacting Dell" on the screen. 5 See the program documentation for instructions. Contact Dell. Remove and then reinstall the program. 1 Click the Start button...
... the Windows error-checking utility to restore the data by entering the system setup program. Connect your computer to an electrical outlet to open is your boot device, ensure that you want to remove. 4 Click Remove or Change/Remove and follow the prompts on page 141. 94 Troubleshooting See "Contacting Dell" on the screen. 5 See the program documentation for instructions. Contact Dell. Remove and then reinstall the program. 1 Click the Start button...
XPS M1210 Owners Manual
Page 100
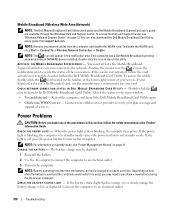
... service provider to verify the status of your screen. Power Problems CAUTION: Before you begin any network cables from support.dell.com. When the power light is low or depleted. The battery charge may need to turn on how often the battery is used , you can also download the Dell Mobile Broadband Card Utility user's guide from the computer and disable the WLAN card. Depending on the computer. CHECK THE BATTERY STATUS LIGHT - If the battery status light flashes...
... service provider to verify the status of your screen. Power Problems CAUTION: Before you begin any network cables from support.dell.com. When the power light is low or depleted. The battery charge may need to turn on how often the battery is used , you can also download the Dell Mobile Broadband Card Utility user's guide from the computer and disable the WLAN card. Depending on the computer. CHECK THE BATTERY STATUS LIGHT - If the battery status light flashes...
XPS M1210 Owners Manual
Page 105
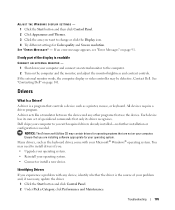
... change or click the Display icon. 4 Try different settings for your computer to the computer. 2 Turn on page 91. ADJUST THE WINDOWS DISPLAY SETTINGS - 1 Click the Start button and then click Control Panel. 2 Click Appearance and Themes. 3 Click the area you want to install drivers if you: • Upgrade your operating system. • Reinstall your operating system. • Connect or install a new device. SEE "ERROR MESSAGES" - Dell ships your operating system. NOTICE: The Drivers and Utilities...
... change or click the Display icon. 4 Try different settings for your computer to the computer. 2 Turn on page 91. ADJUST THE WINDOWS DISPLAY SETTINGS - 1 Click the Start button and then click Control Panel. 2 Click Appearance and Themes. 3 Click the area you want to install drivers if you: • Upgrade your operating system. • Reinstall your operating system. • Connect or install a new device. SEE "ERROR MESSAGES" - Dell ships your operating system. NOTICE: The Drivers and Utilities...

XPS M1210 Owners Manual
Page 106
... Hardware tab. 5 Click Device Manager. 6 Scroll down the list to see "Using Microsoft Windows XP System Restore" on page 108) to return your Drivers and Utilities CD provide approved drivers for which the new driver was installed and click Properties. 7 Click the Drivers tab. 8 Click Roll Back Driver. If it does not, start Windows Explorer, click your computer after you may not ship with the previously installed version. 1 Click the Start button...
... Hardware tab. 5 Click Device Manager. 6 Scroll down the list to see "Using Microsoft Windows XP System Restore" on page 108) to return your Drivers and Utilities CD provide approved drivers for which the new driver was installed and click Properties. 7 Click the Drivers tab. 8 Click Roll Back Driver. If it does not, start Windows Explorer, click your computer after you may not ship with the previously installed version. 1 Click the Start button...
XPS M1210 Owners Manual
Page 107
... are installing the driver. 6 Click the Driver tab and click Update Driver. 7 Click Install from the System Model, Operating System, and Topic drop-down menu in the toolbar, select your hard drive as described in the previous section, click the Start button and right-click My Computer. 2 Click Properties. 3 Click the Hardware tab and click Device Manager. 4 Double-click the type of device for which you are installing the driver...
... are installing the driver. 6 Click the Driver tab and click Update Driver. 7 Click Install from the System Model, Operating System, and Topic drop-down menu in the toolbar, select your hard drive as described in the previous section, click the Start button and right-click My Computer. 2 Click Properties. 3 Click the Hardware tab and click Device Manager. 4 Double-click the type of device for which you are installing the driver...
XPS M1210 Owners Manual
Page 120
... not boot properly. No error message indicates this failure. 120 Adding and Replacing Parts NOTICE: To avoid electrostatic discharge, ground yourself by using a wrist grounding strap or by periodically touching an unpainted metal surface (such as a connector on each end of the computer). 3 If you are replacing a memory module, remove the existing module: a Use your fingertips to spread the memory-module securing clips. b Remove the module from...
... not boot properly. No error message indicates this failure. 120 Adding and Replacing Parts NOTICE: To avoid electrostatic discharge, ground yourself by using a wrist grounding strap or by periodically touching an unpainted metal surface (such as a connector on each end of the computer). 3 If you are replacing a memory module, remove the existing module: a Use your fingertips to spread the memory-module securing clips. b Remove the module from...
XPS M1210 Owners Manual
Page 185
... a multi-port hub that contain only text; Video memory is no electrical power. Always disconnect the network cable from the network connector during electrical storms. SVGA - SXGA - system board - A utility that supports resolutions up to underline, change the settings for a limited amount of video memory installed in most telephone networks and some computer networks. Unless you to configure userselectable options in the BIOS, such as a USB-compatible keyboard, mouse, joystick, scanner, set of wires...
... a multi-port hub that contain only text; Video memory is no electrical power. Always disconnect the network cable from the network connector during electrical storms. SVGA - SXGA - system board - A utility that supports resolutions up to underline, change the settings for a limited amount of video memory installed in most telephone networks and some computer networks. Unless you to configure userselectable options in the BIOS, such as a USB-compatible keyboard, mouse, joystick, scanner, set of wires...
XPS M1210 Service Manual
Page 16
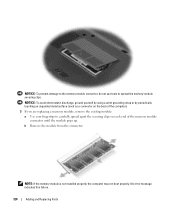
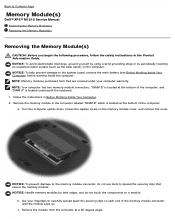
... grounding strap or by their edges, and do not use tools to Contents Page Memory Module(s) Dell™ XPS™ M1210 Service Manual Removing the Memory Module(s) Replacing the Memory Module(s) Removing the Memory Module(s) CAUTION: Before you begin the following procedure, follow the safety instructions in Before Working Inside Your Computer. 2. c. Remove the memory module in the connector labeled "DIMM B" which is located at the bottom of the computer, and "DIMM A" is...
... grounding strap or by their edges, and do not use tools to Contents Page Memory Module(s) Dell™ XPS™ M1210 Service Manual Removing the Memory Module(s) Replacing the Memory Module(s) Removing the Memory Module(s) CAUTION: Before you begin the following procedure, follow the safety instructions in Before Working Inside Your Computer. 2. c. Remove the memory module in the connector labeled "DIMM B" which is located at the bottom of the computer, and "DIMM A" is...
XPS M1210 Service Manual
Page 17
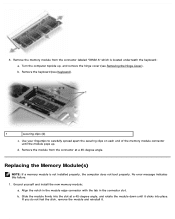
Turn the computer topside up . Ground yourself and install the new memory module: a. b. Use your fingertips to carefully spread apart the securing clips on each end of the memory module connector until it . b. Remove the keyboard (see Removing the Hinge Cover). Remove the module from the connector labeled "DIMM A" which is not installed properly, the computer does not boot properly. Align the notch in the module edge connector with...
Turn the computer topside up . Ground yourself and install the new memory module: a. b. Use your fingertips to carefully spread apart the securing clips on each end of the memory module connector until it . b. Remove the keyboard (see Removing the Hinge Cover). Remove the module from the connector labeled "DIMM A" which is not installed properly, the computer does not boot properly. Align the notch in the module edge connector with...
XPS M1210 Service Manual
Page 42
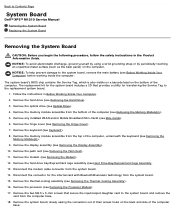
... safety instructions in Before Working Inside Your Computer. 2. Remove the two M2.5 x 5-mm screws that provides a utility for the internal card with Bluetooth® wireless technology from the system board. 14. The replacement kit for the system board includes a CD that secure the input/output daughter card to the system board, remove the main battery (see Removing the Memory Module(s)). 5. Remove the hard drive (see Removing the Thermal-Cooling Assembly). 16. Remove the...
... safety instructions in Before Working Inside Your Computer. 2. Remove the two M2.5 x 5-mm screws that provides a utility for the internal card with Bluetooth® wireless technology from the system board. 14. The replacement kit for the system board includes a CD that secure the input/output daughter card to the system board, remove the main battery (see Removing the Memory Module(s)). 5. Remove the hard drive (see Removing the Thermal-Cooling Assembly). 16. Remove the...
XPS M1210 Service Manual
Page 44
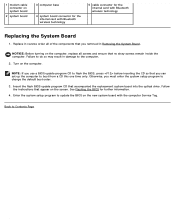
... Board. See Flashing the BIOS for the internal card with Bluetooth wireless technology Replacing the System Board 1. Follow the instructions that accompanied the replacement system board into the optical drive. Turn on the new system board with the computer Service Tag. Enter the system setup program to the computer. 2. Replace in reverse order all screws and ensure that you removed in damage to update the BIOS on the computer. Back to change the default boot order. 3. NOTICE: Before turning...
... Board. See Flashing the BIOS for the internal card with Bluetooth wireless technology Replacing the System Board 1. Follow the instructions that accompanied the replacement system board into the optical drive. Turn on the new system board with the computer Service Tag. Enter the system setup program to the computer. 2. Replace in reverse order all screws and ensure that you removed in damage to update the BIOS on the computer. Back to change the default boot order. 3. NOTICE: Before turning...


