
Setup Guide
Page 6
... and Replacing the Battery 50 Software Features 52 Dell DataSafe Online Backup 53 Dell Stage 54 NVIDIA Optimus Technology (Optional 56 NVIDIA 3DTV Play 57 Free Fall Sensor 61 Solving Problems 63 Beep Codes 63 Touch Screen Problems 64 Network Problems 65 Power Problems 66 ...Memory Problems 67 Lockups and Software Problems 68 Using Support Tools 70 Dell Support Center 70 My Dell Downloads 71 Hardware Troubleshooter 72 Dell Diagnostics 72 Restoring Your Operating System 77...
... and Replacing the Battery 50 Software Features 52 Dell DataSafe Online Backup 53 Dell Stage 54 NVIDIA Optimus Technology (Optional 56 NVIDIA 3DTV Play 57 Free Fall Sensor 61 Solving Problems 63 Beep Codes 63 Touch Screen Problems 64 Network Problems 65 Power Problems 66 ...Memory Problems 67 Lockups and Software Problems 68 Using Support Tools 70 Dell Support Center 70 My Dell Downloads 71 Hardware Troubleshooter 72 Dell Diagnostics 72 Restoring Your Operating System 77...
Setup Guide
Page 13
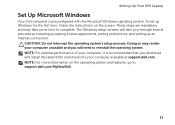
The Windows setup screens will take some time to reinstall the operating system. Doing so may take you through several procedures including accepting license...time, follow the instructions on the operating system and features, go to support.dell.com/MyNewDell. 11 NOTE: For more information on the screen. Setting Up Your XPS Laptop Set Up Microsoft Windows Your Dell computer is recommended that you will need to complete. To set up an ... not interrupt the operating system's setup process. These steps are mandatory and may render your computer available at support.dell.com.
The Windows setup screens will take some time to reinstall the operating system. Doing so may take you through several procedures including accepting license...time, follow the instructions on the operating system and features, go to support.dell.com/MyNewDell. 11 NOTE: For more information on the screen. Setting Up Your XPS Laptop Set Up Microsoft Windows Your Dell computer is recommended that you will need to complete. To set up an ... not interrupt the operating system's setup process. These steps are mandatory and may render your computer available at support.dell.com.

Setup Guide
Page 15
Setting Up Your XPS Laptop To create a system recovery media: 1. Follow the instructions on page 8). 2. Ensure that the AC adapter is connected (see "System Recovery Media" on page 81. 13 Click Start → All Programs→ Dell DataSafe Local Backup. 4. Click Create Recovery Media. 5. NOTE: For information on restoring your operating system using the system recovery media, see "Connect the AC Adapter" on the screen. Insert the disc or USB key in the computer. 3.
Setting Up Your XPS Laptop To create a system recovery media: 1. Follow the instructions on page 8). 2. Ensure that the AC adapter is connected (see "System Recovery Media" on page 81. 13 Click Start → All Programs→ Dell DataSafe Local Backup. 4. Click Create Recovery Media. 5. NOTE: For information on restoring your operating system using the system recovery media, see "Connect the AC Adapter" on the screen. Insert the disc or USB key in the computer. 3.
Setup Guide
Page 19
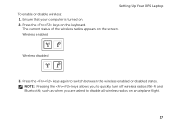
Setting Up Your XPS Laptop To enable or disable wireless: 1. The current status of the wireless radios appears on . 2. NOTE: Pressing the keys allows you to quickly turn off wireless radios (Wi-Fi and Bluetooth), such as when you are asked to switch between the wireless enabled or disabled states. Wireless enabled Wireless disabled 3. Ensure that your computer is turned on the screen. Press the keys again to disable all wireless radios on the keyboard. Press the keys on an airplane flight. 17
Setting Up Your XPS Laptop To enable or disable wireless: 1. The current status of the wireless radios appears on . 2. NOTE: Pressing the keys allows you to quickly turn off wireless radios (Wi-Fi and Bluetooth), such as when you are asked to switch between the wireless enabled or disabled states. Wireless enabled Wireless disabled 3. Ensure that your computer is turned on the screen. Press the keys again to disable all wireless radios on the keyboard. Press the keys on an airplane flight. 17
Setup Guide
Page 21
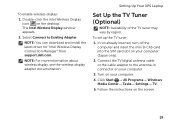
...→ TV. 5. Select Connect to the antenna-in connector on the screen. 19 NOTE: You can download and install the latest driver for "Intel Wireless Display Connection Manager" from support.dell.com. Connect the TV/digital antenna cable or the cable adapter to Existing... Adapter. To enable wireless display: 1. NOTE: For more information about wireless display, see the wireless display adapter documentation. Follow the instructions on your computer. 3. Setting Up Your XPS Laptop...
...→ TV. 5. Select Connect to the antenna-in connector on the screen. 19 NOTE: You can download and install the latest driver for "Intel Wireless Display Connection Manager" from support.dell.com. Connect the TV/digital antenna cable or the cable adapter to Existing... Adapter. To enable wireless display: 1. NOTE: For more information about wireless display, see the wireless display adapter documentation. Follow the instructions on your computer. 3. Setting Up Your XPS Laptop...

Setup Guide
Page 24
... Provider (ISP). Follow the instructions on page 16). 2. To complete setting up your wireless router. Setting Up Your XPS Laptop Connect to the Internet (Optional) To connect to the Internet, you need to connect to your connection to a...Before you are using a DSL or cable/satellite modem connection, contact your wireless router, see "Enable or Disable Wireless" on the screen to a network. 5. In the search box, type network, and then click Network and Sharing Center→ Connect to complete ...up your Internet connection. • If you can purchase one from dell.com.
... Provider (ISP). Follow the instructions on page 16). 2. To complete setting up your wireless router. Setting Up Your XPS Laptop Connect to the Internet (Optional) To connect to the Internet, you need to connect to your connection to a...Before you are using a DSL or cable/satellite modem connection, contact your wireless router, see "Enable or Disable Wireless" on the screen to a network. 5. In the search box, type network, and then click Network and Sharing Center→ Connect to complete ...up your Internet connection. • If you can purchase one from dell.com.

Setup Guide
Page 25
In the search box, type network, and then click Network and Sharing Center→ Set up your country. Setting Up Your XPS Laptop To set up a new connection or network→ Connect to the Internet window appears. The Connect to the Internet. Contact your ...you cannot connect to the Internet but have successfully connected in your Internet connection: 1. Contact your ISP information ready. Follow the instructions on the screen and use the setup information provided by country. Setting Up Your Internet Connection ISPs and ISP offerings vary by your ISP. 4. If you get ...
In the search box, type network, and then click Network and Sharing Center→ Set up your country. Setting Up Your XPS Laptop To set up a new connection or network→ Connect to the Internet window appears. The Connect to the Internet. Contact your ...you cannot connect to the Internet but have successfully connected in your Internet connection: 1. Contact your ISP information ready. Follow the instructions on the screen and use the setup information provided by country. Setting Up Your Internet Connection ISPs and ISP offerings vary by your ISP. 4. If you get ...

Setup Guide
Page 41
... you to increase or decrease the magnification of the active window. To zoom out: Move two fingers close together to enlarge the view of the screen content. Allows you to rotate the active content on the touch pad. Keeping the thumb in place, move the index finger in or zoom-out... by moving two fingers apart or bringing them closer together on the screen. Using Your XPS Laptop Zoom Allows you to rotate the active content using two fingers where one finger is anchored and the other rotates. The zoom feature...
... you to increase or decrease the magnification of the active window. To zoom out: Move two fingers close together to enlarge the view of the screen content. Allows you to rotate the active content on the touch pad. Keeping the thumb in place, move the index finger in or zoom-out... by moving two fingers apart or bringing them closer together on the screen. Using Your XPS Laptop Zoom Allows you to rotate the active content using two fingers where one finger is anchored and the other rotates. The zoom feature...

Setup Guide
Page 50
... ginecsrteuareses,osreede"Tcoreuacshe Sthcereen Gestures (Optional)" on seleZcotioonms you made when purchasing your computer. The display may support the touch screen feature if you to zoom-in or zoom- Pinch - To zoom in camera for video conferencing and voice recording. (Optional...zoom out: Move two fingers close together to enlarge the view of the screen content. Using Your XPS Laptop Touch Screen Gestures 1 Microphone - Indicates if the camera is on the screen. Provides high-quality sound for video capture, confNeOreTnEc:inSgo,manedocf hthaet.sTehgeecstaumreesraare ...
... ginecsrteuareses,osreede"Tcoreuacshe Sthcereen Gestures (Optional)" on seleZcotioonms you made when purchasing your computer. The display may support the touch screen feature if you to zoom-in or zoom- Pinch - To zoom in camera for video conferencing and voice recording. (Optional...zoom out: Move two fingers close together to enlarge the view of the screen content. Using Your XPS Laptop Touch Screen Gestures 1 Microphone - Indicates if the camera is on the screen. Provides high-quality sound for video capture, confNeOreTnEc:inSgo,manedocf hthaet.sTehgeecstaumreesraare ...

Setup Guide
Page 51
... flick. Scroll Vertical - Move a finger quickly in the desired direction to flip through content. Press and hold a finger on the touch screen, to flip content forward or backward based on the active window. Scroll Allows you to access additional information by simulating a right-click. Move... a finger up or scroll down to activate vertical scrolling. 49 Using Your XPS Laptop Dwell Allows you to scroll through content in the active window like pages in a book. Flick Allows you to open context-sensitive...
... flick. Scroll Vertical - Move a finger quickly in the desired direction to flip through content. Press and hold a finger on the touch screen, to flip content forward or backward based on the active window. Scroll Allows you to access additional information by simulating a right-click. Move... a finger up or scroll down to activate vertical scrolling. 49 Using Your XPS Laptop Dwell Allows you to scroll through content in the active window like pages in a book. Flick Allows you to open context-sensitive...

Setup Guide
Page 52
You can also rotate the active content by moving both the fingers in an arced direction right or left on the screen. Twist - Keeping a finger or thumb in place, move the other finger in a circular motion. 50 Move a finger to the right or left to scroll right or left . Allows you to rotate the active content using two fingers. Using Your XPS Laptop Scroll Horizontal - Rotate Allows you to rotate the active content on the active window. Allows you to activate horizontal scrolling.
You can also rotate the active content by moving both the fingers in an arced direction right or left on the screen. Twist - Keeping a finger or thumb in place, move the other finger in a circular motion. 50 Move a finger to the right or left to scroll right or left . Allows you to rotate the active content using two fingers. Using Your XPS Laptop Scroll Horizontal - Rotate Allows you to rotate the active content on the active window. Allows you to activate horizontal scrolling.
Setup Guide
Page 56
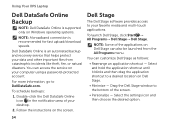
... recommended for fast upload/download speeds. Using Your XPS Laptop Dell DataSafe Online Backup NOTE: Dell DataSafe Online is supported only on the screen. You can access the service on Dell Stage. • Minimize - To launch Dell Stage, click Start → All Programs→ Dell Stage→ Dell Stage. Drag the Dell Stage window to a desired location on your...
... recommended for fast upload/download speeds. Using Your XPS Laptop Dell DataSafe Online Backup NOTE: Dell DataSafe Online is supported only on the screen. You can access the service on Dell Stage. • Minimize - To launch Dell Stage, click Start → All Programs→ Dell Stage→ Dell Stage. Drag the Dell Stage window to a desired location on your...

Setup Guide
Page 58
... equipped with the discrete NVIDIA GPU while running graphicintensive applications such as 3D games. Create notes or reminders using the keyboard or touch screen. You can also create multiple Web Tiles through an application profile. The NVIDIA GPU is enabled through the Apps Gallery. The Optimus ...thus extends the battery life. It enables you to four of your desktop. • Web Tile - NVIDIA Optimus Technology (Optional) Your XPS laptop is launched, the video drivers check if the application has an associated application profile. 56 The tile allows you access STICKYNOTES.
... equipped with the discrete NVIDIA GPU while running graphicintensive applications such as 3D games. Create notes or reminders using the keyboard or touch screen. You can also create multiple Web Tiles through an application profile. The NVIDIA GPU is enabled through the Apps Gallery. The Optimus ...thus extends the battery life. It enables you to four of your desktop. • Web Tile - NVIDIA Optimus Technology (Optional) Your XPS laptop is launched, the video drivers check if the application has an associated application profile. 56 The tile allows you access STICKYNOTES.

Setup Guide
Page 60
Using Your XPS Laptop NVIDIA 3DTV Play The NVIDIA 3DTV Play application installed on your computer allows you see a message stating that the current mode is not HDMI 1.4 compatible, set the in- game resolution to play 3D games, watch Blu-ray 3D videos, and browse 3D photos. 3D Games The NVIDIA 3DTV Play application supports the same games as NVIDIA 3D Vision. Launch the game in 3D 1. Playing Games in full-screen mode. 2. NOTE: For a list of supported 3D games, go to www.nvidia.com. If you to 720p, 1280x720 in HD 3D mode. 58
Using Your XPS Laptop NVIDIA 3DTV Play The NVIDIA 3DTV Play application installed on your computer allows you see a message stating that the current mode is not HDMI 1.4 compatible, set the in- game resolution to play 3D games, watch Blu-ray 3D videos, and browse 3D photos. 3D Games The NVIDIA 3DTV Play application supports the same games as NVIDIA 3D Vision. Launch the game in 3D 1. Playing Games in full-screen mode. 2. NOTE: For a list of supported 3D games, go to www.nvidia.com. If you to 720p, 1280x720 in HD 3D mode. 58

Setup Guide
Page 66
... input device and Enable multi-touch gestures and inking options are selected. • The multi-touch feature may not be disabled. If the touch screen starts losing its sensitivity - Use a clean, lint-free cloth (can spray mild, non abrasive cleaner or water on cloth if needed, but.... Turn off the computer. 2. CAUTION: Do not use water or a cleaning liquid to remove any dirt or fingerprints. 64 Solving Problems Touch Screen Problems Some or all multi-touch features are not working - • Certain touch and multi-touch features may lead to inaccurate touch sensitivity. To...
... input device and Enable multi-touch gestures and inking options are selected. • The multi-touch feature may not be disabled. If the touch screen starts losing its sensitivity - Use a clean, lint-free cloth (can spray mild, non abrasive cleaner or water on cloth if needed, but.... Turn off the computer. 2. CAUTION: Do not use water or a cleaning liquid to remove any dirt or fingerprints. 64 Solving Problems Touch Screen Problems Some or all multi-touch features are not working - • Certain touch and multi-touch features may lead to inaccurate touch sensitivity. To...

Setup Guide
Page 70
... until the computer turns off and then restart your keyboard, or by pressing a key on the CD. If the computer stops responding or a solid blue screen appears -
... until the computer turns off and then restart your keyboard, or by pressing a key on the CD. If the computer stops responding or a solid blue screen appears -
Setup Guide
Page 71
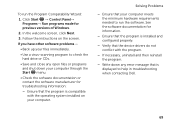
...the Program Compatability Wizard: 1. To run the software. Solving Problems -- Ensure that the program is displayed to help in troubleshooting when contacting Dell. 69 If you have other software problems - • Back up your computer meets the minimum hardware requirements needed to check the hard ...open files or programs and shut down any error message that the device drivers do not conflict with the operating system installed on the screen. Verify that is installed and configured properly. -- Follow the instructions on your computer through the Start menu. • Check the ...
...the Program Compatability Wizard: 1. To run the software. Solving Problems -- Ensure that the program is displayed to help in troubleshooting when contacting Dell. 69 If you have other software problems - • Back up your computer meets the minimum hardware requirements needed to check the hard ...open files or programs and shut down any error message that the device drivers do not conflict with the operating system installed on the screen. Verify that is installed and configured properly. -- Follow the instructions on your computer through the Start menu. • Check the ...
Setup Guide
Page 73
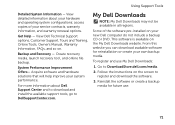
... hardware solutions that will help improve your hardware and operating system configurations; To register and use . 71 View detailed information about Dell Support Center and to download and install the available support tools, go to register and download the software. 3. access copies of... the software pre-installed on the screen to DellSupportCenter.com. This software is available on . Using Support Tools Detailed System Information - Some of your new Dell computer do not include a backup CD or DVD. From this website you ...
... hardware solutions that will help improve your hardware and operating system configurations; To register and use . 71 View detailed information about Dell Support Center and to download and install the available support tools, go to register and download the software. 3. access copies of... the software pre-installed on the screen to DellSupportCenter.com. This software is available on . Using Support Tools Detailed System Information - Some of your new Dell computer do not include a backup CD or DVD. From this website you ...
Setup Guide
Page 75
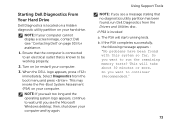
... Pre-Boot System Assessment (PSA) on your hard drive. Do you wait too long and the operating system logo appears, continue to run Dell Diagnostics from the boot menu and press . Ensure that the computer is connected to be working properly. 2. If PSA is known to an... 3. The PSA will take about 30 minutes or more. Turn on (or restart) your computer cannot display a screen image, contact Dell (see "Contacting Dell" on page 93) for assistance. 1. When the DELL logo appears, press immediately. then, shut down your computer and try again. If the PSA completes successfully, the ...
... Pre-Boot System Assessment (PSA) on your hard drive. Do you wait too long and the operating system logo appears, continue to run Dell Diagnostics from the boot menu and press . Ensure that the computer is connected to be working properly. 2. If PSA is known to an... 3. The PSA will take about 30 minutes or more. Turn on (or restart) your computer cannot display a screen image, contact Dell (see "Contacting Dell" on page 93) for assistance. 1. When the DELL logo appears, press immediately. then, shut down your computer and try again. If the PSA completes successfully, the ...
Setup Guide
Page 76
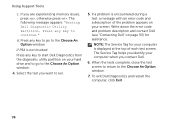
...with an error code and a description of each test screen. Press any key to run. 5. Select the test you are experiencing memory issues, press , otherwise press . Write down the error code and problem description and contact Dell (see "Contacting Dell" on your hard drive and to go to continue."... When the tests complete, close the test screen to return to the Choose An Option window. 4. To exit Dell Diagnostics and restart the computer, click Exit. 74 ...
...with an error code and a description of each test screen. Press any key to run. 5. Select the test you are experiencing memory issues, press , otherwise press . Write down the error code and problem description and contact Dell (see "Contacting Dell" on your hard drive and to go to continue."... When the tests complete, close the test screen to return to the Choose An Option window. 4. To exit Dell Diagnostics and restart the computer, click Exit. 74 ...


