

Setting Up and Using 3D TV
Page 5
... You can view stereoscopic 3D photos using the photo viewer and to download 3D photos, go to watch Blu-ray 3D videos, use the CyberLink Power DVD application installed on the photo. The photo viewer also allows you to edit the 3D effects on your computer.
... You can view stereoscopic 3D photos using the photo viewer and to download 3D photos, go to watch Blu-ray 3D videos, use the CyberLink Power DVD application installed on the photo. The photo viewer also allows you to edit the 3D effects on your computer.
Setup Guide
Page 5
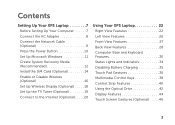
Contents Setting Up Your XPS Laptop 7 Before Setting Up Your Computer 7 Connect the AC Adapter 8 Connect the Network Cable (Optional 9 Press the Power Button 10 Set Up Microsoft Windows 11 Create System Recovery Media (Recommended 12 Install the SIM Card (Optional 14 Enable or Disable Wireless (Optional 16 ...
Contents Setting Up Your XPS Laptop 7 Before Setting Up Your Computer 7 Connect the AC Adapter 8 Connect the Network Cable (Optional 9 Press the Power Button 10 Set Up Microsoft Windows 11 Create System Recovery Media (Recommended 12 Install the SIM Card (Optional 14 Enable or Disable Wireless (Optional 16 ...
Setup Guide
Page 6
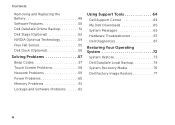
...the Battery 48 Software Features 50 Dell DataSafe Online Backup 51 Dell Stage (Optional 52 NVIDIA Optimus Technology 54 Free Fall Sensor 55 Dell Dock (Optional 56 Solving Problems 57 Beep Codes 57 Touch Screen Problems 58 Network Problems 59 Power Problems 60 Memory Problems 61 ...Lockups and Software Problems 62 Using Support Tools 64 Dell Support Center 64 My Dell Downloads 65 System Messages 65 Hardware Troubleshooter 67 Dell Diagnostics 67 Restoring Your Operating System 72 System ...
...the Battery 48 Software Features 50 Dell DataSafe Online Backup 51 Dell Stage (Optional 52 NVIDIA Optimus Technology 54 Free Fall Sensor 55 Dell Dock (Optional 56 Solving Problems 57 Beep Codes 57 Touch Screen Problems 58 Network Problems 59 Power Problems 60 Memory Problems 61 ...Lockups and Software Problems 62 Using Support Tools 64 Dell Support Center 64 My Dell Downloads 65 System Messages 65 Hardware Troubleshooter 67 Dell Diagnostics 67 Restoring Your Operating System 72 System ...

Setup Guide
Page 9
...you allow dust to the computer. 7 WARNING: Do not block, push objects into, or allow easy access to a power source, adequate ventilation, and a level surface to place your Dell computer in a low-airflow environment, such as a closed briefcase, or on fabric surfaces, such as a cabinet or drawer... while it is normal and does not indicate a problem with the fan or the computer. Fan noise is powered on the right and left sides. Restricting airflow around your Dell™ XPS™ laptop. To prevent overheating ensure that you leave a minimum of 5.1 cm (2 inches) on . Do...
...you allow dust to the computer. 7 WARNING: Do not block, push objects into, or allow easy access to a power source, adequate ventilation, and a level surface to place your Dell computer in a low-airflow environment, such as a closed briefcase, or on fabric surfaces, such as a cabinet or drawer... while it is normal and does not indicate a problem with the fan or the computer. Fan noise is powered on the right and left sides. Restricting airflow around your Dell™ XPS™ laptop. To prevent overheating ensure that you leave a minimum of 5.1 cm (2 inches) on . Do...

Setup Guide
Page 10
However, power connectors and power strips vary among countries. Setting Up Your XPS Laptop Connect the AC Adapter Connect the AC adapter to your computer. 8 Using an incompatible cable or improperly connecting the cable to a power strip or electrical outlet may cause fire or permanent damage to the computer and then plug it into an electrical outlet or surge protector. WARNING: The AC adapter works with electrical outlets worldwide.
However, power connectors and power strips vary among countries. Setting Up Your XPS Laptop Connect the AC Adapter Connect the AC adapter to your computer. 8 Using an incompatible cable or improperly connecting the cable to a power strip or electrical outlet may cause fire or permanent damage to the computer and then plug it into an electrical outlet or surge protector. WARNING: The AC adapter works with electrical outlets worldwide.

Setup Guide
Page 12
Setting Up Your XPS Laptop Press the Power Button 10
Setting Up Your XPS Laptop Press the Power Button 10
Setup Guide
Page 25
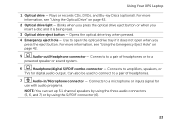
...button. Use to a microphone or inputs signal for digital audio output. Connects to a pair of headphones. 7 Audio-in/Microphone connector - Using Your XPS Laptop 1 Optical drive - Blinks when you press the optical drive eject button or when you insert a disc and it does not open the optical ...drive tray if it is being read. 3 Optical drive eject button - Connects to a powered speaker or sound system. 6 Headphone/digital S/PDIF combo connector - Plays or records CDs, DVDs, and Blu-ray Discs (optional). Can also be used...
...button. Use to a microphone or inputs signal for digital audio output. Connects to a pair of headphones. 7 Audio-in/Microphone connector - Using Your XPS Laptop 1 Optical drive - Blinks when you press the optical drive eject button or when you insert a disc and it does not open the optical ...drive tray if it is being read. 3 Optical drive eject button - Connects to a powered speaker or sound system. 6 Headphone/digital S/PDIF combo connector - Plays or records CDs, DVDs, and Blu-ray Discs (optional). Can also be used...

Setup Guide
Page 27
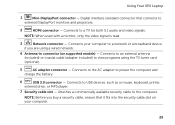
..., turn off or in sleep state. NOTE: If you to charge USB devices when the computer is powered on the computer to eSATA compatible storage devices (such as external hard drives or optical drives) or USB... on /off your computer while charging a USB device, the device stops charging. NOTE: The USB PowerShare feature is powered off when only 10% of the total battery life remains. 25 Connects to charge the device. NOTE: Certain USB ...To continue charging, disconnect the USB device and connect it again. Using Your XPS Laptop 8 eSATA/USB combo connector with USB PowerShare -
..., turn off or in sleep state. NOTE: If you to charge USB devices when the computer is powered on the computer to eSATA compatible storage devices (such as external hard drives or optical drives) or USB... on /off your computer while charging a USB device, the device stops charging. NOTE: The USB PowerShare feature is powered off when only 10% of the total battery life remains. 25 Connects to charge the device. NOTE: Certain USB ...To continue charging, disconnect the USB device and connect it again. Using Your XPS Laptop 8 eSATA/USB combo connector with USB PowerShare -
Setup Guide
Page 31
.... 7 Security cable slot - NOTE: When used with a monitor, only the video signal is read. 3 Network connector - Connects to power the computer and charge the battery. 6 USB 3.0 connector - Digital interface standard connector that it fits into the security cable slot on supported... models) - Using Your XPS Laptop 1 Mini-DisplayPort connector - Connects to an external antenna (included) or coaxial cable (adapter included) to view programs using a ...
.... 7 Security cable slot - NOTE: When used with a monitor, only the video signal is read. 3 Network connector - Connects to power the computer and charge the battery. 6 USB 3.0 connector - Digital interface standard connector that it fits into the security cable slot on supported... models) - Using Your XPS Laptop 1 Mini-DisplayPort connector - Connects to an external antenna (included) or coaxial cable (adapter included) to view programs using a ...

Setup Guide
Page 33
... drive activity. Indicates the battery charge status. For more information on the logo light, see "Multimedia Control Keys" on page 40. 4 XPS logo light - For more information on the battery status light, see "Control Strip Features" on page 38. 31 For more information on ...the control strip, see "Status Lights and Indicators" on the XPS logo indicates the power states. Using Your XPS Laptop 1 Battery status light - The power button, status lights, and touch-sensitive controls are located in this row. CAUTION: To avoid loss of...
... drive activity. Indicates the battery charge status. For more information on the logo light, see "Multimedia Control Keys" on page 40. 4 XPS logo light - For more information on the battery status light, see "Control Strip Features" on page 38. 31 For more information on ...the control strip, see "Status Lights and Indicators" on the XPS logo indicates the power states. Using Your XPS Laptop 1 Battery status light - The power button, status lights, and touch-sensitive controls are located in this row. CAUTION: To avoid loss of...
Setup Guide
Page 36
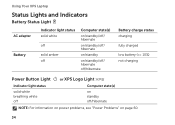
Using Your XPS Laptop Status Lights and Indicators Battery Status Light AC adapter Battery Indicator light status solid white off solid amber off Computer state(s) on/standby/off/ hibernate on/standby/off/ hibernate on/standby on/standby/off/ hibernate off/hibernate Battery charge status charging fully charged low battery (
Using Your XPS Laptop Status Lights and Indicators Battery Status Light AC adapter Battery Indicator light status solid white off solid amber off Computer state(s) on/standby/off/ hibernate on/standby/off/ hibernate on/standby on/standby/off/ hibernate off/hibernate Battery charge status charging fully charged low battery (
Setup Guide
Page 40
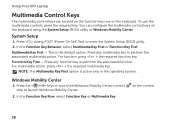
...function. Press the < > keys or touch the Windows Mobility Center control strip to enter the System Setup (BIOS) utility. 2. Press during POST (Power On Self Test) to launch Windows Mobility Center. 2. This is active only in the operating system. For multimedia action, press + the required multimedia... key. on the keyboard using the System Setup (BIOS) utility or Windows Mobility Center. Using Your XPS Laptop Multimedia Control Keys The multimedia control keys are located on the function key row on the keyboard. In the Function Key Row, ...
...function. Press the < > keys or touch the Windows Mobility Center control strip to enter the System Setup (BIOS) utility. 2. Press during POST (Power On Self Test) to launch Windows Mobility Center. 2. This is active only in the operating system. For multimedia action, press + the required multimedia... key. on the keyboard using the System Setup (BIOS) utility or Windows Mobility Center. Using Your XPS Laptop Multimedia Control Keys The multimedia control keys are located on the function key row on the keyboard. In the Function Key Row, ...
Setup Guide
Page 43
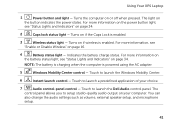
... "Status Lights and Indicators" on if the Caps Lock is enabled. 3 Wireless status light - Turns the computer on the button indicates the power states. Turns on page 34. For more information on the battery status light, see "Enable or Disable Wireless" on page 34. 2 Caps... lock status light - The control panel allows you to launch the Dell Audio control panel. Using Your XPS Laptop 1 Power button and light - Turns on your choice. 7 Audio control-panel control - Touch to setup studio-quality audio output on ...
... "Status Lights and Indicators" on if the Caps Lock is enabled. 3 Wireless status light - Turns the computer on the button indicates the power states. Turns on page 34. For more information on the battery status light, see "Enable or Disable Wireless" on page 34. 2 Caps... lock status light - The control panel allows you to launch the Dell Audio control panel. Using Your XPS Laptop 1 Power button and light - Turns on your choice. 7 Audio control-panel control - Touch to setup studio-quality audio output on ...

Setup Guide
Page 61
... the wireless router (see "Setting Up a Wireless Connection" on and connected to ensure it is lost - Try moving the computer closer to ensure it is powered on page 20). • Interference may be blocking or interrupting your wireless router. The network cable is loose or damaged. • Check the network cable...
... the wireless router (see "Setting Up a Wireless Connection" on and connected to ensure it is lost - Try moving the computer closer to ensure it is powered on page 20). • Interference may be blocking or interrupting your wireless router. The network cable is loose or damaged. • Check the network cable...

Setup Guide
Page 62
...is working by testing it with another device, such as a lamp. • Check the AC adapter cable connections. Also bypass power protection devices, power strips, and power extension cables to verify that the computer turns on properly. • Ensure that the electrical outlet is off - The computer is...on . If the AC adapter has a light, ensure that the power strip is not responding - The computer resumes normal operation if it back on. • If the problem persists, contact Dell (see "Contacting Dell" on . If the power light is solid white and the computer is turned on page 87)....
...is working by testing it with another device, such as a lamp. • Check the AC adapter cable connections. Also bypass power protection devices, power strips, and power extension cables to verify that the computer turns on properly. • Ensure that the electrical outlet is off - The computer is...on . If the AC adapter has a light, ensure that the power strip is not responding - The computer resumes normal operation if it back on. • If the problem persists, contact Dell (see "Contacting Dell" on . If the power light is solid white and the computer is turned on page 87)....
Setup Guide
Page 63
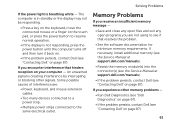
... display is not responding, press the power button until the computer turns off and then turn it back on. • If the problem persists, contact Dell (see "Contacting Dell" on your computer - Solving Problems If the power light is creating interference by interrupting or... blocking other memory problems - • Run Dell Diagnostics (see "Dell Diagnostics" on page 67). • If the problem persists, contact Dell (see "Contacting Dell" on ...
... display is not responding, press the power button until the computer turns off and then turn it back on. • If the problem persists, contact Dell (see "Contacting Dell" on your computer - Solving Problems If the power light is creating interference by interrupting or... blocking other memory problems - • Run Dell Diagnostics (see "Dell Diagnostics" on page 67). • If the problem persists, contact Dell (see "Contacting Dell" on ...

Setup Guide
Page 64
... by pressing a key on the CD. NOTE: Software usually includes installation instructions in an environment similar to get a response by moving your mouse, press the power button for an earlier Microsoft® Windows® operating system - Press simultaneously. 2. Solving Problems Lockups and Software Problems If the computer does not start up...
... by pressing a key on the CD. NOTE: Software usually includes installation instructions in an environment similar to get a response by moving your mouse, press the power button for an earlier Microsoft® Windows® operating system - Press simultaneously. 2. Solving Problems Lockups and Software Problems If the computer does not start up...
Setup Guide
Page 69
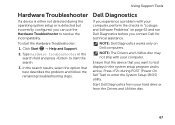
... follow the remaining troubleshooting steps. Press during the operating system setup or is detected but incorrectly configured, you contact Dell for technical assistance. Click Start → Help and Support. 2. Using Support Tools Hardware Troubleshooter If a device is either not ...detected during POST (Power On Self Test) to enter the System Setup (BIOS) utility. To start the search. 3. Start Dell Diagnostics from the Drivers and Utilities disc. 67 NOTE: The Drivers and Utilities disc may...
... follow the remaining troubleshooting steps. Press during the operating system setup or is detected but incorrectly configured, you contact Dell for technical assistance. Click Start → Help and Support. 2. Using Support Tools Hardware Troubleshooter If a device is either not ...detected during POST (Power On Self Test) to enter the System Setup (BIOS) utility. To start the search. 3. Start Dell Diagnostics from the Drivers and Utilities disc. 67 NOTE: The Drivers and Utilities disc may...

Setup Guide
Page 96
Input voltage 100-240 VAC/11-16 VDC Input current (maximum) Input frequency Output power 1.50 A/2.30 A/2.50 A 50-60 Hz 90 W/130 W 94 See the safety information that shipped with your computer. Specifications Battery 9-cell "smart" lithium ion: Height ...
Input voltage 100-240 VAC/11-16 VDC Input current (maximum) Input frequency Output power 1.50 A/2.30 A/2.50 A 50-60 Hz 90 W/130 W 94 See the safety information that shipped with your computer. Specifications Battery 9-cell "smart" lithium ion: Height ...

Setup Guide
Page 102
Index E email addresses for technical support 81 F finding more information 88 flick 46 FTP login, anonymous 81 H hard drive activity light 31 hardware problems diagnosing 67 Hardware Troubleshooter 67 help getting assistance and support 79 I Internet connection 20 100 ISP Internet Service Provider 20 M memory problems solving 61 mini-DisplayPort connector 29 Multimedia Control Keys 38 N network connection fixing 59 NVIDIA Optimus Technology 54 O Optical Drive Using 42 P power problems, solving 60
Index E email addresses for technical support 81 F finding more information 88 flick 46 FTP login, anonymous 81 H hard drive activity light 31 hardware problems diagnosing 67 Hardware Troubleshooter 67 help getting assistance and support 79 I Internet connection 20 100 ISP Internet Service Provider 20 M memory problems solving 61 mini-DisplayPort connector 29 Multimedia Control Keys 38 N network connection fixing 59 NVIDIA Optimus Technology 54 O Optical Drive Using 42 P power problems, solving 60


