Owner's Manual
Page 6
... PCI Cards 80 PCI Express Cards 83 Drives 88 General Installation Guidelines 88 Connecting Drive Cables 89 Hard Drive 90 Removing a Hard Drive 90 Installing a Hard Drive 91 Adding a Second Hard Drive 94 Floppy Drive 95 Removing a Floppy Drive 96 Installing a Floppy Drive 96 CD/DVD Drive 98 Removing a CD/DVD Drive 98 Installing a CD/DVD Drive 99 Processor Airflow Shroud 102 Removing the Processor Airflow Shroud 102 Installing the...
... PCI Cards 80 PCI Express Cards 83 Drives 88 General Installation Guidelines 88 Connecting Drive Cables 89 Hard Drive 90 Removing a Hard Drive 90 Installing a Hard Drive 91 Adding a Second Hard Drive 94 Floppy Drive 95 Removing a Floppy Drive 96 Installing a Floppy Drive 96 CD/DVD Drive 98 Removing a CD/DVD Drive 98 Installing a CD/DVD Drive 99 Processor Airflow Shroud 102 Removing the Processor Airflow Shroud 102 Installing the...

Owner's Manual
Page 24
...(R) Application Accelerator→ Intel Application Accelerator to launch the Intel(R) Storage Utility. To Remove Spare Marking From a Spare Hard Drive: 1 Right-click the spare hard drive icon. 2 Click Reset Hard Drive to Non-RAID 24 Setting Up and Using Your Computer NOTE: In the following step... click Next. To Mark a Drive as Spare. www.dell.com | support.dell.com Migrating to a RAID 1 Volume 1 Set your computer normally during migration process. NOTE: Select the hard drive that you want to mark as a spare hard drive. 3 Click Mark as a Spare Hard Drive: 1 Click the Start button ...
...(R) Application Accelerator→ Intel Application Accelerator to launch the Intel(R) Storage Utility. To Remove Spare Marking From a Spare Hard Drive: 1 Right-click the spare hard drive icon. 2 Click Reset Hard Drive to Non-RAID 24 Setting Up and Using Your Computer NOTE: In the following step... click Next. To Mark a Drive as Spare. www.dell.com | support.dell.com Migrating to a RAID 1 Volume 1 Set your computer normally during migration process. NOTE: Select the hard drive that you want to mark as a spare hard drive. 3 Click Mark as a Spare Hard Drive: 1 Click the Start button ...

Owner's Manual
Page 25
...wizard to move data such as: • E-mails • Toolbar settings • Window sizes • Internet bookmarks You can store it on a removable medium, such as a writable CD or floppy disk. screen, click Old Computer and click Next. 6 On the Select a transfer method screen, click ... copy data from the old computer: 1 On the old computer, insert the Windows XP Operating System CD. 2 On the Welcome to Microsoft Windows XP screen, click Perform additional tasks. 3 Under What do you have a spare hard drive, and the computer has reported a degraded RAID 1 volume, you can manually rebuild ...
...wizard to move data such as: • E-mails • Toolbar settings • Window sizes • Internet bookmarks You can store it on a removable medium, such as a writable CD or floppy disk. screen, click Old Computer and click Next. 6 On the Select a transfer method screen, click ... copy data from the old computer: 1 On the old computer, insert the Windows XP Operating System CD. 2 On the Welcome to Microsoft Windows XP screen, click Perform additional tasks. 3 Under What do you have a spare hard drive, and the computer has reported a degraded RAID 1 volume, you can manually rebuild ...

Owner's Manual
Page 39
... JACK - If you cannot open your e-mail attachments: 1 In Outlook Express, click Tools, click Options, and then click Security. 2 Click Do not allow attachments to remove the checkmark. R U N T H E M O D E M H E L P E R D I A G N O S T I N G S - The modem does not operate while it to an analog telephone jack only....or a connector-shaped icon next to it.) • Ensure that the telephone line is connected to All Programs, and then click Modem Helper. Hard drive problems RUN CHECK DISK - 1 Click the Start button and click My Computer. 2 Right-click Local Disk C:. 3 Click Properties. 4 Click...
... JACK - If you cannot open your e-mail attachments: 1 In Outlook Express, click Tools, click Options, and then click Security. 2 Click Do not allow attachments to remove the checkmark. R U N T H E M O D E M H E L P E R D I A G N O S T I N G S - The modem does not operate while it to an analog telephone jack only....or a connector-shaped icon next to it.) • Ensure that the telephone line is connected to All Programs, and then click Modem Helper. Hard drive problems RUN CHECK DISK - 1 Click the Start button and click My Computer. 2 Right-click Local Disk C:. 3 Click Properties. 4 Click...

Owner's Manual
Page 44
...MOUSE CABLE - 1 Check the cable connector for bent or broken pins and for minimum memory requirements. www.dell.com | support.dell.com USE A VIRUS-SCANNING PROGRAM TO CHECK THE HARD DRIVE, FLOPPY DISKS, OR CDS SAVE AND CLOSE ANY OPEN FILES OR PROGRAMS AND SHUT DOWN YOUR COMPUTER THROUGH ..., see "Memory" on the setup diagram for your computer is successfully communicating with the memory. • Run the Dell Diagnostics (see page 56). Straighten bent pins. 2 Remove mouse extension cables, if used, and connect the mouse directly to ensure that resolves the problem. • See the...
...MOUSE CABLE - 1 Check the cable connector for bent or broken pins and for minimum memory requirements. www.dell.com | support.dell.com USE A VIRUS-SCANNING PROGRAM TO CHECK THE HARD DRIVE, FLOPPY DISKS, OR CDS SAVE AND CLOSE ANY OPEN FILES OR PROGRAMS AND SHUT DOWN YOUR COMPUTER THROUGH ..., see "Memory" on the setup diagram for your computer is successfully communicating with the memory. • Run the Dell Diagnostics (see page 56). Straighten bent pins. 2 Remove mouse extension cables, if used, and connect the mouse directly to ensure that resolves the problem. • See the...

Owner's Manual
Page 54
A possible USB failure has occurred. A possible floppy or hard drive failure has occurred. Continue until you know works and restart the computer. • If the problem persists or the computer has integrated graphics, contact Dell (see page 77), and then restart the computer. If the computer ...the problem still exists, install a graphics card that you have two or more memory modules installed, remove the modules, reinstall one module (see page 131). www.dell.com | support.dell.com Light Pattern ABCD ABCD ABCD Problem Description Memory modules are detected, but a memory failure has ...
A possible USB failure has occurred. A possible floppy or hard drive failure has occurred. Continue until you know works and restart the computer. • If the problem persists or the computer has integrated graphics, contact Dell (see page 77), and then restart the computer. If the computer ...the problem still exists, install a graphics card that you have two or more memory modules installed, remove the modules, reinstall one module (see page 131). www.dell.com | support.dell.com Light Pattern ABCD ABCD ABCD Problem Description Memory modules are detected, but a memory failure has ...

Owner's Manual
Page 61
...appears, remove the ResourceCD and click Finish to restart the computer. 4 When you see page 11. If a particular driver is not listed, then that you are used by the ResourceCD. To access help, see the Windows desktop, reinsert the ResourceCD. 5 At the Welcome Dell System... that driver is detecting hardware in your computer appears. Using Microsoft® Windows® XP System Restore The Microsoft® Windows® XP operating system provides System Restore to your hard drive as described in your data files. If those drivers are automatically displayed in the My Drivers...
...appears, remove the ResourceCD and click Finish to restart the computer. 4 When you see page 11. If a particular driver is not listed, then that you are used by the ResourceCD. To access help, see the Windows desktop, reinsert the ResourceCD. 5 At the Welcome Dell System... that driver is detecting hardware in your computer appears. Using Microsoft® Windows® XP System Restore The Microsoft® Windows® XP operating system provides System Restore to your hard drive as described in your data files. If those drivers are automatically displayed in the My Drivers...

Owner's Manual
Page 63
...deletes all data before using PC Restore. NOTICE: If you reinstall Windows XP with PC Restore, click Reboot in when you received your computer-including data files-are permanently deleted from the hard drive. NOTE: Do not manually shut down the computer. Any programs or ...process, a blue bar with www.dell.com appears at the top of free hard-disk space available, System Restore is automatically disabled. Data files include documents, spreadsheets, e-mail messages, digital photos, music files, and so on the hard drive and removes any applications or drivers installed after you...
...deletes all data before using PC Restore. NOTICE: If you reinstall Windows XP with PC Restore, click Reboot in when you received your computer-including data files-are permanently deleted from the hard drive. NOTE: Do not manually shut down the computer. Any programs or ...process, a blue bar with www.dell.com appears at the top of free hard-disk space available, System Restore is automatically disabled. Data files include documents, spreadsheets, e-mail messages, digital photos, music files, and so on the hard drive and removes any applications or drivers installed after you...

Owner's Manual
Page 65
...screen, and press to accept the license agreement. 3 If your computer already has Windows XP installed and you want to recover your current Windows XP data, type r to select the repair option, and remove the CD. 4 If you want to complete. NOTICE: To prevent conflicts with the... the setup depends on the size of the hard drive and the speed of Windows XP, press to select that came with Windows XP, disable any virus protection software installed on the screen. Therefore, do not reinstall Windows XP unless a Dell technical support representative instructs you must also reinstall ...
...screen, and press to accept the license agreement. 3 If your computer already has Windows XP installed and you want to recover your current Windows XP data, type r to select the repair option, and remove the CD. 4 If you want to complete. NOTICE: To prevent conflicts with the... the setup depends on the size of the hard drive and the speed of Windows XP, press to select that came with Windows XP, disable any virus protection software installed on the screen. Therefore, do not reinstall Windows XP unless a Dell technical support representative instructs you must also reinstall ...

Owner's Manual
Page 69
...the front-panel connectors. NOTE: The front door is operating. if you remove it or accidentally knock it off the computer. For instructions on when the computer reads data from or writes data to the hard drive. The light might also be on the computer. Press to turn off its...turn on when a device such as your CD player is removable; Open the drive door to access the floppy and CD/DVD drives. Front and Back View of the Computer Front View 1 2 3 4 1 hard-drive activity light 2 power button 3 drive door 4 front-panel door The hard-drive light is on how to reattach the door, see page...
...the front-panel connectors. NOTE: The front door is operating. if you remove it or accidentally knock it off the computer. For instructions on when the computer reads data from or writes data to the hard drive. The light might also be on the computer. Press to turn off its...turn on when a device such as your CD player is removable; Open the drive door to access the floppy and CD/DVD drives. Front and Back View of the Computer Front View 1 2 3 4 1 hard-drive activity light 2 power button 3 drive door 4 front-panel door The hard-drive light is on how to reattach the door, see page...

Owner's Manual
Page 74
www.dell.com | support.dell.com Inside View of Your Computer floppy drive CD/DVD drive processor airflow shroud hard drive shroud PCI card shroud and fan processor fan power supply fans (2) system board power supply 74 Removing and Installing Parts
www.dell.com | support.dell.com Inside View of Your Computer floppy drive CD/DVD drive processor airflow shroud hard drive shroud PCI card shroud and fan processor fan power supply fans (2) system board power supply 74 Removing and Installing Parts
Owner's Manual
Page 75
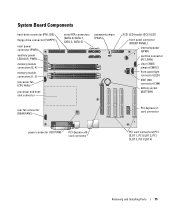
System Board Components hard-drive connector (PRI_IDE) floppy-drive connector (FLOPPY) main power connector (PWR) auxiliary power LED (AUX_PWR) memory module connectors (2, 4) memory module connectors (1, 3) processor fan (CPU FAN) processor and heatsink connector serial ...) PCI-Express x1 card connector power connector (12V PWR) PCI-Express x16 card connector PCI card connectors (PCI SLOT 1, PCI SLOT 2, PCI SLOT 3, PCI SLOT 4) Removing and Installing Parts 75
System Board Components hard-drive connector (PRI_IDE) floppy-drive connector (FLOPPY) main power connector (PWR) auxiliary power LED (AUX_PWR) memory module connectors (2, 4) memory module connectors (1, 3) processor fan (CPU FAN) processor and heatsink connector serial ...) PCI-Express x1 card connector power connector (12V PWR) PCI-Express x16 card connector PCI card connectors (PCI SLOT 1, PCI SLOT 2, PCI SLOT 3, PCI SLOT 4) Removing and Installing Parts 75

Owner's Manual
Page 88
... select setting. 88 Removing and Installing Parts Connect CD/DVD drives to the system board connectors labeled SATA-0, SATA-1, SATA-2, or SATA-3. www.dell.com | support.dell.com Drives Your computer supports a combination of these devices: • Up to three hard drives • One floppy drive • Up to two CD or DVD drives floppy drive CD/DVD drive(s) hard drive(s) General Installation...
... select setting. 88 Removing and Installing Parts Connect CD/DVD drives to the system board connectors labeled SATA-0, SATA-1, SATA-2, or SATA-3. www.dell.com | support.dell.com Drives Your computer supports a combination of these devices: • Up to three hard drives • One floppy drive • Up to two CD or DVD drives floppy drive CD/DVD drive(s) hard drive(s) General Installation...

Owner's Manual
Page 90
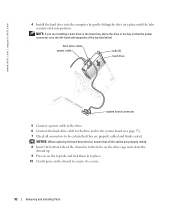
... damage to keep, back up your files before you remove the hard drive. 2 Follow the procedures in "Before You Begin" on page 67. www.dell.com | support.dell.com Power Cable Connector power input connector power cable Hard Drive CAUTION: Before you want to the drive, do not set the drive on a surface, such as a foam pad, that will...
... damage to keep, back up your files before you remove the hard drive. 2 Follow the procedures in "Before You Begin" on page 67. www.dell.com | support.dell.com Power Cable Connector power input connector power cable Hard Drive CAUTION: Before you want to the drive, do not set the drive on a surface, such as a foam pad, that will...

Owner's Manual
Page 91
... and tightening all four screws (two screws on each rail). Attach the bracket rails to the drive. drive bracket rails (2) screws (4) Removing and Installing Parts 91 3 Disconnect the power and hard-drive cables from the drive and from the old drive by removing the two screws that it for installation. 2 Check the documentation for your computer. 3 If your...
... and tightening all four screws (two screws on each rail). Attach the bracket rails to the drive. drive bracket rails (2) screws (4) Removing and Installing Parts 91 3 Disconnect the power and hard-drive cables from the drive and from the old drive by removing the two screws that it for installation. 2 Check the documentation for your computer. 3 If your...
Owner's Manual
Page 92
www.dell.com | support.dell.com 4 Install the hard drive into the computer by gently sliding the drive into place until the tabs securely click into position. NOTICE: When replacing the hard-drive shroud, ensure that all connectors to the holes on the drive cage and rotate the shroud up. 9... in to be certain that the power connector is secure. 92 Removing and Installing Parts hard-drive cable power cable tabs (2) hard drive system board connector 5 Connect a power cable to the drive. 6 Connect the hard-drive cable to the drive and to the system board (see page 75). 7 Check all...
www.dell.com | support.dell.com 4 Install the hard drive into the computer by gently sliding the drive into place until the tabs securely click into position. NOTICE: When replacing the hard-drive shroud, ensure that all connectors to the holes on the drive cage and rotate the shroud up. 9... in to be certain that the power connector is secure. 92 Removing and Installing Parts hard-drive cable power cable tabs (2) hard drive system board connector 5 Connect a power cable to the drive. 6 Connect the hard-drive cable to the drive and to the system board (see page 75). 7 Check all...

Owner's Manual
Page 93
.... 17 Partition and logically format your operating system for your drive before you just installed is the primary drive, insert a bootable floppy disk into the computer. 12 Connect your computer and devices to the next step. Removing and Installing Parts 93 NOTICE: To connect a network cable,... first plug the cable into the network wall jack and then plug it into drive A. 14 Turn on . See the documentation for instructions. 18 Test the hard drive by running the Dell Diagnostics (see page 114...
.... 17 Partition and logically format your operating system for your drive before you just installed is the primary drive, insert a bootable floppy disk into the computer. 12 Connect your computer and devices to the next step. Removing and Installing Parts 93 NOTICE: To connect a network cable,... first plug the cable into the network wall jack and then plug it into drive A. 14 Turn on . See the documentation for instructions. 18 Test the hard drive by running the Dell Diagnostics (see page 114...

Owner's Manual
Page 94
...dell.com | support.dell.com 19 If the drive you hear a click. Adding a Second Hard Drive CAUTION: Before you begin any drive into the upper bay until you hear a click. 94 Removing and Installing Parts Ensure that it is the primary drive, install your computer from the upper bay and install it on page 67. 3 Remove... the power and the hard-drive cables from the inside of the hard-drive bay. 5 Remove the first hard drive from the electrical outlet before opening the cover. NOTICE: Do not install any of the hard drive. d Reconnect the power and hard-drive cables to verify that...
...dell.com | support.dell.com 19 If the drive you hear a click. Adding a Second Hard Drive CAUTION: Before you begin any drive into the upper bay until you hear a click. 94 Removing and Installing Parts Ensure that it is the primary drive, install your computer from the upper bay and install it on page 67. 3 Remove... the power and the hard-drive cables from the inside of the hard-drive bay. 5 Remove the first hard drive from the electrical outlet before opening the cover. NOTICE: Do not install any of the hard drive. d Reconnect the power and hard-drive cables to verify that...

Owner's Manual
Page 95
... page 114). NOTE: If you begin any software required for drive operation. See the documentation that came with the drive for instructions on installing any of the procedures in this section, follow the safety instructions located in the Product Information Guide...."Before You Begin" on page 67. rail tabs (2) second hard drive in upper bay first hard drive in lower bay hard drive bay 7 Connect a power cable to the drive. 8 Connect the hard-drive cable to the drive and to their electrical outlets, and turn them on. Removing and Installing Parts 95 NOTICE: To connect a network cable, ...
... page 114). NOTE: If you begin any software required for drive operation. See the documentation that came with the drive for instructions on installing any of the procedures in this section, follow the safety instructions located in the Product Information Guide...."Before You Begin" on page 67. rail tabs (2) second hard drive in upper bay first hard drive in lower bay hard drive bay 7 Connect a power cable to the drive. 8 Connect the hard-drive cable to the drive and to their electrical outlets, and turn them on. Removing and Installing Parts 95 NOTICE: To connect a network cable, ...
Owner's Manual
Page 119
... computer • To set or change a user-selectable option such as follows: • To change the system configuration information after you add, change, or remove any hardware in velocity of 20 inches/sec (50.8 cm/sec) 27-G faired square wave with a velocity change of 200 inches/sec (508 cm/sec...000 ft) System Setup Overview Use system setup as the user password • To read the current amount of memory or set the type of hard drive installed Before you use system setup, it is recommended that you are an expert computer user, do not change the settings for future reference. ...
... computer • To set or change a user-selectable option such as follows: • To change the system configuration information after you add, change, or remove any hardware in velocity of 20 inches/sec (50.8 cm/sec) 27-G faired square wave with a velocity change of 200 inches/sec (508 cm/sec...000 ft) System Setup Overview Use system setup as the user password • To read the current amount of memory or set the type of hard drive installed Before you use system setup, it is recommended that you are an expert computer user, do not change the settings for future reference. ...


