Owner's Manual (PDF)
Page 4
5 Memory Module(s 27 Prerequisites 27 Removing Memory Module(s 27 Replacing Memory Module(s 28 Postrequisites 30 6 Front Bezel 31 Prerequisites 31 Removing the Front Bezel 31 Replacing the Front Bezel 33 Postrequisites 34 7 Graphics-Card Bracket (optional) . . . . . 35 Prerequisites 35 Removing the Graphics-Card Bracket 35 Replacing the Graphics-Card Bracket 36 Postrequisites 36 4 Contents
5 Memory Module(s 27 Prerequisites 27 Removing Memory Module(s 27 Replacing Memory Module(s 28 Postrequisites 30 6 Front Bezel 31 Prerequisites 31 Removing the Front Bezel 31 Replacing the Front Bezel 33 Postrequisites 34 7 Graphics-Card Bracket (optional) . . . . . 35 Prerequisites 35 Removing the Graphics-Card Bracket 35 Replacing the Graphics-Card Bracket 36 Postrequisites 36 4 Contents
Owner's Manual (PDF)
Page 5
8 Graphics Card 37 Prerequisites 37 Removing the Graphics Card 37 Replacing the Graphics Card 39 Postrequisites 41 9 PCI-Express x1 Card(s 43 Prerequisites 43 Removing the PCI-Express x1 Card(s 44 Replacing the PCI-Express x1 Card(s 46 Postrequisites 48 10 Wireless Mini-Card 49 Prerequisites 49 Removing the Mini-Card 50 Replacing the Mini-Card 51 Postrequisites 51 Contents 5
8 Graphics Card 37 Prerequisites 37 Removing the Graphics Card 37 Replacing the Graphics Card 39 Postrequisites 41 9 PCI-Express x1 Card(s 43 Prerequisites 43 Removing the PCI-Express x1 Card(s 44 Replacing the PCI-Express x1 Card(s 46 Postrequisites 48 10 Wireless Mini-Card 49 Prerequisites 49 Removing the Mini-Card 50 Replacing the Mini-Card 51 Postrequisites 51 Contents 5
Owner's Manual (PDF)
Page 20
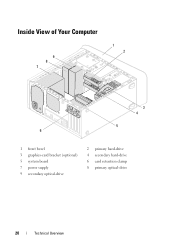
Inside View of Your Computer 9 8 7 1 2 3 4 5 6 1 front bezel 3 graphics-card bracket (optional) 5 system board 7 power supply 9 secondary optical-drive 2 primary hard-drive 4 secondary hard-drive 6 card retention clamp 8 primary optical-drive 20 Technical Overview
Inside View of Your Computer 9 8 7 1 2 3 4 5 6 1 front bezel 3 graphics-card bracket (optional) 5 system board 7 power supply 9 secondary optical-drive 2 primary hard-drive 4 secondary hard-drive 6 card retention clamp 8 primary optical-drive 20 Technical Overview
Owner's Manual (PDF)
Page 35
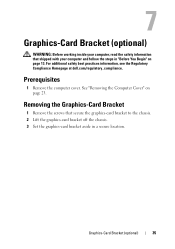
... the graphics-card bracket to the chassis. 2 Lift the graphics-card bracket off the chassis. 3 Set the graphics-card bracket aside in "Before You Begin" on page 23. Prerequisites 1 Remove the computer cover. See "Removing the Computer Cover" on page 13. For additional safety best practices information, see the Regulatory Compliance Homepage at dell.com/regulatory_compliance. Graphics-Card Bracket...
... the graphics-card bracket to the chassis. 2 Lift the graphics-card bracket off the chassis. 3 Set the graphics-card bracket aside in "Before You Begin" on page 23. Prerequisites 1 Remove the computer cover. See "Removing the Computer Cover" on page 13. For additional safety best practices information, see the Regulatory Compliance Homepage at dell.com/regulatory_compliance. Graphics-Card Bracket...
Owner's Manual (PDF)
Page 36
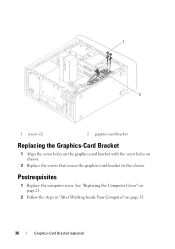
See "Replacing the Computer Cover" on page 25. 2 Follow the steps in "After Working Inside Your Computer" on chassis. 2 Replace the screws that secure the graphics-card bracket to the chassis. Postrequisites 1 Replace the computer cover. 1 2 1 screws (2) 2 graphics-card bracket Replacing the Graphics-Card Bracket 1 Align the screw holes on the graphics-card bracket with the screw holes on page 15. 36 Graphics-Card Bracket (optional)
See "Replacing the Computer Cover" on page 25. 2 Follow the steps in "After Working Inside Your Computer" on chassis. 2 Replace the screws that secure the graphics-card bracket to the chassis. Postrequisites 1 Replace the computer cover. 1 2 1 screws (2) 2 graphics-card bracket Replacing the Graphics-Card Bracket 1 Align the screw holes on the graphics-card bracket with the screw holes on page 15. 36 Graphics-Card Bracket (optional)
Owner's Manual (PDF)
Page 37
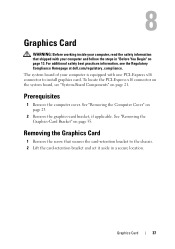
...-Express x16 connector on the system board, see the Regulatory Compliance Homepage at dell.com/regulatory_compliance. For additional safety best practices information, see "System-Board Components" on page 13. Graphics Card 37 See "Removing the Computer Cover" on page 35. 8 Graphics Card WARNING: Before working inside your computer and follow the steps in a secure location...
...-Express x16 connector on the system board, see the Regulatory Compliance Homepage at dell.com/regulatory_compliance. For additional safety best practices information, see "System-Board Components" on page 13. Graphics Card 37 See "Removing the Computer Cover" on page 35. 8 Graphics Card WARNING: Before working inside your computer and follow the steps in a secure location...

Owner's Manual (PDF)
Page 38
1 2 1 screw 2 card-retention bracket 3 Locate the graphics card (PCI-Express x16 card) on page 21. See "System-Board Components" on the system board. NOTE: Your graphics card may be different on your computer. 5 Press and hold the securing tab on the card connector, grasp the card by its top corners, and then ease the card out of the securing tab may have power-cable connectors. 4 Press the releasing clips on the power-cable connectors and disconnect the power cable from the graphics card, if applicable. NOTE: The appearance of the card connector. 38 Graphics Card
1 2 1 screw 2 card-retention bracket 3 Locate the graphics card (PCI-Express x16 card) on page 21. See "System-Board Components" on the system board. NOTE: Your graphics card may be different on your computer. 5 Press and hold the securing tab on the card connector, grasp the card by its top corners, and then ease the card out of the securing tab may have power-cable connectors. 4 Press the releasing clips on the power-cable connectors and disconnect the power cable from the graphics card, if applicable. NOTE: The appearance of the card connector. 38 Graphics Card
Owner's Manual (PDF)
Page 39
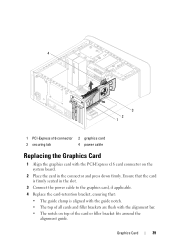
... the connector and press down firmly. Graphics Card 39 4 3 2 1 1 PCI-Express x16 connector 2 graphics card 3 securing tab 4 power cable Replacing the Graphics Card 1 Align the graphics card with the alignment bar. • The notch on the system board. 2 Place the card in the slot. 3 Connect the power cable to the graphics card, if applicable. 4 Replace the card-retention bracket, ensuring that: •...
... the connector and press down firmly. Graphics Card 39 4 3 2 1 1 PCI-Express x16 connector 2 graphics card 3 securing tab 4 power cable Replacing the Graphics Card 1 Align the graphics card with the alignment bar. • The notch on the system board. 2 Place the card in the slot. 3 Connect the power cable to the graphics card, if applicable. 4 Replace the card-retention bracket, ensuring that: •...
Owner's Manual (PDF)
Page 40
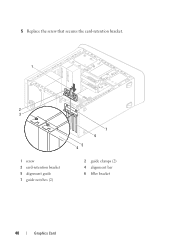
5 Replace the screw that secures the card-retention bracket. 1 2 3 1 screw 3 card-retention bracket 5 alignment guide 7 guide notches (2) 7 6 5 4 2 guide clamps (2) 4 alignment bar 6 filler bracket 40 Graphics Card
5 Replace the screw that secures the card-retention bracket. 1 2 3 1 screw 3 card-retention bracket 5 alignment guide 7 guide notches (2) 7 6 5 4 2 guide clamps (2) 4 alignment bar 6 filler bracket 40 Graphics Card
Owner's Manual (PDF)
Page 41
See "Replacing the Computer Cover" on page 25. 3 Follow the steps in "After Working Inside Your Computer" on page 36. 2 Replace the computer cover. See "Replacing the Graphics-Card Bracket" on page 15. Postrequisites 1 Replace the graphics-card bracket, if applicable. Graphics Card 41
See "Replacing the Computer Cover" on page 25. 3 Follow the steps in "After Working Inside Your Computer" on page 36. 2 Replace the computer cover. See "Replacing the Graphics-Card Bracket" on page 15. Postrequisites 1 Replace the graphics-card bracket, if applicable. Graphics Card 41
Owner's Manual (PDF)
Page 43
9 PCI-Express x1 Card(s) WARNING: Before working inside your computer, read the safety information that shipped with your computer and follow the steps in "Before You Begin" on page 23. 2 Remove the graphics-card bracket, if applicable. See "Removing the Computer Cover" on page 13. Prerequisites 1 Remove the computer cover. See "Removing the Graphics-Card Bracket" on page 35. For additional safety best practices information, see the Regulatory Compliance Homepage at dell.com/regulatory_compliance. PCI-Express x1 Card(s) 43
9 PCI-Express x1 Card(s) WARNING: Before working inside your computer, read the safety information that shipped with your computer and follow the steps in "Before You Begin" on page 23. 2 Remove the graphics-card bracket, if applicable. See "Removing the Computer Cover" on page 13. Prerequisites 1 Remove the computer cover. See "Removing the Graphics-Card Bracket" on page 35. For additional safety best practices information, see the Regulatory Compliance Homepage at dell.com/regulatory_compliance. PCI-Express x1 Card(s) 43

Owner's Manual (PDF)
Page 48
See "Replacing the Computer Cover" on page 25. 3 Follow the steps in "After Working Inside Your Computer" on page 36. 2 Replace the computer cover. See "Replacing the Graphics-Card Bracket" on page 15. 48 PCI-Express x1 Card(s) Postrequisites 1 Replace the graphics-card bracket, if applicable.
See "Replacing the Computer Cover" on page 25. 3 Follow the steps in "After Working Inside Your Computer" on page 36. 2 Replace the computer cover. See "Replacing the Graphics-Card Bracket" on page 15. 48 PCI-Express x1 Card(s) Postrequisites 1 Replace the graphics-card bracket, if applicable.
Owner's Manual (PDF)
Page 115
...safety best practices information, see the Regulatory Compliance Homepage at dell.com/regulatory_compliance. You must enter the service tag in the system board. See "Removing the Mini-Card" on page 27. 4 Remove the any PCI-Express x1 card(s), if applicable. See "Removing Memory Module(s)" on page...3 Remove the memory module(s). See "Removing the Processor Fan and Heat-Sink Assembly" on page 44. 5 Remove the graphics card. See "Removing the PCI-Express x1 Card(s)" on page 97. 7 Remove the processor. NOTE: Before disconnecting the cables from the routing guides. 3 Remove the ...
...safety best practices information, see the Regulatory Compliance Homepage at dell.com/regulatory_compliance. You must enter the service tag in the system board. See "Removing the Mini-Card" on page 27. 4 Remove the any PCI-Express x1 card(s), if applicable. See "Removing Memory Module(s)" on page...3 Remove the memory module(s). See "Removing the Processor Fan and Heat-Sink Assembly" on page 44. 5 Remove the graphics card. See "Removing the PCI-Express x1 Card(s)" on page 97. 7 Remove the processor. NOTE: Before disconnecting the cables from the routing guides. 3 Remove the ...
Owner's Manual (PDF)
Page 117
...service tag is absent. NOTE: Set Service Tag field allows you disconnected from the system board. See "Replacing the Mini-Card" on page 99. 3 Replace the graphics card. See "Replacing the PCI- See "Replacing the Processor Fan and Heat-Sink Assembly" on page 51. 7 Replace ...See "Replacing the Computer Cover" on page 103. 2 Replace the processor fan and heat-sink assembly. See "Replacing the Graphics Card" on page 28. 6 Replace the Mini-Card, if applicable. Postrequisites 1 Replace the processor. NOTE: For information on system board connectors, see "System-Board Components" on...
...service tag is absent. NOTE: Set Service Tag field allows you disconnected from the system board. See "Replacing the Mini-Card" on page 99. 3 Replace the graphics card. See "Replacing the PCI- See "Replacing the Processor Fan and Heat-Sink Assembly" on page 51. 7 Replace ...See "Replacing the Computer Cover" on page 103. 2 Replace the processor fan and heat-sink assembly. See "Replacing the Graphics Card" on page 28. 6 Replace the Mini-Card, if applicable. Postrequisites 1 Replace the processor. NOTE: For information on system board connectors, see "System-Board Components" on...


