Owner's Manual (PDF)
Page 14
... of the computer. Recommended Tools The procedures in this document may require the following tools: • Small Phillips screwdriver • Hex nut driver • Flash BIOS executable update program available at the back of the components inside your computer, ground yourself by touching an unpainted metal surface..., such as the metal at support.dell.com 14 Before you disconnect a cable, pull on its connector or on its pull-tab, not on the cable itself. While you...
... of the computer. Recommended Tools The procedures in this document may require the following tools: • Small Phillips screwdriver • Hex nut driver • Flash BIOS executable update program available at the back of the components inside your computer, ground yourself by touching an unpainted metal surface..., such as the metal at support.dell.com 14 Before you disconnect a cable, pull on its connector or on its pull-tab, not on the cable itself. While you...
Owner's Manual (PDF)
Page 23
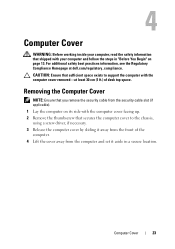
... up. 2 Remove the thumbscrew that secures the computer cover to support the computer with the computer cover removed-at dell.com/regulatory_compliance. CAUTION: Ensure that sufficient space exists to the chassis, using a screw driver, if necessary. 3 Release the computer cover by sliding it away from the computer and set it aside in...
... up. 2 Remove the thumbscrew that secures the computer cover to support the computer with the computer cover removed-at dell.com/regulatory_compliance. CAUTION: Ensure that sufficient space exists to the chassis, using a screw driver, if necessary. 3 Release the computer cover by sliding it away from the computer and set it aside in...
Owner's Manual (PDF)
Page 70
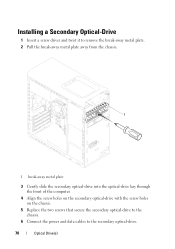
Installing a Secondary Optical-Drive 1 Insert a screw driver and twist it to remove the break-away metal plate. 2 Pull the break-away metal plate away from the chassis. 1 1 break-away metal plate 3 Gently slide the secondary optical-drive into the optical-drive bay through the front of the computer. 4 Align the screw holes on the secondary optical-drive with the screw holes on the chassis. 5 Replace the two screws that secure the secondary optical-drive to the chassis. 6 Connect the power and data cables to the secondary optical-drive. 70 Optical Drive(s)
Installing a Secondary Optical-Drive 1 Insert a screw driver and twist it to remove the break-away metal plate. 2 Pull the break-away metal plate away from the chassis. 1 1 break-away metal plate 3 Gently slide the secondary optical-drive into the optical-drive bay through the front of the computer. 4 Align the screw holes on the secondary optical-drive with the screw holes on the chassis. 5 Replace the two screws that secure the secondary optical-drive to the chassis. 6 Connect the power and data cables to the secondary optical-drive. 70 Optical Drive(s)

Owner's Manual (PDF)
Page 126
...and the operating system logo appears, continue to wait until you are booting from a USB device, connect the USB device to boot from the Drivers and Utilities disc. For example, if you see the Microsoft Windows desktop. When F12 Boot Options appears in the lower-right corner of the...Device - The Boot Device Menu appears, listing all available boot devices. 4 On the Boot Device Menu choose the device you are booting to run Dell Diagnostics from . The computer attempts to boot from the network. • CD/DVD/CD-RW Drive - The computer attempts to boot from the ...
...and the operating system logo appears, continue to wait until you are booting from a USB device, connect the USB device to boot from the Drivers and Utilities disc. For example, if you see the Microsoft Windows desktop. When F12 Boot Options appears in the lower-right corner of the...Device - The Boot Device Menu appears, listing all available boot devices. 4 On the Boot Device Menu choose the device you are booting to run Dell Diagnostics from . The computer attempts to boot from the network. • CD/DVD/CD-RW Drive - The computer attempts to boot from the ...


