Owner's Manual (PDF)
Page 2
... or their products. All rights reserved. and is subject to change without the written permission of your product. is a registered trademark owned by Dell under license. Notes, Cautions, and Warnings NOTE: A NOTE indicates important information that helps you how to avoid the problem. Reproduction of these...injury, or death. Microsoft®, Windows®, and the Windows start button logo are trademarks of Microsoft Corporation in this text: Dell™, the DELL logo, and XPS™ are either potential damage to hardware or loss of data, and tells you make better use of...
... or their products. All rights reserved. and is subject to change without the written permission of your product. is a registered trademark owned by Dell under license. Notes, Cautions, and Warnings NOTE: A NOTE indicates important information that helps you how to avoid the problem. Reproduction of these...injury, or death. Microsoft®, Windows®, and the Windows start button logo are trademarks of Microsoft Corporation in this text: Dell™, the DELL logo, and XPS™ are either potential damage to hardware or loss of data, and tells you make better use of...
Owner's Manual (PDF)
Page 3
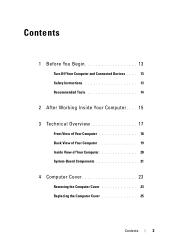
Contents 1 Before You Begin 13 Turn Off Your Computer and Connected Devices . . . . 13 Safety Instructions 13 Recommended Tools 14 2 After Working Inside Your Computer . . . . 15 3 Technical Overview 17 Front View of Your Computer 18 Back View of Your Computer 19 Inside View of Your Computer 20 System-Board Components 21 4 Computer Cover 23 Removing the Computer Cover 23 Replacing the Computer Cover 25 Contents 3
Contents 1 Before You Begin 13 Turn Off Your Computer and Connected Devices . . . . 13 Safety Instructions 13 Recommended Tools 14 2 After Working Inside Your Computer . . . . 15 3 Technical Overview 17 Front View of Your Computer 18 Back View of Your Computer 19 Inside View of Your Computer 20 System-Board Components 21 4 Computer Cover 23 Removing the Computer Cover 23 Replacing the Computer Cover 25 Contents 3
Owner's Manual (PDF)
Page 4
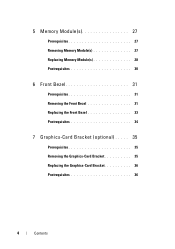
5 Memory Module(s 27 Prerequisites 27 Removing Memory Module(s 27 Replacing Memory Module(s 28 Postrequisites 30 6 Front Bezel 31 Prerequisites 31 Removing the Front Bezel 31 Replacing the Front Bezel 33 Postrequisites 34 7 Graphics-Card Bracket (optional) . . . . . 35 Prerequisites 35 Removing the Graphics-Card Bracket 35 Replacing the Graphics-Card Bracket 36 Postrequisites 36 4 Contents
5 Memory Module(s 27 Prerequisites 27 Removing Memory Module(s 27 Replacing Memory Module(s 28 Postrequisites 30 6 Front Bezel 31 Prerequisites 31 Removing the Front Bezel 31 Replacing the Front Bezel 33 Postrequisites 34 7 Graphics-Card Bracket (optional) . . . . . 35 Prerequisites 35 Removing the Graphics-Card Bracket 35 Replacing the Graphics-Card Bracket 36 Postrequisites 36 4 Contents
Owner's Manual (PDF)
Page 5
8 Graphics Card 37 Prerequisites 37 Removing the Graphics Card 37 Replacing the Graphics Card 39 Postrequisites 41 9 PCI-Express x1 Card(s 43 Prerequisites 43 Removing the PCI-Express x1 Card(s 44 Replacing the PCI-Express x1 Card(s 46 Postrequisites 48 10 Wireless Mini-Card 49 Prerequisites 49 Removing the Mini-Card 50 Replacing the Mini-Card 51 Postrequisites 51 Contents 5
8 Graphics Card 37 Prerequisites 37 Removing the Graphics Card 37 Replacing the Graphics Card 39 Postrequisites 41 9 PCI-Express x1 Card(s 43 Prerequisites 43 Removing the PCI-Express x1 Card(s 44 Replacing the PCI-Express x1 Card(s 46 Postrequisites 48 10 Wireless Mini-Card 49 Prerequisites 49 Removing the Mini-Card 50 Replacing the Mini-Card 51 Postrequisites 51 Contents 5
Owner's Manual (PDF)
Page 6
11 Mini-Card Antennas 53 Prerequisites 53 Removing the Mini-Card Antennas 53 Replacing the Mini-Card Antennas 55 Postrequisites 55 12 mSATA Drive 57 Prerequisites 57 Removing the mSATA Drive 57 Replacing the mSATA Drive 58 Postrequisites 59 13 Hard Drive(s 61 Prerequisites 61 Removing the Primary Hard-Drive 61 Replacing the Primary Hard-Drive 62 Postrequisites 62 Prerequisites 63 Removing the Hard Drive Cage 63 Replacing the Hard Drive Cage 64 Postrequisites 65 Prerequisites 65 6 Contents
11 Mini-Card Antennas 53 Prerequisites 53 Removing the Mini-Card Antennas 53 Replacing the Mini-Card Antennas 55 Postrequisites 55 12 mSATA Drive 57 Prerequisites 57 Removing the mSATA Drive 57 Replacing the mSATA Drive 58 Postrequisites 59 13 Hard Drive(s 61 Prerequisites 61 Removing the Primary Hard-Drive 61 Replacing the Primary Hard-Drive 62 Postrequisites 62 Prerequisites 63 Removing the Hard Drive Cage 63 Replacing the Hard Drive Cage 64 Postrequisites 65 Prerequisites 65 6 Contents
Owner's Manual (PDF)
Page 7
Removing the Secondary Hard-Drive 65 Replacing the Secondary Hard-Drive 66 Postrequisites 66 14 Optical Drive(s 67 Prerequisites 67 Removing the Optical Drive 67 Replacing the Optical Drive 69 Postrequisites 69 Secondary Optical-Drive 69 Prerequisites 69 Installing a Secondary Optical-Drive 70 Postrequisites 71 15 Media-Card Reader 73 Prerequisites 73 Removing the Media-Card Reader 74 Replacing the Media-Card Reader 75 Postrequisites 75 Contents 7
Removing the Secondary Hard-Drive 65 Replacing the Secondary Hard-Drive 66 Postrequisites 66 14 Optical Drive(s 67 Prerequisites 67 Removing the Optical Drive 67 Replacing the Optical Drive 69 Postrequisites 69 Secondary Optical-Drive 69 Prerequisites 69 Installing a Secondary Optical-Drive 70 Postrequisites 71 15 Media-Card Reader 73 Prerequisites 73 Removing the Media-Card Reader 74 Replacing the Media-Card Reader 75 Postrequisites 75 Contents 7
Owner's Manual (PDF)
Page 8
16 Top Cover 77 Prerequisites 77 Removing the Top Cover 77 Replacing the Top Cover 78 Postrequisites 79 17 Top I/O Panel 81 Prerequisites 81 Removing the Top I/O Panel 81 Replacing the Top I/O Panel 83 Postrequisites 83 18 Front USB Panel 85 Prerequisites 85 Removing the Front USB Panel 85 Replacing the Front USB Panel 86 Postrequisites 87 8 Contents
16 Top Cover 77 Prerequisites 77 Removing the Top Cover 77 Replacing the Top Cover 78 Postrequisites 79 17 Top I/O Panel 81 Prerequisites 81 Removing the Top I/O Panel 81 Replacing the Top I/O Panel 83 Postrequisites 83 18 Front USB Panel 85 Prerequisites 85 Removing the Front USB Panel 85 Replacing the Front USB Panel 86 Postrequisites 87 8 Contents
Owner's Manual (PDF)
Page 9
19 Power Button Module 89 Prerequisites 89 Removing the Power Button Module 90 Replacing the Power Button Module 91 Postrequisites 91 20 Chassis Fan 93 Prerequisites 93 Removing the Chassis Fan 94 Replacing the Chassis Fan 95 Postrequisites 95 21 Processor Fan and Heat-Sink Assembly . 97 Prerequisites 97 Removing the Processor Fan and Heat-Sink Assembly. 97 Replacing the Processor Fan and Heat-Sink Assembly 99 Postrequisites 99 Contents 9
19 Power Button Module 89 Prerequisites 89 Removing the Power Button Module 90 Replacing the Power Button Module 91 Postrequisites 91 20 Chassis Fan 93 Prerequisites 93 Removing the Chassis Fan 94 Replacing the Chassis Fan 95 Postrequisites 95 21 Processor Fan and Heat-Sink Assembly . 97 Prerequisites 97 Removing the Processor Fan and Heat-Sink Assembly. 97 Replacing the Processor Fan and Heat-Sink Assembly 99 Postrequisites 99 Contents 9

Owner's Manual (PDF)
Page 10
22 Processor 101 Prerequisites 101 Removing the Processor 102 Replacing the Processor 103 Postrequisites 106 23 Coin-Cell Battery 107 Prerequisites 107 Removing the Coin-Cell Battery 107 Replacing the Coin-Cell Battery 108 Postrequisites 109 24 Power-Supply Unit 111 Prerequisites 111 Removing the Power-Supply Unit 111 Replacing the Power-Supply Unit 112 Postrequisites 113 10 Contents
22 Processor 101 Prerequisites 101 Removing the Processor 102 Replacing the Processor 103 Postrequisites 106 23 Coin-Cell Battery 107 Prerequisites 107 Removing the Coin-Cell Battery 107 Replacing the Coin-Cell Battery 108 Postrequisites 109 24 Power-Supply Unit 111 Prerequisites 111 Removing the Power-Supply Unit 111 Replacing the Power-Supply Unit 112 Postrequisites 113 10 Contents
Owner's Manual (PDF)
Page 13
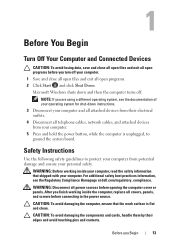
... attached devices from their edges and avoid touching pins and contacts. NOTE: If you are using a different operating system, see the Regulatory Compliance Homepage at dell.com/regulatory_compliance. For additional safety best practices information, see the documentation of your computer. 5 Press and hold the power button, while the computer is flat...
... attached devices from their edges and avoid touching pins and contacts. NOTE: If you are using a different operating system, see the Regulatory Compliance Homepage at dell.com/regulatory_compliance. For additional safety best practices information, see the documentation of your computer. 5 Press and hold the power button, while the computer is flat...
Owner's Manual (PDF)
Page 14
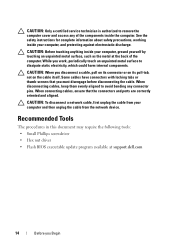
CAUTION: Before touching anything inside your computer, ground yourself by touching an unpainted metal surface, such as the metal at support.dell.com 14 Before you work, periodically touch an unpainted metal surface to dissipate static electricity, which could harm internal components. When disconnecting cables, keep them ...
CAUTION: Before touching anything inside your computer, ground yourself by touching an unpainted metal surface, such as the metal at support.dell.com 14 Before you work, periodically touch an unpainted metal surface to dissipate static electricity, which could harm internal components. When disconnecting cables, keep them ...
Owner's Manual (PDF)
Page 15
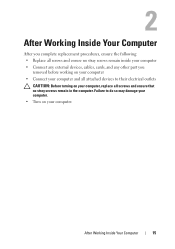
2 After Working Inside Your Computer After you complete replacement procedures, ensure the following: • Replace all screws and ensure no stray screws remain in the computer. Failure to their electrical outlets CAUTION: Before turning on your computer, replace all attached devices to do so may damage your computer. • Turn on your computer • Connect your computer and all screws and ensure that no stray screws remain inside your computer • Connect any external devices, cables, cards, and any other part you removed before working on your computer. After Working ...
2 After Working Inside Your Computer After you complete replacement procedures, ensure the following: • Replace all screws and ensure no stray screws remain in the computer. Failure to their electrical outlets CAUTION: Before turning on your computer, replace all attached devices to do so may damage your computer. • Turn on your computer • Connect your computer and all screws and ensure that no stray screws remain inside your computer • Connect any external devices, cables, cards, and any other part you removed before working on your computer. After Working ...
Owner's Manual (PDF)
Page 17
3 Technical Overview WARNING: Before working inside your computer, read the safety information that shipped with your computer and follow the steps in "Before You Begin" on page 13. Technical Overview 17 For additional safety best practices information, see the Regulatory Compliance Homepage at dell.com/regulatory_compliance.
3 Technical Overview WARNING: Before working inside your computer, read the safety information that shipped with your computer and follow the steps in "Before You Begin" on page 13. Technical Overview 17 For additional safety best practices information, see the Regulatory Compliance Homepage at dell.com/regulatory_compliance.

Owner's Manual (PDF)
Page 18
Front View of Your Computer 1 2 3 5 1 4 11 10 9 8 7 6 18 Technical Overview
Front View of Your Computer 1 2 3 5 1 4 11 10 9 8 7 6 18 Technical Overview
Owner's Manual (PDF)
Page 19
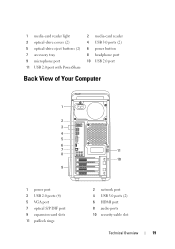
1 media-card reader light 3 optical-drive covers (2) 5 optical-drive eject buttons (2) 7 accessory tray 9 microphone port 11 USB 2.0 port with PowerShare 2 media-card reader 4 USB 3.0 ports (2) 6 power button 8 headphone port 10 USB 2.0 port Back View of Your Computer 1 2 3 4 5 6 7 8 9 1 power port 3 USB 2.0 ports (4) 5 VGA port 7 optical S/P DIF port 9 expansion-card slots 11 padlock rings 11 10 2 network port 4 USB 3.0 ports (2) 6 HDMI port 8 audio ports 10 security-cable slot Technical Overview 19
1 media-card reader light 3 optical-drive covers (2) 5 optical-drive eject buttons (2) 7 accessory tray 9 microphone port 11 USB 2.0 port with PowerShare 2 media-card reader 4 USB 3.0 ports (2) 6 power button 8 headphone port 10 USB 2.0 port Back View of Your Computer 1 2 3 4 5 6 7 8 9 1 power port 3 USB 2.0 ports (4) 5 VGA port 7 optical S/P DIF port 9 expansion-card slots 11 padlock rings 11 10 2 network port 4 USB 3.0 ports (2) 6 HDMI port 8 audio ports 10 security-cable slot Technical Overview 19
Owner's Manual (PDF)
Page 20
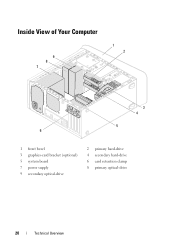
Inside View of Your Computer 9 8 7 1 2 3 4 5 6 1 front bezel 3 graphics-card bracket (optional) 5 system board 7 power supply 9 secondary optical-drive 2 primary hard-drive 4 secondary hard-drive 6 card retention clamp 8 primary optical-drive 20 Technical Overview
Inside View of Your Computer 9 8 7 1 2 3 4 5 6 1 front bezel 3 graphics-card bracket (optional) 5 system board 7 power supply 9 secondary optical-drive 2 primary hard-drive 4 secondary hard-drive 6 card retention clamp 8 primary optical-drive 20 Technical Overview
Owner's Manual (PDF)
Page 23
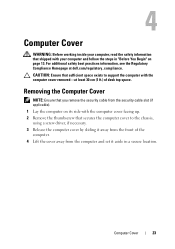
... the safety information that shipped with your computer and follow the steps in "Before You Begin" on its side with the computer cover removed-at dell.com/regulatory_compliance. Removing the Computer Cover NOTE: Ensure that you remove the security cable from the computer and set it aside in a secure location...
... the safety information that shipped with your computer and follow the steps in "Before You Begin" on its side with the computer cover removed-at dell.com/regulatory_compliance. Removing the Computer Cover NOTE: Ensure that you remove the security cable from the computer and set it aside in a secure location...

Owner's Manual (PDF)
Page 24
1 2 1 thumbscrew 2 computer cover 24 Computer Cover
1 2 1 thumbscrew 2 computer cover 24 Computer Cover
Owner's Manual (PDF)
Page 25
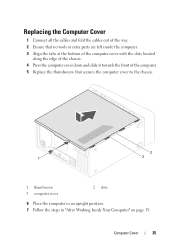
Replacing the Computer Cover 1 Connect all the cables and fold the cables out of the way. 2 Ensure that no tools or extra parts are left inside the computer. 3 Align the tabs at the bottom of the computer cover with the slots located along the edge of the chassis. 4 Press the computer cover down and slide it towards the front of the computer. 5 Replace the thumbscrew that secures the computer cover to the chassis. 3 1 2 1 thumbscrew 3 computer cover 2 slots 6 Place the computer in an upright position. 7 Follow the steps in "After Working Inside Your Computer" on page 15. Computer ...
Replacing the Computer Cover 1 Connect all the cables and fold the cables out of the way. 2 Ensure that no tools or extra parts are left inside the computer. 3 Align the tabs at the bottom of the computer cover with the slots located along the edge of the chassis. 4 Press the computer cover down and slide it towards the front of the computer. 5 Replace the thumbscrew that secures the computer cover to the chassis. 3 1 2 1 thumbscrew 3 computer cover 2 slots 6 Place the computer in an upright position. 7 Follow the steps in "After Working Inside Your Computer" on page 15. Computer ...

Owner's Manual (PDF)
Page 26
26 Computer Cover
26 Computer Cover
