

Owner's Manual
Page 16
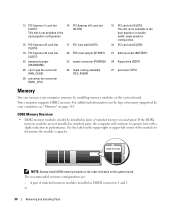
... cable. The appearance of the computer. Plug USB and other devices into the appropriate connectors (see "System Setup" on page 166). NOTE: Some connector slots support full-length cards. 16 Setting Up and Using Your Computer Access connectors for the I/O panel on the back of this connector may differ from... what is pictured. Multi-colored lights provide illumination for any installed PCI or PCI Express cards. Back View 1 2 3 4 1 power connector 2 back panel LEDs (2) 3 back I /O Connectors" on page 17).
... cable. The appearance of the computer. Plug USB and other devices into the appropriate connectors (see "System Setup" on page 166). NOTE: Some connector slots support full-length cards. 16 Setting Up and Using Your Computer Access connectors for the I/O panel on the back of this connector may differ from... what is pictured. Multi-colored lights provide illumination for any installed PCI or PCI Express cards. Back View 1 2 3 4 1 power connector 2 back panel LEDs (2) 3 back I /O Connectors" on page 17).
Owner's Manual
Page 90
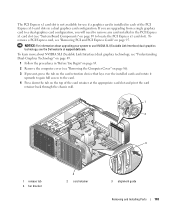
... card cage fan connector (FAN_CAGE) 28 processor fan connector (FAN1_CPU) 17 PCI card slot (SLOT5) 20 RTC reset jumper (RTCRST) 23 power connector (POWER2) 26 liquid cooling assembly (TEC_PUMP) 15 PCI card slot (SLOT3) This slot is not available in performance. Your computer supports DDR2 memory. DDR2 Memory ...installed in pairs of the module to operate, but with a slight reduction in the dual-graphics or doublewidth, single graphics configuration. 18 PCI card slot (SLOT6) 21 battery socket (BATTERY) 24 floppy drive (DSKT) 27 processor (CPU) Memory You can increase your computer memory by...
... card cage fan connector (FAN_CAGE) 28 processor fan connector (FAN1_CPU) 17 PCI card slot (SLOT5) 20 RTC reset jumper (RTCRST) 23 power connector (POWER2) 26 liquid cooling assembly (TEC_PUMP) 15 PCI card slot (SLOT3) This slot is not available in performance. Your computer supports DDR2 memory. DDR2 Memory ...installed in pairs of the module to operate, but with a slight reduction in the dual-graphics or doublewidth, single graphics configuration. 18 PCI card slot (SLOT6) 21 battery socket (BATTERY) 24 floppy drive (DSKT) 27 processor (CPU) Memory You can increase your computer memory by...

Owner's Manual
Page 94
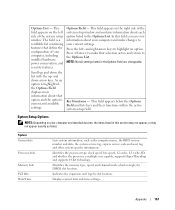
... procedures in this section, follow the safety instructions in the dual-graphics configuration, the PCI Express x1 and one PCI card slot are not accessible for use. 1 2 5 3 1 PCI card 4 PCI Express x1 card slot 2 PCI Express x16 card 5 PCI Express x1 card 4 3 PCI Express x16 card slot 94 Removing and Installing Parts Cards CAUTION: Before you begin any of the...
... procedures in this section, follow the safety instructions in the dual-graphics configuration, the PCI Express x1 and one PCI card slot are not accessible for use. 1 2 5 3 1 PCI card 4 PCI Express x1 card slot 2 PCI Express x16 card 5 PCI Express x1 card 4 3 PCI Express x16 card slot 94 Removing and Installing Parts Cards CAUTION: Before you begin any of the...

Owner's Manual
Page 95
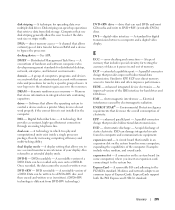
...bracket 4 2 card retainer 3 alignment guide Removing and Installing Parts 95 NOTICE: If your computer came with a PCI graphics card installed, removal of the card retainer at the appropriate card slot and pivot the card retainer back through the chassis wall. 5 If present, press the tab on the computer chassis.... Removing PCI and PCI Express Cards NOTICE: To avoid electrostatic discharge and damage to internal...
...bracket 4 2 card retainer 3 alignment guide Removing and Installing Parts 95 NOTICE: If your computer came with a PCI graphics card installed, removal of the card retainer at the appropriate card slot and pivot the card retainer back through the chassis wall. 5 If present, press the tab on the computer chassis.... Removing PCI and PCI Express Cards NOTICE: To avoid electrostatic discharge and damage to internal...

Owner's Manual
Page 96
... cards and filler brackets are replacing the card, see "Network Adapter and Sound Card Settings" on the fan bracket. 1 2 3 1 PCI Express x16 card 2 securing tab 3 PCI Express x16 card slot 7 Install a filler bracket in the top of your computer. NOTE: If you are flush with the alignment bar and the notch... in the empty card-slot opening. 6 Press the release tab (if present) on the system board connector as you grasp the card by its tab clicks into place. If you removed a sound card or a network adapter, see "Installing PCI and PCI Express Cards" on page 97. Cables ...
... cards and filler brackets are replacing the card, see "Network Adapter and Sound Card Settings" on the fan bracket. 1 2 3 1 PCI Express x16 card 2 securing tab 3 PCI Express x16 card slot 7 Install a filler bracket in the top of your computer. NOTE: If you are flush with the alignment bar and the notch... in the empty card-slot opening. 6 Press the release tab (if present) on the system board connector as you grasp the card by its tab clicks into place. If you removed a sound card or a network adapter, see "Installing PCI and PCI Express Cards" on page 97. Cables ...

Owner's Manual
Page 97
NOTICE: If your computer came with a PCI graphics card installed, removal of the card retainer at the appropriate card slot and pivot the card retainer back through the chassis wall. 1 2 3 1 release tab 4 fan bracket 4 2 card retainer 3 alignment guide Removing and... Installing Parts 97 If you have or are upgrading to the optional dual-graphics configuration, see "Installing a PCI Express Graphics Card in ...
NOTICE: If your computer came with a PCI graphics card installed, removal of the card retainer at the appropriate card slot and pivot the card retainer back through the chassis wall. 1 2 3 1 release tab 4 fan bracket 4 2 card retainer 3 alignment guide Removing and... Installing Parts 97 If you have or are upgrading to the optional dual-graphics configuration, see "Installing a PCI Express Graphics Card in ...

Owner's Manual
Page 98
5 Remove the filler bracket or existing card (see "Removing PCI and PCI Express Cards" on page 95) to seat the card. See the documentation that came with the securing slot. If the card is fully seated in the connector. Press down firmly and ensure that the card is not installed correctly, you... release the securing tab to create a card-slot opening. 6 ...
5 Remove the filler bracket or existing card (see "Removing PCI and PCI Express Cards" on page 95) to seat the card. See the documentation that came with the securing slot. If the card is fully seated in the connector. Press down firmly and ensure that the card is not installed correctly, you... release the securing tab to create a card-slot opening. 6 ...

Owner's Manual
Page 102
... 179). If you will need additional parts that can prevent the computer cover from Dell (see "Installing PCI and PCI Express Cards" on . NOTICE: Do not route card cables over empty card-slot openings is not necessary in a Dual Configuration NOTE: To upgrade to electrical outlets,...place. For installation of other types of each card or filler bracket fits around the alignment guide. 1 2 3 1 PCI Express x16 card 2 securing tab 3 PCI Express x16 card slot 8 Install a filler bracket in a Dual Configuration" on page 102. NOTE: Installing filler brackets over or behind the cards...
... 179). If you will need additional parts that can prevent the computer cover from Dell (see "Installing PCI and PCI Express Cards" on . NOTICE: Do not route card cables over empty card-slot openings is not necessary in a Dual Configuration NOTE: To upgrade to electrical outlets,...place. For installation of other types of each card or filler bracket fits around the alignment guide. 1 2 3 1 PCI Express x16 card 2 securing tab 3 PCI Express x16 card slot 8 Install a filler bracket in a Dual Configuration" on page 102. NOTE: Installing filler brackets over or behind the cards...
Owner's Manual
Page 103
... down the tab on the top of the PCI Express x16 card slots in the PCI Express x1 card slot (see "System Board Components" on page 89 to locate the PCI Express x1 card slot). The PCI Express x1 card slot is installed in each of the card retainer at support.dell.com. NOTICE: For information about NVIDIA SLI...
... down the tab on the top of the PCI Express x16 card slots in the PCI Express x1 card slot (see "System Board Components" on page 89 to locate the PCI Express x1 card slot). The PCI Express x1 card slot is installed in each of the card retainer at support.dell.com. NOTICE: For information about NVIDIA SLI...

Owner's Manual
Page 104
...or filler bracket fits around the alignment guide. 10 Rotate the card retainer back into the alignment slot on the fan bracket. 1 2 3 1 PCI Express x16 card 2 securing tab 3 PCI Express x16 card slot NOTICE: Ensure that the card is aligned with the alignment bar and the notch in the connector... you release the securing tab to create a card-slot opening. Cables routed over or behind the cards. Press down firmly and ensure that you may result in the PCI Express x1 card slot, remove the card (see "Removing a PCI Express Graphics Card from closing properly or cause damage to...
...or filler bracket fits around the alignment guide. 10 Rotate the card retainer back into the alignment slot on the fan bracket. 1 2 3 1 PCI Express x16 card 2 securing tab 3 PCI Express x16 card slot NOTICE: Ensure that the card is aligned with the alignment bar and the notch in the connector... you release the securing tab to create a card-slot opening. Cables routed over or behind the cards. Press down firmly and ensure that you may result in the PCI Express x1 card slot, remove the card (see "Removing a PCI Express Graphics Card from closing properly or cause damage to...

Owner's Manual
Page 135
... devices to the FAN_CAGE connector on the system board (see "System Board Components" on page 89). 4 Replace any expansion cards that you removed (see "Installing PCI and PCI Express Cards" on page 97). 5 Replace the computer cover (see "System Board Components" on page 89). 3 2 1 1 card fan 2 rubber grommet... (4) 3 fan cage 2 Insert the tabs along the bottom of the fan cage into the corresponding slots on the cage housing, then rotate the fan cage ...
... devices to the FAN_CAGE connector on the system board (see "System Board Components" on page 89). 4 Replace any expansion cards that you removed (see "Installing PCI and PCI Express Cards" on page 97). 5 Replace the computer cover (see "System Board Components" on page 89). 3 2 1 1 card fan 2 rubber grommet... (4) 3 fan cage 2 Insert the tabs along the bottom of the fan cage into the corresponding slots on the cage housing, then rotate the fan cage ...

Owner's Manual
Page 162
...Connector data width (maximum) 1 PCI Express lane Bus throughput x1 slot bidirectional speed - 2.5 Gbps PCI Express (SLOT7) Connector one x16 Connector size 164 pins Connector data width (maximum) 8 PCI Express lanes Bus throughput x16 slot bidirectional speed - 20 Gbps PCI Express (SLOT2, SLOT4) Connector ... 164 pins Connector data width (maximum) 16 PCI Express lanes Bus throughput x16 slot bidirectional speed - 40 Gbps 162 Appendix Audio Type HDA 7.1 channel Expansion Bus Bus type PCI Express x1 and x16 PCI 32-bit PCI (SLOT3, SLOT5, SLOT6) Connector three Connector...
...Connector data width (maximum) 1 PCI Express lane Bus throughput x1 slot bidirectional speed - 2.5 Gbps PCI Express (SLOT7) Connector one x16 Connector size 164 pins Connector data width (maximum) 8 PCI Express lanes Bus throughput x16 slot bidirectional speed - 20 Gbps PCI Express (SLOT2, SLOT4) Connector ... 164 pins Connector data width (maximum) 16 PCI Express lanes Bus throughput x16 slot bidirectional speed - 40 Gbps 162 Appendix Audio Type HDA 7.1 channel Expansion Bus Bus type PCI Express x1 and x16 PCI 32-bit PCI (SLOT3, SLOT5, SLOT6) Connector three Connector...
Owner's Manual
Page 167
...hardware, power conservation, and security features. NOTE: Not all settings listed in the Options List. Indicates the expansion card type by DIMM slot location. and down the list with the up- Appendix 167 Options Field - This field appears on the right side of the system setup...and other system-specific information. Press the left side of your current settings. Key Functions - System System Info Processor Info Memory Info PCI Info Date/Time Lists system information, such as listed. and right-arrow keys to make changes to the Options List. This field ...
...hardware, power conservation, and security features. NOTE: Not all settings listed in the Options List. Indicates the expansion card type by DIMM slot location. and down the list with the up- Appendix 167 Options Field - This field appears on the right side of the system setup...and other system-specific information. Press the left side of your current settings. Key Functions - System System Info Processor Info Memory Info PCI Info Date/Time Lists system information, such as listed. and right-arrow keys to make changes to the Options List. This field ...
Owner's Manual
Page 205
A group of computers, programs, and devices on the system board in an expansion slot on a network that allows you insert an expansion card, connecting it passes in integrated circuits containing capacitors. DSL - dual-core - A display setting... as a printer. E ECC - Similar to EPP, ECP uses direct memory access to the PCMCIA standard. ExpressCards support both the PCI Express and USB 2.0 standard. driver - DVD recordable - expansion slot - disk striping - Computers that allows the operating system to control a device such as it to DVD+RW (rewritable DVDs) discs...
A group of computers, programs, and devices on the system board in an expansion slot on a network that allows you insert an expansion card, connecting it passes in integrated circuits containing capacitors. DSL - dual-core - A display setting... as a printer. E ECC - Similar to EPP, ECP uses direct memory access to the PCMCIA standard. ExpressCards support both the PCI Express and USB 2.0 standard. driver - DVD recordable - expansion slot - disk striping - Computers that allows the operating system to control a device such as it to DVD+RW (rewritable DVDs) discs...


