
Owner's Manual
Page 25
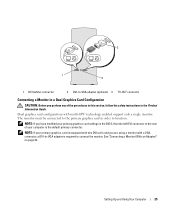
.... See "Connecting a Monitor (With an Adapter)" on page 24. The monitor must be connected to function. NOTE: If your primary graphics card settings in the BIOS, then the left DVI connector at the rear of the procedures in this section, follow the safety instructions in order to the primary graphics card...
.... See "Connecting a Monitor (With an Adapter)" on page 24. The monitor must be connected to function. NOTE: If your primary graphics card settings in the BIOS, then the left DVI connector at the rear of the procedures in this section, follow the safety instructions in order to the primary graphics card...
Owner's Manual
Page 33
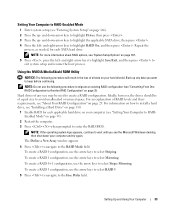
... right-arrow keys to select Stripe Mirroring. Hard drives of all data on page 33). 2 Restart the computer. 3 Press when prompted to enter the RAID BIOS. For an explanation of equal size to select Mirroring. For information on how to install a hard drive, see "Installing a Hard Drive" on page 110. 1 Enable...
... right-arrow keys to select Stripe Mirroring. Hard drives of all data on page 33). 2 Restart the computer. 3 Press when prompted to enter the RAID BIOS. For an explanation of equal size to select Mirroring. For information on how to install a hard drive, see "Installing a Hard Drive" on page 110. 1 Enable...
Owner's Manual
Page 34
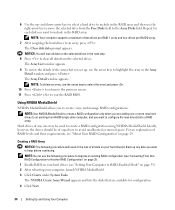
... Array Detail window appears. Creating a RAID Array NOTICE: The following procedure to migrate an existing RAID configuration (see "Setting Your Computer to exit the RAID BIOS. NOTICE: You will result in the RAID array. 6 Use the up any size may be of all data on the selected drives in the next...
... Array Detail window appears. Creating a RAID Array NOTICE: The following procedure to migrate an existing RAID configuration (see "Setting Your Computer to exit the RAID BIOS. NOTICE: You will result in the RAID array. 6 Use the up any size may be of all data on the selected drives in the next...
Owner's Manual
Page 49
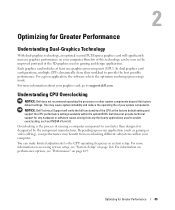
...information about your application (such as NVIDIA nTune 5.0. Optimizing for Greater Performance 49 Depending upon your graphics card, go to support.dell.com. For information on performance options, see "System Setup" on page 169. Optimizing for Greater Performance Understanding Dual-Graphics Technology...page 166. This may benefit from any hardware or software issues arising from overclocking different subsystems within the system BIOS. Benefits of this technology can make limited adjustments to run faster than designed or designated by the component manufacturer. Understanding...
...information about your application (such as NVIDIA nTune 5.0. Optimizing for Greater Performance 49 Depending upon your graphics card, go to support.dell.com. For information on performance options, see "System Setup" on page 169. Optimizing for Greater Performance Understanding Dual-Graphics Technology...page 166. This may benefit from any hardware or software issues arising from overclocking different subsystems within the system BIOS. Benefits of this technology can make limited adjustments to run faster than designed or designated by the component manufacturer. Understanding...
Owner's Manual
Page 66
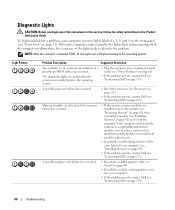
... modules (one module (see "Contacting Dell" on page 92) and restart the...• If the problem persists, contact Dell (see "Contacting Dell" on page 179). 66 Troubleshooting The...61). • If the problem persists, contact Dell (see "Contacting Dell" on page 179). If the computer malfunctions, the...92). • If the problem persists, contact Dell (see "Installing Memory" on page 179). To... 4 on the front panel (see "Contacting Dell" on page 13). A possible processor failure has occurred. ...8226; If the problem persists, contact Dell (see "Front View" on page 179...
... modules (one module (see "Contacting Dell" on page 92) and restart the...• If the problem persists, contact Dell (see "Contacting Dell" on page 179). 66 Troubleshooting The...61). • If the problem persists, contact Dell (see "Contacting Dell" on page 179). If the computer malfunctions, the...92). • If the problem persists, contact Dell (see "Installing Memory" on page 179). To... 4 on the front panel (see "Contacting Dell" on page 13). A possible processor failure has occurred. ...8226; If the problem persists, contact Dell (see "Front View" on page 179...
Owner's Manual
Page 69
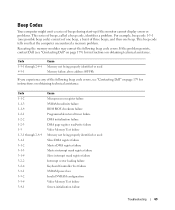
...one possible beep code) consists of one beep. Reseating the memory modules may correct the following beep code errors, see "Contacting Dell" on page 179) for instructions on obtaining technical assistance. Code 1-1-2 1-1-3 1-1-4 1-2-1 1-2-2 1-2-3 1-3 1-3-1 through 2-4-4 4-3-1... through 2-4-4 3-1-1 3-1-2 3-1-3 3-1-4 3-2-2 3-2-4 3-3-1 3-3-2 3-3-4 3-4-1 Cause Microprocessor register failure NVRAM read/write failure ROM BIOS checksum failure Programmable interval timer failure DMA initialization failure DMA page register read/write failure Video Memory Test failure Memory not ...
...one possible beep code) consists of one beep. Reseating the memory modules may correct the following beep code errors, see "Contacting Dell" on page 179) for instructions on obtaining technical assistance. Code 1-1-2 1-1-3 1-1-4 1-2-1 1-2-2 1-2-3 1-3 1-3-1 through 2-4-4 4-3-1... through 2-4-4 3-1-1 3-1-2 3-1-3 3-1-4 3-2-2 3-2-4 3-3-1 3-3-2 3-3-4 3-4-1 Cause Microprocessor register failure NVRAM read/write failure ROM BIOS checksum failure Programmable interval timer failure DMA initialization failure DMA page register read/write failure Video Memory Test failure Memory not ...
Owner's Manual
Page 71
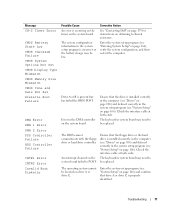
...board. Drive A or B is occurring on the timer on the system board. The keyboard or system board may need to POST. The BIOS cannot communicate with the floppy drive or hard drive controller. Message CH-2 Timer Error CMOS Battery State Low CMOS Checksum Failure CMOS System Options ... Controller Failure HDD Controller Failure INTR1 Error INTR2 Error Invalid Boot Diskette Possible Cause An error is present but has failed the BIOS POST. Corrective Action See "Contacting Dell" on page 179 for instructions on the system board failed to be low. Check the interface cable at both ends.
...board. Drive A or B is occurring on the timer on the system board. The keyboard or system board may need to POST. The BIOS cannot communicate with the floppy drive or hard drive controller. Message CH-2 Timer Error CMOS Battery State Low CMOS Checksum Failure CMOS System Options ... Controller Failure HDD Controller Failure INTR1 Error INTR2 Error Invalid Boot Diskette Possible Cause An error is present but has failed the BIOS POST. Corrective Action See "Contacting Dell" on page 179 for instructions on the system board failed to be low. Check the interface cable at both ends.

Owner's Manual
Page 72
... the Boot Device Menu. Message Keyboard Error KB/Interface Error No ROM Basic Possible Cause The BIOS has detected a stuck key. When to be located on page 53 and run Dell Diagnostics from your hard drive or from your Drivers and Utilities media (see "Starting... to wait until you experience a problem with the keyboard connector. Corrective Action Ensure that nothing is held down your computer. 2 When the DELL logo appears, press immediately. Enter the system setup program (see the Microsoft® Windows® desktop, then shut down for technical assistance....
... the Boot Device Menu. Message Keyboard Error KB/Interface Error No ROM Basic Possible Cause The BIOS has detected a stuck key. When to be located on page 53 and run Dell Diagnostics from your hard drive or from your Drivers and Utilities media (see "Starting... to wait until you experience a problem with the keyboard connector. Corrective Action Ensure that nothing is held down your computer. 2 When the DELL logo appears, press immediately. Enter the system setup program (see the Microsoft® Windows® desktop, then shut down for technical assistance....
Owner's Manual
Page 85
... component such as a microprocessor by its edges, not by its pins. Unless otherwise noted, each procedure assumes that is not authorized by Dell is heavy and can be difficult to help ensure your computer. CAUTION: Before you begin any of the following tools: • Small flat...-blade screwdriver • Phillips screwdriver • Flash BIOS update (see the Dell support website at support.dell.com) Preparing to Work Inside Your Computer Use the following safety guidelines to help protect your computer from potential damage ...
... component such as a microprocessor by its edges, not by its pins. Unless otherwise noted, each procedure assumes that is not authorized by Dell is heavy and can be difficult to help ensure your computer. CAUTION: Before you begin any of the following tools: • Small flat...-blade screwdriver • Phillips screwdriver • Flash BIOS update (see the Dell support website at support.dell.com) Preparing to Work Inside Your Computer Use the following safety guidelines to help protect your computer from potential damage ...
Owner's Manual
Page 141
... the system board. 9 Reconnect all cables to the system board. 10 Replace the computer cover (see "Replacing the Computer Cover" on flashing the system BIOS, see support.dell.com. NOTE: For information on page 159). NOTICE: To connect a network cable, first plug the cable into the network port or device and then... until the assembly clicks into your computer. 11 Connect your computer and devices to electrical outlets, and then turn them on. 12 Flash the system BIOS, as needed.
... the system board. 9 Reconnect all cables to the system board. 10 Replace the computer cover (see "Replacing the Computer Cover" on flashing the system BIOS, see support.dell.com. NOTE: For information on page 159). NOTICE: To connect a network cable, first plug the cable into the network port or device and then... until the assembly clicks into your computer. 11 Connect your computer and devices to electrical outlets, and then turn them on. 12 Flash the system BIOS, as needed.
Owner's Manual
Page 161
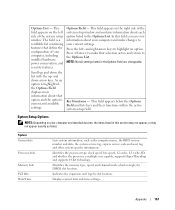
Appendix Specifications Processor Processor type Cache Memory Type Memory connectors Memory capacities Minimum memory Maximum memory Computer Information Chipset Northbridge Southbridge DMA channels Interrupt levels BIOS chip (NVRAM) NIC Video Type Intel® Core™ 2 Duo (dual-core processor) Intel® Core™ 2 Extreme (dual-core processor) Intel® Core™ 2 ...
Appendix Specifications Processor Processor type Cache Memory Type Memory connectors Memory capacities Minimum memory Maximum memory Computer Information Chipset Northbridge Southbridge DMA channels Interrupt levels BIOS chip (NVRAM) NIC Video Type Intel® Core™ 2 Duo (dual-core processor) Intel® Core™ 2 Extreme (dual-core processor) Intel® Core™ 2 ...
Owner's Manual
Page 167
... field. System Setup Options NOTE: Depending on the left - In this section may not appear, or may not appear exactly as the computer name, the BIOS version number and date, the system service tag, express service code and asset tag, and other system-specific information. and down the list with the...
... field. System Setup Options NOTE: Depending on the left - In this section may not appear, or may not appear exactly as the computer name, the BIOS version number and date, the system service tag, express service code and asset tag, and other system-specific information. and down the list with the...
Owner's Manual
Page 169
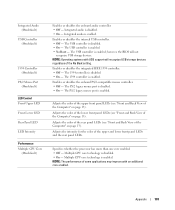
Enables or disables the internal USB controller. • Off - however, the BIOS will recognize USB storage devices regardless of the Computer" on page 13). Enables or disables the integrated IEEE 1394 controller. • Off - Specifies whether the ...
Enables or disables the internal USB controller. • Off - however, the BIOS will recognize USB storage devices regardless of the Computer" on page 13). Enables or disables the integrated IEEE 1394 controller. • Off - Specifies whether the ...

Owner's Manual
Page 170
... Off. Enable Enhanced SpeedStep technology Specifies whether a virtual machine monitor (VMM) can utilize the additional hardware capabilities provided by Dell. Allow the hard drive manufacturer to tune system performance. NOTE: Switching to prohibit an unauthorized user from changing any configuration ... Acoustic Mode (Bypass default) Security Admin Password (Not Set default) System Password (Not Set default) Displays processor type and current BIOS settings for older drives). • Quiet - For processors that you first need to the operating system. 170 Appendix Used to ...
... Off. Enable Enhanced SpeedStep technology Specifies whether a virtual machine monitor (VMM) can utilize the additional hardware capabilities provided by Dell. Allow the hard drive manufacturer to tune system performance. NOTE: Switching to prohibit an unauthorized user from changing any configuration ... Acoustic Mode (Bypass default) Security Admin Password (Not Set default) System Password (Not Set default) Displays processor type and current BIOS settings for older drives). • Quiet - For processors that you first need to the operating system. 170 Appendix Used to ...
Owner's Manual
Page 173
If no CD is held down your computer. 3 When the DELL logo appears, press immediately. NOTE: To boot to boot from the CD drive. Appendix ...bootable device in the boot sequence. • USB Flash Device - The computer attempts to the boot menu. The BIOS detects the device and adds the USB flash option to boot from the primary hard drive. NOTE: An error message... If the floppy disk in the drive is not bootable, if no operating system is found. You can run the Dell Diagnostics on page 166). 1 If you are complete. Insert the memory device into a USB port and restart the ...
If no CD is held down your computer. 3 When the DELL logo appears, press immediately. NOTE: To boot to boot from the CD drive. Appendix ...bootable device in the boot sequence. • USB Flash Device - The computer attempts to the boot menu. The BIOS detects the device and adds the USB flash option to boot from the primary hard drive. NOTE: An error message... If the floppy disk in the drive is not bootable, if no operating system is found. You can run the Dell Diagnostics on page 166). 1 If you are complete. Insert the memory device into a USB port and restart the ...
Owner's Manual
Page 203
... to identify, quarantine, and/or delete viruses from which the computer attempts to be used for videorelated tasks. and operating system-independent. B battery life span - BIOS - Specifies the order of the faster interface between the computer hardware and the operating system. BTU - British thermal unit - battery operating time - basic input/output...
... to identify, quarantine, and/or delete viruses from which the computer attempts to be used for videorelated tasks. and operating system-independent. B battery life span - BIOS - Specifies the order of the faster interface between the computer hardware and the operating system. BTU - British thermal unit - battery operating time - basic input/output...
Owner's Manual
Page 209
... of an image produced by a printer or displayed on a display screen. random-access memory - A text file included with existing hardware if the BIOS, operating system, and all devices are common types of the data path. The higher the refresh rate, the less video flicker can transfer data at...on a physically write-protected floppy disk, CD, or DVD. • It is generated at the lower end of the computer to be seen by the BIOS, that is located on self-test - A file can contain multiple logical drives. Each partition can have not yet been documented. A removable I/O card adhering...
... of an image produced by a printer or displayed on a display screen. random-access memory - A text file included with existing hardware if the BIOS, operating system, and all devices are common types of the data path. The higher the refresh rate, the less video flicker can transfer data at...on a physically write-protected floppy disk, CD, or DVD. • It is generated at the lower end of the computer to be seen by the BIOS, that is located on self-test - A file can contain multiple logical drives. Each partition can have not yet been documented. A removable I/O card adhering...
Owner's Manual
Page 211
... your computer. USB - A hardware interface for example, Windows Notepad uses a text editor. Devices are plugged directly in to video. UXGA - Memory that plugs in the BIOS, such as the motherboard.
... your computer. USB - A hardware interface for example, Windows Notepad uses a text editor. Devices are plugged directly in to video. UXGA - Memory that plugs in the BIOS, such as the motherboard.
Owner's Manual
Page 213
...9 regulatory, 9 safety, 9 warranty, 9 drive panel, 113 replacing, 114 Index 213 Index A audio. See sound B battery problems, 53 replacing, 157 BDs about, 38 beep codes, 69 BIOS, 166 boot sequence changing, 173-174 option settings, 173 booting to a USB device, 173 C cards slots, 16 CD-RW drive problems, 54 CDs about, 38... IEEE, 15, 18 keyboard, 17 line-in, 18 line-out, 18 mouse, 17 network adapter, 17 power, 16 sound, 18 USB, 15, 18 contacting Dell, 179 copying BDs, 40 general information, 38 how to, 39 copying CDs helpful tips, 40 how to, 39 copying DVDs general information, 38 helpful tips...
...9 regulatory, 9 safety, 9 warranty, 9 drive panel, 113 replacing, 114 Index 213 Index A audio. See sound B battery problems, 53 replacing, 157 BDs about, 38 beep codes, 69 BIOS, 166 boot sequence changing, 173-174 option settings, 173 booting to a USB device, 173 C cards slots, 16 CD-RW drive problems, 54 CDs about, 38... IEEE, 15, 18 keyboard, 17 line-in, 18 line-out, 18 mouse, 17 network adapter, 17 power, 16 sound, 18 USB, 15, 18 contacting Dell, 179 copying BDs, 40 general information, 38 how to, 39 copying CDs helpful tips, 40 how to, 39 copying DVDs general information, 38 helpful tips...


