
Owner's Manual
Page 2
..., Modem, and Internet Problems 47 Error Messages 48 IEEE 1394 Device Problems 49 Keyboard Problems 49 Lockups and Software Problems 50 The computer does not start up 50 The computer stops responding 50 A program stops responding 51 A program crashes repeatedly 51 A program is designed for an earlier Windows operating system . . . . . 51...
..., Modem, and Internet Problems 47 Error Messages 48 IEEE 1394 Device Problems 49 Keyboard Problems 49 Lockups and Software Problems 50 The computer does not start up 50 The computer stops responding 50 A program stops responding 51 A program crashes repeatedly 51 A program is designed for an earlier Windows operating system . . . . . 51...

Owner's Manual
Page 9
... - Upgrade information for correct operation of your region or business segment to personalize my desktop Windows Help and Support Center 1 Click Start→ Help and Support. 2 Type a word or phrase that describes your problem, and then click the arrow icon. 3 Click..., online courses, and frequently asked questions Dell Support Website - depending on the screen. support.dell.com NOTE: Select your Dell computer. Computer documentation, details on your selections. • How to use Windows XP • How to support.dell.com, select your business segment, and ...
... - Upgrade information for correct operation of your region or business segment to personalize my desktop Windows Help and Support Center 1 Click Start→ Help and Support. 2 Type a word or phrase that describes your problem, and then click the arrow icon. 3 Click..., online courses, and frequently asked questions Dell Support Website - depending on the screen. support.dell.com NOTE: Select your Dell computer. Computer documentation, details on your selections. • How to use Windows XP • How to support.dell.com, select your business segment, and ...

Owner's Manual
Page 18
..., follow the safety instructions in the Product Information Guide. NOTE: Ensure that the computer is off . The total ampere rating of all attached devices: a Click Start, then click Turn Off Computer. NOTE: If your monitor has a VGA connector and your video card may have a VGA port, follow the instructions in "Connecting...
..., follow the safety instructions in the Product Information Guide. NOTE: Ensure that the computer is off . The total ampere rating of all attached devices: a Click Start, then click Turn Off Computer. NOTE: If your monitor has a VGA connector and your video card may have a VGA port, follow the instructions in "Connecting...
Owner's Manual
Page 19
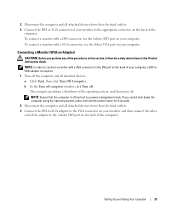
... adapter is off and not in the Product Information Guide. Setting Up and Using Your Computer 21 2 Disconnect the computer and all attached devices: a Click Start, then click Turn Off Computer. To connect a monitor with a VGA connector to the VGA connector on your computer.
... adapter is off and not in the Product Information Guide. Setting Up and Using Your Computer 21 2 Disconnect the computer and all attached devices: a Click Start, then click Turn Off Computer. To connect a monitor with a VGA connector to the VGA connector on your computer.

Owner's Manual
Page 21
... cannot shut down the computer using the operating system, press and hold the power button for 4 seconds. 2 Disconnect the computer and all attached devices: a Click Start, then click Turn Off Computer. The computer performs a shutdown of the procedures in this section, follow the safety instructions in a power management mode. NOTE: In...
... cannot shut down the computer using the operating system, press and hold the power button for 4 seconds. 2 Disconnect the computer and all attached devices: a Click Start, then click Turn Off Computer. The computer performs a shutdown of the procedures in this section, follow the safety instructions in a power management mode. NOTE: In...

Owner's Manual
Page 22
... connectors of the computer. 24 Setting Up and Using Your Computer An S-video cable is off the computer and all attached devices: a Click Start, then click Turn Off Computer. If you cannot shut down the computer using the operating system, press and hold the power button for 4 ...(VGA or DVI) in a power management mode. NOTE: See the documentation that the computer is off the computer and all attached devices: a Click Start, then click Turn Off Computer. The computer performs a shutdown of the computer. NOTE: Ensure that came with your computer. 1 Turn off and not...
... connectors of the computer. 24 Setting Up and Using Your Computer An S-video cable is off the computer and all attached devices: a Click Start, then click Turn Off Computer. If you cannot shut down the computer using the operating system, press and hold the power button for 4 ...(VGA or DVI) in a power management mode. NOTE: See the documentation that the computer is off the computer and all attached devices: a Click Start, then click Turn Off Computer. The computer performs a shutdown of the computer. NOTE: Ensure that came with your computer. 1 Turn off and not...
Owner's Manual
Page 23
... multi-GPU technology, see the device user's guide in the Help and Support Center (click Start, click Help and Support, click User and system guides, click Device guides, and then click the guide for instructions). Your Dell XPS computer supports RAID level 0 and RAID level 1. NOTE: RAID levels do not represent a hierarchy. The...
... multi-GPU technology, see the device user's guide in the Help and Support Center (click Start, click Help and Support, click User and system guides, click Device guides, and then click the guide for instructions). Your Dell XPS computer supports RAID level 0 and RAID level 1. NOTE: RAID levels do not represent a hierarchy. The...

Owner's Manual
Page 31
...an error message notifies you that the current resolution and color depth are muted, you do not hear the CD or DVD playing. 1 Click Start, point to All Programs→ Accessories→ Entertainment, and then click Volume Control. 2 In the Master Volume control window, click and ... or decrease the volume. Adjusting the Volume NOTE: When the speakers are using too much memory and preventing DVD playback, adjust the display properties. 1 Click Start, then click Control Panel. 2 Under Pick a category, click Appearance and Themes. 3 Under Pick a task..., click Change the screen resolution. 4 In ...
...an error message notifies you that the current resolution and color depth are muted, you do not hear the CD or DVD playing. 1 Click Start, point to All Programs→ Accessories→ Entertainment, and then click Volume Control. 2 In the Master Volume control window, click and ... or decrease the volume. Adjusting the Volume NOTE: When the speakers are using too much memory and preventing DVD playback, adjust the display properties. 1 Click Start, then click Control Panel. 2 Under Pick a category, click Appearance and Themes. 3 Under Pick a task..., click Change the screen resolution. 4 In ...

Owner's Manual
Page 32
... purposes, such as creating music CDs from the source CD or DVD to and may vary by country. Dell Edition. After the maximum storage capacity of the window. If you have inserted your source CD or DVD,...CD and DVD recording media. NOTE: The types of a CD or DVD using Roxio Creator Plus. 1 Click Start, point to a temporary folder on the Sonic support website at www.sonic.com. Using Blank CDs and DVDs CD...following instructions explain how to make an exact copy of CD or DVD drives offered by Dell may not read DVD+/-R, DVD+/-RW and DVD+R DL (dual layer) media, but cannot write to the...
... purposes, such as creating music CDs from the source CD or DVD to and may vary by country. Dell Edition. After the maximum storage capacity of the window. If you have inserted your source CD or DVD,...CD and DVD recording media. NOTE: The types of a CD or DVD using Roxio Creator Plus. 1 Click Start, point to a temporary folder on the Sonic support website at www.sonic.com. Using Blank CDs and DVDs CD...following instructions explain how to make an exact copy of CD or DVD drives offered by Dell may not read DVD+/-R, DVD+/-RW and DVD+R DL (dual layer) media, but cannot write to the...

Owner's Manual
Page 33
... No No No Helpful Tips • Use Microsoft® Windows® Explorer to drag and drop files to a CD-R or CD-RW only after you start Roxio Creator Plus and open a Creator project. • Use CD-Rs to burn music CDs that you plan to finalize the recording. CD-RWs may...
... No No No Helpful Tips • Use Microsoft® Windows® Explorer to drag and drop files to a CD-R or CD-RW only after you start Roxio Creator Plus and open a Creator project. • Use CD-Rs to burn music CDs that you plan to finalize the recording. CD-RWs may...

Owner's Manual
Page 36
...sharing files, printers, or an Internet connection between computers in a home or small office. 1 Click Start, point to the Internet enables the integrated firewall provided with Windows XP SP1. 4 Complete the checklist and required preparations. NOTE: Selecting the connection method This computer connects directly.... 2 On the welcome screen, click Next. 3 Click Checklist for the file transfer: 1 Click Start, point to be transferred over a network or serial connection, or you have a Windows XP CD? To prepare the new computer for creating a network. You can move data from the Windows...
...sharing files, printers, or an Internet connection between computers in a home or small office. 1 Click Start, point to the Internet enables the integrated firewall provided with Windows XP SP1. 4 Complete the checklist and required preparations. NOTE: Selecting the connection method This computer connects directly.... 2 On the welcome screen, click Next. 3 Click Checklist for the file transfer: 1 Click Start, point to be transferred over a network or serial connection, or you have a Windows XP CD? To prepare the new computer for creating a network. You can move data from the Windows...

Owner's Manual
Page 38
...key on the Power Schemes tab, Advanced tab, and Hibernate tab. To activate hibernate mode: 1 Click Start, then click Control Panel. 2 Under Pick a category, click Performance and Maintenance. 3 Under or ... keyboard or move the mouse. If the computer's hard drive becomes corrupted, Windows XP recreates the hibernate file automatically. Power Options Properties Define your standby mode settings, hibernate...set standby mode to automatically activate after a defined period of the computer memory, Dell creates an appropriately sized hibernate mode file before shipping the computer to you. ...
...key on the Power Schemes tab, Advanced tab, and Hibernate tab. To activate hibernate mode: 1 Click Start, then click Control Panel. 2 Under Pick a category, click Performance and Maintenance. 3 Under or ... keyboard or move the mouse. If the computer's hard drive becomes corrupted, Windows XP recreates the hibernate file automatically. Power Options Properties Define your standby mode settings, hibernate...set standby mode to automatically activate after a defined period of the computer memory, Dell creates an appropriately sized hibernate mode file before shipping the computer to you. ...

Owner's Manual
Page 39
... Tab The Hibernate tab allows you want your Windows password before the hard drive. If you want to change the default settings for starting standby mode, hibernate mode, turning off the monitor, and turning off the computer. For more information on power management options: 1 Click... Start, then click Help and Support. 2 In the Help and Support window, click Performance and maintenance. 3 In the Performance and maintenance window, click Conserving...
... Tab The Hibernate tab allows you want your Windows password before the hard drive. If you want to change the default settings for starting standby mode, hibernate mode, turning off the monitor, and turning off the computer. For more information on power management options: 1 Click... Start, then click Help and Support. 2 In the Help and Support window, click Performance and maintenance. 3 In the Performance and maintenance window, click Conserving...
Owner's Manual
Page 41
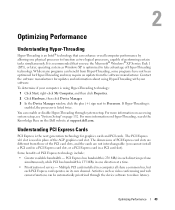
...Express is the next generation technology for updates and information about using Hyper-Threading with your computer is using Hyper-Threading technology: 1 Click Start, right-click My Computer, and then click Properties. 2 Click Hardware, then click Device Manager. 3 In the Device Manager window, click... For more information on Hyper-Threading, search the Knowledge Base on the Dell website at a time. • Prioritization of PCI Express card slots are not interchangeable (you use the Microsoft® Windows® XP Service Pack 1 (SP1), or later, operating system as two logical ...
...Express is the next generation technology for updates and information about using Hyper-Threading with your computer is using Hyper-Threading technology: 1 Click Start, right-click My Computer, and then click Properties. 2 Click Hardware, then click Device Manager. 3 In the Device Manager window, click... For more information on Hyper-Threading, search the Knowledge Base on the Dell website at a time. • Prioritization of PCI Express card slots are not interchangeable (you use the Microsoft® Windows® XP Service Pack 1 (SP1), or later, operating system as two logical ...

Owner's Manual
Page 43
...and date information after turning on the computer, or if an incorrect time or date displays during start-up, replace the battery (see "Replacing the Battery" on page 123). If you added or removed a part before the... part is incorrectly installed. Drive Problems CAUTION: Before you begin any of the procedures in this section, follow the safety instructions in a program, see "Contacting Dell" on the screen, write down the exact message. E N S U R E T H A T M I C R O S O F T ® W I N D O W S ® R E C O G N I Z E S T H E D R I V E - Discard used batteries according ...
...and date information after turning on the computer, or if an incorrect time or date displays during start-up, replace the battery (see "Replacing the Battery" on page 123). If you added or removed a part before the... part is incorrectly installed. Drive Problems CAUTION: Before you begin any of the procedures in this section, follow the safety instructions in a program, see "Contacting Dell" on the screen, write down the exact message. E N S U R E T H A T M I C R O S O F T ® W I N D O W S ® R E C O G N I Z E S T H E D R I V E - Discard used batteries according ...

Owner's Manual
Page 44
... occurs. If the stream is normal and may cause noise, which does not indicate a defect in Windows Help and Support Center (click Start, then click Help and Support) for information on page 39 or search for the keyword standby in the drive or the CD or DVD.... See "Cleaning Your Computer" on page 71. See "Resolving Software and Hardware Incompatibilities" on page 141. See "Dell Diagnostics" on page 56. R W D I N G T O A C D / D V D - See "Standby Mode" on power management modes. 46 Solving Problems NOTE: Because of different regions worldwide ...
... occurs. If the stream is normal and may cause noise, which does not indicate a defect in Windows Help and Support Center (click Start, then click Help and Support) for information on page 39 or search for the keyword standby in the drive or the CD or DVD.... See "Cleaning Your Computer" on page 71. See "Resolving Software and Hardware Incompatibilities" on page 141. See "Dell Diagnostics" on page 56. R W D I N G T O A C D / D V D - See "Standby Mode" on power management modes. 46 Solving Problems NOTE: Because of different regions worldwide ...

Owner's Manual
Page 45
... TELEPHONE LINE - • Verify that the telephone line is 3 m (10 ft) or more in the Product Information Guide. Hard drive problems RUN CHECK DISK - 1 Click Start, then click My Computer. 2 Right-click Local Disk C:. 3 Click Properties. 4 Click the Tools tab. 5 Under Error-checking, click Check Now. 6 Click Scan for a dial tone...
... TELEPHONE LINE - • Verify that the telephone line is 3 m (10 ft) or more in the Product Information Guide. Hard drive problems RUN CHECK DISK - 1 Click Start, then click My Computer. 2 Right-click Local Disk C:. 3 Click Properties. 4 Click the Tools tab. 5 Under Error-checking, click Check Now. 6 Click Scan for a dial tone...

Owner's Manual
Page 46
... Helper diagnostics are trying to an Internet provider. The program that the modem is communicating with Windows. To remove and then reinstall the program: 1 Click Start, click Control Panel, and then click Add or Remove Programs. 2 Under Currently installed programs, select the program you have subscribed to open , click File. R U N T H E M O D ... Hardware. 3 Click Phone and Modem Options. 4 Click the Modems tab. 5 Click the COM port for installation instructions. A R E Q U I A - Click Start, point to the Internet. I N S E R T B O O T A B L E M E D I R E D . Ensure that you want...
... Helper diagnostics are trying to an Internet provider. The program that the modem is communicating with Windows. To remove and then reinstall the program: 1 Click Start, click Control Panel, and then click Add or Remove Programs. 2 Under Currently installed programs, select the program you have subscribed to open , click File. R U N T H E M O D ... Hardware. 3 Click Phone and Modem Options. 4 Click the Modems tab. 5 Click the COM port for installation instructions. A R E Q U I A - Click Start, point to the Internet. I N S E R T B O O T A B L E M E D I R E D . Ensure that you want...

Owner's Manual
Page 47
...System Setup Options" on page 145). ENSURE THAT THE IEEE 1394 DEVICE IS RECOGNIZED BY WINDOWS - 1 Click Start, then click Control Panel. 2 Click Printers and Other Hardware. Contact Dell (see the documentation for the operating system or the program that you begin any of the procedures in this ... appeared. NOTE: If the error message is listed, Windows recognizes the device. If your IEEE 1394 device is not listed, see "Contacting Dell" on page 145). Contact the IEEE 1394 device manufacturer. In some cases, you begin any of the procedures in this section, follow the...
...System Setup Options" on page 145). ENSURE THAT THE IEEE 1394 DEVICE IS RECOGNIZED BY WINDOWS - 1 Click Start, then click Control Panel. 2 Click Printers and Other Hardware. Contact Dell (see the documentation for the operating system or the program that you begin any of the procedures in this ... appeared. NOTE: If the error message is listed, Windows recognizes the device. If your IEEE 1394 device is not listed, see "Contacting Dell" on page 145). Contact the IEEE 1394 device manufacturer. In some cases, you begin any of the procedures in this section, follow the...
Owner's Manual
Page 48
... any bent pins. • Remove any of the procedures in this section, follow the safety instructions in the Product Information Guide. The computer does not start up C H E C K T H E D I A G N O S T I C L I G H T S - Connect a properly working keyboard to the computer. TE S T T H E K E Y B O A R D - Lockups and Software Problems CAUTION: Before you are unable to Work Inside Your Computer" on page...
... any bent pins. • Remove any of the procedures in this section, follow the safety instructions in the Product Information Guide. The computer does not start up C H E C K T H E D I A G N O S T I C L I G H T S - Connect a properly working keyboard to the computer. TE S T T H E K E Y B O A R D - Lockups and Software Problems CAUTION: Before you are unable to Work Inside Your Computer" on page...


