Owners Manual
Page 1
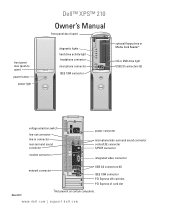
front panel door (push to open) power button power light Dell™ XPS™ 210 Owner's Manual front panel door (open) diagnostic lights hard drive activity light headphone connector microphone connector IEEE 1394 connector optional floppy drive or Media Card Reader* CD or DVD drive light USB 2.0 connectors (2) voltage selection switch line-out connector line-in connector rear... network connector USB 2.0 connectors (6) IEEE 1394 connector PCI Express x16 card slot PCI Express x1 card slot Model DCCY *Not present on certain computers. www.dell.com | support.dell.com
front panel door (push to open) power button power light Dell™ XPS™ 210 Owner's Manual front panel door (open) diagnostic lights hard drive activity light headphone connector microphone connector IEEE 1394 connector optional floppy drive or Media Card Reader* CD or DVD drive light USB 2.0 connectors (2) voltage selection switch line-out connector line-in connector rear... network connector USB 2.0 connectors (6) IEEE 1394 connector PCI Express x16 card slot PCI Express x1 card slot Model DCCY *Not present on certain computers. www.dell.com | support.dell.com
Owners Manual
Page 4
... feature in the Operating system 31 Hyper-Threading and Dual-Core Technology 31 2 Solving Problems 33 Troubleshooting Tips 33 Battery Problems 33 Drive Problems 34 CD and DVD drive problems 34 Hard drive problems 35 E-Mail, Modem, and Internet Problems 35 Error Messages 37 Media Card Reader Problems 38 IEEE 1394 Device Problems 38...
... feature in the Operating system 31 Hyper-Threading and Dual-Core Technology 31 2 Solving Problems 33 Troubleshooting Tips 33 Battery Problems 33 Drive Problems 34 CD and DVD drive problems 34 Hard drive problems 35 E-Mail, Modem, and Internet Problems 35 Error Messages 37 Media Card Reader Problems 38 IEEE 1394 Device Problems 38...
Owners Manual
Page 6
... Connector 75 Connecting and Disconnecting Drive Cables 76 Hard Drive 76 Removing a Hard Drive 76 Installing a Hard Drive 78 CD/DVD Drive 81 Removing a CD/DVD Drive 81 Installing a CD/DVD Drive 83 Media Card Reader 85 Removing a Media Card Reader 85 Installing a Media Card Reader 87 Floppy Drive (Optional 89 Removing a Floppy Drive 89 Installing a Floppy Drive 91 Modem 93 Replacing the...
... Connector 75 Connecting and Disconnecting Drive Cables 76 Hard Drive 76 Removing a Hard Drive 76 Installing a Hard Drive 78 CD/DVD Drive 81 Removing a CD/DVD Drive 81 Installing a CD/DVD Drive 83 Media Card Reader 85 Removing a Media Card Reader 85 Installing a Media Card Reader 87 Floppy Drive (Optional 89 Removing a Floppy Drive 89 Installing a Floppy Drive 91 Modem 93 Replacing the...
Owners Manual
Page 11
...Computer documentation, details on the screen. DSS is necessary for correct search for components, such as the memory, hard drive, and operating system • Customer Care - support.dell.com NOTE: Select your Service Tag or product model. operation of your operating system and language, and then... - If you should also reinstall the DSS utility. NOTE: The support.dell.com user interface may vary depending on your selections. • How to use Windows XP • How to work with other Dell customers • Upgrades - Upgrade information for the keyword Desktop System Software...
...Computer documentation, details on the screen. DSS is necessary for correct search for components, such as the memory, hard drive, and operating system • Customer Care - support.dell.com NOTE: Select your Service Tag or product model. operation of your operating system and language, and then... - If you should also reinstall the DSS utility. NOTE: The support.dell.com user interface may vary depending on your selections. • How to use Windows XP • How to work with other Dell customers • Upgrades - Upgrade information for the keyword Desktop System Software...
Owners Manual
Page 14
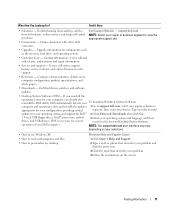
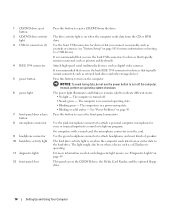
...microphone connector to indicate different states: • No light - Use the green headphone connector to access the front-panel connectors. The hard drive activity light is recommended that you use the back IEEE 1394 connector for more information on what each diagnostic light means, see "... when a device such as printers and keyboards. Use the front USB connectors for devices that you use the power button to the hard drive. It is recommended that you connect occasionally, such as digital video cameras. Instead, perform an operating system shutdown. Press this button...
...microphone connector to indicate different states: • No light - Use the green headphone connector to access the front-panel connectors. The hard drive activity light is recommended that you use the back IEEE 1394 connector for more information on what each diagnostic light means, see "... when a device such as printers and keyboards. Use the front USB connectors for devices that you use the power button to the hard drive. It is recommended that you connect occasionally, such as digital video cameras. Instead, perform an operating system shutdown. Press this button...

Owners Manual
Page 26
..., and then click RecordNow Copy. 2 Under the Copy tab, click Disc Copy. 3 To copy the CD or DVD: • If you have inserted your computer hard drive. The computer reads your source CD or DVD and copies the data to permanently store large amounts of data. Using Blank CDs and DVDs CD... update information on the CD later. Use blank CD-RWs if you plan to erase, rewrite, or update information on the disc later. CD-Writable Drives Media Type CD-R CD-RW Read Yes Yes Write Yes Yes Rewritable No Yes 26 Setting Up and Using Your Computer When prompted, insert a blank...
..., and then click RecordNow Copy. 2 Under the Copy tab, click Disc Copy. 3 To copy the CD or DVD: • If you have inserted your computer hard drive. The computer reads your source CD or DVD and copies the data to permanently store large amounts of data. Using Blank CDs and DVDs CD... update information on the CD later. Use blank CD-RWs if you plan to erase, rewrite, or update information on the disc later. CD-Writable Drives Media Type CD-R CD-RW Read Yes Yes Write Yes Yes Rewritable No Yes 26 Setting Up and Using Your Computer When prompted, insert a blank...
Owners Manual
Page 28
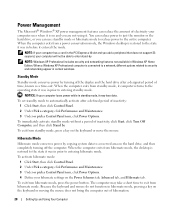
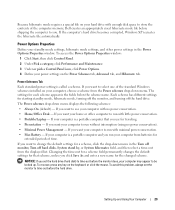
...XP power management features can use standby mode or hibernate mode to reduce power to automatically activate after a designated period of time, known as a time-out. When the computer exits from a power conservation mode, the Windows desktop is restored to exit from standby mode, press a key on the hard drive..., and then completely turning off the display and the hard drive after a defined period of inactivity, click Start, click Turn Off Computer, and then click Stand by...
...XP power management features can use standby mode or hibernate mode to reduce power to automatically activate after a designated period of time, known as a time-out. When the computer exits from a power conservation mode, the Windows desktop is restored to exit from standby mode, press a key on the hard drive..., and then completely turning off the display and the hard drive after a defined period of inactivity, click Start, click Turn Off Computer, and then click Stand by...
Owners Manual
Page 29
...Setting Up and Using Your Computer 29 If you want to time-out before the hard drive. If you want to select one of time. If the computer's hard drive becomes corrupted, Windows XP recreates the hibernate file automatically. Power Options Properties Define your home or office computer... power conservation. • Portable/Laptop - Because hibernate mode requires a special file on your hard drive with enough disk space to store the contents of the computer memory, Dell creates an appropriately sized hibernate mode file before shipping the computer to time-out before the monitor...
...Setting Up and Using Your Computer 29 If you want to time-out before the hard drive. If you want to select one of time. If the computer's hard drive becomes corrupted, Windows XP recreates the hibernate file automatically. Power Options Properties Define your home or office computer... power conservation. • Portable/Laptop - Because hibernate mode requires a special file on your hard drive with enough disk space to store the contents of the computer memory, Dell creates an appropriately sized hibernate mode file before shipping the computer to time-out before the monitor...
Owners Manual
Page 30
...hibernate mode, or turn off feature. Intel Viiv technology is an option for your computer. Also, you may notice that the hard drive indicator may blink when the hard drive is being accessed by the power button indicator and diagnostic lights 1, 2, and 4 being lit. Advanced Tab The Advanced tab allows...the power button, press any key on the keyboard, move the mouse, or press a button on the optional Microsoft® Windows® XP Media Center Edition 2005 remote control. 30 Setting Up and Using Your Computer In this mode, the computer is a technology aimed at the ...
...hibernate mode, or turn off feature. Intel Viiv technology is an option for your computer. Also, you may notice that the hard drive indicator may blink when the hard drive is being accessed by the power button indicator and diagnostic lights 1, 2, and 4 being lit. Advanced Tab The Advanced tab allows...the power button, press any key on the keyboard, move the mouse, or press a button on the optional Microsoft® Windows® XP Media Center Edition 2005 remote control. 30 Setting Up and Using Your Computer In this mode, the computer is a technology aimed at the ...

Owners Manual
Page 35
...does not operate while it is interrupted, an error occurs. If the stream is connected to a CD/DVD-RW drive C L O S E O T H E R P R O G R A M S - R W D I N G T O A C D / D V D - NOTE: Connect the modem to the CD/DVD-RW. Hard drive problems RUN CHECK DISK - 1 Click Start, then click My Computer. 2 Right-click Local Disk C:. 3 ... on page 28 or search for the keyword standby in the Product Information Guide. Solving Problems 35 The CD/DVD-RW drive must receive a steady stream of the procedures in this section, follow the safety instructions located in Windows Help and Support ...
...does not operate while it is interrupted, an error occurs. If the stream is connected to a CD/DVD-RW drive C L O S E O T H E R P R O G R A M S - R W D I N G T O A C D / D V D - NOTE: Connect the modem to the CD/DVD-RW. Hard drive problems RUN CHECK DISK - 1 Click Start, then click My Computer. 2 Right-click Local Disk C:. 3 ... on page 28 or search for the keyword standby in the Product Information Guide. Solving Problems 35 The CD/DVD-RW drive must receive a steady stream of the procedures in this section, follow the safety instructions located in Windows Help and Support ...
Owners Manual
Page 41
BACK UP YOUR FILES IMMEDIATELY USE A VIRUS-SCANNING PROGRAM TO CHECK THE HARD DRIVE, FLOPPY DISKS, OR CDS SAVE AND CLOSE ANY OPEN FILES OR PROGRAMS AND SHUT DOWN YOUR COMPUTER THROUGH THE START MENU Memory Problems CAUTION: Before ...; If necessary, uninstall and then reinstall the program. If necessary, install additional memory (see "Installing Memory" on page 68). • Reseat the memory modules (see "Dell Diagnostics" on your computer. • Ensure that your computer meets the minimum hardware requirements needed to run the software. See the software documentation for minimum...
BACK UP YOUR FILES IMMEDIATELY USE A VIRUS-SCANNING PROGRAM TO CHECK THE HARD DRIVE, FLOPPY DISKS, OR CDS SAVE AND CLOSE ANY OPEN FILES OR PROGRAMS AND SHUT DOWN YOUR COMPUTER THROUGH THE START MENU Memory Problems CAUTION: Before ...; If necessary, uninstall and then reinstall the program. If necessary, install additional memory (see "Installing Memory" on page 68). • Reseat the memory modules (see "Dell Diagnostics" on your computer. • Ensure that your computer meets the minimum hardware requirements needed to run the software. See the software documentation for minimum...

Owners Manual
Page 50
...; If the problem persists or the computer has integrated graphics, contact Dell (see "Contacting Dell" on page 112). Memory modules are detected, but a memory configuration or compatibility error has occurred. • If two or more memory modules are detected. A possible floppy drive or hard drive failure has occurred. Suggested Resolution • Reseat any installed graphics...
...; If the problem persists or the computer has integrated graphics, contact Dell (see "Contacting Dell" on page 112). Memory modules are detected, but a memory configuration or compatibility error has occurred. • If two or more memory modules are detected. A possible floppy drive or hard drive failure has occurred. Suggested Resolution • Reseat any installed graphics...

Owners Manual
Page 51
... the last card removed from the computer for the devices installed on your screen identifying a problem with a device (such as the floppy drive or hard drive), check the device to make sure it is functioning properly. • If the operating system is attempting to boot from a device (such... hard drive), check system setup (see "System Setup" on page 101) to the system board (see "System Board Components" on page 65). • If there is an error message on your computer. • If the problem persists, contact Dell (see "Contacting Dell" on page 112). The system is correct for...
... the last card removed from the computer for the devices installed on your screen identifying a problem with a device (such as the floppy drive or hard drive), check the device to make sure it is functioning properly. • If the operating system is attempting to boot from a device (such... hard drive), check system setup (see "System Setup" on page 101) to the system board (see "System Board Components" on page 65). • If there is an error message on your computer. • If the problem persists, contact Dell (see "Contacting Dell" on page 112). The system is correct for...
Owners Manual
Page 55
... type of the appropriate driver appears, click Next. 13 Click Finish and restart your Dell™ computer. Drivers can be required to where the driver files are located on your hard drive. 12 When the name of device for which you are installing the driver. 7 ... computer after you may not function properly. Troubleshooting Tools 55 Manually Reinstalling Drivers After copying driver files to your hard drive, you install or update a driver, use Windows XP Device Driver Rollback to replace the driver with the previously installed version. 1 Click Start, then click Control Panel...
... type of the appropriate driver appears, click Next. 13 Click Finish and restart your Dell™ computer. Drivers can be required to where the driver files are located on your hard drive. 12 When the name of device for which you are installing the driver. 7 ... computer after you may not function properly. Troubleshooting Tools 55 Manually Reinstalling Drivers After copying driver files to your hard drive, you install or update a driver, use Windows XP Device Driver Rollback to replace the driver with the previously installed version. 1 Click Start, then click Control Panel...
Owners Manual
Page 56
.... NOTICE: Make regular backups of your data files or recover them. Dell PC Restore permanently deletes all data on using System Restore. Using Microsoft Windows XP System Restore The Microsoft Windows XP operating system provides System Restore to allow you received the computer. See ...computers purchased in this document were written for information on the hard drive and removes any applications installed after you to return your computer to an earlier operating state (without affecting data files. • Dell PC Restore by Symantec restores your computer to the operating state...
.... NOTICE: Make regular backups of your data files or recover them. Dell PC Restore permanently deletes all data on using System Restore. Using Microsoft Windows XP System Restore The Microsoft Windows XP operating system provides System Restore to allow you received the computer. See ...computers purchased in this document were written for information on the hard drive and removes any applications installed after you to return your computer to an earlier operating state (without affecting data files. • Dell PC Restore by Symantec restores your computer to the operating state...

Owners Manual
Page 58
... Restore is available only on . 58 Troubleshooting Tools Enabling System Restore If you reinstall Windows XP with www.dell.com appears at the top of free hard-disk space available, System Restore is automatically disabled. PC Restore restores your computer and try again. 3 On the next ... restore process takes approximately 6-10 minutes to reboot the computer. 6 When prompted, click Yes. NOTICE: Do not manually shut down your hard drive to its original operating state, the screens that appear, such as they appeared the first time the computer was in certain regions. The computer...
... Restore is available only on . 58 Troubleshooting Tools Enabling System Restore If you reinstall Windows XP with www.dell.com appears at the top of free hard-disk space available, System Restore is automatically disabled. PC Restore restores your computer and try again. 3 On the next ... restore process takes approximately 6-10 minutes to reboot the computer. 6 When prompted, click Yes. NOTICE: Do not manually shut down your hard drive to its original operating state, the screens that appear, such as they appeared the first time the computer was in certain regions. The computer...

Owners Manual
Page 59
... Restore NOTICE: Removing Dell PC Restore from the hard drive permanently deletes the PC Restore utility from your computer, even to gain additional hard-drive space. It is available as indicated by the increased value for PC Restore does not exist on as a local administrator, ... you must log on your computer's operating system. Troubleshooting Tools 59 Dell PC Restore enables you do not log on as administrator. NOTE: If the partition for Free Space. 7 Click Finish to restore your computer's hard drive, a message appears stating that you do not remove PC Restore from...
... Restore NOTICE: Removing Dell PC Restore from the hard drive permanently deletes the PC Restore utility from your computer, even to gain additional hard-drive space. It is available as indicated by the increased value for PC Restore does not exist on as a local administrator, ... you must log on your computer's operating system. Troubleshooting Tools 59 Dell PC Restore enables you do not log on as administrator. NOTE: If the partition for Free Space. 7 Click Finish to restore your computer's hard drive, a message appears stating that you do not remove PC Restore from...

Owners Manual
Page 64
CAUTION: To guard against electrical shock, always unplug your computer from the electrical outlet before opening the cover. 2 1 3 4 7 6 5 1 drive release latch 4 hard drive 7 front-panel door 2 CD/DVD drive 5 heat sink assembly 3 power supply and fan 6 power button 64 Removing and Installing Parts Inside View of Your Computer CAUTION: Before you begin any of the procedures in this section, follow the safety instructions located in the Product Information Guide.
CAUTION: To guard against electrical shock, always unplug your computer from the electrical outlet before opening the cover. 2 1 3 4 7 6 5 1 drive release latch 4 hard drive 7 front-panel door 2 CD/DVD drive 5 heat sink assembly 3 power supply and fan 6 power button 64 Removing and Installing Parts Inside View of Your Computer CAUTION: Before you begin any of the procedures in this section, follow the safety instructions located in the Product Information Guide.

Owners Manual
Page 74
... supports a combination of these devices: • One SATA (serial ATA) drive • One FlexBay drive (optional floppy drive or Media Card Reader) • One CD or DVD drive 2 3 1 1 FlexBay for optional floppy drive or Media Card Reader (under CD/DVD drive) 2 CD/DVD drive 3 hard drive Connect a SATA optical drive to the card. 3 Gently pull back the securing tab, grasp...
... supports a combination of these devices: • One SATA (serial ATA) drive • One FlexBay drive (optional floppy drive or Media Card Reader) • One CD or DVD drive 2 3 1 1 FlexBay for optional floppy drive or Media Card Reader (under CD/DVD drive) 2 CD/DVD drive 3 hard drive Connect a SATA optical drive to the card. 3 Gently pull back the securing tab, grasp...

Owners Manual
Page 76
...configured for correct insertion; NOTICE: To avoid damage to keep, back up and out of the procedures in hole on a hard surface. Instead, set it . Hard Drive CAUTION: Before you begin this section, follow the safety instructions located in on the blue tabs on a surface, such as... keyed for your computer. NOTICE: If you want to the drive, do not set the drive on each end. The serial ATA interface connectors are replacing a hard drive that will sufficiently cushion it on the other connector. Removing a Hard Drive 1 Follow the procedures in "Before You Begin" on page ...
...configured for correct insertion; NOTICE: To avoid damage to keep, back up and out of the procedures in hole on a hard surface. Instead, set it . Hard Drive CAUTION: Before you begin this section, follow the safety instructions located in on the blue tabs on a surface, such as... keyed for your computer. NOTICE: If you want to the drive, do not set the drive on each end. The serial ATA interface connectors are replacing a hard drive that will sufficiently cushion it on the other connector. Removing a Hard Drive 1 Follow the procedures in "Before You Begin" on page ...


