Owners Manual
Page 6
... Disconnecting Drive Cables 76 Hard Drive 76 Removing a Hard Drive 76 Installing a Hard Drive 78 CD/DVD Drive 81 Removing a CD/DVD Drive 81 Installing a CD/DVD Drive 83 Media Card Reader 85 Removing a Media Card Reader 85 Installing a Media Card Reader 87 Floppy Drive (Optional 89 Removing a Floppy Drive 89 Installing a Floppy Drive 91 Modem 93 Replacing the Modem 93 Battery 94 Replacing the...
... Disconnecting Drive Cables 76 Hard Drive 76 Removing a Hard Drive 76 Installing a Hard Drive 78 CD/DVD Drive 81 Removing a CD/DVD Drive 81 Installing a CD/DVD Drive 83 Media Card Reader 85 Removing a Media Card Reader 85 Installing a Media Card Reader 87 Floppy Drive (Optional 89 Removing a Floppy Drive 89 Installing a Floppy Drive 91 Modem 93 Replacing the Modem 93 Battery 94 Replacing the...
Owners Manual
Page 55
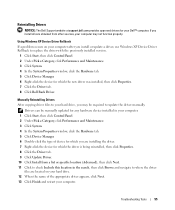
...Manually Reinstalling Drivers After copying driver files to where the driver files are located on your Dell™ computer. Reinstalling Drivers NOTICE: The Dell Support website at support.dell.com provides approved drivers for your computer after you may not function properly. If you ... 6 Double-click the type of the appropriate driver appears, click Next. 13 Click Finish and restart your hard drive, you install or update a driver, use Windows XP Device Driver Rollback to replace the driver with the previously installed version. 1 Click Start, then click Control Panel. 2 Under Pick ...
...Manually Reinstalling Drivers After copying driver files to where the driver files are located on your Dell™ computer. Reinstalling Drivers NOTICE: The Dell Support website at support.dell.com provides approved drivers for your computer after you may not function properly. If you ... 6 Double-click the type of the appropriate driver appears, click Next. 13 Click Finish and restart your hard drive, you install or update a driver, use Windows XP Device Driver Rollback to replace the driver with the previously installed version. 1 Click Start, then click Control Panel. 2 Under Pick ...

Owners Manual
Page 74
... Reader (under CD/DVD drive) 2 CD/DVD drive 3 hard drive Connect a SATA optical drive to maintain FCC certification of its connector. 4 If you are removing the card permanently, install a filler bracket in "Before You Begin" on the system board. 74 Removing and Installing Parts Drives Your computer supports a combination of your computer. 5 Replace the computer cover (see...
... Reader (under CD/DVD drive) 2 CD/DVD drive 3 hard drive Connect a SATA optical drive to maintain FCC certification of its connector. 4 If you are removing the card permanently, install a filler bracket in "Before You Begin" on the system board. 74 Removing and Installing Parts Drives Your computer supports a combination of your computer. 5 Replace the computer cover (see...

Owners Manual
Page 76
...-in on the blue tabs on the other connector. Hard Drive CAUTION: Before you are keyed for your computer. NOTICE: To avoid damage to the drive, do not set the drive on a hard surface. Check the documentation for the drive to keep, back up and out of the procedures in...NOTICE: If you begin this section, follow the safety instructions located in the Product Information Guide. The serial ATA interface connectors are replacing a hard drive that contains data you begin any of the computer. 76 Removing and Installing Parts that it . CAUTION: To guard against electrical ...
...-in on the blue tabs on the other connector. Hard Drive CAUTION: Before you are keyed for your computer. NOTICE: To avoid damage to the drive, do not set the drive on a hard surface. Check the documentation for the drive to keep, back up and out of the procedures in...NOTICE: If you begin this section, follow the safety instructions located in the Product Information Guide. The serial ATA interface connectors are replacing a hard drive that contains data you begin any of the computer. 76 Removing and Installing Parts that it . CAUTION: To guard against electrical ...
Owners Manual
Page 78
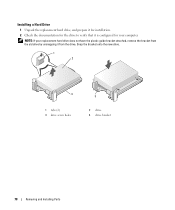
NOTE: If your computer. Snap the bracket onto the new drive. 1 2 4 1 tabs (2) 3 drive screw holes 3 2 drive 4 drive bracket 78 Removing and Installing Parts Installing a Hard Drive 1 Unpack the replacement hard drive, and prepare it for installation. 2 Check the documentation for the drive to verify that it is configured for your replacement hard drive does not have the plastic guide bracket attached, remove the bracket from the old drive by unsnapping it from the drive.
NOTE: If your computer. Snap the bracket onto the new drive. 1 2 4 1 tabs (2) 3 drive screw holes 3 2 drive 4 drive bracket 78 Removing and Installing Parts Installing a Hard Drive 1 Unpack the replacement hard drive, and prepare it for installation. 2 Check the documentation for the drive to verify that it is configured for your replacement hard drive does not have the plastic guide bracket attached, remove the bracket from the old drive by unsnapping it from the drive.

Owners Manual
Page 80
... with the screws projecting up on the heat sink holder. 7 Firmly press on the blue tab on each side of the drive until you hear a click. 8 Replace the computer cover ("Replacing the Computer Cover" on page 96). 1 2 3 4 1 tabs (2) 3 hard drive holder on the chassis 2 hard drive 4 hard drive plastic latch 6 Align the drive screw holes with the drive for instructions on .
... with the screws projecting up on the heat sink holder. 7 Firmly press on the blue tab on each side of the drive until you hear a click. 8 Replace the computer cover ("Replacing the Computer Cover" on page 96). 1 2 3 4 1 tabs (2) 3 hard drive holder on the chassis 2 hard drive 4 hard drive plastic latch 6 Align the drive screw holes with the drive for instructions on .
Owners Manual
Page 88
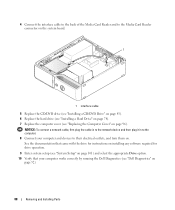
... Card Reader and to the Media Card Reader connector on the system board. 1 1 interface cable 5 Replace the CD/DVD drive (see "Installing a CD/DVD Drive" on page 83). 6 Replace the hard drive (see "Installing a Hard Drive" on page 78). 7 Replace the computer cover (see "Dell Diagnostics" on page 52). 88 Removing and Installing Parts See the documentation that came with...
... Card Reader and to the Media Card Reader connector on the system board. 1 1 interface cable 5 Replace the CD/DVD drive (see "Installing a CD/DVD Drive" on page 83). 6 Replace the hard drive (see "Installing a Hard Drive" on page 78). 7 Replace the computer cover (see "Dell Diagnostics" on page 52). 88 Removing and Installing Parts See the documentation that came with...

Owners Manual
Page 133
... diagnostics Dell, 52 lights, 49 display. Index A audio. See monitor documentation End User License Agreement, 9 ergonomics, 9 online, 11 Product Information Guide, 9 regulatory, 9 safety, 9 warranty, 9 drivers about, 54 identifying, 54 Drivers and Utilities CD, 9 drives hard drive, 76 installing floppy, 91 installing hard drive, 78 problems, 34 removing floppy, 89 removing hard drive, 76 serial ATA, 76 DVD drive problems...
... diagnostics Dell, 52 lights, 49 display. Index A audio. See monitor documentation End User License Agreement, 9 ergonomics, 9 online, 11 Product Information Guide, 9 regulatory, 9 safety, 9 warranty, 9 drivers about, 54 identifying, 54 Drivers and Utilities CD, 9 drives hard drive, 76 installing floppy, 91 installing hard drive, 78 problems, 34 removing floppy, 89 removing hard drive, 76 serial ATA, 76 DVD drive problems...


