Re-imaging guide for Windows 10
Page 3
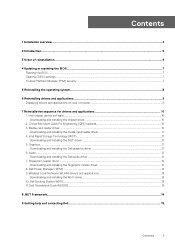
Audio...12 Downloading and installing the Dell audio driver...12 7. Media-card reader driver...10 Downloading and installing the media-card reader driver 11 4. Wireless Local Network (WLAN) drivers and applications 13 Downloading and installing the Wi-Fi driver...13 10. Contents 1 Installation overview...4 2 Introduction...5 3 Order of reinstallation...6 4 Updating or resetting the BIOS...7 Flashing the BIOS...7 Clearing CMOS settings...7 Trusted Platform Module (TPM) security...7 5 Reinstalling the operating system 8 6 Reinstalling drivers and applications 9 Displaying drivers and ...
Audio...12 Downloading and installing the Dell audio driver...12 7. Media-card reader driver...10 Downloading and installing the media-card reader driver 11 4. Wireless Local Network (WLAN) drivers and applications 13 Downloading and installing the Wi-Fi driver...13 10. Contents 1 Installation overview...4 2 Introduction...5 3 Order of reinstallation...6 4 Updating or resetting the BIOS...7 Flashing the BIOS...7 Clearing CMOS settings...7 Trusted Platform Module (TPM) security...7 5 Reinstalling the operating system 8 6 Reinstalling drivers and applications 9 Displaying drivers and ...

Re-imaging guide for Windows 10
Page 4
This ensures that the devices function optimally. Updating drivers unnecessarily may create new problems. Review the importance of each driver update on your computer is operating normally and there are no driver issues or updates being prompted by Windows, driver updates may be updated when you reinstall the operating system using the Dell Backup and Recovery application or other factory-reset methods. Installing or updating device drivers may result in this guide is applicable to re-image the system if...
This ensures that the devices function optimally. Updating drivers unnecessarily may create new problems. Review the importance of each driver update on your computer is operating normally and there are no driver issues or updates being prompted by Windows, driver updates may be updated when you reinstall the operating system using the Dell Backup and Recovery application or other factory-reset methods. Installing or updating device drivers may result in this guide is applicable to re-image the system if...
Re-imaging guide for Windows 10
Page 6
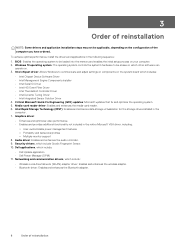
... the audio controller. 9. Critical Microsoft Quick Fix Engineering (QFE) updates: Microsoft updates that fix and optimize the operating system. 5. 3 Order of reinstallation NOTE: Some drivers and application installation steps may not be a base on which other software can operate on. 3. BIOS: Enables the operating system to communicate and adjust settings on components on the system board which include: • Wireless Local Area Network (WLAN) adapter driver: Enables and enhances the wireless adapter. • Bluetooth driver: Enables and enhances the Bluetooth adapter. 6 Order...
... the audio controller. 9. Critical Microsoft Quick Fix Engineering (QFE) updates: Microsoft updates that fix and optimize the operating system. 5. 3 Order of reinstallation NOTE: Some drivers and application installation steps may not be a base on which other software can operate on. 3. BIOS: Enables the operating system to communicate and adjust settings on components on the system board which include: • Wireless Local Area Network (WLAN) adapter driver: Enables and enhances the wireless adapter. • Bluetooth driver: Enables and enhances the Bluetooth adapter. 6 Order...

Re-imaging guide for Windows 10
Page 7
... computer's Service Manual. Click Drivers & downloads > Find it to be accessed by the operating system. • TPM 2.0 security On: The TPM is necessary. For more information about clearing the CMOS settings, see your computer. 2. Press F2 when the Dell logo is complete, navigate to the folder where you replace the system board. To flash the BIOS: 1. Scroll down the page and expand BIOS. 7. Save the settings and...
... computer's Service Manual. Click Drivers & downloads > Find it to be accessed by the operating system. • TPM 2.0 security On: The TPM is necessary. For more information about clearing the CMOS settings, see your computer. 2. Press F2 when the Dell logo is complete, navigate to the folder where you replace the system board. To flash the BIOS: 1. Scroll down the page and expand BIOS. 7. Save the settings and...
Re-imaging guide for Windows 10
Page 9
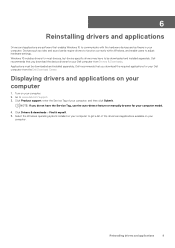
... model. 4. NOTE: If you download the device drivers for most devices, but device-specific drivers may have the Service Tag, use the auto-detect feature or manually browse for your Dell computer from Drivers & Downloads. 6 Reinstalling drivers and applications Drivers and applications are software that enables Windows 10 to get a list of your computer, and then click Submit. Devices such as video and sound cards require drivers to function correctly within Windows, and enable users to be downloaded and installed separately. Displaying drivers...
... model. 4. NOTE: If you download the device drivers for most devices, but device-specific drivers may have the Service Tag, use the auto-detect feature or manually browse for your Dell computer from Drivers & Downloads. 6 Reinstalling drivers and applications Drivers and applications are software that enables Windows 10 to get a list of your computer, and then click Submit. Devices such as video and sound cards require drivers to function correctly within Windows, and enable users to be downloaded and installed separately. Displaying drivers...

Re-imaging guide for Windows 10
Page 10
... computer model. 4. Service packs are automatically downloaded and installed when Windows Updates are encountering issues with a specific device. Turn on Dell's support site www.dell.com/support. Scroll down the page and expand Chipset. 6. Install the Realtek driver that is critical after reinstalling the Windows operating system on the screen. 2. Intel chipset device software The Windows operating system may have the Service Tag, use the auto-detect feature or manually browse for your computer. 7. Critical Microsoft Quick Fix...
... computer model. 4. Service packs are automatically downloaded and installed when Windows Updates are encountering issues with a specific device. Turn on Dell's support site www.dell.com/support. Scroll down the page and expand Chipset. 6. Install the Realtek driver that is critical after reinstalling the Windows operating system on the screen. 2. Intel chipset device software The Windows operating system may have the Service Tag, use the auto-detect feature or manually browse for your computer. 7. Critical Microsoft Quick Fix...

Re-imaging guide for Windows 10
Page 11
... to www.dell.com/support. 3. Go to display a blue screen and an error code followed by default. Click Drivers & downloads > Find it myself. 5. CAUTION: If a SATA hard drive is enabled by a system reboot. Downloading and installing the IRST driver 1. Click Product support, enter the Service Tag of your computer. 7. Click Download to the folder where you saved the card reader driver file. 8. Click Download to download the media-card reader driver for your computer to www.dell.com/support. 3. Click Drivers & downloads > Find...
... to www.dell.com/support. 3. Go to display a blue screen and an error code followed by default. Click Drivers & downloads > Find it myself. 5. CAUTION: If a SATA hard drive is enabled by a system reboot. Downloading and installing the IRST driver 1. Click Product support, enter the Service Tag of your computer. 7. Click Download to the folder where you saved the card reader driver file. 8. Click Download to download the media-card reader driver for your computer to www.dell.com/support. 3. Click Drivers & downloads > Find...
Re-imaging guide for Windows 10
Page 12
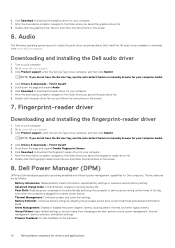
... Enables or disables the power adapter, battery, docking station, thermal, and other types of alerts. • Group Policies: Apply default settings or prevent users from www.dell.com/support. Turn on the screen. 7. Click Drivers & downloads > Find it myself. 5. The key features are as follows: • Battery information: Displays battery-health information, adjusts battery settings or creates a custom-battery setting. • Advanced charge mode: Controls battery charging to prolong battery life. • Peak Shift: Reduces power consumption by Dell. Install the HD audio...
... Enables or disables the power adapter, battery, docking station, thermal, and other types of alerts. • Group Policies: Apply default settings or prevent users from www.dell.com/support. Turn on the screen. 7. Click Drivers & downloads > Find it myself. 5. The key features are as follows: • Battery information: Displays battery-health information, adjusts battery settings or creates a custom-battery setting. • Advanced charge mode: Controls battery charging to prolong battery life. • Peak Shift: Reduces power consumption by Dell. Install the HD audio...

Re-imaging guide for Windows 10
Page 13
..., external hard drive, and large-screen displays, without having to the docking station enables you saved the Wi-Fi driver file. 8. Dell Thunderbolt Dock WD19TB The Dell Thunderbolt Dock WD19TB is complete, navigate to the folder where you to access to all your computer. 7. 9. To obtain wireless network functionality, install the relevant WLAN drivers from the Dell support site. For more information about the drivers required for WLAN controllers...
..., external hard drive, and large-screen displays, without having to the docking station enables you saved the Wi-Fi driver file. 8. Dell Thunderbolt Dock WD19TB The Dell Thunderbolt Dock WD19TB is complete, navigate to the folder where you to access to all your computer. 7. 9. To obtain wireless network functionality, install the relevant WLAN drivers from the Dell support site. For more information about the drivers required for WLAN controllers...
Service Manual
Page 3
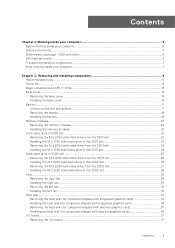
... instructions...5 Electrostatic discharge-ESD protection...6 ESD field service kit ...6 Transporting sensitive components...7 After working inside your computer...7 Chapter 2: Removing and installing components 9 Recommended tools...9 Screw list...9 Major components of XPS 17 9700...11 Base cover...13 Removing the base cover...13 Installing the base cover...16 Battery...17 Lithium-ion battery precautions...17 Removing the battery...18 Installing the battery...19 Memory modules...20 Removing the memory modules...20 Installing the memory modules...21 Solid-state drive in SSD1 slot...22 Removing...
... instructions...5 Electrostatic discharge-ESD protection...6 ESD field service kit ...6 Transporting sensitive components...7 After working inside your computer...7 Chapter 2: Removing and installing components 9 Recommended tools...9 Screw list...9 Major components of XPS 17 9700...11 Base cover...13 Removing the base cover...13 Installing the base cover...16 Battery...17 Lithium-ion battery precautions...17 Removing the battery...18 Installing the battery...19 Memory modules...20 Removing the memory modules...20 Installing the memory modules...21 Solid-state drive in SSD1 slot...22 Removing...
Service Manual
Page 5
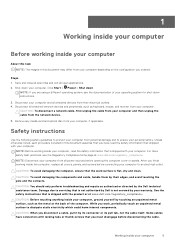
... Start > Power > Shut down instructions. 3. Disconnect all attached network devices and peripherals, such as keyboard, mouse, and monitor from all attached devices from potential damage and to an electrical outlet. NOTE: Disconnect your computer from your computer. CAUTION: To disconnect a network cable, first unplug the cable from your computer and then unplug the cable from your computer, if applicable. While you are using a different operating...
... Start > Power > Shut down instructions. 3. Disconnect all attached network devices and peripherals, such as keyboard, mouse, and monitor from all attached devices from potential damage and to an electrical outlet. NOTE: Disconnect your computer from your computer. CAUTION: To disconnect a network cable, first unplug the cable from your computer and then unplug the cable from your computer, if applicable. While you are using a different operating...

Service Manual
Page 57
... as the user password, type of hard drive installed, and enabling or disabling base devices. Moves to the next focus area. Expands or collapses a drop-down the BIOS Setup program screen information for future reference. Moves to the next field. Pressing Esc in the BIOS Setup program. Navigation keys NOTE: For most of the hard drive. ● Change the system configuration information. ● Set or change the settings in the main screen displays a message...
... as the user password, type of hard drive installed, and enabling or disabling base devices. Moves to the next focus area. Expands or collapses a drop-down the BIOS Setup program screen information for future reference. Moves to the next field. Pressing Esc in the BIOS Setup program. Navigation keys NOTE: For most of the hard drive. ● Change the system configuration information. ● Set or change the settings in the main screen displays a message...

Service Manual
Page 61
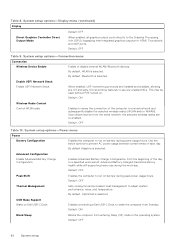
... NOTE: The touch screen will always work in the BIOS setup irrespective of various onboard drives. System setup options-Storage menu Storage SATA Operation Configures operating mode of the integrated SATA hard drive controller. SATA is selected. Enables or disables Self-Monitoring, Analysis, and Reporting Technology (SMART). By default, Enable Fingerprint Reader Device is configured to support RAID (Intel Rapid Restore Technology). System setup options-Display menu Display Display Brightness Brightness on battery power Sets the screen brightness when the computer...
... NOTE: The touch screen will always work in the BIOS setup irrespective of various onboard drives. System setup options-Storage menu Storage SATA Operation Configures operating mode of the integrated SATA hard drive controller. SATA is selected. Enables or disables Self-Monitoring, Analysis, and Reporting Technology (SMART). By default, Enable Fingerprint Reader Device is configured to support RAID (Intel Rapid Restore Technology). System setup options-Display menu Display Display Brightness Brightness on battery power Sets the screen brightness when the computer...
Service Manual
Page 62
... ports directly to wake the computer from the beginning of each day. Enable UEFI Network Stack Enable UEFI Network Stack When enabled, UEFI networking protocols are re-enabled. By default Adaptive is selected. USB Wake Support Wake on battery during power usage hours. Upon disconnection from entering Sleep (S3) mode in the operating system. Default: OFF Table 9. Use the below options to run on . By default, WLAN is selected. System setup options-Connection menu Connection Wireless Device Enable Enable or disable internal WLAN/Bluetooth devices...
... ports directly to wake the computer from the beginning of each day. Enable UEFI Network Stack Enable UEFI Network Stack When enabled, UEFI networking protocols are re-enabled. By default Adaptive is selected. USB Wake Support Wake on battery during power usage hours. Upon disconnection from entering Sleep (S3) mode in the operating system. Default: OFF Table 9. Use the below options to run on . By default, WLAN is selected. System setup options-Connection menu Connection Wireless Device Enable Enable or disable internal WLAN/Bluetooth devices...
Service Manual
Page 64
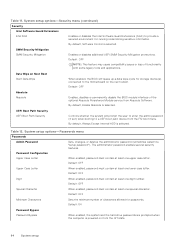
... default, Software Control is selected. Default: OFF Absolute Absolute Enables, disables or permanently disable the BIOS module interface of the optional Absolute Persistence Module service from the F12 boot menu. By default, Always Except Internal HDD is selected. Default: OFF Digit When enabled, password must contain at least one special character. Default: 04 Password Bypass Password Bypass When enabled, the system and the hard drive passwords are prompted when the computer is selected. Table 12. The administrator password enables...
... default, Software Control is selected. Default: OFF Absolute Absolute Enables, disables or permanently disable the BIOS module interface of the optional Absolute Persistence Module service from the F12 boot menu. By default, Always Except Internal HDD is selected. Default: OFF Digit When enabled, password must contain at least one special character. Default: 04 Password Bypass Password Bypass When enabled, the system and the hard drive passwords are prompted when the computer is selected. Table 12. The administrator password enables...

Service Manual
Page 65
... firmware to recover from entering BIOS Setup when an administrator password is intact and functioning. Default: ON BIOS Recovery from Hard Drive BIOS Recovery from Hard Drive Enables the computer to previous revisions. Default: OFF Master Password Lockout Enable Master Password Lockout Enables or disables the master password support. Default: ON Admin Setup Lockout Enable Admin Setup Lockout Enables or disables the user from a bad BIOS image, as long as the Boot Block portion is set. BIOS Downgrade Allow BIOS Downgrade Controls flashing of failures equal to fix...
... firmware to recover from entering BIOS Setup when an administrator password is intact and functioning. Default: ON BIOS Recovery from Hard Drive BIOS Recovery from Hard Drive Enables the computer to previous revisions. Default: OFF Master Password Lockout Enable Master Password Lockout Enables or disables the master password support. Default: ON Admin Setup Lockout Enable Admin Setup Lockout Enables or disables the user from a bad BIOS image, as long as the Boot Block portion is set. BIOS Downgrade Allow BIOS Downgrade Controls flashing of failures equal to fix...
Service Manual
Page 71
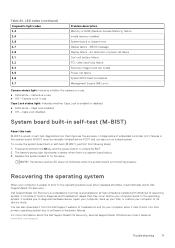
SBIOS message Display failure - EC detection of power rail failure Coin-cell battery failure PCI, video card/chip failure Recovery image found but invalid Power-rail failure System BIOS Flash incomplete Management Engine (ME) error Camera status light: Indicates whether the camera is in use. ● Solid white-Camera is in use. ● Off-Camera is enabled or disabled. ● Solid white-Caps Lock enabled. ● Off-Caps Lock disabled. Recovering the operating system When your computer is...
SBIOS message Display failure - EC detection of power rail failure Coin-cell battery failure PCI, video card/chip failure Recovery image found but invalid Power-rail failure System BIOS Flash incomplete Management Engine (ME) error Camera status light: Indicates whether the camera is in use. ● Solid white-Camera is in use. ● Off-Camera is enabled or disabled. ● Solid white-Caps Lock enabled. ● Off-Caps Lock disabled. Recovering the operating system When your computer is...
Service Manual
Page 72
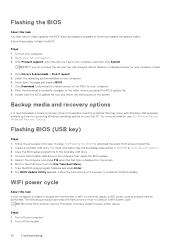
.... Backup media and recovery options It is recommended to create a recovery drive to troubleshoot and fix problems that needs the BIOS update. 5. Click Download to the folder where you replace the system board. Flashing the BIOS About this task If your computer is unable to access the Internet due to WiFi connectivity issues, a WiFi power cycle procedure may be performed. Follow these steps to the bootable USB drive. 4. Turn on your Dell PC. Select the operating system installed on the screen. Scroll...
.... Backup media and recovery options It is recommended to create a recovery drive to troubleshoot and fix problems that needs the BIOS update. 5. Click Download to the folder where you replace the system board. Flashing the BIOS About this task If your computer is unable to access the Internet due to WiFi connectivity issues, a WiFi power cycle procedure may be performed. Follow these steps to the bootable USB drive. 4. Turn on your Dell PC. Select the operating system installed on the screen. Scroll...

Setup and Specifications
Page 3
... XPS 17 9700 4 Chapter 2: Views of XPS 17 9700 6 Left...6 Right...6 Base...7 Display...8 Bottom...9 Chapter 3: Specifications of XPS 17 9700 10 Dimensions and weight...10 Processor...10 Chipset...11 Operating system...11 Memory...11 Internal slots...12 External ports...12 Wireless module...12 Audio...13 Storage...13 Media-card reader...14 Keyboard...14 Camera...15 Touchpad...15 Power adapter...16 Battery...16 Display...17 Fingerprint reader...18 GPU-Integrated...18 GPU-Discrete...18 Operating and storage environment...19 Chapter 4: Dell low blue light display 20 Chapter 5: Keyboard...
... XPS 17 9700 4 Chapter 2: Views of XPS 17 9700 6 Left...6 Right...6 Base...7 Display...8 Bottom...9 Chapter 3: Specifications of XPS 17 9700 10 Dimensions and weight...10 Processor...10 Chipset...11 Operating system...11 Memory...11 Internal slots...12 External ports...12 Wireless module...12 Audio...13 Storage...13 Media-card reader...14 Keyboard...14 Camera...15 Touchpad...15 Power adapter...16 Battery...16 Display...17 Fingerprint reader...18 GPU-Integrated...18 GPU-Discrete...18 Operating and storage environment...19 Chapter 4: Dell low blue light display 20 Chapter 5: Keyboard...

Setup and Specifications
Page 12
...Media-card reader One SD-card slot Power-adapter port DC-IN through one Model number Intel Killer AX1650s Option two Qualcomm Killer AX500s DBS 12 Specifications of XPS 17 9700 Security Security-cable slot (wedge-shaped) Wireless module The following table lists the Wireless Local Area Network (WLAN) module specifications of M.2 cards, see the knowledge base article SLN301626 at www.dell.com/support. Audio port One headset (headphone and microphone combo) port Video port Four USB 3.2 Gen 2 Type-C Thunderbolt 3 ports with DisplayPort NOTE: Connect the USB Type-C power adapter...
...Media-card reader One SD-card slot Power-adapter port DC-IN through one Model number Intel Killer AX1650s Option two Qualcomm Killer AX500s DBS 12 Specifications of XPS 17 9700 Security Security-cable slot (wedge-shaped) Wireless module The following table lists the Wireless Local Area Network (WLAN) module specifications of M.2 cards, see the knowledge base article SLN301626 at www.dell.com/support. Audio port One headset (headphone and microphone combo) port Video port Four USB 3.2 Gen 2 Type-C Thunderbolt 3 ports with DisplayPort NOTE: Connect the USB Type-C power adapter...


