
Me and My Dell
Page 4
Setting Up Your Webcam 22 Integrated Webcam 22 External Webcam 22 Setting up Bluetooth 22 About Your Computer 23 Power Adapter 23 Battery 24 Coin-Cell Battery 24 Touchpad 25 Display 25 Touchscreen 25 3D 25 3D Camera 26 Keyboard 26 Physical Keyboard 27 Keyboard Backlight 27 On-Screen Keyboard 28 Keyboard Connection Types 28 Wired 28 Wireless 28 Service Tag and Express-Service Code 29 Locating the Label on Your Computer 29 Dell Support Website 29 BIOS Setup Program 29 4 Contents
Setting Up Your Webcam 22 Integrated Webcam 22 External Webcam 22 Setting up Bluetooth 22 About Your Computer 23 Power Adapter 23 Battery 24 Coin-Cell Battery 24 Touchpad 25 Display 25 Touchscreen 25 3D 25 3D Camera 26 Keyboard 26 Physical Keyboard 27 Keyboard Backlight 27 On-Screen Keyboard 28 Keyboard Connection Types 28 Wired 28 Wireless 28 Service Tag and Express-Service Code 29 Locating the Label on Your Computer 29 Dell Support Website 29 BIOS Setup Program 29 4 Contents
Me and My Dell
Page 6
... 42 Network‑Interface Controller (NIC) 42 Wireless Wide Area Network (WWAN) Adapter 43 Bluetooth 43 Near-Field Communication 43 Using Your Computer 44 Charging the Battery 44 Using your Keyboard 44 Keyboard Shortcuts 44 Keyboard Shortcuts - Windows 8.1/Windows RT 47 Customizing Your Keyboard 48 Changing Keyboard Input Language 49 Using Numeric Keypad on a Laptop 50 Using Your Touchpad 50 Touchpad Gestures 51 Scroll 51 Zoom 52 Rotate 53 Flick 53 Quick Launch 54 Using Your...
... 42 Network‑Interface Controller (NIC) 42 Wireless Wide Area Network (WWAN) Adapter 43 Bluetooth 43 Near-Field Communication 43 Using Your Computer 44 Charging the Battery 44 Using your Keyboard 44 Keyboard Shortcuts 44 Keyboard Shortcuts - Windows 8.1/Windows RT 47 Customizing Your Keyboard 48 Changing Keyboard Input Language 49 Using Numeric Keypad on a Laptop 50 Using Your Touchpad 50 Touchpad Gestures 51 Scroll 51 Zoom 52 Rotate 53 Flick 53 Quick Launch 54 Using Your...

Me and My Dell
Page 7
Using Bluetooth 57 Pairing a Bluetooth device with your computer 57 Using the Webcam 58 Capturing a Still Image 58 Recording a Video 58 Selecting the Camera and Microphone 58 Ports and Connectors 59 Audio 59 Types of Audio Ports 59 USB 60 USB Ports 60 eSATA 61 Visual Graphics Array (VGA) 62 Digital Visual Interface (DVI) 62 DisplayPort 62 Mini-DisplayPort 62 Advantages of DisplayPort 63 HDMI 63 Advantages of HDMI 63...
Using Bluetooth 57 Pairing a Bluetooth device with your computer 57 Using the Webcam 58 Capturing a Still Image 58 Recording a Video 58 Selecting the Camera and Microphone 58 Ports and Connectors 59 Audio 59 Types of Audio Ports 59 USB 60 USB Ports 60 eSATA 61 Visual Graphics Array (VGA) 62 Digital Visual Interface (DVI) 62 DisplayPort 62 Mini-DisplayPort 62 Advantages of DisplayPort 63 HDMI 63 Advantages of HDMI 63...
Me and My Dell
Page 12
..., and other Windows 8.1 devices that you sign in to see the available options. 12 Signing in without a Microsoft account and follow the instructions on , with your Microsoft account and other linked accounts with your computer: 1. Locking and unlocking your computer Locking your user profile on the screen. Windows 8.1 Features Signing in You can restore them if needed. Using a Microsoft account synchronizes settings, customizations...
..., and other Windows 8.1 devices that you sign in to see the available options. 12 Signing in without a Microsoft account and follow the instructions on , with your Microsoft account and other linked accounts with your computer: 1. Locking and unlocking your computer Locking your user profile on the screen. Windows 8.1 Features Signing in You can restore them if needed. Using a Microsoft account synchronizes settings, customizations...

Me and My Dell
Page 13
... charms sidebar displays a list of Windows - Allows you are Search, Share, Start, Devices, and Settings. The most common tasks such as a TV. Accessing the desktop 13 Turning off your mouse to the most common charms are using a multi-touch touchpad, swipe-in from the right edge of the screen. tap or click the Desktop tile on your friends and social networks. To open the...
... charms sidebar displays a list of Windows - Allows you are Search, Share, Start, Devices, and Settings. The most common tasks such as a TV. Accessing the desktop 13 Turning off your mouse to the most common charms are using a multi-touch touchpad, swipe-in from the right edge of the screen. tap or click the Desktop tile on your friends and social networks. To open the...

Me and My Dell
Page 16
... network password, if prompted. For more information on enabling wireless on your computer, see the Quick Start Guide that shipped with your computer or at dell.com/support. Connect the Ethernet cable to the modem or router and to verify Internet connection. Setting Up Your Computer The setup procedure will vary according to your computer or tablet, see the Quick Start Guide that wireless is enabled on your computer. For setup instructions specific...
... network password, if prompted. For more information on enabling wireless on your computer, see the Quick Start Guide that shipped with your computer or at dell.com/support. Connect the Ethernet cable to the modem or router and to verify Internet connection. Setting Up Your Computer The setup procedure will vary according to your computer or tablet, see the Quick Start Guide that wireless is enabled on your computer. For setup instructions specific...
Me and My Dell
Page 17
... network you want to connect to . Turn on your computer or tablet. 2. Select . 4. Click Start , type Mobile Broadband Utility in the charms sidebar. 3. Make sure that wireless is enabled on your computer connects directly to the service provider's network, like your laptop or tablet to connect to allow your cell phone. Select Settings in the search box and press . 2. In the Mobile Broadband Utility window, click Connect. Windows 8.1/Windows RT 1. Windows 7 1. Setting...
... network you want to connect to . Turn on your computer or tablet. 2. Select . 4. Click Start , type Mobile Broadband Utility in the charms sidebar. 3. Make sure that wireless is enabled on your computer connects directly to the service provider's network, like your laptop or tablet to connect to allow your cell phone. Select Settings in the search box and press . 2. In the Mobile Broadband Utility window, click Connect. Windows 8.1/Windows RT 1. Windows 7 1. Setting...

Me and My Dell
Page 18
... to connect external speakers. NOTE: For best results, place the speakers as specified in speakers, play the media and set the volume to provide multi-channel audio output. Configuring 5.1/7.1 Audio Configure your computer to your speakers. Access the Search charm. 2. Click Next. 6. Click Configure and click Test. Windows 7 1. Alternatively, click Start → Control Panel→ Hardware and Sound→ Sound. 2. The Speaker Setup window appears. 3. Click Next and follow the instructions...
... to connect external speakers. NOTE: For best results, place the speakers as specified in speakers, play the media and set the volume to provide multi-channel audio output. Configuring 5.1/7.1 Audio Configure your computer to your speakers. Access the Search charm. 2. Click Next. 6. Click Configure and click Test. Windows 7 1. Alternatively, click Start → Control Panel→ Hardware and Sound→ Sound. 2. The Speaker Setup window appears. 3. Click Next and follow the instructions...

Me and My Dell
Page 21
... on the right side. The Add Printer Wizard appears. 3. Use the printer-driver media or download the drivers from this list, click Add a device at the top of your computer using the USB cable before performing these steps. Setting Up Your Computer 21 If you are installing a wireless printer, follow the instruction on setting up the printer, see the documentation that is shipped with...
... on the right side. The Add Printer Wizard appears. 3. Use the printer-driver media or download the drivers from this list, click Add a device at the top of your computer using the USB cable before performing these steps. Setting Up Your Computer 21 If you are installing a wireless printer, follow the instruction on setting up the printer, see the documentation that is shipped with...

Me and My Dell
Page 24
... normal usage conditions, the coin-cell battery can be user replaceable or may be discharged and recharged without affecting the operating time significantly. The CMOS chip contains the time, date, and other configuration information about your computer may require a Dell service technician to a power outlet. The life cycle of the battery is the number of system board, temperature, the time for several...
... normal usage conditions, the coin-cell battery can be user replaceable or may be discharged and recharged without affecting the operating time significantly. The CMOS chip contains the time, date, and other configuration information about your computer may require a Dell service technician to a power outlet. The life cycle of the battery is the number of system board, temperature, the time for several...
Me and My Dell
Page 26
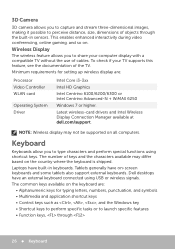
...; Function keys, through the built-in keyboards. Keyboard Keyboards allow you to type characters and perform special functions using USB or wireless signals. Dell desktops have on . This enables enhanced interactivity during video conferencing, online gaming, and so on -screen keyboards and some tablets also support external keyboards. The number of keys and the characters available may not be supported on the keyboard are: • Alphanumeric keys for setting up wireless display are: Processor Video Controller WLAN card Operating System Driver...
...; Function keys, through the built-in keyboards. Keyboard Keyboards allow you to type characters and perform special functions using USB or wireless signals. Dell desktops have on . This enables enhanced interactivity during video conferencing, online gaming, and so on -screen keyboards and some tablets also support external keyboards. The number of keys and the characters available may not be supported on the keyboard are: • Alphanumeric keys for setting up wireless display are: Processor Video Controller WLAN card Operating System Driver...

Me and My Dell
Page 45
... items in the Power Options Properties window. Delete a selected item and move it to activate a different power management mode using the Advanced tab in a document or window. CAUTION: Files deleted using this keyboard shortcut to the Recycle Bin. Cycle through items in the order in a window or on the desktop. Cycle through screen elements in which they were opened. Using your Keyboard 45 Display the address bar...
... items in the Power Options Properties window. Delete a selected item and move it to activate a different power management mode using the Advanced tab in a document or window. CAUTION: Files deleted using this keyboard shortcut to the Recycle Bin. Cycle through items in the order in a window or on the desktop. Cycle through screen elements in which they were opened. Using your Keyboard 45 Display the address bar...
Me and My Dell
Page 69
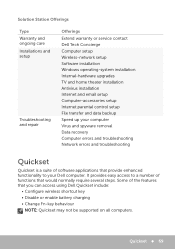
... installation Antivirus installation Internet and email setup Computer‑accessories setup Internet parental control setup File transfer and data backup Speed up your Dell computer. It provides easy access to a number of functions that provide enhanced functionality to your computer Virus and spyware removal Data recovery Computer errors and troubleshooting Network errors and troubleshooting Quickset Quickset is a suite of the features that you can access using Dell Quickset include: • Configure wireless shortcut key • Disable or enable battery charging • Change...
... installation Antivirus installation Internet and email setup Computer‑accessories setup Internet parental control setup File transfer and data backup Speed up your Dell computer. It provides easy access to a number of functions that provide enhanced functionality to your computer Virus and spyware removal Data recovery Computer errors and troubleshooting Network errors and troubleshooting Quickset Quickset is a suite of the features that you can access using Dell Quickset include: • Configure wireless shortcut key • Disable or enable battery charging • Change...

Me and My Dell
Page 72
NOTE: To access DellConnect and terms of usage, see dell.com/DellConnect. 72 DellConnect It allows an technical support representative to remotely diagnose and resolve issues on your permission. A DellConnect request is an online tool that allows a Dell agent to access your computer (under your supervision) to interact with your computer with your computer. DellConnect DellConnect is initiated by a technical support agent when required during troubleshooting.
NOTE: To access DellConnect and terms of usage, see dell.com/DellConnect. 72 DellConnect It allows an technical support representative to remotely diagnose and resolve issues on your permission. A DellConnect request is an online tool that allows a Dell agent to access your computer (under your supervision) to interact with your computer with your computer. DellConnect DellConnect is initiated by a technical support agent when required during troubleshooting.
Me and My Dell
Page 85
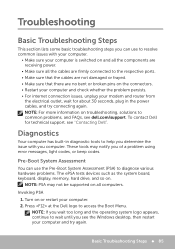
... a problem using error messages, light codes, or beep codes. Turn on or restart your modem and router from the electrical outlet, wait for technical support. Pre-Boot System Assessment You can use the Pre-Boot System Assessment (PSA) to diagnose various hardware problems. The ePSA tests devices such as the system board, keyboard, display, memory, hard drive, and so on. Diagnostics Your computer has built-in the power cables, and try again. Troubleshooting...
... a problem using error messages, light codes, or beep codes. Turn on or restart your modem and router from the electrical outlet, wait for technical support. Pre-Boot System Assessment You can use the Pre-Boot System Assessment (PSA) to diagnose various hardware problems. The ePSA tests devices such as the system board, keyboard, display, memory, hard drive, and so on. Diagnostics Your computer has built-in the power cables, and try again. Troubleshooting...
Me and My Dell
Page 91
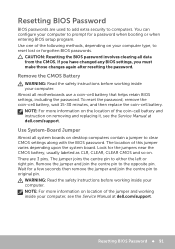
... dell.com/support. Remove the CMOS Battery WARNING: Read the safety instructions before working inside your computer. The location of the coin‑cell battery and instruction on removing and replacing it, see the Service Manual at dell.com/support. NOTE: For more information on the location of this jumper varies depending upon the system board. Resetting BIOS Password BIOS passwords are 3 pins. CAUTION: Resetting the BIOS password involves clearing all motherboards use a coin‑cell battery that helps retain BIOS settings...
... dell.com/support. Remove the CMOS Battery WARNING: Read the safety instructions before working inside your computer. The location of the coin‑cell battery and instruction on removing and replacing it, see the Service Manual at dell.com/support. NOTE: For more information on the location of this jumper varies depending upon the system board. Resetting BIOS Password BIOS passwords are 3 pins. CAUTION: Resetting the BIOS password involves clearing all motherboards use a coin‑cell battery that helps retain BIOS settings...
Me and My Dell
Page 99
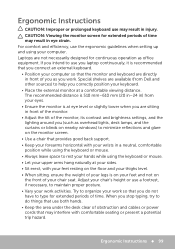
... computer. Adjust your chair's height or use the ergonomic guidelines when setting up and using the keyboard or mouse. • Let your upper arms hang naturally at your sides. • Sit erect, with your wrists in injury. For comfort and efficiency, use a footrest, if necessary, to organize your work . Ergonomic Instructions 99 CAUTION: Viewing the monitor screen for continuous operation as...
... computer. Adjust your chair's height or use the ergonomic guidelines when setting up and using the keyboard or mouse. • Let your upper arms hang naturally at your sides. • Sit erect, with your wrists in injury. For comfort and efficiency, use a footrest, if necessary, to organize your work . Ergonomic Instructions 99 CAUTION: Viewing the monitor screen for continuous operation as...

XPS 14Z L412z Owners Manual
Page 3
Contents 1 Before You Begin 7 Recommended Tools 7 Turning Off Your Computer 7 Before Working Inside Your Computer 8 2 Base Cover 11 Removing the Base Cover 11 Replacing the Base Cover 12 3 Battery 15 Removing the Battery 15 Replacing the Battery 16 4 Memory Module(s 17 Removing the Memory Module(s 17 Replacing the Memory Module(s 18 Contents 3
Contents 1 Before You Begin 7 Recommended Tools 7 Turning Off Your Computer 7 Before Working Inside Your Computer 8 2 Base Cover 11 Removing the Base Cover 11 Replacing the Base Cover 12 3 Battery 15 Removing the Battery 15 Replacing the Battery 16 4 Memory Module(s 17 Removing the Memory Module(s 17 Replacing the Memory Module(s 18 Contents 3

XPS 14Z L412z Owners Manual
Page 19
... not installed properly, the computer may result in damage to your computer and an electrical outlet. CAUTION: Before turning on page 48. To replace the system board, see "Replacing the Base Cover" on page 12). 6 Connect the AC adapter to the computer. 7 Turn on the computer. NOTE: Replace the system board after replacing the secondary memory module. If you do so may not boot. 3 2 1 1 tab 3 memory-module...
... not installed properly, the computer may result in damage to your computer and an electrical outlet. CAUTION: Before turning on page 48. To replace the system board, see "Replacing the Base Cover" on page 12). 6 Connect the AC adapter to the computer. 7 Turn on the computer. NOTE: Replace the system board after replacing the secondary memory module. If you do so may not boot. 3 2 1 1 tab 3 memory-module...

XPS 14Z L412z Owners Manual
Page 25
... operating system, drivers, and utilities on page 15) before removing the hard drive. CAUTION: Hard drives are installing a hard drive from the computer when the drive is On or in "Before You Begin" on page 7. 2 Remove the base cover (see "Removing the Base Cover" on page 11). 3 Remove the battery (see "Removing the Battery" on the new hard drive. CAUTION: Only a certified service technician should perform repairs on your computer. Exercise care when handling the hard drive. Removing...
... operating system, drivers, and utilities on page 15) before removing the hard drive. CAUTION: Hard drives are installing a hard drive from the computer when the drive is On or in "Before You Begin" on page 7. 2 Remove the base cover (see "Removing the Base Cover" on page 11). 3 Remove the battery (see "Removing the Battery" on the new hard drive. CAUTION: Only a certified service technician should perform repairs on your computer. Exercise care when handling the hard drive. Removing...


