
Me and My Dell
Page 4
Setting Up Your Webcam 22 Integrated Webcam 22 External Webcam 22 Setting up Bluetooth 22 About Your Computer 23 Power Adapter 23 Battery 24 Coin-Cell Battery 24 Touchpad 25 Display 25 Touchscreen 25 3D 25 3D Camera 26 Keyboard 26 Physical Keyboard 27 Keyboard Backlight 27 On-Screen Keyboard 28 Keyboard Connection Types 28 Wired 28 Wireless 28 Service Tag and Express-Service Code 29 Locating the Label on Your Computer 29 Dell Support Website 29 BIOS Setup Program 29 4 Contents
Setting Up Your Webcam 22 Integrated Webcam 22 External Webcam 22 Setting up Bluetooth 22 About Your Computer 23 Power Adapter 23 Battery 24 Coin-Cell Battery 24 Touchpad 25 Display 25 Touchscreen 25 3D 25 3D Camera 26 Keyboard 26 Physical Keyboard 27 Keyboard Backlight 27 On-Screen Keyboard 28 Keyboard Connection Types 28 Wired 28 Wireless 28 Service Tag and Express-Service Code 29 Locating the Label on Your Computer 29 Dell Support Website 29 BIOS Setup Program 29 4 Contents

Me and My Dell
Page 23
... is designed for, and the power cable varies based on the country where the power adapter is recommended to portable computers and certain desktop computers. Power Adapter 23 CAUTION: To avoid damaging your computer or a Dell‑approved replacement power adapter. About Your Computer Power Adapter Power adapters are used to supply power to use only the power adapter that shipped with your computer...
... is designed for, and the power cable varies based on the country where the power adapter is recommended to portable computers and certain desktop computers. Power Adapter 23 CAUTION: To avoid damaging your computer or a Dell‑approved replacement power adapter. About Your Computer Power Adapter Power adapters are used to supply power to use only the power adapter that shipped with your computer...
Me and My Dell
Page 44
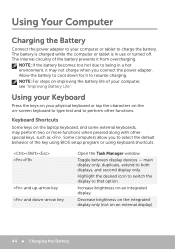
... functions. The battery is charged while the computer or tablet is in a hot environment, it from overcharging. Some computers allow you connect the power adapter. main display only, duplicate, extend to charge the battery. Decrease brightness on the integrated display only (not on an integrated display. NOTE:... If the battery becomes too hot due to being in use or turned off. Using Your Computer Charging the Battery Connect the power adapter to your computer or tablet to both displays, and second display only. NOTE: For steps on the laptop keyboard, and some external ...
... functions. The battery is charged while the computer or tablet is in a hot environment, it from overcharging. Some computers allow you connect the power adapter. main display only, duplicate, extend to charge the battery. Decrease brightness on the integrated display only (not on an integrated display. NOTE:... If the battery becomes too hot due to being in use or turned off. Using Your Computer Charging the Battery Connect the power adapter to your computer or tablet to both displays, and second display only. NOTE: For steps on the laptop keyboard, and some external ...

Me and My Dell
Page 87
... displays the status of the peripheral. Press at the Dell logo to enter the LCD BIST. LCD BIST LCD BIST (Built‑In Self Test) helps you do not notice the problem during the test then the issue lies outside of the battery, power adapter, fans, and so on. • Event Log - Diagnostics...
... displays the status of the peripheral. Press at the Dell logo to enter the LCD BIST. LCD BIST LCD BIST (Built‑In Self Test) helps you do not notice the problem during the test then the issue lies outside of the battery, power adapter, fans, and so on. • Event Log - Diagnostics...

Me and My Dell
Page 96
... 7 1. Choose what you want your computer to do when you use your battery significantly reduces if you press the power button from the drop-down menu next to a power adapter. 6. The operating time of your laptop computer. Click Choose what you want your Control Panel is the time the ..., which is displayed by Category, click the View by: drop‑down menu next to a power adapter. 4. You may choose different option when your computer is running on how you press the power button from the drop-down and select Small icons or Large icons. 5. Click Save changes. Click...
... 7 1. Choose what you want your computer to do when you use your battery significantly reduces if you press the power button from the drop-down menu next to a power adapter. 6. The operating time of your laptop computer. Click Choose what you want your Control Panel is the time the ..., which is displayed by Category, click the View by: drop‑down menu next to a power adapter. 4. You may choose different option when your computer is running on how you press the power button from the drop-down and select Small icons or Large icons. 5. Click Save changes. Click...
Me and My Dell
Page 98
... two different computers. Click the Desktop mode tab. 3. Click Enable or Disable based on the Windows notification area, and then click Dell Extended Battery Life Options. The most common reasons requiring a computer migration are several utilities that simplify migration, it is recommended that you...documents, and so on. See www.microsoft.com for migration from one operating system to another. Click OK. Dell Desktop Mode If you primarily use your computer with the power adapter connected, you can enable the desktop mode to moderate the extent to a new operating systems. CAUTION: While...
... two different computers. Click the Desktop mode tab. 3. Click Enable or Disable based on the Windows notification area, and then click Dell Extended Battery Life Options. The most common reasons requiring a computer migration are several utilities that simplify migration, it is recommended that you...documents, and so on. See www.microsoft.com for migration from one operating system to another. Click OK. Dell Desktop Mode If you primarily use your computer with the power adapter connected, you can enable the desktop mode to moderate the extent to a new operating systems. CAUTION: While...

XPS 13 L321X Owners Manual
Page 5
Postrequisites 28 9 Heat Sink 29 Prerequisites 29 Removing the Heat Sink 29 Replacing the Heat Sink 30 Postrequisites 30 10 Fan 31 Prerequisites 31 Removing the Fan 31 Replacing the Fan 33 Postrequisites 33 11 Power-Adapter Connector 35 Prerequisites 35 Removing the Power-Adapter Connector 35 Replacing the Power-Adapter Connector 37 Postrequisites 38 Contents 5
Postrequisites 28 9 Heat Sink 29 Prerequisites 29 Removing the Heat Sink 29 Replacing the Heat Sink 30 Postrequisites 30 10 Fan 31 Prerequisites 31 Removing the Fan 31 Replacing the Fan 33 Postrequisites 33 11 Power-Adapter Connector 35 Prerequisites 35 Removing the Power-Adapter Connector 35 Replacing the Power-Adapter Connector 37 Postrequisites 38 Contents 5

XPS 13 L321X Owners Manual
Page 32
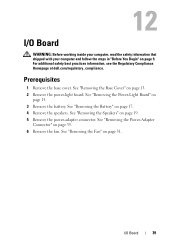
2 Disconnect the power-adapter connector cable from the system-board connector. 3 Release the power-adapter connector cable from the routing guides on the fan. 1 2 1 routing guides 2 power-adapter connector cable 4 Disconnect the fan cable from the I/O board connector. 5 Remove the screws that secure the fan to the palm-rest assembly. 6 Lift the fan off the palm-rest assembly. 1 1 fan cable 3 fan 32 Fan 2 3 2 screws (2)
2 Disconnect the power-adapter connector cable from the system-board connector. 3 Release the power-adapter connector cable from the routing guides on the fan. 1 2 1 routing guides 2 power-adapter connector cable 4 Disconnect the fan cable from the I/O board connector. 5 Remove the screws that secure the fan to the palm-rest assembly. 6 Lift the fan off the palm-rest assembly. 1 1 fan cable 3 fan 32 Fan 2 3 2 screws (2)

XPS 13 L321X Owners Manual
Page 33
See "Replacing the Battery" on the fan. 5 Connect the power-adapter connector cable to the system-board connector. 6 Connect the I/O cable to the I /O board connector and system-board connector. Fan 33 Postrequisites 1 Replace the battery. Replacing ... that secure the fan to the palm-rest assembly. 3 Connect the fan cable to the I /O board connector. 4 Route the power-adapter connector cable through the routing guides on page 18. 2 Replace the power-light board. See "Replacing the Base Cover" on page 14. 4 Follow the instructions in "After Working Inside Your Computer" on...
See "Replacing the Battery" on the fan. 5 Connect the power-adapter connector cable to the system-board connector. 6 Connect the I/O cable to the I /O board connector and system-board connector. Fan 33 Postrequisites 1 Replace the battery. Replacing ... that secure the fan to the palm-rest assembly. 3 Connect the fan cable to the I /O board connector. 4 Route the power-adapter connector cable through the routing guides on page 18. 2 Replace the power-light board. See "Replacing the Base Cover" on page 14. 4 Follow the instructions in "After Working Inside Your Computer" on...

XPS 13 L321X Owners Manual
Page 35
... page 15. 3 Remove the battery. Power-Adapter Connector 35 See "Removing the Power-Light Board" on page 13. 2 Remove the power-light board. For additional safety best practices information, see the Regulatory Compliance Homepage at dell.com/regulatory_compliance. See "Removing the Battery" on page 9. Prerequisites 1 Remove the base cover. 11 Power-Adapter Connector WARNING: Before working inside your...
... page 15. 3 Remove the battery. Power-Adapter Connector 35 See "Removing the Power-Light Board" on page 13. 2 Remove the power-light board. For additional safety best practices information, see the Regulatory Compliance Homepage at dell.com/regulatory_compliance. See "Removing the Battery" on page 9. Prerequisites 1 Remove the base cover. 11 Power-Adapter Connector WARNING: Before working inside your...

XPS 13 L321X Owners Manual
Page 36
1 2 3 1 routing guides 3 mini-card cables (2) 2 touchpad cable 4 Disconnect the power-adapter connector cable from the system-board connector. 5 Release the power-adapter connector cable from the routing guides on the fan. 6 Remove the screw that secures the power-adapter connector to the palm-rest assembly. 7 Lift the power-adapter connector off the palm-rest assembly. 36 Power-Adapter Connector
1 2 3 1 routing guides 3 mini-card cables (2) 2 touchpad cable 4 Disconnect the power-adapter connector cable from the system-board connector. 5 Release the power-adapter connector cable from the routing guides on the fan. 6 Remove the screw that secures the power-adapter connector to the palm-rest assembly. 7 Lift the power-adapter connector off the palm-rest assembly. 36 Power-Adapter Connector

XPS 13 L321X Owners Manual
Page 37
... with the screw hole on the palm-rest assembly. 2 Replace the screw that secures the power-adapter connector to the palm-rest assembly. 3 Route the power-adapter connector cable through the routing guides on the fan. 4 Connect the power-adapter connector cable to the system-board connector. 5 Route the mini-card cables through the routing guides...
... with the screw hole on the palm-rest assembly. 2 Replace the screw that secures the power-adapter connector to the palm-rest assembly. 3 Route the power-adapter connector cable through the routing guides on the fan. 4 Connect the power-adapter connector cable to the system-board connector. 5 Route the mini-card cables through the routing guides...

XPS 13 L321X Owners Manual
Page 38
... the mini-card cable color scheme for the mini-card supported by your computer. See "Replacing the Speakers" on page 11. 38 Power-Adapter Connector See "Replacing the Base Cover" on page 14. 5 Follow the instructions in "After Working Inside Your Computer" on page 22. ... (white triangle) white Auxiliary WLAN + Bluetooth (black triangle) black Postrequisites 1 Replace the speakers. Connectors on page 18. 3 Replace the power-light board. See "Replacing the Power-Light Board" on the mini-card. 7 Connect the mini-card cables to the connectors on page 16. 4 Replace the base cover.
... the mini-card cable color scheme for the mini-card supported by your computer. See "Replacing the Speakers" on page 11. 38 Power-Adapter Connector See "Replacing the Base Cover" on page 14. 5 Follow the instructions in "After Working Inside Your Computer" on page 22. ... (white triangle) white Auxiliary WLAN + Bluetooth (black triangle) black Postrequisites 1 Replace the speakers. Connectors on page 18. 3 Replace the power-light board. See "Replacing the Power-Light Board" on the mini-card. 7 Connect the mini-card cables to the connectors on page 16. 4 Replace the base cover.
XPS 13 L321X Owners Manual
Page 39
... computer, read the safety information that shipped with your computer and follow the steps in "Before You Begin" on page 19. 5 Remove the power-adapter connector. See "Removing the Speakers" on page 9. 12 I /O Board 39 See "Removing the Battery" on page 31. See "Removing the... Fan" on page 17. 4 Remove the speakers. See "Removing the Base Cover" on page 13. 2 Remove the power-light board. For additional safety best practices information, see the Regulatory Compliance Homepage at dell.com/regulatory_compliance. Prerequisites 1 Remove the base cover.
... computer, read the safety information that shipped with your computer and follow the steps in "Before You Begin" on page 19. 5 Remove the power-adapter connector. See "Removing the Speakers" on page 9. 12 I /O Board 39 See "Removing the Battery" on page 31. See "Removing the... Fan" on page 17. 4 Remove the speakers. See "Removing the Base Cover" on page 13. 2 Remove the power-light board. For additional safety best practices information, see the Regulatory Compliance Homepage at dell.com/regulatory_compliance. Prerequisites 1 Remove the base cover.

XPS 13 L321X Owners Manual
Page 41
See "Replacing the Battery" on page 11. See "Replacing the Base Cover" on page 14. 7 Follow the instructions in "After Working Inside Your Computer" on page 18. 5 Replace the power-light board. Postrequisites 1 Replace the fan. I/O Board 41 See "Replacing the Power-Adapter Connector" on page 37. 3 Replace the speakers See "Replacing the Speakers" on page 16. 6 Replace the base cover. See "Replacing the Power-Light Board" on page 22. 4 Replace the battery. See "Replacing the Fan" on page 33. 2 Replace the power-adapter connector.
See "Replacing the Battery" on page 11. See "Replacing the Base Cover" on page 14. 7 Follow the instructions in "After Working Inside Your Computer" on page 18. 5 Replace the power-light board. Postrequisites 1 Replace the fan. I/O Board 41 See "Replacing the Power-Adapter Connector" on page 37. 3 Replace the speakers See "Replacing the Speakers" on page 16. 6 Replace the base cover. See "Replacing the Power-Light Board" on page 22. 4 Replace the battery. See "Replacing the Fan" on page 33. 2 Replace the power-adapter connector.

XPS 13 L321X Owners Manual
Page 54
2 Disconnect the power-adapter connector cable from the system-board connector. 3 Release the power-adapter connector cable from the routing guides on the fan. 1 2 1 routing guides 2 power-adapter connector cable 4 Disconnect the mini-card cables from the connectors on the mini-card. 5 Lift the connector latch and pull the pull-tab to disconnect the touchpad cable from the connector on the system board. 54 Display Assembly
2 Disconnect the power-adapter connector cable from the system-board connector. 3 Release the power-adapter connector cable from the routing guides on the fan. 1 2 1 routing guides 2 power-adapter connector cable 4 Disconnect the mini-card cables from the connectors on the mini-card. 5 Lift the connector latch and pull the pull-tab to disconnect the touchpad cable from the connector on the system board. 54 Display Assembly

XPS 13 L321X Owners Manual
Page 57
... Color Scheme WLAN + Bluetooth (2 cables) Main WLAN + Bluetooth (white triangle) white Auxiliary WLAN + Bluetooth (black triangle) black 7 Route the power-adapter connector cable through the routing guides on the fan. 8 Connect the power-adapter connector cable to the connectors on the mini-card. Postrequisites 1 Replace the speakers. See "Replacing the Battery" on page 11...
... Color Scheme WLAN + Bluetooth (2 cables) Main WLAN + Bluetooth (white triangle) white Auxiliary WLAN + Bluetooth (black triangle) black 7 Route the power-adapter connector cable through the routing guides on the fan. 8 Connect the power-adapter connector cable to the connectors on the mini-card. Postrequisites 1 Replace the speakers. See "Replacing the Battery" on page 11...

XPS 13 L321X Owners Manual
Page 59
...the battery. See "Removing the System Board" on page 29. 8 Remove the power-adapter connector. See "Removing the Fan" on page 31. 10 Remove the I /O ...See "Removing the I /O board. For additional safety best practices information, see the Regulatory Compliance Homepage at dell.com/regulatory_compliance. See "Removing the Solid-State Drive" on page 19. 5 Remove the mini-card. Prerequisites ...information that shipped with your computer and follow the steps in "Before You Begin" on page 13. 2 Remove the power-light board. See "Removing the Battery" on page 24. 6 Remove the solid-state ...
...the battery. See "Removing the System Board" on page 29. 8 Remove the power-adapter connector. See "Removing the Fan" on page 31. 10 Remove the I /O ...See "Removing the I /O board. For additional safety best practices information, see the Regulatory Compliance Homepage at dell.com/regulatory_compliance. See "Removing the Solid-State Drive" on page 19. 5 Remove the mini-card. Prerequisites ...information that shipped with your computer and follow the steps in "Before You Begin" on page 13. 2 Remove the power-light board. See "Removing the Battery" on page 24. 6 Remove the solid-state ...

XPS 13 L321X Owners Manual
Page 61
See "Replacing the Fan" on page 37. 5 Replace the heat sink. See "Replacing the Power-Adapter Connector" on page 33. 4 Replace the power-adapter connector. See "Replacing the Speakers" on page 30. 6 Replace the solid-state drive. See "Replacing the System Board" on page 46. 2 Replace the I ...on the palmrest assembly. 2 Replace the screws that secure the keyboard to the palm-rest assembly. See "Replacing the I /O board. See "Replacing the Power-Light Board" on page 28. 7 Replace the mini-card. See "Replacing the Solid-State Drive" on page 16. 11 Replace the base cover. See ...
See "Replacing the Fan" on page 37. 5 Replace the heat sink. See "Replacing the Power-Adapter Connector" on page 33. 4 Replace the power-adapter connector. See "Replacing the Speakers" on page 30. 6 Replace the solid-state drive. See "Replacing the System Board" on page 46. 2 Replace the I ...on the palmrest assembly. 2 Replace the screws that secure the keyboard to the palm-rest assembly. See "Replacing the I /O board. See "Replacing the Power-Light Board" on page 28. 7 Replace the mini-card. See "Replacing the Solid-State Drive" on page 16. 11 Replace the base cover. See ...

XPS 13 L321X Owners Manual
Page 63
... additional safety best practices information, see the Regulatory Compliance Homepage at dell.com/regulatory_compliance. See "Removing the Base Cover" on page 24. 6 Remove the solid-state drive. See "Removing the Mini-Card" on page 13. 2 Remove the power-light board. See "Removing the Heat Sink" on page 17.... 4 Remove the speakers. See "Removing the System Board" on page 44. 11 Remove the I /O Board" on page 35. 9 Remove the fan. See "Removing the Battery" on page 29. 8 Remove the power-adapter connector...
... additional safety best practices information, see the Regulatory Compliance Homepage at dell.com/regulatory_compliance. See "Removing the Base Cover" on page 24. 6 Remove the solid-state drive. See "Removing the Mini-Card" on page 13. 2 Remove the power-light board. See "Removing the Heat Sink" on page 17.... 4 Remove the speakers. See "Removing the System Board" on page 44. 11 Remove the I /O Board" on page 35. 9 Remove the fan. See "Removing the Battery" on page 29. 8 Remove the power-adapter connector...


