
Owner's Manual
Page 5
... the Touch Pad 50 6 Using PC Cards PC Card Types 51 PC Card Blanks 51 Extended PC Cards 51 Installing a PC Card 51 Removing a PC Card or Blank 52 7 Setting Up a Home and Office Network Connecting to a Network Adapter 55 Network Setup Wizard 56 Connecting to a Wireless Local Area Network 56 Determining Your Network Type 56 Connecting to a Wireless Network in Microsoft® Windows® XP . . . . . 57 8 Solving Problems Dell™ Diagnostics 59 When to Use the Dell Diagnostics 59 Drive Problems 61 DVD drive problems 62 Hard drive problems 63...
... the Touch Pad 50 6 Using PC Cards PC Card Types 51 PC Card Blanks 51 Extended PC Cards 51 Installing a PC Card 51 Removing a PC Card or Blank 52 7 Setting Up a Home and Office Network Connecting to a Network Adapter 55 Network Setup Wizard 56 Connecting to a Wireless Local Area Network 56 Determining Your Network Type 56 Connecting to a Wireless Network in Microsoft® Windows® XP . . . . . 57 8 Solving Problems Dell™ Diagnostics 59 When to Use the Dell Diagnostics 59 Drive Problems 61 DVD drive problems 62 Hard drive problems 63...

Owner's Manual
Page 11
...; M processors, optical drives, and USB devices. Find It Here • Solutions - Service call and order status, warranty, and repair information • Service and support - support.dell.com NOTE: Select your computer and operating system and installs the updates appropriate for components, such at premier.support.dell.com. Upgrade information for your Dell computer. The software automatically detects your region to System and Configuration Utilities, and click Dell Notebook System Software. What Are You...
...; M processors, optical drives, and USB devices. Find It Here • Solutions - Service call and order status, warranty, and repair information • Service and support - support.dell.com NOTE: Select your computer and operating system and installs the updates appropriate for components, such at premier.support.dell.com. Upgrade information for your Dell computer. The software automatically detects your region to System and Configuration Utilities, and click Dell Notebook System Software. What Are You...
Owner's Manual
Page 17
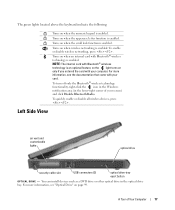
... can install devices such as a DVD drive or other optical drive in the lower-right corner of Your Computer 17 Left Side View air vent and customizable lights optical drive security cable slot USB connectors (2) optical drive-tray eject button O P T I C A L D R I V E - A Turns on when an internal card with your screen) and click Disable Bluetooth Radio. Turns on when the uppercase letter function is enabled. To quickly enable or disable all wireless devices, press . The green lights located above the keyboard indicate...
... can install devices such as a DVD drive or other optical drive in the lower-right corner of Your Computer 17 Left Side View air vent and customizable lights optical drive security cable slot USB connectors (2) optical drive-tray eject button O P T I C A L D R I V E - A Turns on when an internal card with your screen) and click Disable Bluetooth Radio. Turns on when the uppercase letter function is enabled. To quickly enable or disable all wireless devices, press . The green lights located above the keyboard indicate...
Owner's Manual
Page 27
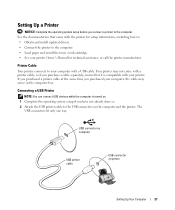
... how to: • Obtain and install updated drivers. • Connect the printer to the USB connectors on the computer and the printer. Printer Cable Your printer connects to the computer. Setting Up a Printer NOTICE: Complete the operating system setup before you connect a printer to your computer with a USB cable. USB connector on computer USB printer cable USB connector on . 1 Complete the operating system setup if you have not already...
... how to: • Obtain and install updated drivers. • Connect the printer to the USB connectors on the computer and the printer. Printer Cable Your printer connects to the computer. Setting Up a Printer NOTICE: Complete the operating system setup before you connect a printer to your computer with a USB cable. USB connector on computer USB printer cable USB connector on . 1 Complete the operating system setup if you have not already...
Owner's Manual
Page 28
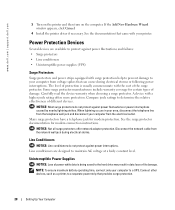
... Add New Hardware Wizard window appears, click Cancel. 4 Install the printer driver if necessary. Power Protection Devices Several devices are designed to determine the relative effectiveness of damage. Some surge protector manufacturers include warranty coverage for certain types of different devices. Compare joule ratings to maintain AC voltage at a fairly constant level. Many surge protectors have a telephone jack for modem connection instructions. NOTE...
... Add New Hardware Wizard window appears, click Cancel. 4 Install the printer driver if necessary. Power Protection Devices Several devices are designed to determine the relative effectiveness of damage. Some surge protector manufacturers include warranty coverage for certain types of different devices. Compare joule ratings to maintain AC voltage at a fairly constant level. Many surge protectors have a telephone jack for modem connection instructions. NOTE...

Owner's Manual
Page 31
... page 9. NOTE: For information about the Dell™ warranty for advice on operating conditions. Operating time is used , you perform operations including, but not limited to, the following: • Using DVD+RW/DVD+R drives • Using wireless communications devices, PC Cards, or USB devices • Using high-brightness display settings, 3D screen savers, or other computers with the main battery installed at all times, and always connect your computer to an electrical outlet...
... page 9. NOTE: For information about the Dell™ warranty for advice on operating conditions. Operating time is used , you perform operations including, but not limited to, the following: • Using DVD+RW/DVD+R drives • Using wireless communications devices, PC Cards, or USB devices • Using high-brightness display settings, 3D screen savers, or other computers with the main battery installed at all times, and always connect your computer to an electrical outlet...
Owner's Manual
Page 47
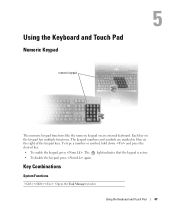
Each key on the right of the keypad keys. To type a number or symbol, hold down and press the desired key. • To enable the keypad, press . The 9 light indicates that the keypad is active. • To disable the keypad, press again. The keypad numbers and symbols are marked in blue on the keypad has multiple functions. Key Combinations System Functions Opens the Task Manager window Using the Keyboard and Touch Pad 47 Using the Keyboard and Touch Pad Numeric Keypad numeric keypad The numeric keypad functions like the numeric keypad on an external keyboard.
Each key on the right of the keypad keys. To type a number or symbol, hold down and press the desired key. • To enable the keypad, press . The 9 light indicates that the keypad is active. • To disable the keypad, press again. The keypad numbers and symbols are marked in blue on the keypad has multiple functions. Key Combinations System Functions Opens the Task Manager window Using the Keyboard and Touch Pad 47 Using the Keyboard and Touch Pad Numeric Keypad numeric keypad The numeric keypad functions like the numeric keypad on an external keyboard.
Owner's Manual
Page 61
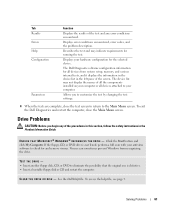
... device list may indicate requirements for the selected device. Solving Problems 61 Drive Problems CAUTION: Before you to customize the test by changing the test settings. 4 When the tests are complete, close the Main Menu screen. Viruses can sometimes prevent Windows from system setup, memory, and various internal tests, and it displays the information in the device list in the Product Information Guide. C L E A N T H E D R I V E O R D I V E - The Dell Diagnostics obtains configuration information for and remove...
... device list may indicate requirements for the selected device. Solving Problems 61 Drive Problems CAUTION: Before you to customize the test by changing the test settings. 4 When the tests are complete, close the Main Menu screen. Viruses can sometimes prevent Windows from system setup, memory, and various internal tests, and it displays the information in the device list in the Product Information Guide. C L E A N T H E D R I V E O R D I V E - The Dell Diagnostics obtains configuration information for and remove...
Owner's Manual
Page 77
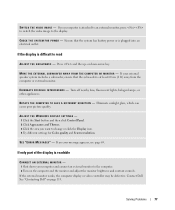
... to the display. E L I M I N A T E P O S S I B L E I O N - Turn off nearby fans, fluorescent lights, halogen lamps, or other appliances. If the external monitor works, the computer display or video controller may be defective. If an error message appears, see page 65. If your computer and connect an external monitor to change or click the Display icon. 4 Try different settings for Color quality and Screen resolution. ADJUST THE WINDOWS DISPLAY SETTINGS - 1 Click the Start button and then click Control Panel. 2 Click Appearance...
... to the display. E L I M I N A T E P O S S I B L E I O N - Turn off nearby fans, fluorescent lights, halogen lamps, or other appliances. If the external monitor works, the computer display or video controller may be defective. If an error message appears, see page 65. If your computer and connect an external monitor to change or click the Display icon. 4 Try different settings for Color quality and Screen resolution. ADJUST THE WINDOWS DISPLAY SETTINGS - 1 Click the Start button and then click Control Panel. 2 Click Appearance...
Owner's Manual
Page 78
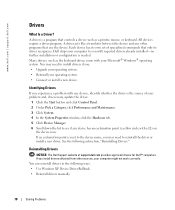
...; Use Windows XP Device Driver Rollback. • Reinstall drivers manually. 78 Solving Problems All devices require a driver program. Each device has its own set of your problem and, if necessary, update the driver. 1 Click the Start button and click Control Panel. 2 Under Pick a Category, click Performance and Maintenance. 3 Click System. 4 In the System Properties window, click the Hardware tab. 5 Click Device Manager. 6 Scroll down the list to the device name, you install drivers obtained from other programs that use the device. Dell...
...; Use Windows XP Device Driver Rollback. • Reinstall drivers manually. 78 Solving Problems All devices require a driver program. Each device has its own set of your problem and, if necessary, update the driver. 1 Click the Start button and click Control Panel. 2 Under Pick a Category, click Performance and Maintenance. 3 Click System. 4 In the System Properties window, click the Hardware tab. 5 Click Device Manager. 6 Scroll down the list to the device name, you install drivers obtained from other programs that use the device. Dell...
Owner's Manual
Page 79
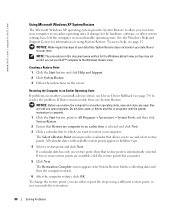
.... If Device Driver Rollback does not resolve the problem, then use Windows XP Device Driver Rollback to replace the driver with the previously installed version. 1 Click the Start button and click Control Panel. 2 Under Pick a Category, click Performance and Maintenance. 3 Click System. 4 In the System Properties window, click the Hardware tab. 5 Click Device Manager. 6 Right-click the device for which you are installing the driver. 6 Click the Driver tab and click Update Driver. 7 Click Install from a list or specific location...
.... If Device Driver Rollback does not resolve the problem, then use Windows XP Device Driver Rollback to replace the driver with the previously installed version. 1 Click the Start button and click Control Panel. 2 Under Pick a Category, click Performance and Maintenance. 3 Click System. 4 In the System Properties window, click the Hardware tab. 5 Click Device Manager. 6 Right-click the device for which you are installing the driver. 6 Click the Driver tab and click Update Driver. 7 Click Install from a list or specific location...
Owner's Manual
Page 80
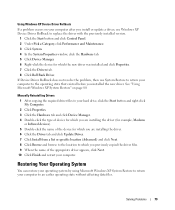
... to an earlier operating state if changes to restore your computer. See the Windows Help and Support Center for the Windows default view, so they may not work if you set your Dell™ computer to resolve the problem. To access help, see and select restore points. Creating a Restore Point 1 Click the Start button and click Help and Support. 2 Click System Restore. 3 Follow the instructions on using a different restore point, or you...
... to an earlier operating state if changes to restore your computer. See the Windows Help and Support Center for the Windows default view, so they may not work if you set your Dell™ computer to resolve the problem. To access help, see and select restore points. Creating a Restore Point 1 Click the Start button and click Help and Support. 2 Click System Restore. 3 Follow the instructions on using a different restore point, or you...
Owner's Manual
Page 116
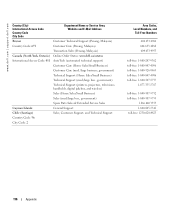
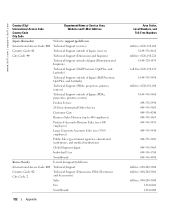
....dell.ca/ostatus International Access Code: 011 AutoTech (automated technical support) Customer Care (Home Sales/Small Business) Customer Care (med./large business, government) Technical Support (Home Sales/Small Business) Technical Support (med./large bus., government) Technical Support (printers, projectors, televisions, handhelds, digital jukebox, and wireless) Sales (Home Sales/Small Business) Sales (med./large bus., government) Spare Parts Sales & Extended Service Sales...
....dell.ca/ostatus International Access Code: 011 AutoTech (automated technical support) Customer Care (Home Sales/Small Business) Customer Care (med./large business, government) Technical Support (Home Sales/Small Business) Technical Support (med./large bus., government) Technical Support (printers, projectors, televisions, handhelds, digital jukebox, and wireless) Sales (Home Sales/Small Business) Sales (med./large bus., government) Spare Parts Sales & Extended Service Sales...
Owner's Manual
Page 121
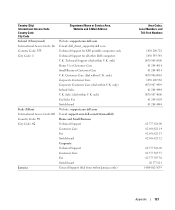
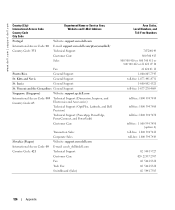
... User Customer Care Small Business Customer Care U.K. Sales (dial within U.K. Country (City) International Access Code Country Code City Code Ireland (Cherrywood) International Access Code: 16 Country Code: 353 City Code: 1 Italy (Milan) International Access Code: 00 Country Code: 39 City Code: 02 Jamaica Department Name or Service Area, Website and E-Mail Address Website: support.euro.dell.com E-mail: dell_direct_support@dell.com Technical Support for XPS portable computers only Technical Support for all other Dell...
... User Customer Care Small Business Customer Care U.K. Sales (dial within U.K. Country (City) International Access Code Country Code City Code Ireland (Cherrywood) International Access Code: 16 Country Code: 353 City Code: 1 Italy (Milan) International Access Code: 00 Country Code: 39 City Code: 02 Jamaica Department Name or Service Area, Website and E-Mail Address Website: support.euro.dell.com E-mail: dell_direct_support@dell.com Technical Support for XPS portable computers only Technical Support for all other Dell...
Owner's Manual
Page 122
..., and medical institutions) Global Segment Japan Individual User Switchboard Korea (Seoul) E-mail: krsupport@dell.com International Access Code: 001 Technical Support Country Code: 82 City Code: 2 Technical Support (Dimension, PDA, Electronics and Accessories) Sales Fax Switchboard 122 Appendix Area Codes, Local Numbers, and Toll-Free Numbers toll-free: 0120-198-498 81-44-556-4162 toll-free: 0120-198-226 81-44-520-1435 toll...
..., and medical institutions) Global Segment Japan Individual User Switchboard Korea (Seoul) E-mail: krsupport@dell.com International Access Code: 001 Technical Support Country Code: 82 City Code: 2 Technical Support (Dimension, PDA, Electronics and Accessories) Sales Fax Switchboard 122 Appendix Area Codes, Local Numbers, and Toll-Free Numbers toll-free: 0120-198-498 81-44-556-4162 toll-free: 0120-198-226 81-44-520-1435 toll...
Owner's Manual
Page 126
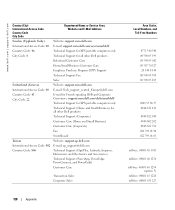
....dell.com International Access Code: 005 Country Code: 65 Technical Support (Dimension, Inspiron, and Electronics and Accessories) Technical Support (OptiPlex, Latitude, and Dell Precision) Technical Support (PowerApp, PowerEdge, PowerConnect, and PowerVault) Customer Care Slovakia (Prague) International Access Code: 00 Country Code: 421 Transaction Sales Corporate Sales Website: support.euro.dell.com E-mail: czech_dell@dell.com Technical Support Customer Care Fax Tech Fax Switchboard (Sales) Area Codes, Local Numbers, and Toll-Free Numbers...
....dell.com International Access Code: 005 Country Code: 65 Technical Support (Dimension, Inspiron, and Electronics and Accessories) Technical Support (OptiPlex, Latitude, and Dell Precision) Technical Support (PowerApp, PowerEdge, PowerConnect, and PowerVault) Customer Care Slovakia (Prague) International Access Code: 00 Country Code: 421 Transaction Sales Corporate Sales Website: support.euro.dell.com E-mail: czech_dell@dell.com Technical Support Customer Care Fax Tech Fax Switchboard (Sales) Area Codes, Local Numbers, and Toll-Free Numbers...
Owner's Manual
Page 128
... Small Business) Customer Care (Corporate) Fax Switchboard Taiwan Website: support.ap.dell.com International Access Code: 002 E-mail: ap_support@dell.com Country Code: 886 Technical Support (OptiPlex, Latitude, Inspiron, Dimension, and Electronics and Accessories) Technical Support (PowerApp, PowerEdge, PowerConnect, and PowerVault) Customer Care Transaction Sales Corporate Sales Area Codes, Local Numbers, and Toll-Free Numbers 0771 340 340 08 590 05 199 08 590...
... Small Business) Customer Care (Corporate) Fax Switchboard Taiwan Website: support.ap.dell.com International Access Code: 002 E-mail: ap_support@dell.com Country Code: 886 Technical Support (OptiPlex, Latitude, Inspiron, Dimension, and Electronics and Accessories) Technical Support (PowerApp, PowerEdge, PowerConnect, and PowerVault) Customer Care Transaction Sales Corporate Sales Area Codes, Local Numbers, and Toll-Free Numbers 0771 340 340 08 590 05 199 08 590...
Owner's Manual
Page 130
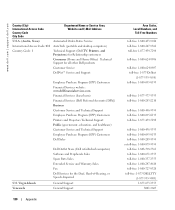
...) International Access Code Country Code City Code Department Name or Service Area, Website and E-Mail Address U.S.A. (Austin, Texas) Automated Order-Status Service International Access Code: 011 AutoTech (portable and desktop computers) Country Code: 1 Technical Support (Dell TV, Printers, and Projectors) for Relationship customers Consumer (Home and Home Office) Technical Support for the Deaf, Hard-of-Hearing, or Speech-Impaired General Support General Support Area Codes, Local Numbers, and Toll-Free Numbers toll-free...
...) International Access Code Country Code City Code Department Name or Service Area, Website and E-Mail Address U.S.A. (Austin, Texas) Automated Order-Status Service International Access Code: 011 AutoTech (portable and desktop computers) Country Code: 1 Technical Support (Dell TV, Printers, and Projectors) for Relationship customers Consumer (Home and Home Office) Technical Support for the Deaf, Hard-of-Hearing, or Speech-Impaired General Support General Support Area Codes, Local Numbers, and Toll-Free Numbers toll-free...
Service Manual
Page 47
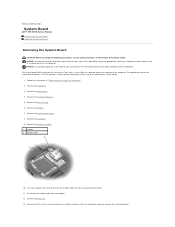
... Service Tag to the replacement system board. 1. NOTICE: To avoid damaging the system board, you must remove the main battery before you begin working inside the computer. Follow the instructions in the Product Information Guide. Disconnect the modem cable from the system board connector. 11. Remove the memory module(s). 5. Remove the palm rest. 13. Remove the hard drive. 3. Back to Contents Page System Board Dell™ XPS M170 Service Manual Removing the System Board Replacing the System Board Removing...
... Service Tag to the replacement system board. 1. NOTICE: To avoid damaging the system board, you must remove the main battery before you begin working inside the computer. Follow the instructions in the Product Information Guide. Disconnect the modem cable from the system board connector. 11. Remove the memory module(s). 5. Remove the palm rest. 13. Remove the hard drive. 3. Back to Contents Page System Board Dell™ XPS M170 Service Manual Removing the System Board Replacing the System Board Removing...
Service Manual
Page 59
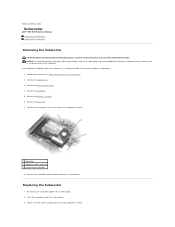
... 2 subwoofer cable connector 3 system board connector 8. Remove the optical drive. 3. Remove the keyboard. 5. Tighten the two captive screws that secure the subwoofer in place. Remove the center control cover. 4. Remove the palm rest. 7. Reconnect the subwoofer cable to Contents Page Subwoofer Dell™ XPS M170 Service Manual Removing the Subwoofer Replacing the Subwoofer Removing the Subwoofer CAUTION: Before performing the following procedures, read the safety instructions in "Before Working Inside Your...
... 2 subwoofer cable connector 3 system board connector 8. Remove the optical drive. 3. Remove the keyboard. 5. Tighten the two captive screws that secure the subwoofer in place. Remove the center control cover. 4. Remove the palm rest. 7. Reconnect the subwoofer cable to Contents Page Subwoofer Dell™ XPS M170 Service Manual Removing the Subwoofer Replacing the Subwoofer Removing the Subwoofer CAUTION: Before performing the following procedures, read the safety instructions in "Before Working Inside Your...


