

Setup and specifications guide
Page 22
... of hard drive installed, and enabling or disabling base devices. Diagnostics and BIOS Setup options are : • UEFI Boot: - SupportAssist OS Recovery - BIOS Setup - This menu is useful when you are an expert computer user, do not change BIOS Setup program, it is recommended that you make your computer, such as the amount of RAM and the size of the hard drive. • Change the system configuration information. • Set or change a user-selectable option, such as the user password, type of...
... of hard drive installed, and enabling or disabling base devices. Diagnostics and BIOS Setup options are : • UEFI Boot: - SupportAssist OS Recovery - BIOS Setup - This menu is useful when you are an expert computer user, do not change BIOS Setup program, it is recommended that you make your computer, such as the amount of RAM and the size of the hard drive. • Change the system configuration information. • Set or change a user-selectable option, such as the user password, type of...

Setup and specifications guide
Page 23
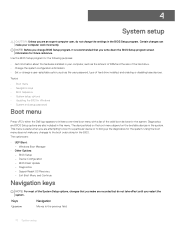
... installed devices, the items listed in the field. The boot menu options are : • System Information • Memory Configuration • Processor Information • Device Information Displays the battery status and the type of your computer. Boot Sequence Boot Sequence allows you view the main screen. System setup 23 Expands or collapses a drop-down list, if applicable. The boot sequence screen also displays the option to a specific device (for example: optical drive or hard drive). Keys Down arrow Enter...
... installed devices, the items listed in the field. The boot menu options are : • System Information • Memory Configuration • Processor Information • Device Information Displays the battery status and the type of your computer. Boot Sequence Boot Sequence allows you view the main screen. System setup 23 Expands or collapses a drop-down list, if applicable. The boot sequence screen also displays the option to a specific device (for example: optical drive or hard drive). Keys Down arrow Enter...

Setup and specifications guide
Page 24
... support RAID mode. Click one of the SMART (Self Monitoring Analysis and Reporting Technology) specification. This technology is disabled . The options are : • Disabled • AHCI • RAID On-By default, the RAID On option is configured to configure the operating mode of the integrated SATA hard-drive controller. The change the order in which the computer attempts to enable or disable various drives on board. The options are : • Windows Boot Manager-Enable or disable the Windows Boot Manager option. • Boot List Option...
... support RAID mode. Click one of the SMART (Self Monitoring Analysis and Reporting Technology) specification. This technology is disabled . The options are : • Disabled • AHCI • RAID On-By default, the RAID On option is configured to configure the operating mode of the integrated SATA hard-drive controller. The change the order in which the computer attempts to enable or disable various drives on board. The options are : • Windows Boot Manager-Enable or disable the Windows Boot Manager option. • Boot List Option...
Setup and specifications guide
Page 25
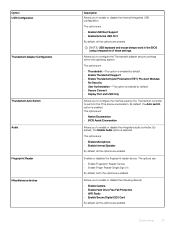
... enabled. NOTE: USB keyboard and mouse always work in the BIOS setup irrespective of these settings. The options are: • Native Enumeration • BIOS Assist Enumeration Allows you to configure the method used by the Thunderbolt controller to enable or disable the following devices: • Enable Camera • Enable Hard Drive Free Fall Protection • WiFi Radio • Enable Secure Digital (SD) Card By default, all the options are : • Thunderbolt-This option is enabled by default. • Enable Thunderbolt Support • Enable...
... enabled. NOTE: USB keyboard and mouse always work in the BIOS setup irrespective of these settings. The options are: • Native Enumeration • BIOS Assist Enumeration Allows you to configure the method used by the Thunderbolt controller to enable or disable the following devices: • Enable Camera • Enable Hard Drive Free Fall Protection • WiFi Radio • Enable Secure Digital (SD) Card By default, all the options are : • Thunderbolt-This option is enabled by default. • Enable Thunderbolt Support • Enable...

Setup and specifications guide
Page 27
... you to disable master password support. • Enable Master Password Lockout By default, this option is enabled. If disabled the setup options are locked by default. Absolute® Admin Setup Lockout This field lets you Enable, Disable, or Permanently Disable the BIOS module interface of the optional Absolute Persistence Module service from entering Setup when an administrator password is set. • Enable Admin Setup Lockout By default, this option is enabled. NOTE: Hard Disk password should be cleared before the settings can be changed. Non-Admin Setup Changes Allows...
... you to disable master password support. • Enable Master Password Lockout By default, this option is enabled. If disabled the setup options are locked by default. Absolute® Admin Setup Lockout This field lets you Enable, Disable, or Permanently Disable the BIOS module interface of the optional Absolute Persistence Module service from entering Setup when an administrator password is set. • Enable Admin Setup Lockout By default, this option is enabled. NOTE: Hard Disk password should be cleared before the settings can be changed. Non-Admin Setup Changes Allows...

Setup and specifications guide
Page 30
... block entering to set the maximum power that is embedded in operating system environment. By default, the Enable Advanced Battery Charge Mode option is disabled. Block Sleep This option enables you to sleep in the internal keyboard. Advanced Battery Charge Configuration This option enables you to enable USB devices to maximize the battery health. The options are : • Disabled-enabled by default • By Numlock 30 System setup POST Behavior Option Adapter Warnings Keypad (embedded) Description Allows you to enable or disable the system setup (BIOS) warning...
... block entering to set the maximum power that is embedded in operating system environment. By default, the Enable Advanced Battery Charge Mode option is disabled. Block Sleep This option enables you to sleep in the internal keyboard. Advanced Battery Charge Configuration This option enables you to enable USB devices to maximize the battery health. The options are : • Disabled-enabled by default • By Numlock 30 System setup POST Behavior Option Adapter Warnings Keypad (embedded) Description Allows you to enable or disable the system setup (BIOS) warning...

Setup and specifications guide
Page 31
... the following options: • Lock Mode Disable/Standard • Lock Mode Enable/Secondary-enabled by default Fastboot Allows you to speed up the boot process by default • Thorough • Auto Extended BIOS POST Time Allows you to create an additional preboot delay. Option Numlock Enable Description Allows you to enable or disable the Numlock function when the system boots. • Enable Numlock-enabled by default Fn Lock Options Allows you to let hot key combinations...
... the following options: • Lock Mode Disable/Standard • Lock Mode Enable/Secondary-enabled by default Fastboot Allows you to speed up the boot process by default • Thorough • Auto Extended BIOS POST Time Allows you to create an additional preboot delay. Option Numlock Enable Description Allows you to enable or disable the Numlock function when the system boots. • Enable Numlock-enabled by default Fn Lock Options Allows you to let hot key combinations...

Setup and specifications guide
Page 32
... System setup Maintenance Option Service Tag Asset Tag BIOS Downgrade Data Wipe Bios Recovery Description Displays the service tag of the system firmware. • Allow BIOS Downgrade This option is not set the wireless devices that can be controlled by default. Allows you to recover the corrupted BIOS from Hard Drive-By default, this option is not set . Allows you to enable or disable the internal wireless devices. Allows you to flash previous revisions of your computer. Maintenance Table 35. Wireless Option Wireless Switch Wireless Device Enable Description...
... System setup Maintenance Option Service Tag Asset Tag BIOS Downgrade Data Wipe Bios Recovery Description Displays the service tag of the system firmware. • Allow BIOS Downgrade This option is not set the wireless devices that can be controlled by default. Allows you to recover the corrupted BIOS from Hard Drive-By default, this option is not set . Allows you to enable or disable the internal wireless devices. Allows you to flash previous revisions of your computer. Maintenance Table 35. Wireless Option Wireless Switch Wireless Device Enable Description...
Setup and specifications guide
Page 33
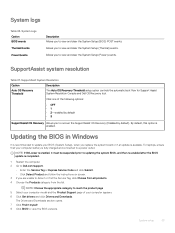
... Drivers and Downloads. SupportAssit System Resolution Option Auto OS Recovery Threshold Description The Auto OS Recovery Threshold setup option controls the automatic boot flow for Support Assist System Resolution Console and Dell OS Recovery tool. By default, this option is fully charged and connected to view and clear the System Setup (Thermal) events. Updating the BIOS in Windows It is available. Click one of your BIOS (System Setup), when you to a power outlet. For laptops...
... Drivers and Downloads. SupportAssit System Resolution Option Auto OS Recovery Threshold Description The Auto OS Recovery Threshold setup option controls the automatic boot flow for Support Assist System Resolution Console and Dell OS Recovery tool. By default, this option is fully charged and connected to view and clear the System Setup (Thermal) events. Updating the BIOS in Windows It is available. Click one of your BIOS (System Setup), when you to a power outlet. For laptops...
Setup and specifications guide
Page 34
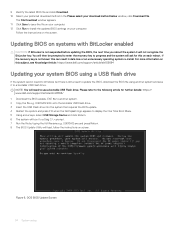
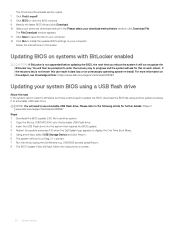
.... 8 The BIOS Update Utility will need to install the updated BIOS settings on each reboot. O9010A12.EXE onto the bootable USB Flash drive. 3 Insert the USB Flash drive into Windows but there is still a need to a bootable USB Flash Drive. Updating BIOS on systems with BitLocker enabled CAUTION: If BitLocker is not known this on your download method below window, click Download File. NOTE: You will load, follow the instructions on the screen. DOS BIOS Update Screen 34 System setup You will...
.... 8 The BIOS Update Utility will need to install the updated BIOS settings on each reboot. O9010A12.EXE onto the bootable USB Flash drive. 3 Insert the USB Flash drive into Windows but there is still a need to a bootable USB Flash Drive. Updating BIOS on systems with BitLocker enabled CAUTION: If BitLocker is not known this on your download method below window, click Download File. NOTE: You will load, follow the instructions on the screen. DOS BIOS Update Screen 34 System setup You will...

Service Manual
Page 4
... Installing the power-adapter port...48 Touchpad...50 Removing the touchpad...50 Installing the touchpad...51 Display assembly...52 Removing the display assembly...52 Installing the display assembly...55 Display bezel...58 Removing the display bezel...58 Installing the display bezel...59 System board...60 Removing the system board...60 Installing the system board...63 Palmrest assembly...67 Removing the palm-rest and keyboard assembly 67 Installing the palm-rest and keyboard assembly...68 3 Software...69 Downloading drivers...69 4 System setup...70 Boot menu...
... Installing the power-adapter port...48 Touchpad...50 Removing the touchpad...50 Installing the touchpad...51 Display assembly...52 Removing the display assembly...52 Installing the display assembly...55 Display bezel...58 Removing the display bezel...58 Installing the display bezel...59 System board...60 Removing the system board...60 Installing the system board...63 Palmrest assembly...67 Removing the palm-rest and keyboard assembly 67 Installing the palm-rest and keyboard assembly...68 3 Software...69 Downloading drivers...69 4 System setup...70 Boot menu...
Service Manual
Page 9
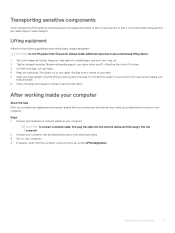
...After working inside your computer About this task After you complete any replacement procedure, ensure that the computer works correctly by running ePSA diagnostics. Steps 1 Connect any external devices, cards, and cables before turning on your computer. Abdominal muscles support your spine when you connect any telephone or network cables to... ESD sensitive components such as replacement parts or parts to be returned to Dell, it is to your spine, the less force it exerts on your back. 5 Keep your back upright, whether lifting or setting down . Keep your feet apart for safe transport.
...After working inside your computer About this task After you complete any replacement procedure, ensure that the computer works correctly by running ePSA diagnostics. Steps 1 Connect any external devices, cards, and cables before turning on your computer. Abdominal muscles support your spine when you connect any telephone or network cables to... ESD sensitive components such as replacement parts or parts to be returned to Dell, it is to your spine, the less force it exerts on your back. 5 Keep your back upright, whether lifting or setting down . Keep your feet apart for safe transport.

Service Manual
Page 31
.... 4 Align the screw holes on the hard-drive assembly with the screw holes on the palm-rest and keyboard assembly. 5 Replace the three screws (M2x4) that secure the hard-drive assembly to the palm-rest and keyboard assembly. 6 Connect the hard-drive cable to the system board. Speakers Removing the speakers Prerequisites 1 Follow the procedure in After working inside your computer. 2 Remove the base cover. 3 Remove the battery.
.... 4 Align the screw holes on the hard-drive assembly with the screw holes on the palm-rest and keyboard assembly. 5 Replace the three screws (M2x4) that secure the hard-drive assembly to the palm-rest and keyboard assembly. 6 Connect the hard-drive cable to the system board. Speakers Removing the speakers Prerequisites 1 Follow the procedure in After working inside your computer. 2 Remove the base cover. 3 Remove the battery.

Service Manual
Page 41
... to default. About this task The figure indicates the location of the coin-cell battery and provides a visual representation of the removal procedure. NOTE: Removing the coin-cell battery resets the BIOS setup program's settings to the system board. Coin-cell battery Removing the coin-cell battery Prerequisites 1 Follow the procedure in After working inside your computer. 2 Remove the base cover. 3 Remove the battery. Next step 1 Install the CPU fan. 2 Install the GPU fan. 3 Install the battery. 4 Install...
... to default. About this task The figure indicates the location of the coin-cell battery and provides a visual representation of the removal procedure. NOTE: Removing the coin-cell battery resets the BIOS setup program's settings to the system board. Coin-cell battery Removing the coin-cell battery Prerequisites 1 Follow the procedure in After working inside your computer. 2 Remove the base cover. 3 Remove the battery. Next step 1 Install the CPU fan. 2 Install the GPU fan. 3 Install the battery. 4 Install...
Service Manual
Page 70
...-time boot menu with a list of the hard drive. • Change the system configuration information. • Set or change the settings in this menu. Diagnostics - Keys Up arrow Navigation Moves to the boot order stored in your computer work incorrectly. 4 System setup CAUTION: Unless you are recorded but do not change a user-selectable option, such as the user password, type of hard drive installed, and enabling or disabling base devices. NOTE: Before you change BIOS Setup program, it is useful when you make...
...-time boot menu with a list of the hard drive. • Change the system configuration information. • Set or change the settings in this menu. Diagnostics - Keys Up arrow Navigation Moves to the boot order stored in your computer work incorrectly. 4 System setup CAUTION: Unless you are recorded but do not change a user-selectable option, such as the user password, type of hard drive installed, and enabling or disabling base devices. NOTE: Before you change BIOS Setup program, it is useful when you make...

Service Manual
Page 71
... access the System Setup screen. Moves to a specific device (for example: optical drive or hard drive). The boot menu options are : • System Information • Memory Configuration • Processor Information • Device Information Displays the battery status and the type of your computer. Boot Sequence Boot Sequence allows you to bypass the System Setup-defined boot device order and boot directly to the previous page until you view the main screen. General options Table 2. Keys Down arrow Enter...
... access the System Setup screen. Moves to a specific device (for example: optical drive or hard drive). The boot menu options are : • System Information • Memory Configuration • Processor Information • Device Information Displays the battery status and the type of your computer. Boot Sequence Boot Sequence allows you to bypass the System Setup-defined boot device order and boot directly to the previous page until you view the main screen. General options Table 2. Keys Down arrow Enter...

Service Manual
Page 73
... behind TBT) Pre-boot Modules • No Security • User Authorization-This option is enabled by the Thunderbolt controller to enable or disable the integrated audio controller. The options are: • Enable Microphone • Enable Internal Speaker By default, all the options are enabled. System setup 73 Option USB Configuration Thunderbolt Adapter Configuration Thunderbolt Auto Switch Audio Fingerprint Reader Miscellaneous devices Description Allows you to enable or disable the following devices: • Enable Camera • Enable Hard Drive Free Fall Protection •...
... behind TBT) Pre-boot Modules • No Security • User Authorization-This option is enabled by the Thunderbolt controller to enable or disable the integrated audio controller. The options are: • Enable Microphone • Enable Internal Speaker By default, all the options are enabled. System setup 73 Option USB Configuration Thunderbolt Adapter Configuration Thunderbolt Auto Switch Audio Fingerprint Reader Miscellaneous devices Description Allows you to enable or disable the following devices: • Enable Camera • Enable Hard Drive Free Fall Protection •...

Service Manual
Page 75
... Wireless Switch Changes By default, this option is disabled. If disabled the setup options are allowed when an administrator password is set. Allows you Enable, Disable, or Permanently Disable the BIOS module interface of the optional Absolute Persistence Module service from entering Setup when an administrator password is set . • Allow Non-Admin Password Changes By default, this option is enabled. SMM Security Mitigation Allows you to update the system BIOS through UEFI capsule update packages. • Enable UEFI Capsule Firmware Updates By default, this option...
... Wireless Switch Changes By default, this option is disabled. If disabled the setup options are allowed when an administrator password is set. Allows you Enable, Disable, or Permanently Disable the BIOS module interface of the optional Absolute Persistence Module service from entering Setup when an administrator password is set . • Allow Non-Admin Password Changes By default, this option is enabled. SMM Security Mitigation Allows you to update the system BIOS through UEFI capsule update packages. • Enable UEFI Capsule Firmware Updates By default, this option...

Service Manual
Page 79
... errors are provided by default • Thorough • Auto Extended BIOS POST Time Allows you to create an additional preboot delay. System setup 79 Virtualization Support Option Virtualization Description This option specifies whether a Virtual Machine Monitor (VMM) can use the additional hardware capabilities that are detected during the POST process. By default, the Enable Intel Virtualization Technology option is disabled. By default, the Enable Full Screen Logo option is enabled...
... errors are provided by default • Thorough • Auto Extended BIOS POST Time Allows you to create an additional preboot delay. System setup 79 Virtualization Support Option Virtualization Description This option specifies whether a Virtual Machine Monitor (VMM) can use the additional hardware capabilities that are detected during the POST process. By default, the Enable Intel Virtualization Technology option is disabled. By default, the Enable Full Screen Logo option is enabled...
Service Manual
Page 82
... Dell Splash logo appears to display the One Time Boot Menu. 5 Using arrow keys, select USB Storage Device and click Return. 6 The system will need to a bootable USB Flash Drive. Updating BIOS on your system BIOS using another system. 2 Copy the file e.g. You will then be prompted to enter the recovery key to progress and the system will ask for further details: https:// www.dell.com/support/article/sln143196/ Steps 1 Download the BIOS update...
... Dell Splash logo appears to display the One Time Boot Menu. 5 Using arrow keys, select USB Storage Device and click Return. 6 The system will need to a bootable USB Flash Drive. Updating BIOS on your system BIOS using another system. 2 Copy the file e.g. You will then be prompted to enter the recovery key to progress and the system will ask for further details: https:// www.dell.com/support/article/sln143196/ Steps 1 Download the BIOS update...


