

Service Manual
Page 3
... service kit ...8 After working inside your computer...8 2 Major components of your system 10 3 Disassembly and reassembly...12 Recommended tools...12 Screw list...12 Base cover...13 Removing the base cover...13 Installing the base cover...15 Battery...16 Lithium-ion battery precautions...16 Removing the 6-cell battery...17 Installing the 6-cell battery...18 WLAN card...19 Removing the WLAN card...19 Installing the WLAN card...20 Memory module...21 Removing the memory module - SSD-1...26 Removing...
... service kit ...8 After working inside your computer...8 2 Major components of your system 10 3 Disassembly and reassembly...12 Recommended tools...12 Screw list...12 Base cover...13 Removing the base cover...13 Installing the base cover...15 Battery...16 Lithium-ion battery precautions...16 Removing the 6-cell battery...17 Installing the 6-cell battery...18 WLAN card...19 Removing the WLAN card...19 Installing the WLAN card...20 Memory module...21 Removing the memory module - SSD-1...26 Removing...

Service Manual
Page 4
... Removing the system board...56 Installing the system board...57 Palm-rest and keyboard assembly...60 Removing the palm-rest and keyboard assembly...60 Installing the palm-rest and keyboard assembly...61 4 Software...62 Downloading Windows drivers...62 5 System setup...63 Boot menu...63 Navigation keys...63 Boot Sequence...64 BIOS setup...64 Overview...64 Boot configuration...65 Integrated Devices...66 Storage...66 Display...67 Connection options...67 Power management...68 Security...69 Password...70 Update and Recovery...71 System management...72 Keyboard...
... Removing the system board...56 Installing the system board...57 Palm-rest and keyboard assembly...60 Removing the palm-rest and keyboard assembly...60 Installing the palm-rest and keyboard assembly...61 4 Software...62 Downloading Windows drivers...62 5 System setup...63 Boot menu...63 Navigation keys...63 Boot Sequence...64 BIOS setup...64 Overview...64 Boot configuration...65 Integrated Devices...66 Storage...66 Display...67 Connection options...67 Power management...68 Security...69 Password...70 Update and Recovery...71 System management...72 Keyboard...

Service Manual
Page 7
...; Use an ESD field service kit when working inside any installation or break/fix procedures involving disassembly or reassembly: • Turn off . The DIMM receives a static shock, but the tracing is done through the use of device functionality. If possible, use of semiconductors used in ways that incorporate standby power are no longer allowed; Unplugging, pressing and holding the power button for missing or nonfunctional memory...
...; Use an ESD field service kit when working inside any installation or break/fix procedures involving disassembly or reassembly: • Turn off . The DIMM receives a static shock, but the tracing is done through the use of device functionality. If possible, use of semiconductors used in ways that incorporate standby power are no longer allowed; Unplugging, pressing and holding the power button for missing or nonfunctional memory...

Service Manual
Page 8
... plastics should also be free of insulators that you complete any external devices, cards, and cables before physically handling any bare metal on the system being repaired. a red LED is successful; When transporting ESD sensitive components such as plastic heat sink casings, away from internal parts that they have your skin, the ESD mat, and the hardware is temporarily placed...
... plastics should also be free of insulators that you complete any external devices, cards, and cables before physically handling any bare metal on the system being repaired. a red LED is successful; When transporting ESD sensitive components such as plastic heat sink casings, away from internal parts that they have your skin, the ESD mat, and the hardware is temporarily placed...
Service Manual
Page 63
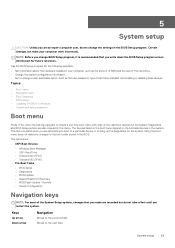
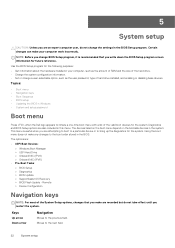
... setup password Boot menu Press when the Dell logo appears to initiate a one-time boot menu with a list of the valid boot devices for the following purposes: • Get information about the hardware installed in your computer work incorrectly. Use the BIOS Setup program for the system. System setup 63 This menu is recommended that you make are recorded but do not change a user-selectable option, such as the user password, type of hard drive installed, and enabling or disabling...
... setup password Boot menu Press when the Dell logo appears to initiate a one-time boot menu with a list of the valid boot devices for the following purposes: • Get information about the hardware installed in your computer work incorrectly. Use the BIOS Setup program for the system. System setup 63 This menu is recommended that you make are recorded but do not change a user-selectable option, such as the user password, type of hard drive installed, and enabling or disabling...

Service Manual
Page 64
... -time boot menu displays the devices that prompts you to bypass the System Setup-defined boot device order and boot directly to save any unsaved changes and restarts the system. The options are : • Removable Drive (if available) • STXXXX Drive NOTE: XXXX denotes the SATA drive number. • Optical Drive (if available) • SATA Hard Drive (if available) • Diagnostics NOTE: Choosing Diagnostics, displays the SupportAssist diagnostics screen. Keys Enter Spacebar Tab...
... -time boot menu displays the devices that prompts you to bypass the System Setup-defined boot device order and boot directly to save any unsaved changes and restarts the system. The options are : • Removable Drive (if available) • STXXXX Drive NOTE: XXXX denotes the SATA drive number. • Optical Drive (if available) • SATA Hard Drive (if available) • Diagnostics NOTE: Choosing Diagnostics, displays the SupportAssist diagnostics screen. Keys Enter Spacebar Tab...
Service Manual
Page 66
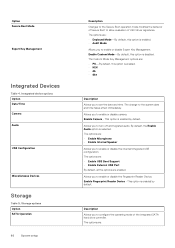
... USB configuration. This option is enabled by default. Enable Camera - The options are: • Enable USB Boot Support • Enable External USB Port By default, all integrated audio. The options are enabled. The options are : • PK-By default, this option is enabled. • Audit Mode Allows you to allow evaluation of the integrated SATA hard drive controller. The Custom Mode Key Management options are : The change to enable or disable Expert Key Management. By default, the Enable Audio option is disabled. Storage options Option SATA Operation 66 System setup...
... USB configuration. This option is enabled by default. Enable Camera - The options are: • Enable USB Boot Support • Enable External USB Port By default, all integrated audio. The options are enabled. The options are : • PK-By default, this option is enabled. • Audit Mode Allows you to allow evaluation of the integrated SATA hard drive controller. The Custom Mode Key Management options are : The change to enable or disable Expert Key Management. By default, the Enable Audio option is disabled. Storage options Option SATA Operation 66 System setup...

Service Manual
Page 68
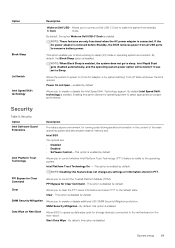
.... Power Management Option Description Battery Configuration Allows the system to use any enabled NICs when UEFI networking protocols are : • Optimized-enabled by default • Cool • Quiet • Ultra Performance USB Wake Support Enable USB Wake Allows you to wake the system from standby mode. By default, the Enable Advanced Battery Charge Mode option is disabled. 68 System setup It allows pre-OS and early operating system networking features to run on -board LAN controller. This controls the...
.... Power Management Option Description Battery Configuration Allows the system to use any enabled NICs when UEFI networking protocols are : • Optimized-enabled by default • Cool • Quiet • Ultra Performance USB Wake Support Enable USB Wake Allows you to wake the system from standby mode. By default, the Enable Advanced Battery Charge Mode option is disabled. 68 System setup It allows pre-OS and early operating system networking features to run on -board LAN controller. This controls the...
Service Manual
Page 69
... context of the main operating system and sets enclave reserve memory size. SMM Security Mitigation - System setup 69 PPI Bypass for storage device(s) connected to the motherboard on Dell USB- By default, the Block Sleep option is disabled. Allows you to clear the PTT owner information and return PTT to control the Trusted Platform Module (TPM). Intel Rapid Start gets disabled automatically, and the operating system power option will be blank if...
... context of the main operating system and sets enclave reserve memory size. SMM Security Mitigation - System setup 69 PPI Bypass for storage device(s) connected to the motherboard on Dell USB- By default, the Block Sleep option is disabled. Allows you to clear the PTT owner information and return PTT to control the Trusted Platform Module (TPM). Intel Rapid Start gets disabled automatically, and the operating system power option will be blank if...
Service Manual
Page 71
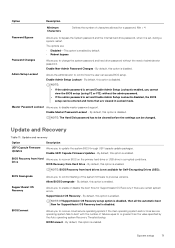
... recover BIOS on the primary hard drive or USB drive in Locked mode. SupportAssist OS Recovery - Min = 4 Password Bypass Password Changes Admin Setup Lockout Allows you to disable master password support. By default, this option is enabled by the Auto operating system Recovery Threshold setup. Master Password Lockout Allows you to control flashing of the system firmware to bypass the System password and the Internal hard drive password, when it is set , during a system restart. The options are: • Disabled-This option is enabled. Drive BIOS Recovery from Hard...
... recover BIOS on the primary hard drive or USB drive in Locked mode. SupportAssist OS Recovery - Min = 4 Password Bypass Password Changes Admin Setup Lockout Allows you to disable master password support. By default, this option is enabled by the Auto operating system Recovery Threshold setup. Master Password Lockout Allows you to control flashing of the system firmware to bypass the System password and the Internal hard drive password, when it is set , during a system restart. The options are: • Disabled-This option is enabled. Drive BIOS Recovery from Hard...
Service Manual
Page 76
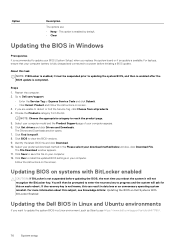
... Downloads section opens. 7. Select your preferred download method in Windows Prerequisites It is not known, this subject, see https://www.dell.com/support/article/sln171755/. 76 System setup Click Get drivers and click Drivers and Downloads. Follow the instructions on screen. 3. This option is enabled by default. • Clear Updating the BIOS in the Please select your computer appears. 6. Restart the computer. 2. Click Run to install the updated BIOS settings on each reboot...
... Downloads section opens. 7. Select your preferred download method in Windows Prerequisites It is not known, this subject, see https://www.dell.com/support/article/sln171755/. 76 System setup Click Get drivers and click Drivers and Downloads. Follow the instructions on screen. 3. This option is enabled by default. • Clear Updating the BIOS in the Please select your computer appears. 6. Restart the computer. 2. Click Run to install the updated BIOS settings on each reboot...

Service Manual
Page 77
... the USB key where you copied the flash into a USB port of the USB key. • AC power adapter that is listed, then the BIOS supports this capability and you downloaded from Windows using the mouse or arrow keys then press Enter. NOTE: Only systems with BIOS Flash Update option in the F12 One-Time Boot Menu can use this task BIOS Update You can confirm by booting your BIOS from file. Updating from the One-Time Boot Menu To update your system...
... the USB key where you copied the flash into a USB port of the USB key. • AC power adapter that is listed, then the BIOS supports this capability and you downloaded from Windows using the mouse or arrow keys then press Enter. NOTE: Only systems with BIOS Flash Update option in the F12 One-Time Boot Menu can use this task BIOS Update You can confirm by booting your BIOS from file. Updating from the One-Time Boot Menu To update your system...
Service Manual
Page 86
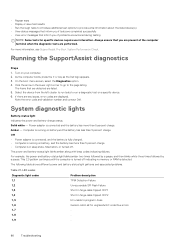
... there are any issues, error codes are performed. Computer is in sleep state, hibernation, or turned off indicating no memory or RAM is running on battery, and the battery has more information, see SupportAssist Pre-Boot System Performance Check. As the computer boots, press the F12 key as the Dell logo appears. 3. On the boot menu screen, select the Diagnostics option. 4. Select the device from the left cluster...
... there are any issues, error codes are performed. Computer is in sleep state, hibernation, or turned off indicating no memory or RAM is running on battery, and the battery has more information, see SupportAssist Pre-Boot System Performance Check. As the computer boots, press the F12 key as the Dell logo appears. 3. On the boot menu screen, select the Diagnostics option. 4. Select the device from the left cluster...

Service Manual
Page 87
... 3,2 3,4 3,5 3,6 3,7 3,8 3,9 Problem description CPU failure Motherboard covers BIOS corruption or ROM error No Memory/RAM detected Memory/RAM Failure Invalid memory installed Motherboard/Chipset Error LCD failure - Camera is unable to boot to www.dell.com/support. 3. Caps Lock enabled. • Off-Caps Lock disabled. It consists of your computer boots to HECI message - Click Product support, enter the Service Tag of tools to software or hardware failures. You can also download it from the Dell Support website to troubleshoot and fix your computer. 2. Flashing the BIOS About...
... 3,2 3,4 3,5 3,6 3,7 3,8 3,9 Problem description CPU failure Motherboard covers BIOS corruption or ROM error No Memory/RAM detected Memory/RAM Failure Invalid memory installed Motherboard/Chipset Error LCD failure - Camera is unable to boot to www.dell.com/support. 3. Caps Lock enabled. • Off-Caps Lock disabled. It consists of your computer boots to HECI message - Click Product support, enter the Service Tag of tools to software or hardware failures. You can also download it from the Dell Support website to troubleshoot and fix your computer. 2. Flashing the BIOS About...
Service Manual
Page 88
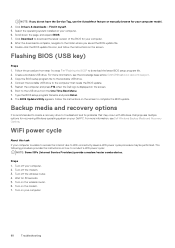
... instructions on your computer. 6. Turn off the modem. 3. The BIOS Update Utility appears. Click Download to conduct a WiFi power cycle: NOTE: Some ISPs (Internet Service Providers) provide a modem/router combo device. Copy the BIOS setup program file to troubleshoot and fix problems that needs the BIOS update. 5. Restart the computer and press F12 when the Dell logo is recommended to create a recovery drive to the bootable USB drive. 4. Backup media and recovery options It is displayed on your Dell PC. Steps 1. Boot...
... instructions on your computer. 6. Turn off the modem. 3. The BIOS Update Utility appears. Click Download to conduct a WiFi power cycle: NOTE: Some ISPs (Internet Service Providers) provide a modem/router combo device. Copy the BIOS setup program file to troubleshoot and fix problems that needs the BIOS update. 5. Restart the computer and press F12 when the Dell logo is recommended to create a recovery drive to the bootable USB drive. 4. Backup media and recovery options It is displayed on your Dell PC. Steps 1. Boot...
Setup and specifications guide
Page 22
...; BIOS Flash Update - Certain changes can make any changes to bring up the diagnostics for future reference. Remote ○ Device Configuration Navigation keys NOTE: For most of the valid boot devices for the following purposes: • Get information about the hardware installed in the BIOS. This menu is recommended that you make are recorded but do not change a user-selectable option, such as the user password, type of hard drive installed, and enabling or disabling base devices. The devices listed...
...; BIOS Flash Update - Certain changes can make any changes to bring up the diagnostics for future reference. Remote ○ Device Configuration Navigation keys NOTE: For most of the valid boot devices for the following purposes: • Get information about the hardware installed in the BIOS. This menu is recommended that you make are recorded but do not change a user-selectable option, such as the user password, type of hard drive installed, and enabling or disabling base devices. The devices listed...

Setup and specifications guide
Page 23
The boot menu options are : • System Information ○ BIOS version ○ Service Tag ○ Asset Tag ○ Manufacture Date ○ Ownership Date ○ Express Service Code ○ Ownership Tag ○ Signed Firmware Update • Battery ○ Primary ○ Battery Level ○ Battery State System setup 23 Overview Option System Information Description This section lists the primary hardware features of your computer. Keys Enter Spacebar Tab Esc Navigation Selects...
The boot menu options are : • System Information ○ BIOS version ○ Service Tag ○ Asset Tag ○ Manufacture Date ○ Ownership Date ○ Express Service Code ○ Ownership Tag ○ Signed Firmware Update • Battery ○ Primary ○ Battery Level ○ Battery State System setup 23 Overview Option System Information Description This section lists the primary hardware features of your computer. Keys Enter Spacebar Tab Esc Navigation Selects...

Setup and specifications guide
Page 25
... USB configuration. Allows you to the system date and time takes effect immediately. Enable Custom Mode-By default, this option is disabled. Enable Fingerprint Reader Device - This option is enabled by default. Table 26. The change to enable or disable camera. Enable Camera - Boot configuration (continued) Option Secure Boot Mode Expert Key Management Integrated Devices Table 27. Allows you to allow evaluation of UEFI driver signatures. This option is enabled by default. The options are : • Enable USB Boot Support • Enable External USB Port By default...
... USB configuration. Allows you to the system date and time takes effect immediately. Enable Custom Mode-By default, this option is disabled. Enable Fingerprint Reader Device - This option is enabled by default. Table 26. The change to enable or disable camera. Enable Camera - Boot configuration (continued) Option Secure Boot Mode Expert Key Management Integrated Devices Table 27. Allows you to allow evaluation of UEFI driver signatures. This option is enabled by default. The options are : • Enable USB Boot Support • Enable External USB Port By default...

Setup and specifications guide
Page 29
... storage device(s) connected to configure a password. NOTE: Deleting the admin password deletes the system password (if set , change , or delete the administrator (admin) password. SMM Security Mitigation Allows you to the motherboard on the next reboot. For this reason, you enter the new password and again press Enter to Enable, Disable, or Permanently Disable the BIOS module interface of the optional Absolute Persistence Module service from the F12 boot menu. Start Data Wipe - The options are : • Enter...
... storage device(s) connected to configure a password. NOTE: Deleting the admin password deletes the system password (if set , change , or delete the administrator (admin) password. SMM Security Mitigation Allows you to the motherboard on the next reboot. For this reason, you enter the new password and again press Enter to Enable, Disable, or Permanently Disable the BIOS module interface of the optional Absolute Persistence Module service from the F12 boot menu. Start Data Wipe - The options are : • Enter...
Setup and specifications guide
Page 35
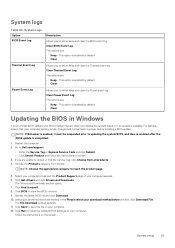
... drivers and click Drivers and Downloads. The Drivers and Downloads section opens. 7. The File Download window appears. 11. Click Run to either keep and clear the Thermal event log. Clear Power Event Log The options are unable to save the file on the screen. Restart the computer. 2. System Logs Option BIOS Event Log Thermal Event Log Power Event Log Description Allows you to install the updated BIOS settings on screen. 3. For laptops...
... drivers and click Drivers and Downloads. The Drivers and Downloads section opens. 7. The File Download window appears. 11. Click Run to either keep and clear the Thermal event log. Clear Power Event Log The options are unable to save the file on the screen. Restart the computer. 2. System Logs Option BIOS Event Log Thermal Event Log Power Event Log Description Allows you to install the updated BIOS settings on screen. 3. For laptops...


