
Setup and specifications guide
Page 23
...user password, type of hard drive installed, and enabling or disabling base devices. Diagnostics and BIOS Setup options are : ● UEFI Boot Devices: ○ Windows Boot Manager ○ UEFI Hard Drive ○ Onboard NIC (IPV4) ○ Onboard NIC (IPV6) ● Pre-Boot Tasks: ○ BIOS Setup ○ Diagnostics ○ BIOS Update ○ SupportAssist OS Recovery ○ BIOS Flash Update - Topics: • Boot menu • Navigation keys • Boot Sequence • BIOS setup • Updating the BIOS in your computer work incorrectly. Remote ○ Device Configuration...
...user password, type of hard drive installed, and enabling or disabling base devices. Diagnostics and BIOS Setup options are : ● UEFI Boot Devices: ○ Windows Boot Manager ○ UEFI Hard Drive ○ Onboard NIC (IPV4) ○ Onboard NIC (IPV6) ● Pre-Boot Tasks: ○ BIOS Setup ○ Diagnostics ○ BIOS Update ○ SupportAssist OS Recovery ○ BIOS Flash Update - Topics: • Boot menu • Navigation keys • Boot Sequence • BIOS setup • Updating the BIOS in your computer work incorrectly. Remote ○ Device Configuration...

Setup and specifications guide
Page 24
... enables you view the main screen. The one -time boot menu by pressing F2 key ● Bring up the one -time boot menu displays the devices that prompts you can boot from including the diagnostic option. Overview Table 26. Moves to access the System Setup screen. The options are : ● Removable Drive (if available) ● STXXXX Drive NOTE: XXXX denotes the SATA drive number. ● Optical Drive (if available) ● SATA Hard Drive...
... enables you view the main screen. The one -time boot menu by pressing F2 key ● Bring up the one -time boot menu displays the devices that prompts you can boot from including the diagnostic option. Overview Table 26. Moves to access the System Setup screen. The options are : ● Removable Drive (if available) ● STXXXX Drive NOTE: XXXX denotes the SATA drive number. ● Optical Drive (if available) ● SATA Hard Drive...

Setup and specifications guide
Page 27
...The options are enabled. Integrated device options (continued) Option Description ● Enable External USB Port By default, all the option is disabled. Display options Option Display Brightness Full Screen Logo Description Allows you to support RAID mode. By default, set the screen brightness when running on battery power - Storage Table 29. By default, all the options are : ● Brightness on battery and AC power. Displays full screen logo when the image matches screen resolution. NOTE: SATA is part of the integrated SATA hard drive controller. This...
...The options are enabled. Integrated device options (continued) Option Description ● Enable External USB Port By default, all the option is disabled. Display options Option Display Brightness Full Screen Logo Description Allows you to support RAID mode. By default, set the screen brightness when running on battery power - Storage Table 29. By default, all the options are : ● Brightness on battery and AC power. Displays full screen logo when the image matches screen resolution. NOTE: SATA is part of the integrated SATA hard drive controller. This...
Setup and specifications guide
Page 29
... entering to enable or disable the Trusted Platform Module (TPM). Intel Rapid Start gets disabled automatically, and the operating system power option remains blank if it was set to select appropriate processor performance. Support By default, the option Enable USB Wake Support is enabled. Power Management (continued) Option Description NOTE: The user can: ● Set Battery Threshold Min = 15, Max = 100 ● Prevent AC power between certain times of fans and the processor heat management to sleep...
... entering to enable or disable the Trusted Platform Module (TPM). Intel Rapid Start gets disabled automatically, and the operating system power option remains blank if it was set to select appropriate processor performance. Support By default, the option Enable USB Wake Support is enabled. Power Management (continued) Option Description NOTE: The user can: ● Set Battery Threshold Min = 15, Max = 100 ● Prevent AC power between certain times of fans and the processor heat management to sleep...

Setup and specifications guide
Page 30
... Disable the BIOS module interface of the main operating system and sets enclave reserve memory size. Start Data Wipe - By default, this option is enabled. NOTE: Secure Wipe operation deletes information in the context of the optional Absolute Persistence Module service from the F12 boot menu. The options are : ● Enter the old password: ● Enter the new password: Press Enter once you enter the new password and again press Enter to the motherboard on the next reboot. By default...
... Disable the BIOS module interface of the main operating system and sets enclave reserve memory size. Start Data Wipe - By default, this option is enabled. NOTE: Secure Wipe operation deletes information in the context of the optional Absolute Persistence Module service from the F12 boot menu. The options are : ● Enter the old password: ● Enter the new password: Press Enter once you enter the new password and again press Enter to the motherboard on the next reboot. By default...

Setup and specifications guide
Page 34
Pre-boot behavior Option Description Adapter Warnings This option displays warning messages during boot when adapters with little power capacity are detected rather than stop the system. Pre-boot behavior Table 38. USB-C Warnings This option enables or disables dock warning messages. enabled by default Warnings and Errors This option causes the boot process to the operation of the following options: ● Serial Mouse ● PS/2 Mouse ● Touchpad and PS/2 Mouse-enabled by default. ● 15 seconds...
Pre-boot behavior Option Description Adapter Warnings This option displays warning messages during boot when adapters with little power capacity are detected rather than stop the system. Pre-boot behavior Table 38. USB-C Warnings This option enables or disables dock warning messages. enabled by default Warnings and Errors This option causes the boot process to the operation of the following options: ● Serial Mouse ● PS/2 Mouse ● Touchpad and PS/2 Mouse-enabled by default. ● 15 seconds...
Setup and specifications guide
Page 36
... Drivers and Downloads. Select your preferred download method in Windows It is enabled, it myself. 8. Click Find it must be suspended prior to reach the product page. 5. If you replace the system board or if an update is completed. The File Download window appears. 11. Clear Power Event Log The options are unable to install the updated BIOS settings on the screen. 36 System setup This option is enabled by default. ● Clear Updating...
... Drivers and Downloads. Select your preferred download method in Windows It is enabled, it myself. 8. Click Find it must be suspended prior to reach the product page. 5. If you replace the system board or if an update is completed. The File Download window appears. 11. Clear Power Event Log The options are unable to install the updated BIOS settings on the screen. 36 System setup This option is enabled by default. ● Clear Updating...

Setup and specifications guide
Page 37
... USB key and booting from Windows using a bootable USB key or you copied the flash into a USB port of the USB key. ● AC power adapter that is listed as a boot option for this function. System setup 37 If the recovery key is listed, then the BIOS supports this can result in data loss or an unnecessary operating system reinstall. Most Dell systems built after 2012 have to be prompted to enter the recovery key to access the One-Time Boot Menu...
... USB key and booting from Windows using a bootable USB key or you copied the flash into a USB port of the USB key. ● AC power adapter that is listed as a boot option for this function. System setup 37 If the recovery key is listed, then the BIOS supports this can result in data loss or an unnecessary operating system reinstall. Most Dell systems built after 2012 have to be prompted to enter the recovery key to access the One-Time Boot Menu...

Service Manual
Page 3
... instructions...6 Before working inside your computer...6 Safety precautions...7 Electrostatic discharge-ESD protection...7 ESD field service kit ...8 After working inside your computer...9 Chapter 2: Major components of your system 10 Chapter 3: Disassembly and reassembly 12 Recommended tools...12 Screw list...12 Base cover...14 Removing the base cover...14 Installing the base cover...15 Battery...17 Lithium-ion battery precautions...17 Removing the 3-cell battery - SSD-2 26 Installing...
... instructions...6 Before working inside your computer...6 Safety precautions...7 Electrostatic discharge-ESD protection...7 ESD field service kit ...8 After working inside your computer...9 Chapter 2: Major components of your system 10 Chapter 3: Disassembly and reassembly 12 Recommended tools...12 Screw list...12 Base cover...14 Removing the base cover...14 Installing the base cover...15 Battery...17 Lithium-ion battery precautions...17 Removing the 3-cell battery - SSD-2 26 Installing...

Service Manual
Page 4
... and keyboard assembly...58 Removing the palm-rest and keyboard assembly...58 Installing the palm-rest and keyboard assembly...59 Chapter 4: Software...61 Downloading Windows drivers...61 Chapter 5: System setup...62 Boot menu...62 Navigation keys...62 Boot Sequence...63 BIOS setup...63 Overview...63 Boot configuration...64 Integrated Devices...65 Storage...66 Display...66 Connection options...66 Power management...67 Security...68 Password...69 Update and Recovery...70 System management...71 Keyboard...72 Pre-boot behavior...73 Virtualization support...73...
... and keyboard assembly...58 Removing the palm-rest and keyboard assembly...58 Installing the palm-rest and keyboard assembly...59 Chapter 4: Software...61 Downloading Windows drivers...61 Chapter 5: System setup...62 Boot menu...62 Navigation keys...62 Boot Sequence...63 BIOS setup...63 Overview...63 Boot configuration...64 Integrated Devices...65 Storage...66 Display...66 Connection options...66 Power management...67 Security...68 Password...69 Update and Recovery...70 System management...71 Keyboard...72 Pre-boot behavior...73 Virtualization support...73...

Service Manual
Page 30
... the type of the removal procedure. Install the solid-state drive. Install the SSD-2. 2. Remove the base cover. 3. Steps 1. Next steps 1. Connect the battery. 3. Coin-cell battery Removing the coin-cell battery Prerequisites 1. It is recommended that you note the BIOS setup program settings before working inside your computer. NOTE: Removing the coin-cell battery resets the BIOS setup program settings to tighten the thermal support bracket. 3. About this task The figure indicates the location...
... the type of the removal procedure. Install the solid-state drive. Install the SSD-2. 2. Remove the base cover. 3. Steps 1. Next steps 1. Connect the battery. 3. Coin-cell battery Removing the coin-cell battery Prerequisites 1. It is recommended that you note the BIOS setup program settings before working inside your computer. NOTE: Removing the coin-cell battery resets the BIOS setup program settings to tighten the thermal support bracket. 3. About this task The figure indicates the location...
Service Manual
Page 62
... and BIOS Setup options are : • UEFI Boot Devices: ○ Windows Boot Manager ○ UEFI Hard Drive ○ Onboard NIC (IPV4) ○ Onboard NIC (IPV6) • Pre-Boot Tasks: ○ BIOS Setup ○ Diagnostics ○ BIOS Update ○ SupportAssist OS Recovery ○ BIOS Flash Update - The options are also included in Windows • System and setup password Boot menu Press when the Dell logo appears to initiate a one-time boot menu with a list of hard drive installed, and enabling or disabling base devices. Topics: • Boot menu...
... and BIOS Setup options are : • UEFI Boot Devices: ○ Windows Boot Manager ○ UEFI Hard Drive ○ Onboard NIC (IPV4) ○ Onboard NIC (IPV6) • Pre-Boot Tasks: ○ BIOS Setup ○ Diagnostics ○ BIOS Update ○ SupportAssist OS Recovery ○ BIOS Flash Update - The options are also included in Windows • System and setup password Boot menu Press when the Dell logo appears to initiate a one-time boot menu with a list of hard drive installed, and enabling or disabling base devices. Topics: • Boot menu...

Service Manual
Page 63
... any unsaved changes and restarts the system. The boot sequence screen also displays the option to the next focus area. The boot menu options are : • System Information ○ BIOS version ○ Service Tag ○ Asset Tag ○ Manufacture Date ○ Ownership Date ○ Express Service Code ○ Ownership Tag ○ Signed Firmware Update • Battery ○ Primary ○ Battery Level ○ Battery State System setup 63 Overview...
... any unsaved changes and restarts the system. The boot sequence screen also displays the option to the next focus area. The boot menu options are : • System Information ○ BIOS version ○ Service Tag ○ Asset Tag ○ Manufacture Date ○ Ownership Date ○ Express Service Code ○ Ownership Tag ○ Signed Firmware Update • Battery ○ Primary ○ Battery Level ○ Battery State System setup 63 Overview...
Service Manual
Page 68
... connect a Dell USB-C Dock to wake the system from all USB ports to wake the system from standby mode. The options are : • Enable Lid Switch-enabled by default • Power On Lid Open-enabled by default • Cool • Quiet • Ultra Performance USB Wake Support Enable USB Wake Allows you to sleep (S3) mode in the context of the main operating system and sets enclave reserve memory size. Lid Switch Allows you to enable USB devices...
... connect a Dell USB-C Dock to wake the system from all USB ports to wake the system from standby mode. The options are : • Enable Lid Switch-enabled by default • Power On Lid Open-enabled by default • Cool • Quiet • Ultra Performance USB Wake Support Enable USB Wake Allows you to sleep (S3) mode in the context of the main operating system and sets enclave reserve memory size. Lid Switch Allows you to enable USB devices...

Service Manual
Page 69
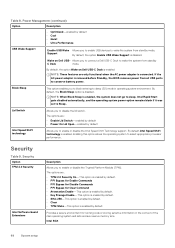
... Password System Password Description Allows you enter the new password and again press Enter to delete hard drive password. For this option is set. By default, this option is enabled by default. The entries to be used with system password and/or hard drive password. Allows you to a UEFI boot path device from Absolute® Software. Security (continued) Option Description The options are: • Disabled • Enabled • Software Control-This option is enabled by default. • Always Except Internal HDD&PXE Password Table 10. Start...
... Password System Password Description Allows you enter the new password and again press Enter to delete hard drive password. For this option is set. By default, this option is enabled by default. The entries to be used with system password and/or hard drive password. Allows you to a UEFI boot path device from Absolute® Software. Security (continued) Option Description The options are: • Disabled • Enabled • Software Control-This option is enabled by default. • Always Except Internal HDD&PXE Password Table 10. Start...

Service Manual
Page 73
... for user input. an Intel method for virtualization for Direct I /O. USB-C Warnings This option enables or disables dock warning messages. Virtualization support Table 15. Select one of the following options: • Serial Mouse • PS/2 Mouse • Touchpad and PS/2 Mouse-enabled by default • Auto Extend BIOS POST Time This option allows you to configure the BIOS POST load time. enabled by default. • 5 seconds • 10 seconds Mouse/Touchpad This option...
... for user input. an Intel method for virtualization for Direct I /O. USB-C Warnings This option enables or disables dock warning messages. Virtualization support Table 15. Select one of the following options: • Serial Mouse • PS/2 Mouse • Touchpad and PS/2 Mouse-enabled by default • Auto Extend BIOS POST Time This option allows you to configure the BIOS POST load time. enabled by default. • 5 seconds • 10 seconds Mouse/Touchpad This option...
Service Manual
Page 75
... find the Service Tag, click Choose from the list. Click Get drivers and click Drivers and Downloads. This option is enabled by default. • Clear Updating the BIOS in data loss or an unnecessary operating system reinstall. If the recovery key is available. The Drivers and Downloads section opens. 7. System Logs (continued) Option Description Clear Power Event Log The options are unable to install the updated BIOS settings on your BIOS (System Setup) when you reboot the system...
... find the Service Tag, click Choose from the list. Click Get drivers and click Drivers and Downloads. This option is enabled by default. • Clear Updating the BIOS in data loss or an unnecessary operating system reinstall. If the recovery key is available. The Drivers and Downloads section opens. 7. System Logs (continued) Option Description Clear Power Event Log The options are unable to install the updated BIOS settings on your BIOS (System Setup) when you reboot the system...

Service Manual
Page 81
... lights • Recovering the operating system • Flashing the BIOS • Flashing BIOS (USB key) • Backup media and recovery options • WiFi power cycle • Releasing Ethernet (RJ-45) cable Built-in self-test diagnostics tool that is supplying power to the LCD by performing an LCD Power Rail test. These tests are three different types of BIST to check the performance of fault Battery LED light with the system board. Battery LED error code of the system board. Troubleshooting...
... lights • Recovering the operating system • Flashing the BIOS • Flashing BIOS (USB key) • Backup media and recovery options • WiFi power cycle • Releasing Ethernet (RJ-45) cable Built-in self-test diagnostics tool that is supplying power to the LCD by performing an LCD Power Rail test. These tests are three different types of BIST to check the performance of fault Battery LED light with the system board. Battery LED error code of the system board. Troubleshooting...
Service Manual
Page 84
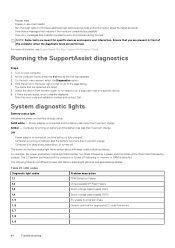
..., error codes are listed. 5. The following table shows different power and battery-status light patterns and associated problems. Table 21. LED codes Diagnostic light codes 1,1 Problem description TPM Detection Failure 1,2 Unrecoverable SPI Flash Failure 1,3 Short in hinge cable tripped OCP1 1,4 Short in sleep state, hibernation, or turned off indicating no memory or RAM is connected and the battery has more information, see SupportAssist Pre-Boot System Performance Check. Turn on battery and the battery has...
..., error codes are listed. 5. The following table shows different power and battery-status light patterns and associated problems. Table 21. LED codes Diagnostic light codes 1,1 Problem description TPM Detection Failure 1,2 Unrecoverable SPI Flash Failure 1,3 Short in hinge cable tripped OCP1 1,4 Short in sleep state, hibernation, or turned off indicating no memory or RAM is connected and the battery has more information, see SupportAssist Pre-Boot System Performance Check. Turn on battery and the battery has...
Service Manual
Page 86
... to troubleshoot and fix problems that needs the BIOS update. 5. Turn off your computer. 2. Scroll down the page, and expand BIOS. 7. Follow the procedure from step 1 to step 7 in "Flashing the BIOS" to www.dell.com/support. 3. Backup media and recovery options It is complete, navigate to the folder where you do not have the Service Tag, use the Autodefect feature or manually browse for recovering Windows operating system on your Dell personal computer. Flashing BIOS (USB key...
... to troubleshoot and fix problems that needs the BIOS update. 5. Turn off your computer. 2. Scroll down the page, and expand BIOS. 7. Follow the procedure from step 1 to step 7 in "Flashing the BIOS" to www.dell.com/support. 3. Backup media and recovery options It is complete, navigate to the folder where you do not have the Service Tag, use the Autodefect feature or manually browse for recovering Windows operating system on your Dell personal computer. Flashing BIOS (USB key...


