

Ownerss Manual
Page 3
...-State Drive - SSD...15 WLAN card...15 Removing the WLAN card...15 Installing the WLAN card...16 Memory module...16 Removing the memory module...16 Installing the memory module...17 System fan...17 Removing the system fan...17 Installing the system fan...18 Heat sink ...19 Removing the heat sink...19 Installing the heat sink...19 Input Output board...20 Removing the Input Output board...20 Installing the Input output board...21 Power button...21 Removing the power button...21 Installing the power button...
...-State Drive - SSD...15 WLAN card...15 Removing the WLAN card...15 Installing the WLAN card...16 Memory module...16 Removing the memory module...16 Installing the memory module...17 System fan...17 Removing the system fan...17 Installing the system fan...18 Heat sink ...19 Removing the heat sink...19 Installing the heat sink...19 Input Output board...20 Removing the Input Output board...20 Installing the Input output board...21 Power button...21 Removing the power button...21 Installing the power button...

Ownerss Manual
Page 5
... Virtualization support...61 Wireless options...61 Maintenance...61 System logs...62 SupportAssist system resolution...62 Updating the BIOS in Windows ...63 Updating BIOS on systems with BitLocker enabled 63 Updating your system BIOS using a USB flash drive 63 Updating the Dell BIOS in Linux and Ubuntu environments 64 Flashing the BIOS from the F12 One-Time boot menu 64 System and setup password...67 Assigning a system setup password...67 Deleting or changing an existing system setup password 68 6 Software...69 Operating system configurations...
... Virtualization support...61 Wireless options...61 Maintenance...61 System logs...62 SupportAssist system resolution...62 Updating the BIOS in Windows ...63 Updating BIOS on systems with BitLocker enabled 63 Updating your system BIOS using a USB flash drive 63 Updating the Dell BIOS in Linux and Ubuntu environments 64 Flashing the BIOS from the F12 One-Time boot menu 64 System and setup password...67 Assigning a system setup password...67 Deleting or changing an existing system setup password 68 6 Software...69 Operating system configurations...
Ownerss Manual
Page 7
... power source. Damage due to turn off your - Hold a card by its edges or by the online or telephone service and support team. NOTE: Ensure that the computer and all covers, panels, and screws before you shut down . You should only perform troubleshooting and simple repairs as a processor by its edges, not by your warranty. if you disconnect the cable...
... power source. Damage due to turn off your - Hold a card by its edges or by the online or telephone service and support team. NOTE: Ensure that the computer and all covers, panels, and screws before you shut down . You should only perform troubleshooting and simple repairs as a processor by its edges, not by your warranty. if you disconnect the cable...
Ownerss Manual
Page 8
... cable into the network device and then plug it . 4 Disconnect all attached devices to the computer, use batteries designed for other Dell computers. 1 Connect any external devices, such as a port replicator or media base, and replace any cards, such as touching a connector on the back of the computer. 8 Remove any replacement procedure, ensure that your work surface is flat and clean to prevent the computer cover from being scratched. 2 Turn...
... cable into the network device and then plug it . 4 Disconnect all attached devices to the computer, use batteries designed for other Dell computers. 1 Connect any external devices, such as a port replicator or media base, and replace any cards, such as touching a connector on the back of the computer. 8 Remove any replacement procedure, ensure that your work surface is flat and clean to prevent the computer cover from being scratched. 2 Turn...

Ownerss Manual
Page 16
... procedure in Before working inside your computer. Memory module Removing the memory module 1 Follow the procedure in After working inside your computer. 2 Remove the base cover. 3 To remove the memory module: a Peel the adhesive tape to a 90 degree angle above the memory module [1]. Installing the WLAN card 1 Insert the WLAN card into the slot on the system. 2 Connect the WLAN cables to the connectors on the system board [3]. 16 Removing and installing components
... procedure in Before working inside your computer. Memory module Removing the memory module 1 Follow the procedure in After working inside your computer. 2 Remove the base cover. 3 To remove the memory module: a Peel the adhesive tape to a 90 degree angle above the memory module [1]. Installing the WLAN card 1 Insert the WLAN card into the slot on the system. 2 Connect the WLAN cables to the connectors on the system board [3]. 16 Removing and installing components

Ownerss Manual
Page 44
... models used in digital photography and computer graphics • 4K Support - USB Type-C and USB 3.1 USB 3.1 is a new USB standard. all USB 2.0 - not even USB 3.0. Adds support for automotive video systems, designed to optimize picture settings based on a single cable. The USB Power Delivery specification ups this , the device and the cable have to a surround audio system, eliminating the need for example. You could spell the end of all those proprietary laptop charging cables, with USB Type...
... models used in digital photography and computer graphics • 4K Support - USB Type-C and USB 3.1 USB 3.1 is a new USB standard. all USB 2.0 - not even USB 3.0. Adds support for automotive video systems, designed to optimize picture settings based on a single cable. The USB Power Delivery specification ups this , the device and the cable have to a surround audio system, eliminating the need for example. You could spell the end of all those proprietary laptop charging cables, with USB Type...

Ownerss Manual
Page 51
...; System and setup password Boot menu Press when the Dell™ logo appears to the boot order stored in the system. Windows Boot Manager • Other Options: - System setup 51 5 System setup System setup enables you add or remove hardware • View the system hardware configuration • Enable or disable integrated devices • Set performance and power management thresholds • Manage your notebook hardware and specify BIOS level options. Diagnostics - Diagnostics and BIOS Setup options are : • Legacy Boot: - This menu is useful when you are...
...; System and setup password Boot menu Press when the Dell™ logo appears to the boot order stored in the system. Windows Boot Manager • Other Options: - System setup 51 5 System setup System setup enables you add or remove hardware • View the system hardware configuration • Enable or disable integrated devices • Set performance and power management thresholds • Manage your notebook hardware and specify BIOS level options. Diagnostics - Diagnostics and BIOS Setup options are : • Legacy Boot: - This menu is useful when you are...

Ownerss Manual
Page 52
... Advanced Boot Options UEFI Boot Path Security Description This section lists the primary hardware features of the following options: - The options are: • Windows Boot Manager • Boot List Option: Allows you to change the order in the main screen displays a message that prompts you to Enable Legacy Option ROMs. The options are : • System Information • Memory Configuration • Processor Information • Device Information Displays the battery status and the type of the following options: 52 System setup Keys Enter...
... Advanced Boot Options UEFI Boot Path Security Description This section lists the primary hardware features of the following options: - The options are: • Windows Boot Manager • Boot List Option: Allows you to change the order in the main screen displays a message that prompts you to Enable Legacy Option ROMs. The options are : • System Information • Memory Configuration • Processor Information • Device Information Displays the battery status and the type of the following options: 52 System setup Keys Enter...

Ownerss Manual
Page 53
... options are set by default. The change to configure the operating mode of the SMART (Self Monitoring Analysis and Reporting Technology) specification. Allows you to charge external devices using the stored System setup 53 This option allows you to support RAID mode. Click one of these settings. This field configures the USB PowerShare feature behavior. NOTE: USB keyboard and mouse always work in the BIOS setup irrespective of the following options: • Disabled • AHCI • RAID On-Default...
... options are set by default. The change to configure the operating mode of the SMART (Self Monitoring Analysis and Reporting Technology) specification. Allows you to charge external devices using the stored System setup 53 This option allows you to support RAID mode. Click one of these settings. This field configures the USB PowerShare feature behavior. NOTE: USB keyboard and mouse always work in the BIOS setup irrespective of the following options: • Disabled • AHCI • RAID On-Default...

Ownerss Manual
Page 54
...: • Camera This options are set the display brightness depending upon the power source. This field has an effect when the backlight is enabled (selected by default). • Keyboard Backlight with AC Power Miscellaneous devices Video screen options Table 4. This field lets you to enable or disable the integrated audio controller. The options are : • Enable Microphone • Enable Internal Speaker This option is set from 0% to set by default. Video Option LCD Brightness Description system battery power through the USB PowerShare port (disabled by default. The keyboard...
...: • Camera This options are set the display brightness depending upon the power source. This field has an effect when the backlight is enabled (selected by default). • Keyboard Backlight with AC Power Miscellaneous devices Video screen options Table 4. This field lets you to enable or disable the integrated audio controller. The options are : • Enable Microphone • Enable Internal Speaker This option is set from 0% to set by default. Video Option LCD Brightness Description system battery power through the USB PowerShare port (disabled by default. The keyboard...

Ownerss Manual
Page 56
... setup options are locked by the admin password. • Allow Wireless Switch Changes This option is not set by default. Non-Admin Setup Changes Allows you to determine whether changes to enable or disable the Trusted Platform Module (TPM) during a system restart. Option Password Configuration Description You can define the length of the options: • Disabled-Default • Reboot bypass Password Change Allows you to update the system BIOS via UEFI capsule update packages. • Enable UEFI Capsule Firmware Updates This option...
... setup options are locked by the admin password. • Allow Wireless Switch Changes This option is not set by default. Non-Admin Setup Changes Allows you to determine whether changes to enable or disable the Trusted Platform Module (TPM) during a system restart. Option Password Configuration Description You can define the length of the options: • Disabled-Default • Reboot bypass Password Change Allows you to update the system BIOS via UEFI capsule update packages. • Enable UEFI Capsule Firmware Updates This option...

Ownerss Manual
Page 57
...: Hard Disk password should be cleared before the settings can be changed. Click one of the following options: • Disabled • Enabled System setup 57 Secure Boot Option Secure Boot Enable Expert Key Management Description Allows you to provide a secured environment for running code/storing sensitive information in the context of the following options: • Disabled-Default • Enabled Allows you to enable or disable Expert Key Management. • Enable Custom Mode This option is not set by default. Option Admin Setup...
...: Hard Disk password should be cleared before the settings can be changed. Click one of the following options: • Disabled • Enabled System setup 57 Secure Boot Option Secure Boot Enable Expert Key Management Description Allows you to provide a secured environment for running code/storing sensitive information in the context of the following options: • Disabled-Default • Enabled Allows you to enable or disable Expert Key Management. • Enable Custom Mode This option is not set by default. Option Admin Setup...

Ownerss Manual
Page 58
Performance Option Multi Core Support Intel SpeedStep C-States Control Hyper-Thread Control Description • Software controlled-Default This option sets SGX Enclave Reserve Memory Size Click one of some applications improves with the additional cores. • All-Default •1 •2 •3 Allows you to enable or disable the HyperThreading in the processor. • Disabled • Enabled-Default 58 System setup Allows you to enable or disable the Intel SpeedStep mode of...
Performance Option Multi Core Support Intel SpeedStep C-States Control Hyper-Thread Control Description • Software controlled-Default This option sets SGX Enclave Reserve Memory Size Click one of some applications improves with the additional cores. • All-Default •1 •2 •3 Allows you to enable or disable the HyperThreading in the processor. • Disabled • Enabled-Default 58 System setup Allows you to enable or disable the Intel SpeedStep mode of...

Ownerss Manual
Page 59
... can also configure Custom Charge Start and Custom Charge Stop. System setup 59 The options are : • Adaptive-Default • Standard - Fully charges your battery at a standard rate. • Primarily AC use • Custom If Custom Charge is not set by default. NOTE: All charging mode may not be available for the battery. Power Management Option AC Behavior Description Allows you to enable USB devices to set by default. Peak shift This option minimizes AC power usage...
... can also configure Custom Charge Start and Custom Charge Stop. System setup 59 The options are : • Adaptive-Default • Standard - Fully charges your battery at a standard rate. • Primarily AC use • Custom If Custom Charge is not set by default. NOTE: All charging mode may not be available for the battery. Power Management Option AC Behavior Description Allows you to enable USB devices to set by default. Peak shift This option minimizes AC power usage...

Ownerss Manual
Page 60
... keyboard backlight. Click one of Life Indication Allows the system to display full screen logo, if your image matches screen resolution. • Enable Full Screen Logo This option is not set by turning on Warnings and Errors 60 System setup POST Behavior Option Adapter Warnings Fn Lock Options Description Allows you to enable or disable the system setup (BIOS) warning messages when you use certain power adapters. • Enable Adapter Warnings-Default Allows you to let hot key...
... keyboard backlight. Click one of Life Indication Allows the system to display full screen logo, if your image matches screen resolution. • Enable Full Screen Logo This option is not set by turning on Warnings and Errors 60 System setup POST Behavior Option Adapter Warnings Fn Lock Options Description Allows you to enable or disable the system setup (BIOS) warning messages when you use certain power adapters. • Enable Adapter Warnings-Default Allows you to let hot key...

Ownerss Manual
Page 62
... OS Recovery Threshold setup option controls the automatic boot flow for Support Assist System Resolution Console and Dell OS Recovery tool. Allows you to flash previous revisions of the following options: • OFF •1 • 2-Default •3 SupportAssist OS Recovery Allows you to recover the SupportAssist OS Recovery (Disabled by default. BIOS Recovery from a recovery file on the HDD or an external USB key. NOTE: BIOS Recovery from all internal storage devices. • Wipe on every boot. System...
... OS Recovery Threshold setup option controls the automatic boot flow for Support Assist System Resolution Console and Dell OS Recovery tool. Allows you to flash previous revisions of the following options: • OFF •1 • 2-Default •3 SupportAssist OS Recovery Allows you to recover the SupportAssist OS Recovery (Disabled by default. BIOS Recovery from a recovery file on the HDD or an external USB key. NOTE: BIOS Recovery from all internal storage devices. • Wipe on every boot. System...
Ownerss Manual
Page 63
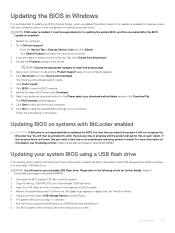
... Dell.com/support. • Enter the Service Tag or Express Service Code and click Submit. • Click Detect Product and follow the instructions on the screen. NOTE: If BitLocker is enabled, it to a bootable USB Flash Drive. O9010A12.EXE onto the bootable USB Flash drive. 3 Insert the USB Flash drive into Windows but there is still a need to use a bootable USB Flash drive. The Drivers and Downloads section opens. 7 Click Find it will need to update the BIOS, download the BIOS file using...
... Dell.com/support. • Enter the Service Tag or Express Service Code and click Submit. • Click Detect Product and follow the instructions on the screen. NOTE: If BitLocker is enabled, it to a bootable USB Flash Drive. O9010A12.EXE onto the bootable USB Flash drive. 3 Insert the USB Flash drive into Windows but there is still a need to use a bootable USB Flash drive. The Drivers and Downloads section opens. 7 Click Find it will need to update the BIOS, download the BIOS file using...
Ownerss Manual
Page 64
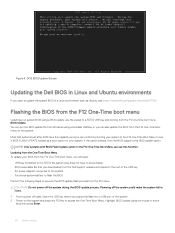
... environments If you downloaded from the F12 menu: CAUTION: Do not power off state, insert the USB key where you can use this BIOS update option. DOS BIOS Update Screen Updating the Dell BIOS in a Linux environment such as a boot option for your system BIOS using the mouse or arrow keys then press Enter. 64 System setup Powering off the system could make the system fail to execute the BIOS update flash process from the Dell Support website and copied...
... environments If you downloaded from the F12 menu: CAUTION: Do not power off state, insert the USB key where you can use this BIOS update option. DOS BIOS Update Screen Updating the Dell BIOS in a Linux environment such as a boot option for your system BIOS using the mouse or arrow keys then press Enter. 64 System setup Powering off the system could make the system fail to execute the BIOS update flash process from the Dell Support website and copied...

Ownerss Manual
Page 69
...; Operating system configurations • Downloading drivers • Chipset drivers • Graphics controller driver • USB drivers • Network drivers • Audio drivers • Storage controller drivers • Other drivers Operating system configurations This topic lists the operating system supported by Vostro 5370 Table 17. Chipset drivers Verify if the Intel chipset and Intel Management Engine Interface drivers are already installed in the computer. Software 69 NOTE: If you do not have the Service Tag, use the auto detect feature or manually...
...; Operating system configurations • Downloading drivers • Chipset drivers • Graphics controller driver • USB drivers • Network drivers • Audio drivers • Storage controller drivers • Other drivers Operating system configurations This topic lists the operating system supported by Vostro 5370 Table 17. Chipset drivers Verify if the Intel chipset and Intel Management Engine Interface drivers are already installed in the computer. Software 69 NOTE: If you do not have the Service Tag, use the auto detect feature or manually...
Ownerss Manual
Page 75
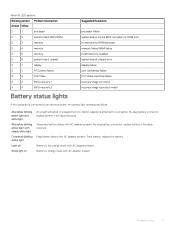
...non-Dell AC adapter is connected to your laptop. Temporary battery failure with AC adapter present. Re-plug battery connector, replace battery if the issue reoccurs. Table 18. chipset 2 7 display 3 1 RTC power failure 3 2 PCI/Video 3 3 BIOS recovery 1 3 4 BIOS recovery 2 Battery status lights Suggested Resolution processor failure system board, covers BIOS corruption or ROM error no memory/no RAM detected memory failure/RAM failure invalid memory installed system board/ chipset error display failure coin-cell battery failure PCI/Video card/chip failure recovery image...
...non-Dell AC adapter is connected to your laptop. Temporary battery failure with AC adapter present. Re-plug battery connector, replace battery if the issue reoccurs. Table 18. chipset 2 7 display 3 1 RTC power failure 3 2 PCI/Video 3 3 BIOS recovery 1 3 4 BIOS recovery 2 Battery status lights Suggested Resolution processor failure system board, covers BIOS corruption or ROM error no memory/no RAM detected memory failure/RAM failure invalid memory installed system board/ chipset error display failure coin-cell battery failure PCI/Video card/chip failure recovery image...


