
Service Manual
Page 3
.... CAUTION: Before touching anything inside your warranty. Click Start > Power > Shut down instructions. 3. NOTE: Disconnect all attached network devices and peripherals, such as a processor by its edges, not by your computer 3 CAUTION: You should only perform troubleshooting and repairs as the metal at www.dell.com/regulatory_compliance. CAUTION: When you work surface is not covered by its pins. When connecting cables, ensure that...
.... CAUTION: Before touching anything inside your warranty. Click Start > Power > Shut down instructions. 3. NOTE: Disconnect all attached network devices and peripherals, such as a processor by its edges, not by your computer 3 CAUTION: You should only perform troubleshooting and repairs as the metal at www.dell.com/regulatory_compliance. CAUTION: When you work surface is not covered by its pins. When connecting cables, ensure that...

Service Manual
Page 4
... you perform any installation or break/fix procedures involving disassembly or reassembly: • Turn off . The internal power enables the system to be unplugged before performing any disassembly instructions. The high rate of intermittent failures means that most of semiconductors used in an anti-static container or packaging. 4 Working inside any notebook to avoid electrostatic discharge (ESD) damage. • After removing any system...
... you perform any installation or break/fix procedures involving disassembly or reassembly: • Turn off . The internal power enables the system to be unplugged before performing any disassembly instructions. The high rate of intermittent failures means that most of semiconductors used in an anti-static container or packaging. 4 Working inside any notebook to avoid electrostatic discharge (ESD) damage. • After removing any system...

Service Manual
Page 5
... and all attached devices to keep sensitive parts separate from internal parts that all insulator parts while performing service and that can be shipped and received in static-safe packaging. All ESD-sensitive devices must be used service kit. Connect your computer. 3. a red LED is not required, or connected to the anti-static mat to any external devices, peripherals, or cables you removed before working on your wrist...
... and all attached devices to keep sensitive parts separate from internal parts that all insulator parts while performing service and that can be shipped and received in static-safe packaging. All ESD-sensitive devices must be used service kit. Connect your computer. 3. a red LED is not required, or connected to the anti-static mat to any external devices, peripherals, or cables you removed before working on your wrist...

Service Manual
Page 21
... location of the coin-cell battery and provides a visual representation of the removal procedure. It is recommended that you are replacing a component, remove the existing component before removing the coin-cell battery. 2. Installing the coin-cell battery Prerequisites If you note the BIOS setup program's settings before performing the installation procedure. CAUTION: Removing the coin-cenn battery resets the BIOS setup program's settings to default. Follow the procedure in Before working...
... location of the coin-cell battery and provides a visual representation of the removal procedure. It is recommended that you are replacing a component, remove the existing component before removing the coin-cell battery. 2. Installing the coin-cell battery Prerequisites If you note the BIOS setup program's settings before performing the installation procedure. CAUTION: Removing the coin-cenn battery resets the BIOS setup program's settings to default. Follow the procedure in Before working...

Service Manual
Page 47
... Dell Windows Backup Media and Recovery Options. The embedded system diagnostics provides a set of problems encountered during testing NOTE: Some tests for specific devices require user interaction. The Dell SupportAssist Pre-boot System Performance Check diagnostics is embedded with the BIOS and is recommended to create a recovery drive to troubleshoot and fix problems that inform you to diagnose hardware issues, repair your computer, back up your files, or restore your computer to its factory...
... Dell Windows Backup Media and Recovery Options. The embedded system diagnostics provides a set of problems encountered during testing NOTE: Some tests for specific devices require user interaction. The Dell SupportAssist Pre-boot System Performance Check diagnostics is embedded with the BIOS and is recommended to create a recovery drive to troubleshoot and fix problems that inform you to diagnose hardware issues, repair your computer, back up your files, or restore your computer to its factory...
Service Manual
Page 53
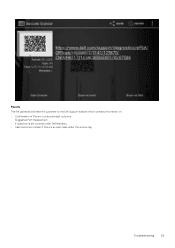
Results The link generated will take the customer to the Dell Support website which contains information on: • Confirmation of the error code and result outcome • Suggested Part Replacement • If customer is still covered under Dell Warranty • Case reference number if there is an open case under the service tag Troubleshooting 53
Results The link generated will take the customer to the Dell Support website which contains information on: • Confirmation of the error code and result outcome • Suggested Part Replacement • If customer is still covered under Dell Warranty • Case reference number if there is an open case under the service tag Troubleshooting 53

Service Manual
Page 55
... a power-off state either connected to AC power or with the system board b. LED codes Diagnostic light codes 2,1 2,2 2,3 2,4 2,5 2,6 2,7 2,8 3,1 3,2 3,3 3,4 3,5 3,6 Problem description Processor failure System board: BIOS or ROM (Read-Only Memory) failure No memory or RAM (Random-Access Memory) detected Memory or RAM (Random-Access Memory) failure Invalid memory installed System-board or chipset error Display failure LCD power rail failure. OFF: No fault detected with battery only. 1. This 2,3 pattern continues until the computer is running on the keyboard and the power button...
... a power-off state either connected to AC power or with the system board b. LED codes Diagnostic light codes 2,1 2,2 2,3 2,4 2,5 2,6 2,7 2,8 3,1 3,2 3,3 3,4 3,5 3,6 Problem description Processor failure System board: BIOS or ROM (Read-Only Memory) failure No memory or RAM (Random-Access Memory) detected Memory or RAM (Random-Access Memory) failure Invalid memory installed System-board or chipset error Display failure LCD power rail failure. OFF: No fault detected with battery only. 1. This 2,3 pattern continues until the computer is running on the keyboard and the power button...
Setup and Specifications
Page 3
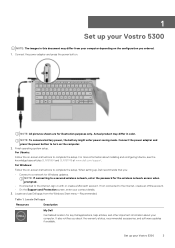
... Vostro 5300 NOTE: The images in color. NOTE: If connecting to a secured wireless network, enter the password for Windows updates. Table 1. It also notifies you : • Connect to turn on the configuration you ordered. 1. If not connected to the internet, sign-in with or create a Microsoft account. NOTE: To conserve battery power, the battery might enter power saving mode. Locate and use Dell apps from your contact details. 3. Set up your computer. Connect the power adapter and press the power button...
... Vostro 5300 NOTE: The images in color. NOTE: If connecting to a secured wireless network, enter the password for Windows updates. Table 1. It also notifies you : • Connect to turn on the configuration you ordered. 1. If not connected to the internet, sign-in with or create a Microsoft account. NOTE: To conserve battery power, the battery might enter power saving mode. Locate and use Dell apps from your contact details. 3. Set up your computer. Connect the power adapter and press the power button...
Setup and Specifications
Page 9
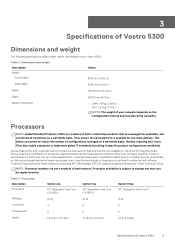
... new security features that are managed for purchase globally. Credential Guard uses virtualization-based security to isolate secrets (credentials) so that it locks a device down so that only privileged system software can lead to change and may vary by region/country. Credential Guard prevents these secrets can access them. NOTE: Processor numbers are only available on a worldwide basis. 3 Specifications of Vostro 5300...
... new security features that are managed for purchase globally. Credential Guard uses virtualization-based security to isolate secrets (credentials) so that it locks a device down so that only privileged system software can lead to change and may vary by region/country. Credential Guard prevents these secrets can access them. NOTE: Processor numbers are only available on a worldwide basis. 3 Specifications of Vostro 5300...
Setup and Specifications
Page 19
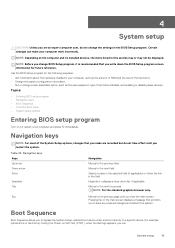
... configuration information. • Set or change a user-selectable option, such as the user password, type of the System Setup options, changes that you make your computer and press F2 immediately. Esc Moves to the previous page until you restart the system. Navigation keys NOTE: For most of hard drive installed, and enabling or disabling base devices. Topics: • Entering BIOS setup program • Navigation keys • Boot Sequence • One time boot menu • System setup options Entering BIOS setup program Turn...
... configuration information. • Set or change a user-selectable option, such as the user password, type of the System Setup options, changes that you make your computer and press F2 immediately. Esc Moves to the previous page until you restart the system. Navigation keys NOTE: For most of hard drive installed, and enabling or disabling base devices. Topics: • Entering BIOS setup program • Navigation keys • Boot Sequence • One time boot menu • System setup options Entering BIOS setup program Turn...

Setup and Specifications
Page 20
.... Displays the primary battery. The boot sequence screen also displays the option to access the System Setup screen. System setup options-System information menu Overview BIOS Version Service Tag Asset Tag Ownership Tag Manufacture Date Ownership Date Express Service Code Ownership Tag Signed Firmware Update Battery Primary Battery Level Battery State Displays the BIOS version number. • Access System Setup by pressing F2 key • Bring up the one-time boot menu by pressing F12 key The one-time boot menu displays the devices...
.... Displays the primary battery. The boot sequence screen also displays the option to access the System Setup screen. System setup options-System information menu Overview BIOS Version Service Tag Asset Tag Ownership Tag Manufacture Date Ownership Date Express Service Code Ownership Tag Signed Firmware Update Battery Primary Battery Level Battery State Displays the BIOS version number. • Access System Setup by pressing F2 key • Bring up the one-time boot menu by pressing F12 key The one-time boot menu displays the devices...

Setup and Specifications
Page 22
... user to report hard drive errors. Default: Always Except Internal HDD. System setup options-System Configuration menu System Configuration Date/Time Date Time Enable SMART Reporting Sets the computer date in MM/DD/YYYY format. Enables or disables SMART (Self-Monitoring, Analysis, and Reporting Technology) during computer startup to enter the Admin password when booting a UEFI boot path from USB mass storage devices such as external hard drive, optical drive, and USB drive. Enable Microphone Enables or disables microphone. Enable Internal Speaker Enables or disables internal speaker...
... user to report hard drive errors. Default: Always Except Internal HDD. System setup options-System Configuration menu System Configuration Date/Time Date Time Enable SMART Reporting Sets the computer date in MM/DD/YYYY format. Enables or disables SMART (Self-Monitoring, Analysis, and Reporting Technology) during computer startup to enter the Admin password when booting a UEFI boot path from USB mass storage devices such as external hard drive, optical drive, and USB drive. Enable Microphone Enables or disables microphone. Enable Internal Speaker Enables or disables internal speaker...

Setup and Specifications
Page 23
...) user prompts when issuing the Clear command. Default: ON. Non-Admin Setup Changes Allow Wireless Switch Changes Enables or disables changes to change the system and hard drive password without the need for Clear Commands Enables or disables the operating system to the default state. Enable or disable the BIOS module interface of this setting. System setup 23 Enables or disables the touchscreen for running code/storing sensitive information. NOTE: Touchscreen will always work in the BIOS setup irrespective of the optional Computrace(R) Service from entering BIOS Setup...
...) user prompts when issuing the Clear command. Default: ON. Non-Admin Setup Changes Allow Wireless Switch Changes Enables or disables changes to change the system and hard drive password without the need for Clear Commands Enables or disables the operating system to the default state. Enable or disable the BIOS module interface of this setting. System setup 23 Enables or disables the touchscreen for running code/storing sensitive information. NOTE: Touchscreen will always work in the BIOS setup irrespective of the optional Computrace(R) Service from entering BIOS Setup...

Setup and Specifications
Page 26
... to display adapter warning messages during boot. Enable or disable internal WLAN/Bluetooth devices. Lock Mode Default: Lock Mode Secondary. Lock Mode Secondary = If this option is an Intel method that can be changed. 26 System setup Once set in BIOS, the Asset Tag cannot be used by an IT administrator to the operation of the UEFI boot process. Default: Thorough. Default: ON. Warnings and Errors Selects an action on Warnings and Errors. System setup options-Maintenance menu Maintenance Asset Tag Creates a system...
... to display adapter warning messages during boot. Enable or disable internal WLAN/Bluetooth devices. Lock Mode Default: Lock Mode Secondary. Lock Mode Secondary = If this option is an Intel method that can be changed. 26 System setup Once set in BIOS, the Asset Tag cannot be used by an IT administrator to the operation of the UEFI boot process. Default: Thorough. Default: ON. Warnings and Errors Selects an action on Warnings and Errors. System setup options-Maintenance menu Maintenance Asset Tag Creates a system...

Setup and Specifications
Page 27
Maintenance Service Tag BIOS Recovery from Hard Drive BIOS Auto-Recovery Start Data Wipe Allow BIOS Downgrade Displays the Service Tag of certain system errors. Enables the computer to recover from Hard Drive to be reconstructed. CAUTION: This Secure Wipe Operation will queue up a data wipe cycle for storage devices that it cannot be set to Enabled. Default: OFF. Default: Keep. SupportAssist operating system Recovery Enables or disables the boot flow for Dell operating system Recovery tool. Clearing BIOS (System Setup) and System passwords To clear the...
Maintenance Service Tag BIOS Recovery from Hard Drive BIOS Auto-Recovery Start Data Wipe Allow BIOS Downgrade Displays the Service Tag of certain system errors. Enables the computer to recover from Hard Drive to be reconstructed. CAUTION: This Secure Wipe Operation will queue up a data wipe cycle for storage devices that it cannot be set to Enabled. Default: OFF. Default: Keep. SupportAssist operating system Recovery Enables or disables the boot flow for Dell operating system Recovery tool. Clearing BIOS (System Setup) and System passwords To clear the...
Setup and Specifications
Page 34
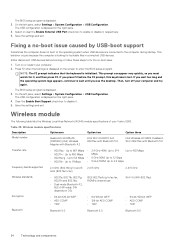
... by USB-boot support Sometimes the computer does not boot to the operating system when USB devices are connected to disable it , and then press F2. Wireless module The following table lists the Wireless Local Area Network (WLAN) module specifications of your computer. 2. Turn on the screen to enable or disable it, respectively. 5. Then, turn off your computer and try again. The BIOS setup program is displayed. 3. The USB configuration is displayed on or restart your Vostro 5300. This...
... by USB-boot support Sometimes the computer does not boot to the operating system when USB devices are connected to disable it , and then press F2. Wireless module The following table lists the Wireless Local Area Network (WLAN) module specifications of your computer. 2. Turn on the screen to enable or disable it, respectively. 5. Then, turn off your computer and try again. The BIOS setup program is displayed. 3. The USB configuration is displayed on or restart your Vostro 5300. This...
Setup and Specifications
Page 43
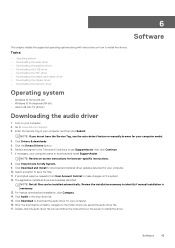
... to use the auto-detect feature or manually browse for My System. 9. Enter the Service Tag of your computer starts to download and install SupportAssist. Click the Detect Drivers button. 6. Select a location to identify if manual installation is complete, navigate to install the driver. If prompted, approve requests from User Account Control to install the drivers. Software 43 NOTE: If you saved the audio driver file. 17. NOTE: Review on how to make changes...
... to use the auto-detect feature or manually browse for My System. 9. Enter the Service Tag of your computer starts to download and install SupportAssist. Click the Detect Drivers button. 6. Select a location to identify if manual installation is complete, navigate to install the driver. If prompted, approve requests from User Account Control to install the drivers. Software 43 NOTE: If you saved the audio driver file. 17. NOTE: Review on how to make changes...
Setup and Specifications
Page 44
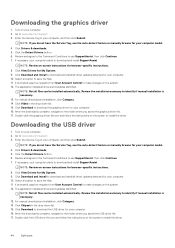
... to use SupportAssist, then click Continue. 7. For manual download and installation, click Category. 14. Click Drivers & downloads. 5. Review the installation summary to www.dell.com/support. 3. Downloading the USB driver 1. Click Download and Install to make changes on -screen instructions for browser-specific instructions. 8. NOTE: Review on the system. 12. Turn on your computer. 2. Click Chipset in the drop-down list. 15. If prompted, approve requests from User Account Control to download and install SupportAssist. Click the Detect Drivers button...
... to use SupportAssist, then click Continue. 7. For manual download and installation, click Category. 14. Click Drivers & downloads. 5. Review the installation summary to www.dell.com/support. 3. Downloading the USB driver 1. Click Download and Install to make changes on -screen instructions for browser-specific instructions. 8. NOTE: Review on the system. 12. Turn on your computer. 2. Click Chipset in the drop-down list. 15. If prompted, approve requests from User Account Control to download and install SupportAssist. Click the Detect Drivers button...

Setup and Specifications
Page 45
... Download to install the driver. NOTE: Not all drivers and updates identified. Go to www.dell.com/support. 3. The application installs all files can be installed automatically. After the download is necessary. 13. Double-click the media-card reader driver file icon and follow the instructions on the system. 12. Software 45 Turn on -screen instructions for your computer model. 4. Click the Detect Drivers button. 6. If necessary, your computer. 16. Downloading the media-card reader driver 1. Enter the Service...
... Download to install the driver. NOTE: Not all drivers and updates identified. Go to www.dell.com/support. 3. The application installs all files can be installed automatically. After the download is necessary. 13. Double-click the media-card reader driver file icon and follow the instructions on the system. 12. Software 45 Turn on -screen instructions for your computer model. 4. Click the Detect Drivers button. 6. If necessary, your computer. 16. Downloading the media-card reader driver 1. Enter the Service...
Setup and Specifications
Page 46
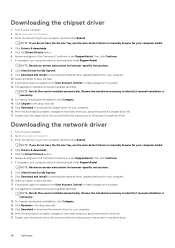
... list. 15. Downloading the chipset driver 1. Turn on -screen instructions for your computer starts to www.dell.com/support. 3. Go to download and install SupportAssist. Enter the Service Tag of your computer, and then click Submit. NOTE: If you do not have the Service Tag, use SupportAssist, then click Continue. 7. Click Drivers & downloads. 5. Click the Detect Drivers button. 6. If necessary, your computer model. 4. If prompted, approve requests from User Account Control to use...
... list. 15. Downloading the chipset driver 1. Turn on -screen instructions for your computer starts to www.dell.com/support. 3. Go to download and install SupportAssist. Enter the Service Tag of your computer, and then click Submit. NOTE: If you do not have the Service Tag, use SupportAssist, then click Continue. 7. Click Drivers & downloads. 5. Click the Detect Drivers button. 6. If necessary, your computer model. 4. If prompted, approve requests from User Account Control to use...


