User Manual
Page 1
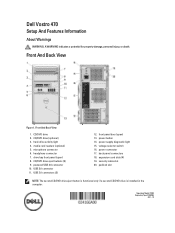
Dell Vostro 470 Setup And Features Information About Warnings WARNING: A WARNING indicates a potential for property damage, personal injury, or death. CD/DVD drive (optional) 3. headphone connector 7. powered USB 2.0 connector 10. USB 2.0 connector 11. power supply diagnostic light 15. expansion card slots (4) 19. CD/DVD drive 2. USB 3.0 connectors (2) 12. Front And Back View Figure 1. Front And Back View...
Dell Vostro 470 Setup And Features Information About Warnings WARNING: A WARNING indicates a potential for property damage, personal injury, or death. CD/DVD drive (optional) 3. headphone connector 7. powered USB 2.0 connector 10. USB 2.0 connector 11. power supply diagnostic light 15. expansion card slots (4) 19. CD/DVD drive 2. USB 3.0 connectors (2) 12. Front And Back View Figure 1. Front And Back View...
Owner's Manual
Page 3
... Battery...23 10 Removing The Heat Sink...25 Installing The Heat Sink...26 11 Removing The Processor...27 Installing The Processor...27 12 Removing The Power Supply Unit 29
... Battery...23 10 Removing The Heat Sink...25 Installing The Heat Sink...26 11 Removing The Processor...27 Installing The Processor...27 12 Removing The Power Supply Unit 29
Owner's Manual
Page 4
Installing The Power Supply Unit...32 13 Removing The System Board 33 Installing The System Board...35 14 Removing The Front Bezel...37 Installing The Front Bezel...38 15 Removing The WLAN Card...39 Installing The WLAN Card...40 16 Removing The Power Switch And The Hard Drive Activity LED 41 Installing The Power Switch... Advanced...51 Security...53 Boot...53 Exit...53 20 Diagnostic Error Messages 55 Diagnostic Beep Codes...56 System Messages...56 21 Specifications...59 22 Contacting Dell...63 Contacting Dell...63
Installing The Power Supply Unit...32 13 Removing The System Board 33 Installing The System Board...35 14 Removing The Front Bezel...37 Installing The Front Bezel...38 15 Removing The WLAN Card...39 Installing The WLAN Card...40 16 Removing The Power Switch And The Hard Drive Activity LED 41 Installing The Power Switch... Advanced...51 Security...53 Boot...53 Exit...53 20 Diagnostic Error Messages 55 Diagnostic Beep Codes...56 System Messages...56 21 Specifications...59 22 Contacting Dell...63 Contacting Dell...63
Owner's Manual
Page 29
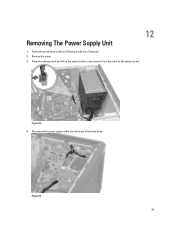
Remove the cover. 3. Figure 25. 4. 12 Removing The Power Supply Unit 1. Follow the procedures in Before Working Inside Your Computer. 2. Disconnect the power supply cable from the latch on the system board. Press the release latch and lift up the cable holder to disconnect it from the back of the hard drive. Figure 26. 29
Remove the cover. 3. Figure 25. 4. 12 Removing The Power Supply Unit 1. Follow the procedures in Before Working Inside Your Computer. 2. Disconnect the power supply cable from the latch on the system board. Press the release latch and lift up the cable holder to disconnect it from the back of the hard drive. Figure 26. 29
Owner's Manual
Page 30
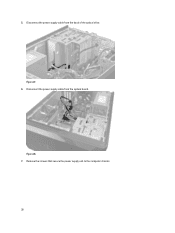
Figure 27. 6. Remove the screws that secure the power supply unit to the computer chassis. 30 Figure 28. 7. 5. Disconnect the power supply cable from the system board. Disconnect the power supply cable from the back of the optical drive.
Figure 27. 6. Remove the screws that secure the power supply unit to the computer chassis. 30 Figure 28. 7. 5. Disconnect the power supply cable from the system board. Disconnect the power supply cable from the back of the optical drive.
Owner's Manual
Page 31
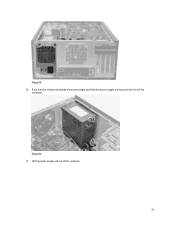
Figure 30. 9. Figure 29. 8. Lift the power supply unit out of the computer. Push the blue release tab beside the power supply and slide the power supply unit towards the front of the computer. 31
Figure 30. 9. Figure 29. 8. Lift the power supply unit out of the computer. Push the blue release tab beside the power supply and slide the power supply unit towards the front of the computer. 31

Owner's Manual
Page 32
Slide the power supply unit towards the back of the computer till it snaps into the computer. 2. Follow the procedures in After Working Inside Your Computer. 32 Connect all the power supply cables to the computer. 4. Install the screws that secure the power supply unit to the system board and drives. 5. Install the cover. 6. Figure 31. Installing The Power Supply Unit 1. Install the power supply unit into place. 3.
Slide the power supply unit towards the back of the computer till it snaps into the computer. 2. Follow the procedures in After Working Inside Your Computer. 32 Connect all the power supply cables to the computer. 4. Install the screws that secure the power supply unit to the system board and drives. 5. Install the cover. 6. Figure 31. Installing The Power Supply Unit 1. Install the power supply unit into place. 3.


