Dell Vostro 470 Support Question
Dell Vostro 470 Support Question
Find answers below for this question about Dell Vostro 470.Need a Dell Vostro 470 manual? We have 2 online manuals for this item!
Question posted by mamrahman1989 on December 28th, 2020
Power On But Always Beep
The person who posted this question about this Dell product did not include a detailed explanation. Please use the "Request More Information" button to the right if more details would help you to answer this question.
Current Answers
Answer #1: Posted by Troubleshooter101 on December 28th, 2020 4:59 AM
Troubleshooter101

Member since:
September 30th, 2015 Points: 2,927,030

Member since:
September 30th, 2015 Points: 2,927,030
Try the memory modules one at a time - and in each socket -- until you isolate the bad module (replace that) or the bad socket (which will require a replacement mainboard).
Thanks
Please respond to my effort to provide you with the best possible solution by using the "Acceptable Solution" and/or the "Helpful" buttons when the answer has proven to be helpful. Please feel free to submit further info for your question, if a solution was not provided. I appreciate the opportunity to serve you!
Troublshooter101
Related Dell Vostro 470 Manual Pages
User Manual - Page 1
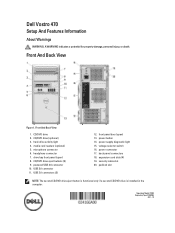
... 4. expansion card slots (4) 19. USB 3.0 connectors (2)
12. Regulatory Model: D10M Regulatory Type: D10M002
2011 - 10 Front And Back View
Figure 1. headphone connector 7. power supply diagnostic light 15. Dell Vostro 470
Setup And Features Information
About Warnings
WARNING: A WARNING indicates a potential for property damage, personal injury, or death. back panel connectors 18. microphone...
User Manual - Page 3
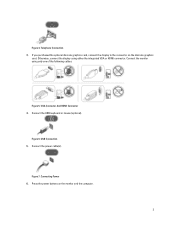
... discrete graphics card, connect the display to the connector on the monitor and the computer.
3 Connect the power cable(s). Otherwise, connect the display using only one of the following cables:
Figure 5. Figure 6.
Press the power buttons on the discrete graphics
card. USB Connection 5. Figure 7. Figure 4. Connect the monitor using either the integrated...
User Manual - Page 4
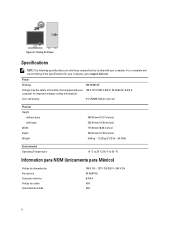
... W/460 W
Voltage (see the safety information that shipped with your computer.
Turning On Power
Specifications
NOTE: The following specifications are only those required by law to ship with base Width Depth Weight
360.00 mm (14.17 inches) 362....
User Manual - Page 5

... be used in this text: Dell™, the DELL logo, Dell Precision™, Precision ON™,ExpressCharge™, Latitude™, Latitude ON™, OptiPlex™, Vostro™, and Wi-Fi Catcher™ are either the entities claiming the marks and names or their products, Dell Inc. Trademarks used in this publication...
Owner's Manual - Page 2
... be used in this text: Dell™, the DELL logo, Dell Precision™, Precision ON™,ExpressCharge™, Latitude™, Latitude ON™, OptiPlex™, Vostro™, and Wi-Fi Catcher™ are registered trademarks or trademarks of Intel Corporation in the U.S. is under license. and other than its own. 2012...
Owner's Manual - Page 3
... Battery...23
10 Removing The Heat Sink...25
Installing The Heat Sink...26
11 Removing The Processor...27
Installing The Processor...27
12 Removing The Power Supply Unit 29
Owner's Manual - Page 4
...15 Removing The WLAN Card...39
Installing The WLAN Card...40
16 Removing The Power Switch And The Hard Drive Activity LED 41
Installing The Power Switch And The Hard Drive Activity LED 42
17 Removing The Front Audio ...Security...53 Boot...53 Exit...53
20 Diagnostic Error Messages 55
Diagnostic Beep Codes...56 System Messages...56
21 Specifications...59
22 Contacting Dell...63
Contacting Dell...63
Owner's Manual - Page 5
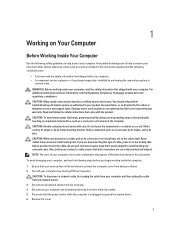
... computer, perform the following steps before you disconnect a cable, pull on its connector or on its pull-tab, not on a card. Press and hold the power button while the computer is flat and clean to prevent the computer cover from being scratched. 2. WARNING: Before working inside your computer, read the safety...
Owner's Manual - Page 6
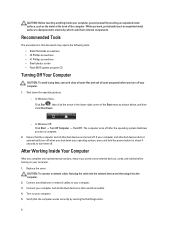
... computer and attached devices did not automatically turn off when you turn them off your computer.
1. Shut down your operating system, press and hold the power button for about 4 seconds to your computer. 3. CAUTION: To connect a network cable, first plug the cable into the network device and then plug it into...
Owner's Manual - Page 13
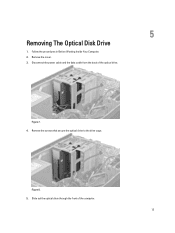
Follow the procedures in Before Working Inside Your Computer. 2. Remove the cover. 3. Disconnect the power cable and the data cable from the back of the computer.
13
Figure 8. 5. Slide out the optical drive through the front of the optical drive. Figure 7. 4. Remove the screws that secure the optical drive to the drive cage.
5
Removing The Optical Disk Drive
1.
Owner's Manual - Page 14
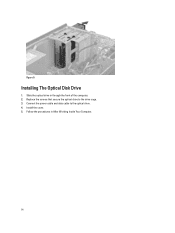
Installing The Optical Disk Drive
1. Replace the screws that secure the optical drive to the optical drive. 4. Follow the procedures in through the front of the computer. 2. Slide the optical drive in After Working Inside Your Computer.
14
Figure 9. Install the cover. 5. Connect the power cable and data cable to the drive cage. 3.
Owner's Manual - Page 15
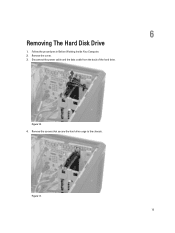
Figure 11. 15
Follow the procedures in Before Working Inside Your Computer. 2. Figure 10. 4. Disconnect the power cable and the data cable from the back of the hard drive. 6
Removing The Hard Disk Drive
1. Remove the cover. 3. Remove the screws that secure the hard drive cage to the chassis.
Owner's Manual - Page 17

3. Connect the power cable and data cable to the hard drive. 4. Install the cover. 5. Follow the procedures in After Working Inside Your Computer.
17
Owner's Manual - Page 29
Press the release latch and lift up the cable holder to disconnect it from the back of the hard drive. Disconnect the power supply cable from the latch on the system board. 12
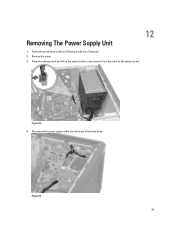
Removing The Power Supply Unit
1. Remove the cover. 3. Follow the procedures in Before Working Inside Your Computer. 2. Figure 26. 29 Figure 25. 4.
Owner's Manual - Page 30
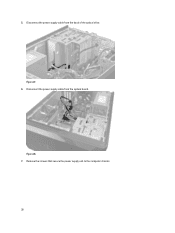
Disconnect the power supply cable from the system board. Figure 28. 7. 5.
Figure 27. 6. Remove the screws that secure the power supply unit to the computer chassis.
30 Disconnect the power supply cable from the back of the optical drive.
Owner's Manual - Page 31
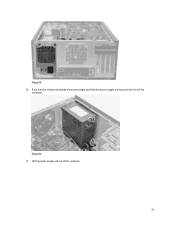
Lift the power supply unit out of the
computer. Figure 30. 9. Push the blue release tab beside the power supply and slide the power supply unit towards the front of the computer.
31 Figure 29. 8.
Owner's Manual - Page 32

... unit towards the back of the computer till it snaps into the computer. 2. Install the screws that secure the power supply unit to the system board and drives. 5. Install the cover. 6. Connect all the power supply cables to the computer. 4. Follow the procedures in After Working Inside Your Computer.
32 Installing The...
Owner's Manual - Page 49
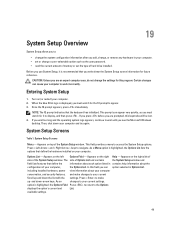
..., press immediately. Options List - Appears on your current settings. including installed hardware, power view information about the
configuration of your computer. 2.
System Setup Screens
Table 1. System...Arrow > and < Right Arrow > keys to wait until you see the Microsoft Windows desktop.
Before you use System Setup, it to the Options
displays the option's current and
List...
Owner's Manual - Page 56
...-up if the display cannot show errors or problems. These series of beeps, called beep codes, identify various problems. The delay between each beep is 300 ms, the delay between each set of beeps, the BIOS should detect if the user presses the power button. Table 9. Previous attempts at booting this checkpoint and contact Dell...
Owner's Manual - Page 59

...
5.0 GT/s
Processor data width
64 bits
RAID support (internal SATA drives only)
RAID 0, RAID 1, RAID 5 and RAID 10
Table 11. System Information
System Information
Model
Vostro 470
Processor
Intel Core i3 (2nd Generation)
Intel Core i5 (3rd Generation)
Intel Core i7 (3rd Generation)
L2 cache
256 KB
L3 cache
up to ship...
Similar Questions


Re Vostro 470 Desktop Front Panel Layout
There 4 USB ports - from left to right. No.1 has an 'lightning symbol appended to the USB sysmbol. N...
There 4 USB ports - from left to right. No.1 has an 'lightning symbol appended to the USB sysmbol. N...
(Posted by richard24277 11 years ago)

How To Install Xp Dell Vostro 470
How to install Dell Vostro 470 In win XP, and where is i find driver in XP
How to install Dell Vostro 470 In win XP, and where is i find driver in XP
(Posted by Anonymous-69001 11 years ago)