Service Manual
Page 37
... provided are for the Vostro 420, Vostro 220, and Vostro 220s computers; Remove the computer cover (see the Regulatory Compliance Homepage at www.dell.com/regulatory_compliance. Slide the optical drive forward far enough to gain access to Contents Page Power Supply Dell™ Vostro™ 420/220/220s Service Manual Removing the Power Supply Replacing the Power Supply DC Power Supply Connectors DC Power Supply Connector Pin Assignments CAUTION...
... provided are for the Vostro 420, Vostro 220, and Vostro 220s computers; Remove the computer cover (see the Regulatory Compliance Homepage at www.dell.com/regulatory_compliance. Slide the optical drive forward far enough to gain access to Contents Page Power Supply Dell™ Vostro™ 420/220/220s Service Manual Removing the Power Supply Replacing the Power Supply DC Power Supply Connectors DC Power Supply Connector Pin Assignments CAUTION...
Service Manual
Page 38
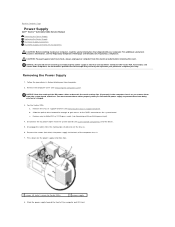
... any PCI or PCI Express cards (see Replacing the Chassis Support Bracket). 5. DC Power Supply Connectors Vostro 420 NOTICE: Route the DC power cables as these screws are secure. 4. Slide the optical drive back into place. 2. The cables must be properly routed to the system board and drives. Replacing the Power Supply 1. Replace the chassis support bracket (see Installing a PCI...
... any PCI or PCI Express cards (see Replacing the Chassis Support Bracket). 5. DC Power Supply Connectors Vostro 420 NOTICE: Route the DC power cables as these screws are secure. 4. Slide the optical drive back into place. 2. The cables must be properly routed to the system board and drives. Replacing the Power Supply 1. Replace the chassis support bracket (see Installing a PCI...

Service Manual
Page 44
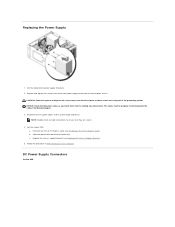
... to Contents Page Connect all the data cables from the drives to the system board (see Replacing the Processor Heat Sink/Fan Assembly). 5. Slide the optical drive back fully into the drive bay. 11. Connect the power supply cables to the system board (see System Board Components for connector locations). 7. Check all expansion...
... to Contents Page Connect all the data cables from the drives to the system board (see Replacing the Processor Heat Sink/Fan Assembly). 5. Slide the optical drive back fully into the drive bay. 11. Connect the power supply cables to the system board (see System Board Components for connector locations). 7. Check all expansion...


