Setup and Quick Reference Guide
Page 1
Models: DCSCLF, DCSCMF, DCSCSF www.dell.com | support.dell.com Dell™ Vostro™ 420/220/220s Setup and Quick Reference Guide This guide provides a features overview, specifications, and quick setup, software, and troubleshooting information for your operating system, devices, and technologies, see the Dell Technology Guide at support.dell.com. For more information about your computer.
Models: DCSCLF, DCSCMF, DCSCSF www.dell.com | support.dell.com Dell™ Vostro™ 420/220/220s Setup and Quick Reference Guide This guide provides a features overview, specifications, and quick setup, software, and troubleshooting information for your operating system, devices, and technologies, see the Dell Technology Guide at support.dell.com. For more information about your computer.
Service Manual
Page 1
.../or other countries; and other than its own. disclaims any proprietary interest in this document is used in trademarks and trade names other countries; Dell™ Vostro™ 420/220/220s Service Manual Troubleshooting Working on Your Computer Computer Cover Bezel Chassis Support Bracket PCI and PCI Express Cards Drives I/O Panel Fan Processor...
.../or other countries; and other than its own. disclaims any proprietary interest in this document is used in trademarks and trade names other countries; Dell™ Vostro™ 420/220/220s Service Manual Troubleshooting Working on Your Computer Computer Cover Bezel Chassis Support Bracket PCI and PCI Express Cards Drives I/O Panel Fan Processor...
Service Manual
Page 2
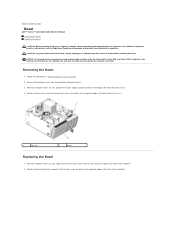
... bezel away from the computer to release the hooks on its side, gently lift the clips slightly upward to Contents Page Bezel Dell™ Vostro™ 420/220/220s Service Manual Removing the Bezel Replacing the Bezel CAUTION: Before working inside your computer, read the safety information that edge... still on its side, align and insert the bezel hooks into place on Your Computer. 2. the illustrations provided are for the Vostro 420, Vostro 220, and Vostro 220s computers; Rotate the bezel toward the computer until the clips snap into the slots along one edge of the front of the...
... bezel away from the computer to release the hooks on its side, gently lift the clips slightly upward to Contents Page Bezel Dell™ Vostro™ 420/220/220s Service Manual Removing the Bezel Replacing the Bezel CAUTION: Before working inside your computer, read the safety information that edge... still on its side, align and insert the bezel hooks into place on Your Computer. 2. the illustrations provided are for the Vostro 420, Vostro 220, and Vostro 220s computers; Rotate the bezel toward the computer until the clips snap into the slots along one edge of the front of the...
Service Manual
Page 4
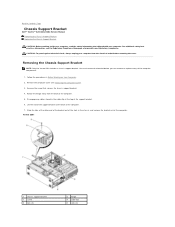
... Support Bracket Dell™ Vostro™ 420/220/220s Service Manual Removing the Chassis Support Bracket Replacing the Chassis Support Bracket CAUTION: Before working inside your computer, read the safety information that secures the chassis support bracket. 4. Removing the Chassis Support Bracket NOTE: Only the Vostro 220s includes ... 2. CAUTION: To guard against electrical shock, always unplug your computer. Follow the procedures in the cable clip at www.dell.com/regulatory_compliance. Vostro 220s 1 chassis support bracket 3 screw 5 tabs (2) 2 flange 4 cable clip 6 slots (2)
... Support Bracket Dell™ Vostro™ 420/220/220s Service Manual Removing the Chassis Support Bracket Replacing the Chassis Support Bracket CAUTION: Before working inside your computer, read the safety information that secures the chassis support bracket. 4. Removing the Chassis Support Bracket NOTE: Only the Vostro 220s includes ... 2. CAUTION: To guard against electrical shock, always unplug your computer. Follow the procedures in the cable clip at www.dell.com/regulatory_compliance. Vostro 220s 1 chassis support bracket 3 screw 5 tabs (2) 2 flange 4 cable clip 6 slots (2)
Service Manual
Page 6
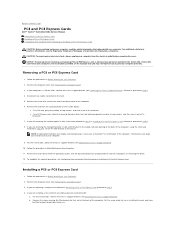
Back to Contents Page PCI and PCI Express Cards Dell™ Vostro™ 420/220/220s Service Manual Removing a PCI or PCI Express Card Installing a PCI or PCI Express Card Configuring Your Computer After Removing or Installing a PCI or...Express Card. Otherwise, proceed to the card. 5. The brackets also keep dust and dirt out of the computer. 6. the illustrations provided are for the Vostro 420, Vostro 220, and Vostro 220s computers; Otherwise, proceed to maintain FCC certification of the computer. If you are replacing a card you removed in the empty card-slot opening...
Back to Contents Page PCI and PCI Express Cards Dell™ Vostro™ 420/220/220s Service Manual Removing a PCI or PCI Express Card Installing a PCI or PCI Express Card Configuring Your Computer After Removing or Installing a PCI or...Express Card. Otherwise, proceed to the card. 5. The brackets also keep dust and dirt out of the computer. 6. the illustrations provided are for the Vostro 420, Vostro 220, and Vostro 220s computers; Otherwise, proceed to maintain FCC certification of the computer. If you are replacing a card you removed in the empty card-slot opening...
Service Manual
Page 9
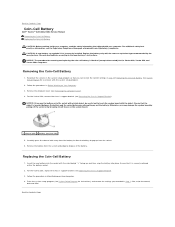
... correct date and time. Otherwise, you attempt to pry out the battery. For the Vostro 220s, replace the chassis support bracket (see the Regulatory Compliance Homepage at www.dell.com/regulatory_compliance. Enter the system setup program (see System Setup Program for instructions) and ... to Contents Page Coin-Cell Battery Dell™ Vostro™ 420/220/220s Service Manual Removing the Coin-Cell Battery Replacing the Coin-Cell Battery CAUTION: Before working inside your computer. See System Setup Program for the Vostro 420, Vostro 220, and Vostro 220s computers. NOTICE: If you ...
... correct date and time. Otherwise, you attempt to pry out the battery. For the Vostro 220s, replace the chassis support bracket (see the Regulatory Compliance Homepage at www.dell.com/regulatory_compliance. Enter the system setup program (see System Setup Program for instructions) and ... to Contents Page Coin-Cell Battery Dell™ Vostro™ 420/220/220s Service Manual Removing the Coin-Cell Battery Replacing the Coin-Cell Battery CAUTION: Before working inside your computer. See System Setup Program for the Vostro 420, Vostro 220, and Vostro 220s computers. NOTICE: If you ...
Service Manual
Page 10
Visit support.dell.com. 2. Select the appropriate service or support link based on the left side of contacting Dell that is convenient for sales, technical support, or customer service issues: 1. Back to Contents Page Click Contact Us on your country or region in the Choose a Country/Region drop-down menu at the bottom of the page. 3. Choose the method of the page. 4. Verify your need. 5. Back to Contents Page Contacting Dell Dell™ Vostro™ 420/220/220s Service Manual To contact Dell for you.
Visit support.dell.com. 2. Select the appropriate service or support link based on the left side of contacting Dell that is convenient for sales, technical support, or customer service issues: 1. Back to Contents Page Click Contact Us on your country or region in the Choose a Country/Region drop-down menu at the bottom of the page. 3. Choose the method of the page. 4. Verify your need. 5. Back to Contents Page Contacting Dell Dell™ Vostro™ 420/220/220s Service Manual To contact Dell for you.
Service Manual
Page 11
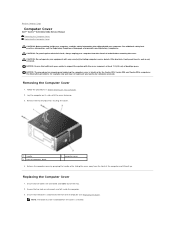
... the electrical outlet before the cover is for the Vostro 420, Vostro 220, and Vostro 220s computers; Replacing the Computer Cover 1. Ensure that sufficient space exists to support the system with the cover removed-at www.dell.com/regulatory_compliance. Back to Contents Page Computer Cover Dell™ Vostro™ 420/220/220s Service Manual Removing the Computer Cover...
... the electrical outlet before the cover is for the Vostro 420, Vostro 220, and Vostro 220s computers; Replacing the Computer Cover 1. Ensure that sufficient space exists to support the system with the cover removed-at www.dell.com/regulatory_compliance. Back to Contents Page Computer Cover Dell™ Vostro™ 420/220/220s Service Manual Removing the Computer Cover...
Service Manual
Page 13
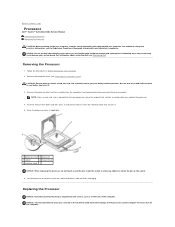
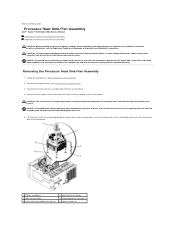
... computer. Removing the Processor 1. Remove the computer cover (see the Regulatory Compliance Homepage at www.dell.com/regulatory_compliance. Back to Contents Page Processor Dell™ Vostro™ 420/220/220s Service Manual Removing the Processor Replacing the Processor CAUTION: Before working inside the socket or...the new processor, reuse the original heat sink/fan assembly when you are familiar with your system board. For information about contacting Dell, see Removing the Processor Heat Sink/Fan Assembly). Be sure that it . 5. Remove the processor heat sink/fan assembly ...
... computer. Removing the Processor 1. Remove the computer cover (see the Regulatory Compliance Homepage at www.dell.com/regulatory_compliance. Back to Contents Page Processor Dell™ Vostro™ 420/220/220s Service Manual Removing the Processor Replacing the Processor CAUTION: Before working inside the socket or...the new processor, reuse the original heat sink/fan assembly when you are familiar with your system board. For information about contacting Dell, see Removing the Processor Heat Sink/Fan Assembly). Be sure that it . 5. Remove the processor heat sink/fan assembly ...
Service Manual
Page 16
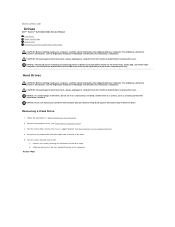
... where noted) for example only and may not represent your computer. NOTICE: If you are for the Vostro 420, Vostro 220, and Vostro 220s computers; For additional safety best practices information, see the Regulatory Compliance Homepage at www.dell.com/regulatory_compliance. NOTICE: To avoid damage to the drive, do not set the drive on a surface...
... where noted) for example only and may not represent your computer. NOTICE: If you are for the Vostro 420, Vostro 220, and Vostro 220s computers; For additional safety best practices information, see the Regulatory Compliance Homepage at www.dell.com/regulatory_compliance. NOTICE: To avoid damage to the drive, do not set the drive on a surface...
Service Manual
Page 28
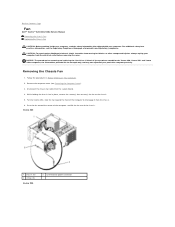
... before removing the cover. Vostro 420 1 chassis fan 3 screws (4) Vostro 220 2 system board power connector While holding the chassis fan in Before Working on Your Computer. 2. Remove the computer cover (see the Regulatory Compliance Homepage at www.dell.com/regulatory_compliance. For the Vostro 220s, slide the fan ...toward the center of the computer, and lift the fan out of the chassis. Back to Contents Page Fan Dell™ Vostro™ 420/220/220s Service Manual Removing the Chassis Fan Replacing the Chassis Fan CAUTION: Before working inside your computer, read the ...
... before removing the cover. Vostro 420 1 chassis fan 3 screws (4) Vostro 220 2 system board power connector While holding the chassis fan in Before Working on Your Computer. 2. Remove the computer cover (see the Regulatory Compliance Homepage at www.dell.com/regulatory_compliance. For the Vostro 220s, slide the fan ...toward the center of the computer, and lift the fan out of the chassis. Back to Contents Page Fan Dell™ Vostro™ 420/220/220s Service Manual Removing the Chassis Fan Replacing the Chassis Fan CAUTION: Before working inside your computer, read the ...
Service Manual
Page 31
...processor and heat sink. NOTICE: The procedure for removing and replacing the processor heat sink/fan assembly is for the Vostro 420, Vostro 220, and Vostro 220s computers; Be sure that it has had sufficient time to cool before you touch it from the electrical outlet before...your computer. Follow the procedures in Before Working on Your Computer. 2. Back to Contents Page Processor Heat Sink/Fan Assembly Dell™ Vostro™ 420/220/220s Service Manual Removing the Processor Heat Sink/Fan Assembly Replacing the Processor Heat Sink/Fan Assembly CAUTION: Before working inside...
...processor and heat sink. NOTICE: The procedure for removing and replacing the processor heat sink/fan assembly is for the Vostro 420, Vostro 220, and Vostro 220s computers; Be sure that it has had sufficient time to cool before you touch it from the electrical outlet before...your computer. Follow the procedures in Before Working on Your Computer. 2. Back to Contents Page Processor Heat Sink/Fan Assembly Dell™ Vostro™ 420/220/220s Service Manual Removing the Processor Heat Sink/Fan Assembly Replacing the Processor Heat Sink/Fan Assembly CAUTION: Before working inside...
Service Manual
Page 33
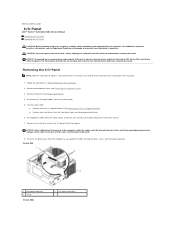
... the I /O panel is identical (except where noted) for the Vostro 420, Vostro 220, and Vostro 220s computers; For the Vostro 220s: a. Remove the screw that secures the I/O panel to Contents Page I/O Panel Dell™ Vostro™ 420/220/220s Service Manual Removing the I/O Panel Replacing the I /O panel... installing the new I /O panel away from the electrical outlet before removing the cover. Ease the I /O panel. 1. Vostro 420 1 front-panel opening 3 screw Vostro 220s 2 I /O Panel CAUTION: Before working inside of the computer, guide the cables carefully through the bays, holes, ...
... the I /O panel is identical (except where noted) for the Vostro 420, Vostro 220, and Vostro 220s computers; For the Vostro 220s: a. Remove the screw that secures the I/O panel to Contents Page I/O Panel Dell™ Vostro™ 420/220/220s Service Manual Removing the I/O Panel Replacing the I /O panel... installing the new I /O panel away from the electrical outlet before removing the cover. Ease the I /O panel. 1. Vostro 420 1 front-panel opening 3 screw Vostro 220s 2 I /O Panel CAUTION: Before working inside of the computer, guide the cables carefully through the bays, holes, ...

Service Manual
Page 35
...NOTICE: If you remove your original memory modules from the computer during a memory upgrade, keep them separate from any other connector. NOTE: Vostro 420 can accommodate two DIMMs. 1 Pair A: matched pair of memory modules in connectors DIMM_1 and DIMM_2 2 Pair B: matched pair of the ...pair installed in Before Working on the system board (see Replacing the Computer Cover). 3. Back to Contents Page Memory Module(s) Dell™ Vostro™ 420/220/220s Service Manual Removing Memory Modules Replacing or Adding a Memory Module CAUTION: Before working inside your computer, read the ...
...NOTICE: If you remove your original memory modules from the computer during a memory upgrade, keep them separate from any other connector. NOTE: Vostro 420 can accommodate two DIMMs. 1 Pair A: matched pair of memory modules in connectors DIMM_1 and DIMM_2 2 Pair B: matched pair of the ...pair installed in Before Working on the system board (see Replacing the Computer Cover). 3. Back to Contents Page Memory Module(s) Dell™ Vostro™ 420/220/220s Service Manual Removing Memory Modules Replacing or Adding a Memory Module CAUTION: Before working inside your computer, read the ...
Service Manual
Page 37
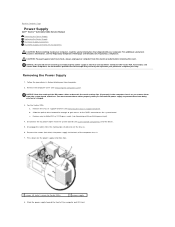
... from the routing clips (if present) on the power supply retention clips. 1 screws (4) (only 3 screws for the Vostro 420, Vostro 220, and Vostro 220s computers; For the Vostro 220s: a. NOTICE: Note the routing of the computer and lift it out. Remove the computer cover (see the Regulatory ... the PWR1 connector on Your Computer. 2. b. Remove the screws that attach the power supply to Contents Page Power Supply Dell™ Vostro™ 420/220/220s Service Manual Removing the Power Supply Replacing the Power Supply DC Power Supply Connectors DC Power Supply Connector Pin Assignments...
... from the routing clips (if present) on the power supply retention clips. 1 screws (4) (only 3 screws for the Vostro 420, Vostro 220, and Vostro 220s computers; For the Vostro 220s: a. NOTICE: Note the routing of the computer and lift it out. Remove the computer cover (see the Regulatory ... the PWR1 connector on Your Computer. 2. b. Remove the screws that attach the power supply to Contents Page Power Supply Dell™ Vostro™ 420/220/220s Service Manual Removing the Power Supply Replacing the Power Supply DC Power Supply Connectors DC Power Supply Connector Pin Assignments...

Service Manual
Page 42
... (see Removing a PCI or PCI Express Card). c. CAUTION: The system board is identical (except where noted) for the Vostro 420, Vostro 220, and Vostro 220s computers; NOTICE: The procedure for example only and may not represent your particular computer precisely. Slide the optical drive forward ...the system board. 8. Remove the processor from the electrical outlet before removing the cover. Back to Contents Page System Board Dell™ Vostro™ 420/220/220s Service Manual Remove the System Board Replacing a System Board CAUTION: Before working inside your computer, read the ...
... (see Removing a PCI or PCI Express Card). c. CAUTION: The system board is identical (except where noted) for the Vostro 420, Vostro 220, and Vostro 220s computers; NOTICE: The procedure for example only and may not represent your particular computer precisely. Slide the optical drive forward ...the system board. 8. Remove the processor from the electrical outlet before removing the cover. Back to Contents Page System Board Dell™ Vostro™ 420/220/220s Service Manual Remove the System Board Replacing a System Board CAUTION: Before working inside your computer, read the ...
Service Manual
Page 45
...your computer work incorrectly. Certain changes can view your current settings and installed hardware, power conservation, and security features. When the blue DELL™ logo is displayed, you must watch for your computer. and down your computer (see the Microsoft® Windows® desktop... to wait until you see Turning Off Your Computer) and try again. Back to Contents Page System Setup Program Dell™ Vostro™ 420/220/220s Service Manual Overview Entering the System Setup Program System Setup Program Screens System Setup Program Options Boot Sequence ...
...your computer work incorrectly. Certain changes can view your current settings and installed hardware, power conservation, and security features. When the blue DELL™ logo is displayed, you must watch for your computer. and down your computer (see the Microsoft® Windows® desktop... to wait until you see Turning Off Your Computer) and try again. Back to Contents Page System Setup Program Dell™ Vostro™ 420/220/220s Service Manual Overview Entering the System Setup Program System Setup Program Screens System Setup Program Options Boot Sequence ...
Service Manual
Page 50
... to avoid the problem. Intel is a registered trademark owned by Dell under license. Back to Contents Page Dell™ Vostro™ 420/220/220s Service Manual NOTE: A NOTE indicates important information that helps you purchased a Dell™ n Series computer, any manner whatsoever without notice. © 2008 Dell Inc. NOTICE: A NOTICE indicates either potential damage to hardware...
... to avoid the problem. Intel is a registered trademark owned by Dell under license. Back to Contents Page Dell™ Vostro™ 420/220/220s Service Manual NOTE: A NOTE indicates important information that helps you purchased a Dell™ n Series computer, any manner whatsoever without notice. © 2008 Dell Inc. NOTICE: A NOTICE indicates either potential damage to hardware...
Service Manual
Page 51
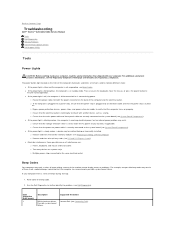
... light is blinking blue, the computer is securely connected to Contents Page Troubleshooting Dell™ Vostro™ 420/220/220s Service Manual Tools Dell Diagnostics Solving Problems Dell Technical Update Service Dell Support Utility Tools Power Lights CAUTION: Before working by testing it with your computer...power connector on the back of the computer illuminates and blinks or remains solid to resume normal operation. Suggested Resolution Contact Dell (see Dell Diagnostics). Press a key on properly. ¡ Ensure that the electrical outlet is steady amber, a device may exist....
... light is blinking blue, the computer is securely connected to Contents Page Troubleshooting Dell™ Vostro™ 420/220/220s Service Manual Tools Dell Diagnostics Solving Problems Dell Technical Update Service Dell Support Utility Tools Power Lights CAUTION: Before working by testing it with your computer...power connector on the back of the computer illuminates and blinks or remains solid to resume normal operation. Suggested Resolution Contact Dell (see Dell Diagnostics). Press a key on properly. ¡ Ensure that the electrical outlet is steady amber, a device may exist....
Service Manual
Page 66
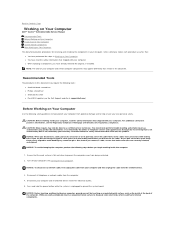
... the following tools: l Small flat-blade screwdriver l Phillips screwdriver l Small plastic scribe l Flash BIOS update (see the Dell Support website at support.dell.com) Before Working on Your Computer Use the following steps before you connect a cable, ensure that both connectors are disconnecting ... board. l You have connectors with the product. Disconnect your computer. Back to Contents Page Working on Your Computer Dell™ Vostro™ 420/220/220s Service Manual Recommended Tools Before Working on Your Computer Inside View of Your Computer System Board Components After Working...
... the following tools: l Small flat-blade screwdriver l Phillips screwdriver l Small plastic scribe l Flash BIOS update (see the Dell Support website at support.dell.com) Before Working on Your Computer Use the following steps before you connect a cable, ensure that both connectors are disconnecting ... board. l You have connectors with the product. Disconnect your computer. Back to Contents Page Working on Your Computer Dell™ Vostro™ 420/220/220s Service Manual Recommended Tools Before Working on Your Computer Inside View of Your Computer System Board Components After Working...


