Setup and Quick Reference Guide
Page 34
Available devices • 3.5-inch SATA hard drives (80 GB to four 3.5-inch SATA drive bays Vostro 220/220s: one 3.5-inch USB media card reader with Bluetooth® • external USB floppy disk drive Connectors External connectors: Video Network adapter VGA connector display port (Vostro 420 only) RJ-45 connector 34 Specifications Drives Externally accessible: Vostro 420: three 5.25-inch Optical Disk...
Available devices • 3.5-inch SATA hard drives (80 GB to four 3.5-inch SATA drive bays Vostro 220/220s: one 3.5-inch USB media card reader with Bluetooth® • external USB floppy disk drive Connectors External connectors: Video Network adapter VGA connector display port (Vostro 420 only) RJ-45 connector 34 Specifications Drives Externally accessible: Vostro 420: three 5.25-inch Optical Disk...

Setup and Quick Reference Guide
Page 36
...Connectors (continued) Front panel audio HDA header Processor Memory Power 12V Power one 10-pin connector one 775-pin connector Vostro 420: four 240-pin connectors Vostro 220/220s: two 240-pin connectors one 4-pin connector one 24-pin connector Controls and Lights Front of computer: Link...Power Problems" on yellow blinking light integrated network adapter) 36 Specifications System is not detecting a physical connection to the SATA hard drive or CD/DVD. A good connection exists between the integrated network adapter) network and the computer. The computer is in sleep state;
...Connectors (continued) Front panel audio HDA header Processor Memory Power 12V Power one 10-pin connector one 775-pin connector Vostro 420: four 240-pin connectors Vostro 220/220s: two 240-pin connectors one 4-pin connector one 24-pin connector Controls and Lights Front of computer: Link...Power Problems" on yellow blinking light integrated network adapter) 36 Specifications System is not detecting a physical connection to the SATA hard drive or CD/DVD. A good connection exists between the integrated network adapter) network and the computer. The computer is in sleep state;
Setup and Quick Reference Guide
Page 41
...or the program that shipped with your Service Manual at support.dell.com for more information. For an external mouse, check the cable connection. Contact Dell (see "Contacting Dell" on page 71). The CD drive does not respond to the microprocessor has failed. battery failure... problem persists, contact Dell. Failure 7 CPU-cache test Contact Dell. failure Error Messages CAUTION: Before you have spelled the command correctly, put spaces in the system setup program. AU X I L I L U R E - The touch pad or external mouse may be faulty. The hard drive cannot read the safety...
...or the program that shipped with your Service Manual at support.dell.com for more information. For an external mouse, check the cable connection. Contact Dell (see "Contacting Dell" on page 71). The CD drive does not respond to the microprocessor has failed. battery failure... problem persists, contact Dell. Failure 7 CPU-cache test Contact Dell. failure Error Messages CAUTION: Before you have spelled the command correctly, put spaces in the system setup program. AU X I L I L U R E - The touch pad or external mouse may be faulty. The hard drive cannot read the safety...
Setup and Quick Reference Guide
Page 42
... N F I G U R A T I Z E H A S C H A N G E D - Shut down the computer, remove the hard drive (see "Contacting Dell" on page 48). The hard drive does not respond to commands from a CD. If the problem persists, try another drive. Run the Hard Disk Drive tests in filenames. DRIVE NOT READY - E X T E N D E D M E M O R Y S I O N E R R O R - Reinstall the...page 48). Then, shut down the computer, reinstall the hard drive, and restart the computer. The operation requires a hard drive in the Dell Diagnostics (see "Dell Diagnostics" on page 71). Reinsert the card or try ...
... N F I G U R A T I Z E H A S C H A N G E D - Shut down the computer, remove the hard drive (see "Contacting Dell" on page 48). The hard drive does not respond to commands from a CD. If the problem persists, try another drive. Run the Hard Disk Drive tests in filenames. DRIVE NOT READY - E X T E N D E D M E M O R Y S I O N E R R O R - Reinstall the...page 48). Then, shut down the computer, reinstall the hard drive, and restart the computer. The operation requires a hard drive in the Dell Diagnostics (see "Dell Diagnostics" on page 71). Reinsert the card or try ...

Setup and Quick Reference Guide
Page 43
..." on page 48). For external keyboards, check the cable connection. The hard drive does not respond to nonbootable media, such as a floppy disk or CD. The hard drive may be played (see "Dell Diagnostics" on page 48). Run the Hard Disk Drive tests in the Dell Diagnostics (see "Dell Diagnostics" on page 48). Correct the appropriate options in the...
..." on page 48). For external keyboards, check the cable connection. The hard drive does not respond to nonbootable media, such as a floppy disk or CD. The hard drive may be played (see "Dell Diagnostics" on page 48). Run the Hard Disk Drive tests in the Dell Diagnostics (see "Dell Diagnostics" on page 48). Correct the appropriate options in the...
Setup and Quick Reference Guide
Page 44
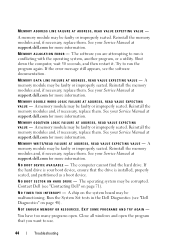
...Dell (see "Contacting Dell" on the system board may be faulty or improperly seated. NOT ENOUGH MEMORY OR RESOURCES. Reinstall the memory modules and, if necessary, replace them . A memory module may be corrupted. Reinstall the memory modules and, if necessary, replace them . The computer cannot find the hard drive...MEMORY WRITE/READ FAILURE AT ADDRESS, READ VALUE EXPECTING VALUE - A memory module may be faulty or improperly seated. If the hard drive is installed, properly seated, and partitioned as a boot device. The operating system may be malfunctioning. A chip on page 71...
...Dell (see "Contacting Dell" on the system board may be faulty or improperly seated. NOT ENOUGH MEMORY OR RESOURCES. Reinstall the memory modules and, if necessary, replace them . A memory module may be corrupted. Reinstall the memory modules and, if necessary, replace them . The computer cannot find the hard drive...MEMORY WRITE/READ FAILURE AT ADDRESS, READ VALUE EXPECTING VALUE - A memory module may be faulty or improperly seated. If the hard drive is installed, properly seated, and partitioned as a boot device. The operating system may be malfunctioning. A chip on page 71...
Setup and Quick Reference Guide
Page 45
... program you are trying to charge the battery. The operating system cannot find a specific track on page 48). Reinstall the hard drive (see "Contacting Dell" on the hard drive. D L L F I N G S YS T E M N O T F O U N D - If the problem persists, contact Dell (see your computer to an electrical outlet to open is missing an essential file. The operating system cannot locate a sector...
... program you are trying to charge the battery. The operating system cannot find a specific track on page 48). Reinstall the hard drive (see "Contacting Dell" on the hard drive. D L L F I N G S YS T E M N O T F O U N D - If the problem persists, contact Dell (see your computer to an electrical outlet to open is missing an essential file. The operating system cannot locate a sector...
Setup and Quick Reference Guide
Page 47
... for assistance). Processor fan failure. Replace processor fan. See your Service Manual at support.dell.com. Possible hard drive failure during the operating system setup or is correct (see "Contacting Dell" on the system board might be enabled or disabled in the search field and press ... resolve the incompatibility. Check cables, swap hard disks, or see "Contacting Dell" on page 71 for the USB device. No bootable partition on hard drive, or the hard drive cable is loose, or no bootable device exists. • If the hard drive is your boot device, ensure that the...
... for assistance). Processor fan failure. Replace processor fan. See your Service Manual at support.dell.com. Possible hard drive failure during the operating system setup or is correct (see "Contacting Dell" on the system board might be enabled or disabled in the search field and press ... resolve the incompatibility. Check cables, swap hard disks, or see "Contacting Dell" on page 71 for the USB device. No bootable partition on hard drive, or the hard drive cable is loose, or no bootable device exists. • If the hard drive is your boot device, ensure that the...

Setup and Quick Reference Guide
Page 48
... procedures in Lockups and Software Problems (see the Regulatory Compliance Homepage at support.dell.com to review your computer's configuration information, and ensure that the device that shipped with your hard drive or from your computer, perform the checks in this section, read the safety... information that you want to follow the remaining troubleshooting steps. See your computer. When to Use the Dell Diagnostics If you experience a problem with...
... procedures in Lockups and Software Problems (see the Regulatory Compliance Homepage at support.dell.com to review your computer's configuration information, and ensure that the device that shipped with your hard drive or from your computer, perform the checks in this section, read the safety... information that you want to follow the remaining troubleshooting steps. See your computer. When to Use the Dell Diagnostics If you experience a problem with...
Setup and Quick Reference Guide
Page 49
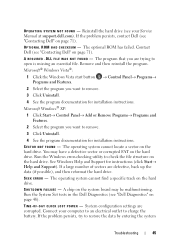
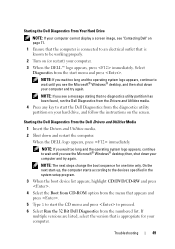
...from the menu that no diagnostics utility partition has been found, run the Dell Diagnostics from the diagnostics utility partition on your hard drive, and follow the instructions on (or restart) your computer. 3 When the DELL™ logo appears, press immediately. then, shut down your computer and ...long and the operating system logo appears, continue to start menu and press . Starting the Dell Diagnostics From Your Hard Drive NOTE: If your computer cannot display a screen image, see "Contacting Dell" on page 71. 1 Ensure that the computer is connected to an electrical outlet that is...
...from the menu that no diagnostics utility partition has been found, run the Dell Diagnostics from the diagnostics utility partition on your hard drive, and follow the instructions on (or restart) your computer. 3 When the DELL™ logo appears, press immediately. then, shut down your computer and ...long and the operating system logo appears, continue to start menu and press . Starting the Dell Diagnostics From Your Hard Drive NOTE: If your computer cannot display a screen image, see "Contacting Dell" on page 71. 1 Ensure that the computer is connected to an electrical outlet that is...

Setup and Quick Reference Guide
Page 54
... YOUR FILES IMMEDIATELY • Use a virus-scanning program to check the hard drive, floppy disks, CDs, or DVDs • Save and close any open files or programs and shut down your computer through the Start menu Dell Technical Update Service The Dell Technical Update service provides proactive e-mail notification of software and hardware updates...
... YOUR FILES IMMEDIATELY • Use a virus-scanning program to check the hard drive, floppy disks, CDs, or DVDs • Save and close any open files or programs and shut down your computer through the Start menu Dell Technical Update Service The Dell Technical Update service provides proactive e-mail notification of software and hardware updates...
Setup and Quick Reference Guide
Page 59
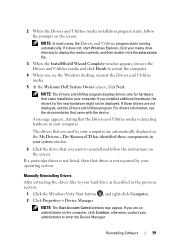
... Explorer, click your operating system. For drivers information, see the Windows desktop, reinsert the Drivers and Utilities media. 5 At the Welcome Dell System Owner screen, click Next. A message appears, stating that you want to restart the computer. 4 When you installed additional hardware, the... Drivers and Utilities media is not required by your computer are an administrator on the computer, click Continue; otherwise, contact your hard drive as described in your computer. NOTE: The User Account Control window may appear. If those drivers are not displayed, exit the...
... Explorer, click your operating system. For drivers information, see the Windows desktop, reinsert the Drivers and Utilities media. 5 At the Welcome Dell System Owner screen, click Next. A message appears, stating that you want to restart the computer. 4 When you installed additional hardware, the... Drivers and Utilities media is not required by your computer are an administrator on the computer, click Continue; otherwise, contact your hard drive as described in your computer. NOTE: The User Account Control window may appear. If those drivers are not displayed, exit the...
Setup and Quick Reference Guide
Page 60
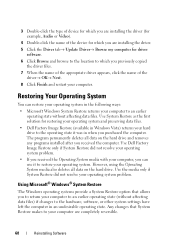
...Microsoft Windows System Restore returns your operating system in an undesirable operating state. The program permanently deletes all data on the hard drive and removes any programs installed after you can restore your computer to an earlier operating state without affecting data files) if ... Driver→ Browse my computer for restoring your operating system and preserving data files. • Dell Factory Image Restore (available in Windows Vista) returns your hard drive to the operating state it to your operating system problem. However, using the Operating System media also...
...Microsoft Windows System Restore returns your operating system in an undesirable operating state. The program permanently deletes all data on the hard drive and removes any programs installed after you can restore your computer to an earlier operating state without affecting data files) if ... Driver→ Browse my computer for restoring your operating system and preserving data files. • Dell Factory Image Restore (available in Windows Vista) returns your hard drive to the operating state it to your operating system problem. However, using the Operating System media also...
Setup and Quick Reference Guide
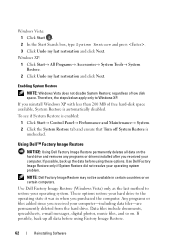
Page 62
...mail messages, digital photos, music files, and so on certain computers. NOTE: Dell Factory Image Restore may not be available in when you received your computer-including data files-are permanently deleted from the hard drive. Any programs or files added since you reinstall Windows XP with less than 200 ...MB of low disk space. Use Dell Factory Image Restore (Windows Vista) only as the last method to Windows XP...
...mail messages, digital photos, music files, and so on certain computers. NOTE: Dell Factory Image Restore may not be available in when you received your computer-including data files-are permanently deleted from the hard drive. Any programs or files added since you reinstall Windows XP with less than 200 ...MB of low disk space. Use Dell Factory Image Restore (Windows Vista) only as the last method to Windows XP...
Setup and Quick Reference Guide
Page 63
...Cancel. 7 Click the checkbox to confirm that you do not want to continue reformatting the hard drive and restoring the system software to select Dell Factory Tools, then Dell Factory Image Restore. 6 On the Dell Factory Image Restore welcome screen, click Next. See "Returning to the operating state it was... in the User name field, then click OK. 5 Click Dell Factory Image Restore. Reinstalling Software 63 NOTE: Depending upon your operating system to a Previous Device Driver Version" on the computer. See "...
...Cancel. 7 Click the checkbox to confirm that you do not want to continue reformatting the hard drive and restoring the system software to select Dell Factory Tools, then Dell Factory Image Restore. 6 On the Dell Factory Image Restore welcome screen, click Next. See "Returning to the operating state it was... in the User name field, then click OK. 5 Click Dell Factory Image Restore. Reinstalling Software 63 NOTE: Depending upon your operating system to a Previous Device Driver Version" on the computer. See "...

Setup and Quick Reference Guide
Page 64
... When the boot device list appears, highlight CD/DVD/CD-RW Drive and press . 6 Press any key to Boot from which you ordered your computer. When the DELL logo appears, press immediately. Use the Dell Drivers and Utilities media to load any open files and exit any ... time only. For conventional hard drive configurations, the primary hard drive is the first drive detected by the computer. then, shut down your primary hard drive. Depending on the region from CD-ROM, and follow the instructions on your computer and try again. NOTE: The Dell Drivers and Utilities media contains...
... When the boot device list appears, highlight CD/DVD/CD-RW Drive and press . 6 Press any key to Boot from which you ordered your computer. When the DELL logo appears, press immediately. Use the Dell Drivers and Utilities media to load any open files and exit any ... time only. For conventional hard drive configurations, the primary hard drive is the first drive detected by the computer. then, shut down your primary hard drive. Depending on the region from CD-ROM, and follow the instructions on your computer and try again. NOTE: The Dell Drivers and Utilities media contains...

Setup and Quick Reference Guide
Page 73
..., 48 starting from the Drivers and Utilities media, 49 starting from your hard drive, 49 Dell Factory Image Restore, 63 Dell Technology Guide, 8 DellConnect, 66 Desktop System Software, 7 diagnostics beep codes, 39 Dell, 48 documentation, 7 Dell Technology Guide, 8 Service Manual, 8 drivers, 57 Drivers and Utilities media, 7 identifying, 57 reinstalling, 58 returning to a previous version, 58 Drivers...
..., 48 starting from the Drivers and Utilities media, 49 starting from your hard drive, 49 Dell Factory Image Restore, 63 Dell Technology Guide, 8 DellConnect, 66 Desktop System Software, 7 diagnostics beep codes, 39 Dell, 48 documentation, 7 Dell Technology Guide, 8 Service Manual, 8 drivers, 57 Drivers and Utilities media, 7 identifying, 57 reinstalling, 58 returning to a previous version, 58 Drivers...
Service Manual
Page 16
.... For additional safety best practices information, see the Regulatory Compliance Homepage at www.dell.com/regulatory_compliance. Instead, set it . Remove the screws securing the hard drive to Contents Page Drives Dell™ Vostro™ 420/220/220s Service Manual Hard Drives Media Card Reader Optical Drive Removing a Drive Bay Break-Away Metal Plate CAUTION: Before working inside your computer, read the...
.... For additional safety best practices information, see the Regulatory Compliance Homepage at www.dell.com/regulatory_compliance. Instead, set it . Remove the screws securing the hard drive to Contents Page Drives Dell™ Vostro™ 420/220/220s Service Manual Hard Drives Media Card Reader Optical Drive Removing a Drive Bay Break-Away Metal Plate CAUTION: Before working inside your computer, read the...

Service Manual
Page 17
Slide the drive partway out of the bay, rotate the back of the drive upward until the drive is perpendicular to the drive cage, and guide the screws through the cutaway channels in the drive cage until you can lift the drive away from the computer. Raise and hold the hard-drive release latch. c. Vostro 220s b. Repeat step a and step b for the second hard drive, if installed. For the Vostro 220s: a. 1 screws (4) 3 power cable Vostro 220 2 hard drive 4 data cable 1 screws (4) 3 power cable 2 hard drive 4 data cable 6.
Slide the drive partway out of the bay, rotate the back of the drive upward until the drive is perpendicular to the drive cage, and guide the screws through the cutaway channels in the drive cage until you can lift the drive away from the computer. Raise and hold the hard-drive release latch. c. Vostro 220s b. Repeat step a and step b for the second hard drive, if installed. For the Vostro 220s: a. 1 screws (4) 3 power cable Vostro 220 2 hard drive 4 data cable 1 screws (4) 3 power cable 2 hard drive 4 data cable 6.

Service Manual
Page 18
... hard drive, if installed. Repeat step a and step b for instructions). b. For the Vostro 220s: a. Follow the procedure in After Working on Your Computer. 2. In the Drives section of the drive upward until you are installing a replacement drive, skip to step 8. 8. Vostro 220s...3 in Before Working on Your Computer. 10. Follow the procedures in Replacing or Adding a Hard Drive. Raise and hold the hard-drive release latch. 1 cutaway channels (2) 3 hard drive 5 power cable 2 hard-drive release latch 4 screw guides (4) 6 data cable 7. If you restart your computer. 4. ...
... hard drive, if installed. Repeat step a and step b for instructions). b. For the Vostro 220s: a. Follow the procedure in After Working on Your Computer. 2. In the Drives section of the drive upward until you are installing a replacement drive, skip to step 8. 8. Vostro 220s...3 in Before Working on Your Computer. 10. Follow the procedures in Replacing or Adding a Hard Drive. Raise and hold the hard-drive release latch. 1 cutaway channels (2) 3 hard drive 5 power cable 2 hard-drive release latch 4 screw guides (4) 6 data cable 7. If you restart your computer. 4. ...


