
Setup and Features Information Tech Sheet
Page 2
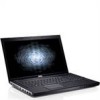
...accumulate in the cooling vents. Fan noise is running. The computer turns on the fan when the computer gets hot. FILE LOCATION: C:\Documents and Settings\kandasamy_m\Desktop\Winery_A01\Info Dev Restricting the airflow can damage the computer or cause a fire. Vostro 3300 - Graphics and callout... tables in a low-airflow environment, such as a closed briefcase, while it is normal and does not indicate a problem with correct art and callouts for Business Portables only. Use the following template for your platform. Work with your Dell ...
...accumulate in the cooling vents. Fan noise is running. The computer turns on the fan when the computer gets hot. FILE LOCATION: C:\Documents and Settings\kandasamy_m\Desktop\Winery_A01\Info Dev Restricting the airflow can damage the computer or cause a fire. Vostro 3300 - Graphics and callout... tables in a low-airflow environment, such as a closed briefcase, while it is normal and does not indicate a problem with correct art and callouts for Business Portables only. Use the following template for your platform. Work with your Dell ...
Service Manual
Page 31
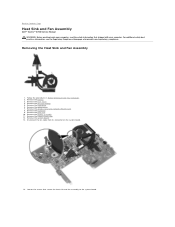
... optical drive. 7. Remove the display assembly. 11. Loosen the screws that shipped with your computer. Remove the battery. 3. Back to Contents Page Heat Sink and Fan Assembly Dell™ Vostro™ 3700 Service Manual WARNING: Before working inside your computer, read the safety information that secure the heat sink and...
... optical drive. 7. Remove the display assembly. 11. Loosen the screws that shipped with your computer. Remove the battery. 3. Back to Contents Page Heat Sink and Fan Assembly Dell™ Vostro™ 3700 Service Manual WARNING: Before working inside your computer, read the safety information that secure the heat sink and...

Service Manual
Page 32
Back to Contents Page 15. Lift the heat sink and fan assembly up and away from the system board. Replacing the Heat Sink and Fan Assembly To replace the heat sink and fan assembly, perform the above steps in reverse order.
Back to Contents Page 15. Lift the heat sink and fan assembly up and away from the system board. Replacing the Heat Sink and Fan Assembly To replace the heat sink and fan assembly, perform the above steps in reverse order.

Service Manual
Page 60
.... 6. For additional safety best practices information, see the Regulatory Compliance Homepage at www.dell.com/regulatory_compliance. Remove the heat sink and fan assembly. 14. Using a flat-blade screwdriver, rotate the cam screw counterclockwise to Contents Page Processor Dell™ Vostro™ 3700 Service Manual WARNING: Before working inside your computer, read the safety information that...
.... 6. For additional safety best practices information, see the Regulatory Compliance Homepage at www.dell.com/regulatory_compliance. Remove the heat sink and fan assembly. 14. Using a flat-blade screwdriver, rotate the cam screw counterclockwise to Contents Page Processor Dell™ Vostro™ 3700 Service Manual WARNING: Before working inside your computer, read the safety information that...


