
3667 Owners Manual
Page 4
... HD Graphics drivers...28 Display options...28 Identifying the display adapter...28 Downloading drivers...28 Changing the screen resolution...28 Adjusting brightness in Windows 10...29 Connecting to external display devices...29 Hard drive options...29 Identifying the hard drive in Windows 10...29 Entering BIOS setup...30 USB features...30 USB 3.0 (SuperSpeed USB)...30 Speed...31 Applications...31 Compatibility...32 HDMI 1.4...32 HDMI 1.4 Features...32 Advantages of HDMI...33 Memory features...33 Verifying system memory ...33 Verifying system memory in setup...33 DDR4...33 Testing memory using...
... HD Graphics drivers...28 Display options...28 Identifying the display adapter...28 Downloading drivers...28 Changing the screen resolution...28 Adjusting brightness in Windows 10...29 Connecting to external display devices...29 Hard drive options...29 Identifying the hard drive in Windows 10...29 Entering BIOS setup...30 USB features...30 USB 3.0 (SuperSpeed USB)...30 Speed...31 Applications...31 Compatibility...32 HDMI 1.4...32 HDMI 1.4 Features...32 Advantages of HDMI...33 Memory features...33 Verifying system memory ...33 Verifying system memory in setup...33 DDR4...33 Testing memory using...
3667 Owners Manual
Page 6
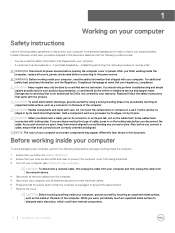
... computer Safety instructions Use the following steps before you begin working inside the computer. 1 Ensure that you follow the safety instructions that shipped with your personal safety. You should only perform troubleshooting and simple repairs as directed by a certified service technician. CAUTION: Handle components and cards with the product. Also, before you connect a cable, ensure that both connectors are disconnecting this type of...
... computer Safety instructions Use the following steps before you begin working inside the computer. 1 Ensure that you follow the safety instructions that shipped with your personal safety. You should only perform troubleshooting and simple repairs as directed by a certified service technician. CAUTION: Handle components and cards with the product. Also, before you connect a cable, ensure that both connectors are disconnecting this type of...

3667 Owners Manual
Page 12
.... 5 Connect the SATA cable and the power cable to the connectors on the hard drive. 6 Install the: a bezel b cover 7 Follow the procedure in Before working inside your computer. Installing the 2.5 inch hard drive assembly 1 Align and insert the pins on the hard drive bracket with the slots on one side of the hard drive bracket to disengage the pins on the bracket from the connectors on the hard drive [1]. d Remove the 6-32xL3.6 screw that secures the optical drive...
.... 5 Connect the SATA cable and the power cable to the connectors on the hard drive. 6 Install the: a bezel b cover 7 Follow the procedure in Before working inside your computer. Installing the 2.5 inch hard drive assembly 1 Align and insert the pins on the hard drive bracket with the slots on one side of the hard drive bracket to disengage the pins on the bracket from the connectors on the hard drive [1]. d Remove the 6-32xL3.6 screw that secures the optical drive...
3667 Owners Manual
Page 28
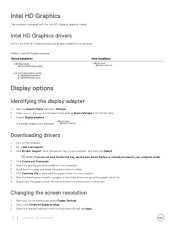
... Graphics drivers Before installation After installation Display options Identifying the display adapter 1 Start the Search Charm and select Settings. 2 Type Device Manager in the computer. The display adapters are already installed in the search box and tap Device Manager from the drop-down the page and select the graphic driver to install. 7 Click Download File to Dell.com/support. 3 Click Product Support, enter the Service Tag of your computer. 8 After the download is shipped with the Intel HD Graphics graphics...
... Graphics drivers Before installation After installation Display options Identifying the display adapter 1 Start the Search Charm and select Settings. 2 Type Device Manager in the computer. The display adapters are already installed in the search box and tap Device Manager from the drop-down the page and select the graphic driver to install. 7 Click Download File to Dell.com/support. 3 Click Product Support, enter the Service Tag of your computer. 8 After the download is shipped with the Intel HD Graphics graphics...

3667 Owners Manual
Page 29
... • Extend • Second Screen only NOTE: For more information, see the document that shipped with your computer to enable or disable automatic-brightness adjustment. NOTE: You can also use the Brightness level slider to adjust the brightness manually. The hard drive is turned on and plug the projector cable into a video port on the Windows 10 Charms Bar. 2 Click Control Panel, select Device Manager , and expand Disk drives.
... • Extend • Second Screen only NOTE: For more information, see the document that shipped with your computer to enable or disable automatic-brightness adjustment. NOTE: You can also use the Brightness level slider to adjust the brightness manually. The hard drive is turned on and plug the projector cable into a video port on the Windows 10 Charms Bar. 2 Click Control Panel, select Device Manager , and expand Disk drives.

3667 Owners Manual
Page 31
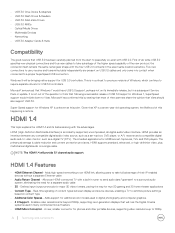
.... USB 3.0 adds four more for two pairs of differential signals (receive and transmit) for devices to maintain backward compatibility. Applications USB 3.0 opens up the laneways and provides more than USB 2.0's half-duplex arrangement. Speed Currently, there are some products that previously weren't USB territory, like external RAID storage systems. Listed below are 3 speed modes defined by the technical changes below ). • USB 2.0 previously had four wires (power, ground...
.... USB 3.0 adds four more for two pairs of differential signals (receive and transmit) for devices to maintain backward compatibility. Applications USB 3.0 opens up the laneways and provides more than USB 2.0's half-duplex arrangement. Speed Currently, there are some products that previously weren't USB territory, like external RAID storage systems. Listed below are 3 speed modes defined by the technical changes below ). • USB 2.0 previously had four wires (power, ground...
3667 Owners Manual
Page 32
... for USB 3.0 controllers. Adds support for true 3D gaming and 3D home theater applications • Content Type - Defines input/output protocols for major 3D video formats, paving the way for additional color models used in Windows 7, SuperSpeed support would have USB 3.0 support, perhaps not on content type • Additional Color Spaces - • USB 3.0 Drive Docks & Adapters • USB 3.0 Flash Drives & Readers • USB 3.0 Solid-state Drives • USB 3.0 RAIDs • Optical Media Drives • Multimedia Devices • Networking • USB 3.0 Adapter Cards...
... for USB 3.0 controllers. Adds support for true 3D gaming and 3D home theater applications • Content Type - Defines input/output protocols for major 3D video formats, paving the way for additional color models used in Windows 7, SuperSpeed support would have USB 3.0 support, perhaps not on content type • Additional Color Spaces - • USB 3.0 Drive Docks & Adapters • USB 3.0 Flash Drives & Readers • USB 3.0 Solid-state Drives • USB 3.0 RAIDs • Optical Media Drives • Multimedia Devices • Networking • USB 3.0 Adapter Cards...
3667 Owners Manual
Page 33
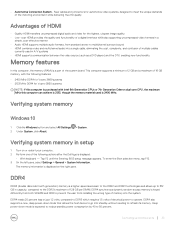
... manner • Audio HDMI supports multiple audio formats, from installing the wrong type of the system board. DDR4 also supports a new, deep power-down mode is a part of memory into the system. To enter the Boot selection menu, tap F12. 3 On the left pane, select Settings > General > System Information, The memory information is displayed: • With keyboard - Deep power-down mode that allows the host device to go into a single cable, eliminating the cost...
... manner • Audio HDMI supports multiple audio formats, from installing the wrong type of the system board. DDR4 also supports a new, deep power-down mode is a part of memory into the system. To enter the Boot selection menu, tap F12. 3 On the left pane, select Settings > General > System Information, The memory information is displayed: • With keyboard - Deep power-down mode that allows the host device to go into a single cable, eliminating the cost...
3667 Owners Manual
Page 37
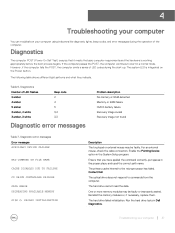
... an external mouse, check the cable connection. If the computer passes the POST, the computer continues to start -up. Enable the Pointing Device option in Dell Diagnostics. The hard drive cannot read the data. However, if the computer fails the POST, the computer emits a series of LED codes during the operation of LED flashes 2 amber 4 amber 5 amber 3 amber, 4 white 3 amber, 3 white Beep code 2 4 5 3,4 3,3 Diagnostic error messages Problem description No memory or RAM detected Memory or RAM failure CMOS battery failure Recovery image invalid Recovery image...
... an external mouse, check the cable connection. If the computer passes the POST, the computer continues to start -up. Enable the Pointing Device option in Dell Diagnostics. The hard drive cannot read the data. However, if the computer fails the POST, the computer emits a series of LED codes during the operation of LED flashes 2 amber 4 amber 5 amber 3 amber, 4 white 3 amber, 3 white Beep code 2 4 5 3,4 3,3 Diagnostic error messages Problem description No memory or RAM detected Memory or RAM failure CMOS battery failure Recovery image invalid Recovery image...

3667 Owners Manual
Page 38
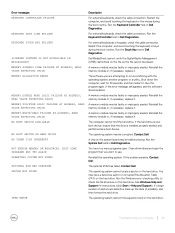
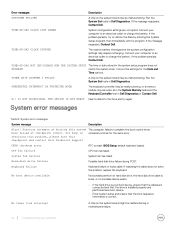
... the hardware configuration. Install a hard drive in Dell Diagnostics. Reinstall the memory module or, if necessary, replace it can continue. Error messages DRIVE NOT READY ERROR READING PCMCIA CARD EXTENDED MEMORY SIZE HAS CHANGED THE FILE BEING COPIED IS TOO LARGE FOR THE DESTINATION DRIVE A FILENAME CANNOT CONTAIN ANY OF THE FOLLOWING CHARACTERS GATE A20 FAILURE GENERAL FAILURE HARD-DISK DRIVE CONFIGURATION ERROR HARD-DISK DRIVE CONTROLLER FAILURE 0 HARD-DISK DRIVE FAILURE HARD-DISK DRIVE READ FAILURE INSERT BOOTABLE MEDIA INVALID CONFIGURATION INFORMATION-PLEASE RUN SYSTEM SETUP...
... the hardware configuration. Install a hard drive in Dell Diagnostics. Reinstall the memory module or, if necessary, replace it can continue. Error messages DRIVE NOT READY ERROR READING PCMCIA CARD EXTENDED MEMORY SIZE HAS CHANGED THE FILE BEING COPIED IS TOO LARGE FOR THE DESTINATION DRIVE A FILENAME CANNOT CONTAIN ANY OF THE FOLLOWING CHARACTERS GATE A20 FAILURE GENERAL FAILURE HARD-DISK DRIVE CONFIGURATION ERROR HARD-DISK DRIVE CONTROLLER FAILURE 0 HARD-DISK DRIVE FAILURE HARD-DISK DRIVE READ FAILURE INSERT BOOTABLE MEDIA INVALID CONFIGURATION INFORMATION-PLEASE RUN SYSTEM SETUP...
3667 Owners Manual
Page 39
... FOUND OPTIONAL ROM BAD CHECKSUM SECTOR NOT FOUND SEEK ERROR Description For external keyboards, check the cable connection. Run the Keyboard Controller test in Dell Diagnostics. Shut down the computer, wait for instructions (click Start > Help and Support). Run the program again. Reinstall the memory module or, if necessary, replace it . The operating system may be faulty or improperly seated. Run the System Set tests in Dell Diagnostics. Reinstall the operating system. Run the Windows error-checking utility to use. Troubleshooting your boot device...
... FOUND OPTIONAL ROM BAD CHECKSUM SECTOR NOT FOUND SEEK ERROR Description For external keyboards, check the cable connection. Run the Keyboard Controller test in Dell Diagnostics. Shut down the computer, wait for instructions (click Start > Help and Support). Run the program again. Reinstall the memory module or, if necessary, replace it . The operating system may be faulty or improperly seated. Run the System Set tests in Dell Diagnostics. Reinstall the operating system. Run the Windows error-checking utility to use. Troubleshooting your boot device...
3667 Owners Manual
Page 40
... solve the problem, replace the keyboard. Correct the settings for the same error. UNEXPECTED INTERRUPT IN PROTECTED MODE The keyboard controller may be malfunctioning, or a memory module may be malfunctioning or motherboard failure. 40 Troubleshooting your computer THE DEVICE IS NOT READY Insert a disk into the drive and try to complete the boot routine three have failed at booting this checkpoint and contact Dell Technical Support CMOS checksum error RTC is reset, BIOS Setup default has...
... solve the problem, replace the keyboard. Correct the settings for the same error. UNEXPECTED INTERRUPT IN PROTECTED MODE The keyboard controller may be malfunctioning, or a memory module may be malfunctioning or motherboard failure. 40 Troubleshooting your computer THE DEVICE IS NOT READY Insert a disk into the drive and try to complete the boot routine three have failed at booting this checkpoint and contact Dell Technical Support CMOS checksum error RTC is reset, BIOS Setup default has...

3667 Owners Manual
Page 43
... processor. Displays the type of the memory installed. Displays the computer model number. Displays the HDD2 size of the processor. Advanced Intel (R) SpeedStep (TM) Virtualization VT for direct I /O Trusted Execution Integrated NIC SATA Operation Intel Multi-Display 6 System Setup Options Displays the system time. Table 9. - Main System Time System Date BIOS Version Product Name Service Tag Asset Tag CPU Type CPU Speed CPU ID CPU Cache HDD0 HDD1 HDD2 HDD3 System Memory Memory Speed Table 10. - Displays the BIOS...
... processor. Displays the type of the memory installed. Displays the computer model number. Displays the HDD2 size of the processor. Advanced Intel (R) SpeedStep (TM) Virtualization VT for direct I /O Trusted Execution Integrated NIC SATA Operation Intel Multi-Display 6 System Setup Options Displays the system time. Table 9. - Main System Time System Date BIOS Version Product Name Service Tag Asset Tag CPU Type CPU Speed CPU ID CPU Cache HDD0 HDD1 HDD2 HDD3 System Memory Memory Speed Table 10. - Displays the BIOS...
3667 Owners Manual
Page 44
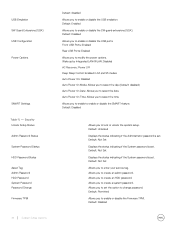
...USB Ports: Enabled Rear USB Ports: Enabled Allows you to modify the power options. Default: Unlocked Displays the status indicating if the Administrator password is set . Security Unlock Setup Status Admin Password Status System Password Status HDD Password Status Asset Tag Admin Password HDD Password System Password Password Change Firmware TPM 44 System Setup Options Default: disabled Allows you to enable to enable or disable the USB emulation. Wake up by Integrated LAN/WLAN: Disabled AC Recovery: Power Off Deep Sleep Control: Enabled in S4 and S5 modes Auto Power On: Disabled...
...USB Ports: Enabled Rear USB Ports: Enabled Allows you to modify the power options. Default: Unlocked Displays the status indicating if the Administrator password is set . Security Unlock Setup Status Admin Password Status System Password Status HDD Password Status Asset Tag Admin Password HDD Password System Password Password Change Firmware TPM 44 System Setup Options Default: disabled Allows you to enable to enable or disable the USB emulation. Wake up by Integrated LAN/WLAN: Disabled AC Recovery: Power Off Deep Sleep Control: Enabled in S4 and S5 modes Auto Power On: Disabled...

3667 Owners Manual
Page 45
... settings for future reference. Default: Enabled Allows you to change a user-selectable option such as the user password. • Read the current amount of memory or set the type of hard drive installed. Accessing System Setup 1 Turn on (or restart) your computer. • Set or change the boot option priorities. Exit Save Changes and Reset Allows to work incorrectly. System Setup Options 45 Boot Boot List Option Secure Boot Legacy Option ROMs Boot Option Priorities Table 13. - Certain changes can cause your computer to modify the HDD...
... settings for future reference. Default: Enabled Allows you to change a user-selectable option such as the user password. • Read the current amount of memory or set the type of hard drive installed. Accessing System Setup 1 Turn on (or restart) your computer. • Set or change the boot option priorities. Exit Save Changes and Reset Allows to work incorrectly. System Setup Options 45 Boot Boot List Option Secure Boot Legacy Option ROMs Boot Option Priorities Table 13. - Certain changes can cause your computer to modify the HDD...

3667 Owners Manual
Page 46
...; Apply - NOTE: The default option might differ based on the left hand side. Restores the default settings of your keyboard Page Up or Page Down keys to change the boot options order. Exits and starts the computer. PCI information: Displays Slot 1, Slot 2, and Slot 3. NOTE: The default option might differ based on the right-hand side. Enables you enable the Secure Boot. General screen options This section lists the primary hardware features of your computer...
...; Apply - NOTE: The default option might differ based on the left hand side. Restores the default settings of your keyboard Page Up or Page Down keys to change the boot options order. Exits and starts the computer. PCI information: Displays Slot 1, Slot 2, and Slot 3. NOTE: The default option might differ based on the right-hand side. Enables you enable the Secure Boot. General screen options This section lists the primary hardware features of your computer...

3667 Owners Manual
Page 47
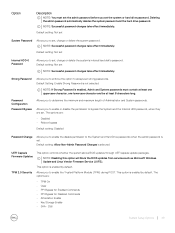
... USB port is disabled by default. System Setup Options 47 Allows you to configure the integrated network controller. Allows you to configure the internal SATA hard-drive controller. The options are : • Disabled • Enabled • Enabled w/PXE: This option is required in this section may or may be available. System configuration screen options Option Integrated NIC SATA Operation Description If you enable UEFI network stack, UEFI network protocols will be used without PXE turned on the computer and its installed devices, the...
... USB port is disabled by default. System Setup Options 47 Allows you to configure the integrated network controller. Allows you to configure the internal SATA hard-drive controller. The options are : • Disabled • Enabled • Enabled w/PXE: This option is required in this section may or may be available. System configuration screen options Option Integrated NIC SATA Operation Description If you enable UEFI network stack, UEFI network protocols will be used without PXE turned on the computer and its installed devices, the...
3667 Owners Manual
Page 49
... hard drive password. NOTE: If Strong Password is set , change or delete the system password. NOTE: Disabling this option will block the BIOS updates from services such as Microsoft Windows Update and Linux Vendor Firmware Service (LVFS). Default setting: Not set , change or delete the system's internal hard disk's password. Password Configuration Password Bypass Allows you to set System Password Allows you to enable or disable the permission to bypass the System and the Internal HDD password, when they are : • TPM On • Clear...
... hard drive password. NOTE: If Strong Password is set , change or delete the system password. NOTE: Disabling this option will block the BIOS updates from services such as Microsoft Windows Update and Linux Vendor Firmware Service (LVFS). Default setting: Not set , change or delete the system's internal hard disk's password. Password Configuration Password Bypass Allows you to set System Password Allows you to enable or disable the permission to bypass the System and the Internal HDD password, when they are : • TPM On • Clear...
3667 Owners Manual
Page 53
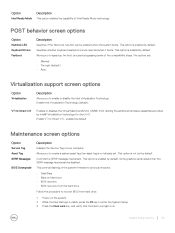
... Next boot • BIOS recovery • BIOS recovery from the hard drive Follow the procedure to recover BIOS from utilizing the additional hardware capabilities provided by default. Controls the SERR message mechanism. Some graphics cards require that the Num Lock light is on the system. 2 While the blue Dell logo is not already set by Intel® Virtualization technology for Direct I /O. Enable Intel Virtualization Technology (default). POST behavior screen options Option Numlock LED Keyboard Errors...
... Next boot • BIOS recovery • BIOS recovery from the hard drive Follow the procedure to recover BIOS from utilizing the additional hardware capabilities provided by default. Controls the SERR message mechanism. Some graphics cards require that the Num Lock light is on the system. 2 While the blue Dell logo is not already set by Intel® Virtualization technology for Direct I /O. Enable Intel Virtualization Technology (default). POST behavior screen options Option Numlock LED Keyboard Errors...
Quick Start Guide - Windows 10
Page 2
... 11. USB 2.0 포트 12. Padlock ring 1 2 3 4 5. 麦克风 6 7. HDMI ポート 10 11. Optical drive eject button 3. HDMI 端口 10 11. Expansion card slot 16. O O O O O - Empty slot 17. Memory card reader 9. Dell.com/support Dell.com/support/manuals Dell.com/support/windows Dell.com/contactdell Dell.com/regulatory_compliance D19M D19M003 Vostro-3667/3668 Vostro-3667/3668 系列 218 號 20 00801-861-011 Printed in China. 2016-11 Locate Dell apps in connector 21.
... 11. USB 2.0 포트 12. Padlock ring 1 2 3 4 5. 麦克风 6 7. HDMI ポート 10 11. Optical drive eject button 3. HDMI 端口 10 11. Expansion card slot 16. O O O O O - Empty slot 17. Memory card reader 9. Dell.com/support Dell.com/support/manuals Dell.com/support/windows Dell.com/contactdell Dell.com/regulatory_compliance D19M D19M003 Vostro-3667/3668 Vostro-3667/3668 系列 218 號 20 00801-861-011 Printed in China. 2016-11 Locate Dell apps in connector 21.


