Dell Vostro 320 No Power

Related Manual Pages
Similar Questions

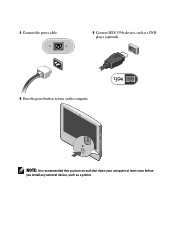
How To Replacing A Power Supply For A Dell Vostro 320
(Posted by surerhonja 10 years ago)


I Have A Dell Vostro 320 All-in-one With No Power
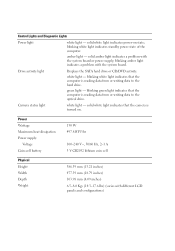
My Vostro 320 has no power but the power supply test fine. What could be the problem?
My Vostro 320 has no power but the power supply test fine. What could be the problem?
(Posted by dave80605 11 years ago)

Dell Xps 8300 Will Not Power-up
Changed ram from 4 by 1 gb to 2 by 1 gb plus 2 by 4 gb. Amber light came on and then nothing. The p...
Changed ram from 4 by 1 gb to 2 by 1 gb plus 2 by 4 gb. Amber light came on and then nothing. The p...
(Posted by dderekcurtis 12 years ago)

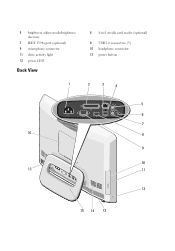
Where Is The Power Button?
manual says power button is on the front right side of the front facia. It is not there. I assumed i...
manual says power button is on the front right side of the front facia. It is not there. I assumed i...
(Posted by simoesusa 12 years ago)