Service Manual
Page 38
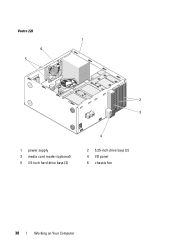
Vostro 220 1 6 5 2 3 1 power supply 3 media card reader (optional) 5 3.5-inch hard drive bays (2) 4 2 5.25-inch drive bays (2) 4 I/O panel 6 chassis fan 38 Working on Your Computer
Vostro 220 1 6 5 2 3 1 power supply 3 media card reader (optional) 5 3.5-inch hard drive bays (2) 4 2 5.25-inch drive bays (2) 4 I/O panel 6 chassis fan 38 Working on Your Computer
Service Manual
Page 39
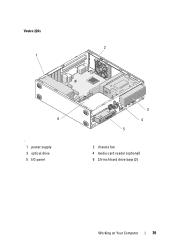
Vostro 220s 2 1 6 ' 1 power supply 3 optical drive 5 I/O panel 3 4 5 2 chassis fan 4 media card reader (optional) 6 3.5-inch hard drive bays (2) Working on Your Computer 39
Vostro 220s 2 1 6 ' 1 power supply 3 optical drive 5 I/O panel 3 4 5 2 chassis fan 4 media card reader (optional) 6 3.5-inch hard drive bays (2) Working on Your Computer 39
Service Manual
Page 93
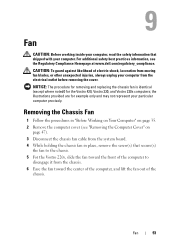
... Compliance Homepage at www.dell.com/regulatory_compliance. Fan CAUTION: Before working inside your computer, read the safety information that secure(s) the fan to the chassis. 5 For the Vostro 220s, slide the fan toward the front of the computer to disengage it from the chassis. 6 Ease the fan toward the center of the computer, and lift the fan out of electric shock...
... Compliance Homepage at www.dell.com/regulatory_compliance. Fan CAUTION: Before working inside your computer, read the safety information that secure(s) the fan to the chassis. 5 For the Vostro 220s, slide the fan toward the front of the computer to disengage it from the chassis. 6 Ease the fan toward the center of the computer, and lift the fan out of electric shock...

Service Manual
Page 97
...on page 40). 4 Follow the procedure in "After Working on Your Computer" on the chassis. Fan 97 b Press the fan into the chassis such that secure the fan to the chassis. 3 Attach the fan cable to step 3. 2 While holding the chassis fan in place, align the screw hole(s) and install the screw(s) that ...the screw hole in the fan is offset and slightly forward of the computer until it sets against the stops. Replacing the Chassis Fan 1 For the Vostro 220s: a Lower the fan into the side of the chassis, and then slide it toward the back of...
...on page 40). 4 Follow the procedure in "After Working on Your Computer" on the chassis. Fan 97 b Press the fan into the chassis such that secure the fan to the chassis. 3 Attach the fan cable to step 3. 2 While holding the chassis fan in place, align the screw hole(s) and install the screw(s) that ...the screw hole in the fan is offset and slightly forward of the computer until it sets against the stops. Replacing the Chassis Fan 1 For the Vostro 220s: a Lower the fan into the side of the chassis, and then slide it toward the back of...
Service Manual
Page 99
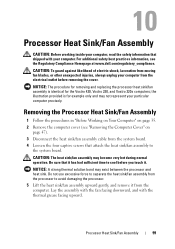
... and replacing the processor heat sink/fan assembly is for the Vostro 420, Vostro 220, and Vostro 220s computers; Lay the assembly with the fan facing downward, and with your computer. Processor Heat Sink/Fan Assembly CAUTION: Before working inside your computer, read the safety information that shipped... practices information, see "Removing the Computer Cover" on page 35. 2 Remove the computer cover (see the Regulatory Compliance Homepage at www.dell.com/regulatory_compliance. Processor Heat Sink/Fan Assembly 99 CAUTION: The heat sink/fan assembly may exist between the processor and...
... and replacing the processor heat sink/fan assembly is for the Vostro 420, Vostro 220, and Vostro 220s computers; Lay the assembly with the fan facing downward, and with your computer. Processor Heat Sink/Fan Assembly CAUTION: Before working inside your computer, read the safety information that shipped... practices information, see "Removing the Computer Cover" on page 35. 2 Remove the computer cover (see the Regulatory Compliance Homepage at www.dell.com/regulatory_compliance. Processor Heat Sink/Fan Assembly 99 CAUTION: The heat sink/fan assembly may exist between the processor and...

Service Manual
Page 119
... by moving fan blades, or other unexpected injuries, always unplug your computer. the illustration provided is for the Vostro 420, Vostro 220, and Vostro 220s computers; System Board CAUTION: Before working inside your computer, read the safety information that shipped with your computer from the ... 3 For the Vostro 220s: a Remove the chassis support bracket (see the Regulatory Compliance Homepage at www.dell.com/regulatory_compliance. Store them temporarily in "Before Working on Your Computer" on page 35. 2 Remove the computer cover (see "Removing the Computer Cover" on page...
... by moving fan blades, or other unexpected injuries, always unplug your computer. the illustration provided is for the Vostro 420, Vostro 220, and Vostro 220s computers; System Board CAUTION: Before working inside your computer, read the safety information that shipped with your computer from the ... 3 For the Vostro 220s: a Remove the chassis support bracket (see the Regulatory Compliance Homepage at www.dell.com/regulatory_compliance. Store them temporarily in "Before Working on Your Computer" on page 35. 2 Remove the computer cover (see "Removing the Computer Cover" on page...


