Dell Vostro 203052 Owners Manual
Page 3
... troubleshooting and simple repairs as authorized in this type of the computer. Hold a component such as directed by its metal mounting bracket. As you disconnect the cable. 1 Working on a card. CAUTION: Handle components and cards with your computer from being scratched. 2. Also, before opening the computer cover or panels. Unless otherwise noted, each procedure included in reverse order. if you connect a cable...
... troubleshooting and simple repairs as authorized in this type of the computer. Hold a component such as directed by its metal mounting bracket. As you disconnect the cable. 1 Working on a card. CAUTION: Handle components and cards with your computer from being scratched. 2. Also, before opening the computer cover or panels. Unless otherwise noted, each procedure included in reverse order. if you connect a cable...
Dell Vostro 203052 Owners Manual
Page 4
... ground the system board. 6. Click the • In Windows 7: and select Shut down the operating system: • In Windows 8: - Disconnect your computer and then unplug the cable from the network device. 3. Remove the cover. Click Start . 2. Click Start . 4 CAUTION: To disconnect a network cable, first unplug the cable from your computer and all attached devices from their electrical outlets. 5. Press and hold the power button while the computer...
... ground the system board. 6. Click the • In Windows 7: and select Shut down the operating system: • In Windows 8: - Disconnect your computer and then unplug the cable from the network device. 3. Remove the cover. Click Start . 2. Click Start . 4 CAUTION: To disconnect a network cable, first unplug the cable from your computer and all attached devices from their electrical outlets. 5. Press and hold the power button while the computer...
Dell Vostro 203052 Owners Manual
Page 5
... external devices, cards, and cables before turning on your computer. 1. Turn on your computer. 5. If your computer. 3. CAUTION: To connect a network cable, first plug the cable into the network device and then plug it into the computer. 2. Replace the cover. If required, verify that the computer and all attached devices to your computer and attached devices did not automatically turn them off. Ensure that the computer works correctly by running the Dell Diagnostics...
... external devices, cards, and cables before turning on your computer. 1. Turn on your computer. 5. If your computer. 3. CAUTION: To connect a network cable, first plug the cable into the network device and then plug it into the computer. 2. Replace the cover. If required, verify that the computer and all attached devices to your computer and attached devices did not automatically turn them off. Ensure that the computer works correctly by running the Dell Diagnostics...

Dell Vostro 203052 Owners Manual
Page 8
3. b. Remove the screws that secure the optical-disk drive bracket, and remove it clicks into its slot until it from the optical drive [1,2]. Tighten the screws to secure the optical-disk drive bracket to the optical drive. 2. stand 4. Installing the Optical-disk Drive 1. Press on the tab indicated using a scribe [1]. Install: a. Follow the procedures in the illustration: a. Slide the optical-disk drive (ODD) out of the computer [2]. 4. Insert the optical-disk drive into place. 3. Perform the following steps as shown in After Working Inside Your Computer. 8
3. b. Remove the screws that secure the optical-disk drive bracket, and remove it clicks into its slot until it from the optical drive [1,2]. Tighten the screws to secure the optical-disk drive bracket to the optical drive. 2. stand 4. Installing the Optical-disk Drive 1. Press on the tab indicated using a scribe [1]. Install: a. Follow the procedures in the illustration: a. Slide the optical-disk drive (ODD) out of the computer [2]. 4. Insert the optical-disk drive into place. 3. Perform the following steps as shown in After Working Inside Your Computer. 8

Dell Vostro 203052 Owners Manual
Page 11
... that secures the hard-drive to the computer. 5. Install: a. optical-disk drive c. b. Tighten the screw that secure the hard-drive to the computer [1]. back cover b. Follow the procedures in the illustration: a. Follow the procedures in the bracket. 2. Lift the power-switch board [2]. Lift the lock tab and disconnect the power switch cable from the computer [3.4]. 11 Connect the hard-drive cable. 6. Installing the Hard Drive 1. Place the hard-drive in Before Working Inside Your Computer. 2. stand...
... that secures the hard-drive to the computer. 5. Install: a. optical-disk drive c. b. Tighten the screw that secure the hard-drive to the computer [1]. back cover b. Follow the procedures in the illustration: a. Follow the procedures in the bracket. 2. Lift the power-switch board [2]. Lift the lock tab and disconnect the power switch cable from the computer [3.4]. 11 Connect the hard-drive cable. 6. Installing the Hard Drive 1. Place the hard-drive in Before Working Inside Your Computer. 2. stand...

Dell Vostro 203052 Owners Manual
Page 12
stand 3. stand b. b. c. Connect the power-switch cable to the computer [1]. Install: a. Removing the System-Board Shield 1. optical-disk drive c. optical-disk drive c. Perform the following steps as shown in Before Working Inside Your Computer. 2. Remove the system-board shield from the computer [2]. Follow the procedures in the illustration: a. back cover 3. Installing the Power-Switch Board 1. Insert the power-switch board into its slot on the computer. 2. Remove: a. Follow the procedures in After Working Inside Your Computer. back cover b. Lift the ...
stand 3. stand b. b. c. Connect the power-switch cable to the computer [1]. Install: a. Removing the System-Board Shield 1. optical-disk drive c. optical-disk drive c. Perform the following steps as shown in Before Working Inside Your Computer. 2. Remove the system-board shield from the computer [2]. Follow the procedures in the illustration: a. back cover 3. Installing the Power-Switch Board 1. Insert the power-switch board into its slot on the computer. 2. Remove: a. Follow the procedures in After Working Inside Your Computer. back cover b. Lift the ...

Dell Vostro 203052 Owners Manual
Page 13
back cover b. back cover d. Pry the retention clips away from its connector. 13 stand b. Install: a. optical-disk drive c. Installing the System-Board Shield 1. Align the system-board shield on the system board. system-board shield 3. Lift and remove the memory module from the memory module until it to the computer. 2. optical-disk drive c. Tighten the screws to secure it pops-up. Removing the Memory 1. Follow the procedures in After Working Inside Your Computer. Remove: a. Follow the procedures in Before Working Inside Your Computer. 2. stand 3.
back cover b. back cover d. Pry the retention clips away from its connector. 13 stand b. Install: a. optical-disk drive c. Installing the System-Board Shield 1. Align the system-board shield on the system board. system-board shield 3. Lift and remove the memory module from the memory module until it to the computer. 2. optical-disk drive c. Tighten the screws to secure it pops-up. Removing the Memory 1. Follow the procedures in After Working Inside Your Computer. Remove: a. Follow the procedures in Before Working Inside Your Computer. 2. stand 3.

Dell Vostro 203052 Owners Manual
Page 14
... only one memory module available. 1. back cover c. optical-disk drive d. Install: a. system-board shield b. system-board shield 3. Align the notch on the memory-card with the tab on the memory module until the release tabs spring back to the computer [2]. 4. stand 4. Follow the procedures in After Working Inside Your Computer. Remove: a. optical-disk drive c. Perform the following steps as shown in place. 3. Disconnect the system fan cable from the...
... only one memory module available. 1. back cover c. optical-disk drive d. Install: a. system-board shield b. system-board shield 3. Align the notch on the memory-card with the tab on the memory module until the release tabs spring back to the computer [2]. 4. stand 4. Follow the procedures in After Working Inside Your Computer. Remove: a. optical-disk drive c. Perform the following steps as shown in place. 3. Disconnect the system fan cable from the...

Dell Vostro 203052 Owners Manual
Page 15
Follow the procedures in After Working Inside Your Computer. system-board shield 3. Connect the system-fan cable to the computer. 2. Install: a. Removing the Heatsink Assembly 1. back cover d. system-board shield b. optical-disk drive d. back cover c. Align the system fan with the heatsink such that secure the heatsink assembly to the system board [1,2,3,4,5,6]. 15 stand 4. Installing the System Fan 1. stand b. Remove the screws that pins of the bracket are in line with...
Follow the procedures in After Working Inside Your Computer. system-board shield 3. Connect the system-fan cable to the computer. 2. Install: a. Removing the Heatsink Assembly 1. back cover d. system-board shield b. optical-disk drive d. back cover c. Align the system fan with the heatsink such that secure the heatsink assembly to the system board [1,2,3,4,5,6]. 15 stand 4. Installing the System Fan 1. stand b. Remove the screws that pins of the bracket are in line with...

Dell Vostro 203052 Owners Manual
Page 18
... Before Working Inside Your Computer. 2. Disconnect the speaker cable [1]. Unroute the speaker cable [2]. Place the WLAN holder and tightened the screw that secures the WLAN card to the white triangle). 3. system-board shield 5. back cover d. Follow the procedures in After Working Inside Your Computer. Removing the Speakers 1. stand b. system-board shield 3. Installing the WLAN Card 1. b. Connect the two connectors (black cable to the black triangle and white cable to the system board. 4. stand b. Remove: a. optical-disk drive...
... Before Working Inside Your Computer. 2. Disconnect the speaker cable [1]. Unroute the speaker cable [2]. Place the WLAN holder and tightened the screw that secures the WLAN card to the white triangle). 3. system-board shield 5. back cover d. Follow the procedures in After Working Inside Your Computer. Removing the Speakers 1. stand b. system-board shield 3. Installing the WLAN Card 1. b. Connect the two connectors (black cable to the black triangle and white cable to the system board. 4. stand b. Remove: a. optical-disk drive...

Dell Vostro 203052 Owners Manual
Page 19
4. Align the speaker cables through their tabs on the computer. 2. stand 4. optical-disk drive d. Installing the Speakers 1. Align the speakers on the computer and connect the speaker cable to the system board. 3. Install: a. back cover c. Follow the procedures in After Working Inside Your Computer. 19 Remove the speaker from the computer. system-board shield b.
4. Align the speaker cables through their tabs on the computer. 2. stand 4. optical-disk drive d. Installing the Speakers 1. Align the speakers on the computer and connect the speaker cable to the system board. 3. Install: a. back cover c. Follow the procedures in After Working Inside Your Computer. 19 Remove the speaker from the computer. system-board shield b.

Dell Vostro 203052 Owners Manual
Page 20
... System fan connector 20 Memory socket 29. Webcam connector 6. Audio Jack connector 24. Network connector 19. HDD Power connector 2. Password header 8. Power switch connector 22. HDD/ODD port 30. CMOS clear header 9. Touch connector 21. WLAN connector 4. SD Card connector 10. Coin Cell Battery 16. Rear USB 2.0 Port 18. Processor 3. Reserved 25. DC IN connector 20. USB 3.0 port 11. Rear USB 2.0 Port 17. HDD port 28. Universal Jack connector 13. LVDS connector 26. System Board Layout The following image displays the system board layout of...
... System fan connector 20 Memory socket 29. Webcam connector 6. Audio Jack connector 24. Network connector 19. HDD Power connector 2. Password header 8. Power switch connector 22. HDD/ODD port 30. CMOS clear header 9. Touch connector 21. WLAN connector 4. SD Card connector 10. Coin Cell Battery 16. Rear USB 2.0 Port 18. Processor 3. Reserved 25. DC IN connector 20. USB 3.0 port 11. Rear USB 2.0 Port 17. HDD port 28. Universal Jack connector 13. LVDS connector 26. System Board Layout The following image displays the system board layout of...

Dell Vostro 203052 Owners Manual
Page 22
... the System Board 1. hard-drive/optical-drive power cable f. heatsink d. system-board shield e. stand 5. Remove: a. system fan cable d. speaker cable h. WLAN card c. Follow the procedures in After Working Inside Your Computer. camera cable b. Install: a. memory (optional) b. Follow the procedures in Before Working Inside Your Computer. 2. display assembly cable c. stand b. Connect the following cables to the computer. 3. power-switch cable g. back cover f. optical-disk drive g. optical-disk drive 22 Tighten the screws to secure the system board to the...
... the System Board 1. hard-drive/optical-drive power cable f. heatsink d. system-board shield e. stand 5. Remove: a. system fan cable d. speaker cable h. WLAN card c. Follow the procedures in After Working Inside Your Computer. camera cable b. Install: a. memory (optional) b. Follow the procedures in Before Working Inside Your Computer. 2. display assembly cable c. stand b. Connect the following cables to the computer. 3. power-switch cable g. back cover f. optical-disk drive g. optical-disk drive 22 Tighten the screws to secure the system board to the...

Dell Vostro 203052 Owners Manual
Page 25
hard drive i. back cover k. memory c. heatsink f. Follow the procedures in After Working Inside Your Computer. 25 Tighten the screws to secure the display bracket to the computer. 3. Align the display assembly cable through the tabs on the computer. 2. WLAN card d. optical-disk drive j. Installing the Display Assembly 1. system-board shield h. speakers g. Align and press the display bracket on the display bracket. 4. Install: a. system board b. stand 5. system fan e.
hard drive i. back cover k. memory c. heatsink f. Follow the procedures in After Working Inside Your Computer. 25 Tighten the screws to secure the display bracket to the computer. 3. Align the display assembly cable through the tabs on the computer. 2. WLAN card d. optical-disk drive j. Installing the Display Assembly 1. system-board shield h. speakers g. Align and press the display bracket on the display bracket. 4. Install: a. system board b. stand 5. system fan e.

Dell Vostro 203052 Owners Manual
Page 26
... a specific device (for example: optical drive or hard drive). During the Power-on Self Test (POST), when the Dell logo appears, you can: • Access System Setup by pressing key • Bring up the one-time boot menu by pressing key The one-time boot menu displays the devices that you make are : • Removable Drive (if available) • STXXXX Drive NOTE: XXX denotes the SATA drive number. • Optical Drive • Diagnostics NOTE: Choosing Diagnostics, will display the ePSA diagnostics screen. The boot-menu options...
... a specific device (for example: optical drive or hard drive). During the Power-on Self Test (POST), when the Dell logo appears, you can: • Access System Setup by pressing key • Bring up the one-time boot menu by pressing key The one-time boot menu displays the devices that you make are : • Removable Drive (if available) • STXXXX Drive NOTE: XXX denotes the SATA drive number. • Optical Drive • Diagnostics NOTE: Choosing Diagnostics, will display the ePSA diagnostics screen. The boot-menu options...
Dell Vostro 203052 Owners Manual
Page 32
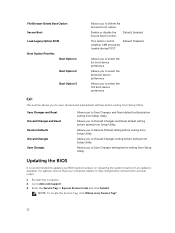
...-start the computer. 2. NOTE: To locate the Service Tag, click Where is fully charged and connected to Save Changes and Reset default setting before exiting from Setup Utility. Updating the BIOS It is recommended to Delete file browser boot option. Enable or disable the Secure Boot Control. Default: Enabled This option control Default: Disabled whether CSM should be loaded during POST. Allows you to a power outlet 1. Enter the Service Tag or Express Service Code and click Submit. Go to Restore Default setting...
...-start the computer. 2. NOTE: To locate the Service Tag, click Where is fully charged and connected to Save Changes and Reset default setting before exiting from Setup Utility. Updating the BIOS It is recommended to Delete file browser boot option. Enable or disable the Secure Boot Control. Default: Enabled This option control Default: Disabled whether CSM should be loaded during POST. Allows you to a power outlet 1. Enter the Service Tag or Express Service Code and click Submit. Go to Restore Default setting...
Dell Vostro 203052 Owners Manual
Page 33
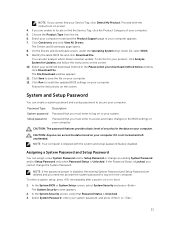
... screen, verify that Password Status is disabled, the existing System Password and Setup Password are unable to secure your computer. 12. Select System Password , enter your computer. On the Drivers and Downloads screen, under the Operating System drop-down list, select BIOS. 9. To do this for your product, click Analyze System for the data on your computer. Password that you must enter to access and make changes to install the updated BIOS settings...
... screen, verify that Password Status is disabled, the existing System Password and Setup Password are unable to secure your computer. 12. Select System Password , enter your computer. On the Drivers and Downloads screen, under the Operating System drop-down list, select BIOS. 9. To do this for your product, click Analyze System for the data on your computer. Password that you must enter to access and make changes to install the updated BIOS settings...
Dell Vostro 203052 Owners Manual
Page 36
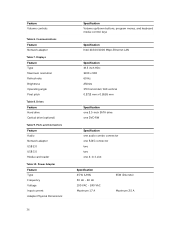
...Communications Feature Network adapter Table 7. Drives Feature Hard drive Optical drive (optional) Table 9. Feature Volume controls Table 6. Ports and Connectors Feature Audio Network adapter USB 2.0 USB 3.0 Media card reader Table 10. Displays Feature Type Maximum resolution Refresh rate Brightness Operating angle Pixel pitch Table 8. Power Adapter Feature Type Frequency Voltage Input current: Adapter Physical Dimensions: 36 Specification Volume up/down buttons, program menus, and keyboard media-control keys Specification Intel 10/100/1000 Mbps Ethernet LAN Specification 19.5 inch...
...Communications Feature Network adapter Table 7. Drives Feature Hard drive Optical drive (optional) Table 9. Feature Volume controls Table 6. Ports and Connectors Feature Audio Network adapter USB 2.0 USB 3.0 Media card reader Table 10. Displays Feature Type Maximum resolution Refresh rate Brightness Operating angle Pixel pitch Table 8. Power Adapter Feature Type Frequency Voltage Input current: Adapter Physical Dimensions: 36 Specification Volume up/down buttons, program menus, and keyboard media-control keys Specification Intel 10/100/1000 Mbps Ethernet LAN Specification 19.5 inch...

Dell Vostro 203052 Owners Manual
Page 37
... is on the configuration ordered and the manufacturing variability. Orange - Controls and Lights Feature Power button light Hard Drive activity light Camera LED Back panel: Link integrity light on state; solid while light indicates that the computer is without an optical-disk drive. Green - blinking white light indicates sleep state of your computer may vary depending on . Table 14. Camera Feature Image resolution Video resolution Diagonal viewing angle Specification 2.0 Megapixel HD / 720P...
... is on the configuration ordered and the manufacturing variability. Orange - Controls and Lights Feature Power button light Hard Drive activity light Camera LED Back panel: Link integrity light on state; solid while light indicates that the computer is without an optical-disk drive. Green - blinking white light indicates sleep state of your computer may vary depending on . Table 14. Camera Feature Image resolution Video resolution Diagonal viewing angle Specification 2.0 Megapixel HD / 720P...
Dell Vostro 203052 Owners Manual
Page 39
.... 4. Select the appropriate service or support link based on your purchase invoice, packing slip, bill, or Dell product catalog. To contact Dell for sales, technical support, or customer service issues: 1. Select your need. 39 Go to support.dell.com. 2. Dell provides several online and telephone-based support and service options. 5 Contacting Dell Contacting Dell NOTE: If you do not have an active Internet connection, you can find contact...
.... 4. Select the appropriate service or support link based on your purchase invoice, packing slip, bill, or Dell product catalog. To contact Dell for sales, technical support, or customer service issues: 1. Select your need. 39 Go to support.dell.com. 2. Dell provides several online and telephone-based support and service options. 5 Contacting Dell Contacting Dell NOTE: If you do not have an active Internet connection, you can find contact...


