Owner's Manual
Page 6
... Picture 67 8 Using Cards 69 ExpressCards 69 ExpressCard Blanks 69 Installing an ExpressCard 70 Removing an ExpressCard or Blank 71 Media Memory Cards 72 Installing a Media Memory Card 72 Removing a Media Memory Card 73 9 Setting Up and Using Networks 75 Physically Connecting to a Network or Broadband Modem 75 Connecting a Network or Broadband Modem...
... Picture 67 8 Using Cards 69 ExpressCards 69 ExpressCard Blanks 69 Installing an ExpressCard 70 Removing an ExpressCard or Blank 71 Media Memory Cards 72 Installing a Media Memory Card 72 Removing a Media Memory Card 73 9 Setting Up and Using Networks 75 Physically Connecting to a Network or Broadband Modem 75 Connecting a Network or Broadband Modem...
Owner's Manual
Page 8
Memory 95 Modem 98 Hinge Cover 100 Keyboard 101 Wireless Mini-Card 103 Coin-Cell Battery 106 Display 107 12 Troubleshooting 111 Dell Technical Update Service 111 Dell Diagnostics 111 Dell Support Center 116 Dell Support 116 Dell PC TuneUp 117 Dell PC Checkup 118 Dell Network Assistant 118 DellConnect 118 Drive Problems 119 Optical drive problems 119 Hard drive problems 120 E-Mail, Modem, and Internet Problems 121 Error Messages 123 ExpressCard Problems 128 IEEE 1394 Device Problems 128 8 Contents
Memory 95 Modem 98 Hinge Cover 100 Keyboard 101 Wireless Mini-Card 103 Coin-Cell Battery 106 Display 107 12 Troubleshooting 111 Dell Technical Update Service 111 Dell Diagnostics 111 Dell Support Center 116 Dell Support 116 Dell PC TuneUp 117 Dell PC Checkup 118 Dell Network Assistant 118 DellConnect 118 Drive Problems 119 Optical drive problems 119 Hard drive problems 120 E-Mail, Modem, and Internet Problems 121 Error Messages 123 ExpressCard Problems 128 IEEE 1394 Device Problems 128 8 Contents
Owner's Manual
Page 9
... crashes repeatedly 131 A program is designed for an earlier Microsoft® Windows® operating system . . . . . 131 A solid blue screen appears 132 Dell MediaDirect problems 132 Other software problems 133 Memory Problems 133 Network Problems 134 Mobile Broadband (Wireless Wide Area Network [WWAN 135 Power Problems 135 Printer Problems 137 Scanner Problems 138...
... crashes repeatedly 131 A program is designed for an earlier Microsoft® Windows® operating system . . . . . 131 A solid blue screen appears 132 Dell MediaDirect problems 132 Other software problems 133 Memory Problems 133 Network Problems 134 Mobile Broadband (Wireless Wide Area Network [WWAN 135 Power Problems 135 Printer Problems 137 Scanner Problems 138...
Owner's Manual
Page 16
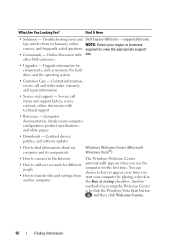
...user accounts for different people • How to have it appear every time you use the computer for components, such as memory, the hard drive, and the operating system • Customer Care - articles from another computer The Windows Welcome Center automatically ... - You can choose to transfer files and settings from technicians; Find It Here • Solutions - Troubleshooting hints and Dell Support Website - support.dell.com tips; Contact information, service call status and support history, service contract, online discussions with site. Upgrade information for ...
...user accounts for different people • How to have it appear every time you use the computer for components, such as memory, the hard drive, and the operating system • Customer Care - articles from another computer The Windows Welcome Center automatically ... - You can choose to transfer files and settings from technicians; Find It Here • Solutions - Troubleshooting hints and Dell Support Website - support.dell.com tips; Contact information, service call status and support history, service contract, online discussions with site. Upgrade information for ...
Owner's Manual
Page 25
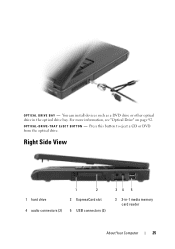
D R I C A L - T R A Y E J E C T B U T T O N - Press this button to eject a CD or DVD from the optical drive. Right Side View 1 hard drive 1 2 2 ExpressCard slot 4 audio connectors (2) 5 USB connectors (2) 34 5 3 3-in the optical drive bay. You can install devices such as a DVD drive or other optical drive in -1 media memory card reader About Your Computer 25 O P T I V E - O P T I C A L D R I V E B A Y - For more information, see "Optical Drive" on page 92.
D R I C A L - T R A Y E J E C T B U T T O N - Press this button to eject a CD or DVD from the optical drive. Right Side View 1 hard drive 1 2 2 ExpressCard slot 4 audio connectors (2) 5 USB connectors (2) 34 5 3 3-in the optical drive bay. You can install devices such as a DVD drive or other optical drive in -1 media memory card reader About Your Computer 25 O P T I V E - O P T I C A L D R I V E B A Y - For more information, see "Optical Drive" on page 92.
Owner's Manual
Page 26
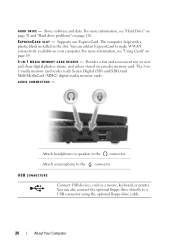
... CONNECTORS - For more information, see "Hard Drive" on page 92 and "Hard drive problems" on a media memory card. The 3-in1 media memory card reader reads Secure Digital (SD) card/SDIO and MultiMediaCard (MMC) digital media memory cards. USB CONNECTORS Connect USB devices, such as a mouse, keyboard, or printer. Stores software and data. You...
... CONNECTORS - For more information, see "Hard Drive" on page 92 and "Hard drive problems" on a media memory card. The 3-in1 media memory card reader reads Secure Digital (SD) card/SDIO and MultiMediaCard (MMC) digital media memory cards. USB CONNECTORS Connect USB devices, such as a mouse, keyboard, or printer. Stores software and data. You...
Owner's Manual
Page 29
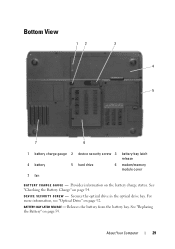
... information on page 92. About Your Computer 29 Bottom View 12 3 4 5 7 6 1 battery charge gauge 2 device security screw 3 battery-bay latch release 4 battery 5 hard drive 6 modem/memory module cover 7 fan B A T T E R Y C H A R G E G A U G E - Secures the optical drive in the optical drive bay. For more information, see "Optical Drive" on the battery charge status. See "Checking...
... information on page 92. About Your Computer 29 Bottom View 12 3 4 5 7 6 1 battery charge gauge 2 device security screw 3 battery-bay latch release 4 battery 5 hard drive 6 modem/memory module cover 7 fan B A T T E R Y C H A R G E G A U G E - Secures the optical drive in the optical drive bay. For more information, see "Optical Drive" on the battery charge status. See "Checking...
Owner's Manual
Page 30
B A T T E R Y - F A N - For more information, see "Using a Battery" on page 53. For more information, see "Modem" on page 98 and "Memory" on page 120. Stores software and data. The computer uses a fan to an electrical outlet. For more information, see "Hard Drive" on page 92 and "... to create airflow through the vents, which prevents the computer from overheating. 30 About Your Computer H A R D D R I V E - M O D E M / M E M O R Y M O D U L E C O V E R - Covers the compartment that contains the modem and the memory modules.
B A T T E R Y - F A N - For more information, see "Using a Battery" on page 53. For more information, see "Modem" on page 98 and "Memory" on page 120. Stores software and data. The computer uses a fan to an electrical outlet. For more information, see "Hard Drive" on page 92 and "... to create airflow through the vents, which prevents the computer from overheating. 30 About Your Computer H A R D D R I V E - M O D E M / M E M O R Y M O D U L E C O V E R - Covers the compartment that contains the modem and the memory modules.

Owner's Manual
Page 53
...perform operations including, but not limited to, the following: • Using optical drives • Using wireless communications devices, ExpressCards, media memory cards, or USB devices • Using high-brightness display settings, 3D screen savers, or other powerintensive programs such as standard equipment in...is recommended that shipped with the battery installed at all times. Using a Battery Battery Performance NOTE: For information about the Dell warranty for your computer, see the Product Information Guide or separate paper warranty document that you connect your computer to an ...
...perform operations including, but not limited to, the following: • Using optical drives • Using wireless communications devices, ExpressCards, media memory cards, or USB devices • Using high-brightness display settings, 3D screen savers, or other powerintensive programs such as standard equipment in...is recommended that shipped with the battery installed at all times. Using a Battery Battery Performance NOTE: For information about the Dell warranty for your computer, see the Product Information Guide or separate paper warranty document that you connect your computer to an ...
Owner's Manual
Page 62
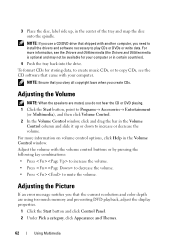
.... 3 Place the disc, label side up or down to increase or decrease the volume. Adjusting the Volume NOTE: When the speakers are using too much memory and preventing DVD playback, adjust the display properties. 1 Click the Start button and click Control Panel. 2 Under Pick a category, click Appearance and Themes. 62 Using...
.... 3 Place the disc, label side up or down to increase or decrease the volume. Adjusting the Volume NOTE: When the speakers are using too much memory and preventing DVD playback, adjust the display properties. 1 Click the Start button and click Control Panel. 2 Under Pick a category, click Appearance and Themes. 62 Using...
Owner's Manual
Page 67
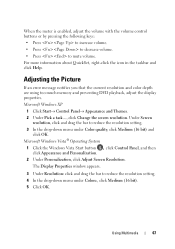
... the taskbar and click Help. Adjusting the Picture If an error message notifies you that the current resolution and color depth are using too much memory and preventing DVD playback, adjust the display properties.
... the taskbar and click Help. Adjusting the Picture If an error message notifies you that the current resolution and color depth are using too much memory and preventing DVD playback, adjust the display properties.
Owner's Manual
Page 69
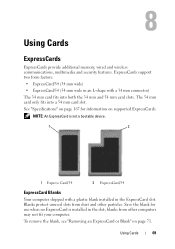
... ExpressCard Blanks Your computer shipped with a 34 mm connector) The 34 mm card fits into a 54 mm card slot. Using Cards ExpressCards ExpressCards provide additional memory, wired and wireless communications, multimedia and security features. See "Specifications" on page 71. The 54 mm card only fits into both the 34 mm and...
... ExpressCard Blanks Your computer shipped with a 34 mm connector) The 34 mm card fits into a 54 mm card slot. Using Cards ExpressCards ExpressCards provide additional memory, wired and wireless communications, multimedia and security features. See "Specifications" on page 71. The 54 mm card only fits into both the 34 mm and...
Owner's Manual
Page 72
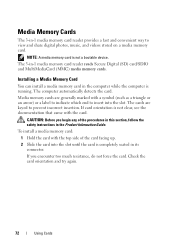
...Using Cards The computer automatically detects the card. The cards are generally marked with the card. If card orientation is not a bootable device. NOTE: A media memory card is not clear, see the documentation that came with a symbol (such as a triangle or an arrow) or a label to indicate which end to... view and share digital photos, music, and videos stored on a media memory card. If you begin any of the card facing up. 2 Slide the card into the slot. Media Memory Cards The 3-in-1 media memory card reader provides a fast and convenient way to insert into the slot until the ...
...Using Cards The computer automatically detects the card. The cards are generally marked with the card. If card orientation is not a bootable device. NOTE: A media memory card is not clear, see the documentation that came with a symbol (such as a triangle or an arrow) or a label to indicate which end to... view and share digital photos, music, and videos stored on a media memory card. If you begin any of the card facing up. 2 Slide the card into the slot. Media Memory Cards The 3-in-1 media memory card reader provides a fast and convenient way to insert into the slot until the ...
Owner's Manual
Page 73
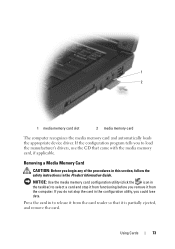
...to release it from the computer. If you do not stop it from functioning before you could lose data. Removing a Media Memory Card CAUTION: Before you begin any of the procedures in this section, follow the safety instructions in the configuration utility, you ... and stop the card in the Product Information Guide. 1 2 1 media memory card slot 2 media memory card The computer recognizes the media memory card and automatically loads the appropriate device driver. NOTICE: Use the media memory card configuration utility (click the icon in to load the manufacturer's drivers, ...
...to release it from the computer. If you do not stop it from functioning before you could lose data. Removing a Media Memory Card CAUTION: Before you begin any of the procedures in this section, follow the safety instructions in the configuration utility, you ... and stop the card in the Product Information Guide. 1 2 1 media memory card slot 2 media memory card The computer recognizes the media memory card and automatically loads the appropriate device driver. NOTICE: Use the media memory card configuration utility (click the icon in to load the manufacturer's drivers, ...
Owner's Manual
Page 91
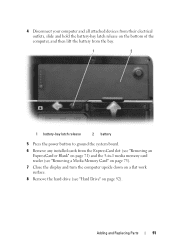
... system board. 6 Remove any installed cards from the ExpressCard slot (see "Removing an ExpressCard or Blank" on page 71) and the 3-in-1 media memory card reader (see "Removing a Media Memory Card" on page 73). 7 Close the display and turn the computer upside down on a flat work surface. 8 Remove the hard drive (see...
... system board. 6 Remove any installed cards from the ExpressCard slot (see "Removing an ExpressCard or Blank" on page 71) and the 3-in-1 media memory card reader (see "Removing a Media Memory Card" on page 73). 7 Close the display and turn the computer upside down on a flat work surface. 8 Remove the hard drive (see...
Owner's Manual
Page 95
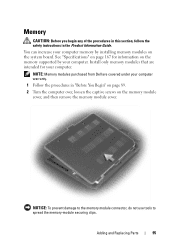
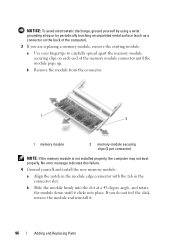
... securing clips. Adding and Replacing Parts 95 NOTE: Memory modules purchased from Dell are intended for information on the memory supported by installing memory modules on the memory module cover, and then remove the memory module cover. You can increase your computer memory by your computer. Install only memory modules that are covered under your computer warranty. 1 Follow...
... securing clips. Adding and Replacing Parts 95 NOTE: Memory modules purchased from Dell are intended for information on the memory supported by installing memory modules on the memory module cover, and then remove the memory module cover. You can increase your computer memory by your computer. Install only memory modules that are covered under your computer warranty. 1 Follow...
Owner's Manual
Page 96
..., remove the existing module: a Use your fingertips to carefully spread apart the memory-module securing clips on the back of the memory module connector until it . 96 Adding and Replacing Parts b Slide the module firmly into the slot at a 45-degree angle, and rotate the module down ... not feel the click, remove the module and reinstall it clicks into place. No error message indicates this failure. 4 Ground yourself and install the new memory module: a Align the notch in the module edge connector with the tab in the connector slot. b Remove the module from the connector...
..., remove the existing module: a Use your fingertips to carefully spread apart the memory-module securing clips on the back of the memory module connector until it . 96 Adding and Replacing Parts b Slide the module firmly into the slot at a 45-degree angle, and rotate the module down ... not feel the click, remove the module and reinstall it clicks into place. No error message indicates this failure. 4 Ground yourself and install the new memory module: a Align the notch in the module edge connector with the tab in the connector slot. b Remove the module from the connector...
Owner's Manual
Page 97
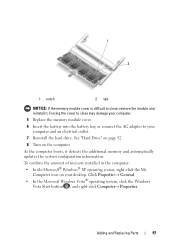
...the Microsoft Windows Vista® operating system, click the Windows Vista Start button , and right-click Computer→ Properties. To confirm the amount of memory installed in the computer: • In the Microsoft® Windows® XP operating system, right-click the My Computer icon on the computer.... 1 2 1 notch 2 tab NOTICE: If the memory module cover is difficult to your computer and an electrical outlet. 7 Reinstall the hard drive. See "Hard Drive" on page 92. 8 Turn on ...
...the Microsoft Windows Vista® operating system, click the Windows Vista Start button , and right-click Computer→ Properties. To confirm the amount of memory installed in the computer: • In the Microsoft® Windows® XP operating system, right-click the My Computer icon on the computer.... 1 2 1 notch 2 tab NOTICE: If the memory module cover is difficult to your computer and an electrical outlet. 7 Reinstall the hard drive. See "Hard Drive" on page 92. 8 Turn on ...
Owner's Manual
Page 112
..., the computer must be working properly. 2 Turn on (or restart) your computer. 3 Start the Dell Diagnostics in one of your system board, keyboard, display, memory, and hard drive. • During the assessment, answer any key to start the Dell Diagnostics from the diagnostics utility partition on your computer and try again. - Select Diagnostics...
..., the computer must be working properly. 2 Turn on (or restart) your computer. 3 Start the Dell Diagnostics in one of your system board, keyboard, display, memory, and hard drive. • During the assessment, answer any key to start the Dell Diagnostics from the diagnostics utility partition on your computer and try again. - Select Diagnostics...

Owner's Manual
Page 114
... Lists a number of common symptoms and allows you to select a test based on the symptom of system devices. Option Test Memory Test System Exit Function Run the stand-alone memory test Run System Diagnostics Exit the Diagnostics After you have selected the Test System option from the menu to run a more... typically takes an hour or more thorough check of the devices in the system and can be used to customize the tests you want . Dell Diagnostics Main Menu After the Dell Diagnostics loads and the Main Menu screen appears, click the button for the option you want to run.
... Lists a number of common symptoms and allows you to select a test based on the symptom of system devices. Option Test Memory Test System Exit Function Run the stand-alone memory test Run System Diagnostics Exit the Diagnostics After you have selected the Test System option from the menu to run a more... typically takes an hour or more thorough check of the devices in the system and can be used to customize the tests you want . Dell Diagnostics Main Menu After the Dell Diagnostics loads and the Main Menu screen appears, click the button for the option you want to run.


