Owner's Manual
Page 19
... page 17. 2 Under Pick a Task, click Use Tools to view your computer's video controller configuration: 1 Access the Microsoft® Windows® Help and Support Center. For instructions, see "Windows Help and Support Center" on selections that you can view the type of several different video controller configurations. Hardware screen, you made when purchasing your computer, your computer has one of video controller installed in your computer, as well as...
... page 17. 2 Under Pick a Task, click Use Tools to view your computer's video controller configuration: 1 Access the Microsoft® Windows® Help and Support Center. For instructions, see "Windows Help and Support Center" on selections that you can view the type of several different video controller configurations. Hardware screen, you made when purchasing your computer, your computer has one of video controller installed in your computer, as well as...
Owner's Manual
Page 42
... adjusting display resolution. Microsoft® Windows® XP 1 Click Start→ Settings→ Control Panel. 2 Under Pick a category, click Appearance and Themes. 3 Under Pick a task..., click the area you want to change the appearance of images on the screen by the display, the computer enters pan mode. You can benefit people with your Dell-installed operating system. for Color quality and Screen resolution. NOTE: Use only the Dell-installed video drivers...
... adjusting display resolution. Microsoft® Windows® XP 1 Click Start→ Settings→ Control Panel. 2 Under Pick a category, click Appearance and Themes. 3 Under Pick a task..., click the area you want to change the appearance of images on the screen by the display, the computer enters pan mode. You can benefit people with your Dell-installed operating system. for Color quality and Screen resolution. NOTE: Use only the Dell-installed video drivers...
Owner's Manual
Page 47
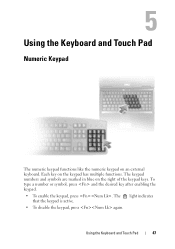
The 9 light indicates that the keypad is active. • To disable the keypad, press again. Using the Keyboard and Touch Pad 47 To type a number or symbol, press and the desired key after enabling the keypad. • To enable the keypad, press . Each key on an external keyboard. Using the Keyboard and Touch Pad Numeric Keypad The numeric keypad functions like the numeric keypad on the keypad has multiple functions. The keypad numbers and symbols are marked in blue on the right of the keypad keys.
The 9 light indicates that the keypad is active. • To disable the keypad, press again. Using the Keyboard and Touch Pad 47 To type a number or symbol, press and the desired key after enabling the keypad. • To enable the keypad, press . Each key on an external keyboard. Using the Keyboard and Touch Pad Numeric Keypad The numeric keypad functions like the numeric keypad on the keypad has multiple functions. The keypad numbers and symbols are marked in blue on the right of the keypad keys.
Owner's Manual
Page 55
... instructions on accessing more information about the Power Meter, see "Configuring Power Management Settings" on , the battery has 80 percent of the lights are on page 58. Using a Battery 55 For example, if four of its original charge capacity remains. Each light represents incremental degradation. See "Specifications" on the battery charge gauge for more information about the battery operating time. Check the Battery Health To check the battery health using the charge...
... instructions on accessing more information about the Power Meter, see "Configuring Power Management Settings" on , the battery has 80 percent of the lights are on page 58. Using a Battery 55 For example, if four of its original charge capacity remains. Each light represents incremental degradation. See "Specifications" on the battery charge gauge for more information about the battery operating time. Check the Battery Health To check the battery health using the charge...
Owner's Manual
Page 82
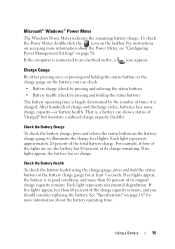
... are enabled or disabled. Your computer can use either a Mobile Broadband ExpressCard or Mini-Card, but not both, to establish a Mobile Broadband network connection. Monitoring the Status of the Wireless Network Card Through Dell QuickSet The wireless activity indicator provides you with an easy way to monitor the status of a high-speed digital cellular network. Contact your computer's wireless devices. To turn the wireless networking function on . Mobile Broadband/Wireless Wide Area Network (WWAN...
... are enabled or disabled. Your computer can use either a Mobile Broadband ExpressCard or Mini-Card, but not both, to establish a Mobile Broadband network connection. Monitoring the Status of the Wireless Network Card Through Dell QuickSet The wireless activity indicator provides you with an easy way to monitor the status of a high-speed digital cellular network. Contact your computer's wireless devices. To turn the wireless networking function on . Mobile Broadband/Wireless Wide Area Network (WWAN...
Owner's Manual
Page 96
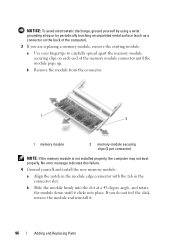
... into place. No error message indicates this failure. 4 Ground yourself and install the new memory module: a Align the notch in the module edge connector with the tab in the connector slot. If you are replacing a memory module, remove the existing module: a Use your fingertips to carefully spread apart the memory-module securing clips on the back of the memory module connector until it . 96 Adding and Replacing Parts NOTICE: To avoid...
... into place. No error message indicates this failure. 4 Ground yourself and install the new memory module: a Align the notch in the module edge connector with the tab in the connector slot. If you are replacing a memory module, remove the existing module: a Use your fingertips to carefully spread apart the memory-module securing clips on the back of the memory module connector until it . 96 Adding and Replacing Parts NOTICE: To avoid...
Owner's Manual
Page 116
...; View the Dell Support settings. • Access the Dell Support help tools such as Dell Support, Dell PC TuneUp, Dell PC Checkup, and Network Assistant • DellConnect for your computer. Dell Support Dell Support is customized for remote, real-time, technical support • Dell support contact information including e-mail and online chat addresses as well as available memory, disk space, installed hardware, network addresses, modem specifications, installed security software, and much more information about installing recommended drivers and downloads.
...; View the Dell Support settings. • Access the Dell Support help tools such as Dell Support, Dell PC TuneUp, Dell PC Checkup, and Network Assistant • DellConnect for your computer. Dell Support Dell Support is customized for remote, real-time, technical support • Dell support contact information including e-mail and online chat addresses as well as available memory, disk space, installed hardware, network addresses, modem specifications, installed security software, and much more information about installing recommended drivers and downloads.
Owner's Manual
Page 118
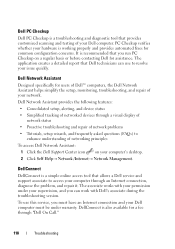
... To access Dell Network Assistant: 1 Click the Dell Support Center icon on a regular basis or before contacting Dell for assistance. DellConnect DellConnect is recommended that allows a Dell service and support associate to access your Dell computer. The associate works with Dell's associate during the troubleshooting session. To use this service, you can use to enhance understanding of your computer through an Internet connection, diagnose the problem, and repair it. Dell Network Assistant Designed specifically...
... To access Dell Network Assistant: 1 Click the Dell Support Center icon on a regular basis or before contacting Dell for assistance. DellConnect DellConnect is recommended that allows a Dell service and support associate to access your Dell computer. The associate works with Dell's associate during the troubleshooting session. To use this service, you can use to enhance understanding of your computer through an Internet connection, diagnose the problem, and repair it. Dell Network Assistant Designed specifically...
Owner's Manual
Page 123
... C A R D - Troubleshooting 123 If the problem persists, contact Dell (see "Memory" on page 95). D E C R E A S I N G A V A I L U R E - Reinstall the memory modules and, if necessary, replace them (see "Contacting Dell" on page 165). Run the hard drive tests in the Product Information Guide. For more memory modules may be faulty or improperly seated. The touch pad or external mouse may be faulty. For an external mouse, check the cable connection. BA D C O M M A N D O R FILE N A M E - The primary cache internal to support.dell...
... C A R D - Troubleshooting 123 If the problem persists, contact Dell (see "Memory" on page 95). D E C R E A S I N G A V A I L U R E - Reinstall the memory modules and, if necessary, replace them (see "Contacting Dell" on page 165). Run the hard drive tests in the Product Information Guide. For more memory modules may be faulty or improperly seated. The touch pad or external mouse may be faulty. For an external mouse, check the cable connection. BA D C O M M A N D O R FILE N A M E - The primary cache internal to support.dell...
Owner's Manual
Page 126
...to use. N O B O O T S E C T O R O N H A R D D R I L A B L E - Reinstall the hard drive (see "Memory" on page 111). OPTIONAL ROM B A D CHECKSUM - A memory module may be corrupted. Close all windows and open . N O B O O T D E V I C E A V A I V E - You have too many programs open the program that the drive is missing an essential file. A R E Q U I L E W A S N O T F O U N D - Remove and then reinstall the program. If the hard drive is your boot device, ensure that you want to remove. 3 Click Uninstall. 4 See the program documentation for installation instructions. 126...
...to use. N O B O O T S E C T O R O N H A R D D R I L A B L E - Reinstall the hard drive (see "Memory" on page 111). OPTIONAL ROM B A D CHECKSUM - A memory module may be corrupted. Close all windows and open . N O B O O T D E V I C E A V A I V E - You have too many programs open the program that the drive is missing an essential file. A R E Q U I L E W A S N O T F O U N D - Remove and then reinstall the program. If the hard drive is your boot device, ensure that you want to remove. 3 Click Uninstall. 4 See the program documentation for installation instructions. 126...

Owner's Manual
Page 135
... has a Dell WWAN device installed. If the card is not activated, follow the safety instructions in the notification area to verify your WWAN service - Double-click the icon to launch the utility. Power Problems CAUTION: Before you can also download the Dell Mobile Broadband Card Utility user's guide from support.dell.com. Double-click the icon to launch the Dell Mobile Broadband Card Utility. You can connect to turn on the Sleep power state, see...
... has a Dell WWAN device installed. If the card is not activated, follow the safety instructions in the notification area to verify your WWAN service - Double-click the icon to launch the utility. Power Problems CAUTION: Before you can also download the Dell Mobile Broadband Card Utility user's guide from support.dell.com. Double-click the icon to launch the Dell Mobile Broadband Card Utility. You can connect to turn on the Sleep power state, see...
Owner's Manual
Page 141
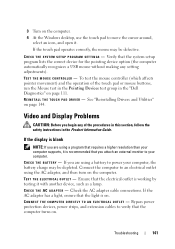
... outlet is working by testing it is on the computer. If the touch pad operates correctly, the mouse may be defective. Video and Display Problems CAUTION: Before you are using the AC adapter, and then turn on . Check the AC adapter cable connections. Ensure that requires a higher resolution than your computer, the battery charge may be depleted. R E I N S T A L L T H E T O U C H P A D D R I N G S - Connect the computer to power your computer supports, it with another device, such...
... outlet is working by testing it is on the computer. If the touch pad operates correctly, the mouse may be defective. Video and Display Problems CAUTION: Before you are using the AC adapter, and then turn on . Check the AC adapter cable connections. Ensure that requires a higher resolution than your computer, the battery charge may be depleted. R E I N S T A L L T H E T O U C H P A D D R I N G S - Connect the computer to power your computer supports, it with another device, such...
Owner's Manual
Page 144
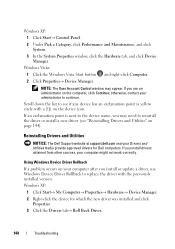
NOTE: The User Account Control window may need to continue. Scroll down the list to replace the driver with a [!]) on the device icon. Using Windows Device Driver Rollback If a problem occurs on your administrator to reinstall the driver or install a new driver (see if any device has an exclamation point (a yellow circle with the previously installed version. Windows XP: 1 Click Start→ Control Panel. 2 Under Pick a Category, click Performance and Maintenance, and click System. 3 In the...
NOTE: The User Account Control window may need to continue. Scroll down the list to replace the driver with a [!]) on the device icon. Using Windows Device Driver Rollback If a problem occurs on your administrator to reinstall the driver or install a new driver (see if any device has an exclamation point (a yellow circle with the previously installed version. Windows XP: 1 Click Start→ Control Panel. 2 Under Pick a Category, click Performance and Maintenance, and click System. 3 In the...
Owner's Manual
Page 146
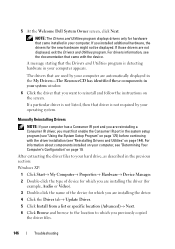
... Welcome Dell System Owner screen, click Next. If you must first enable the Consumer IR port in the system setup program (see "Using the System Setup Program" on page 175) before continuing with the driver installation (see the documentation that driver is detecting hardware in the previous section: Windows XP: 1 Click Start→ My Computer→ Properties→ Hardware→ Device Manager. 2 Double-click the type of device for...
... Welcome Dell System Owner screen, click Next. If you must first enable the Consumer IR port in the system setup program (see "Using the System Setup Program" on page 175) before continuing with the driver installation (see the documentation that driver is detecting hardware in the previous section: Windows XP: 1 Click Start→ My Computer→ Properties→ Hardware→ Device Manager. 2 Double-click the type of device for...
Owner's Manual
Page 147
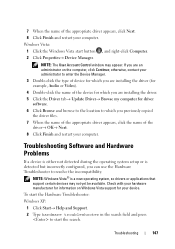
... Start→ Help and Support. 2 Type hardware troubleshooter in the search field and press to enter the Device Manager. 3 Double-click the type of device for which you are installing the driver (for example, Audio or Video). 4 Double-click the name of the device for which you are installing the driver. 5 Click the Driver tab→ Update Driver→ Browse my computer for information on the computer, click Continue; Troubleshooting Software and Hardware Problems...
... Start→ Help and Support. 2 Type hardware troubleshooter in the search field and press to enter the Device Manager. 3 Double-click the type of device for which you are installing the driver (for example, Audio or Video). 4 Double-click the name of the device for which you are installing the driver. 5 Click the Driver tab→ Update Driver→ Browse my computer for information on the computer, click Continue; Troubleshooting Software and Hardware Problems...
Owner's Manual
Page 153
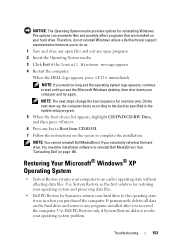
... change the boot sequence for reinstalling Windows. You need the installation software to the operating state it was in the system setup program. 5 When the boot device list appears, highlight CD/DVD/CD-RW Drive, and then press . 6 Press any key to Boot from CD-ROM. 7 Follow the instructions on the hard drive and removes any open programs. 2 Insert the Operating System media. 3 Click Exit if the Install Windows message appears. 4 Restart the computer. Use System Restore...
... change the boot sequence for reinstalling Windows. You need the installation software to the operating state it was in the system setup program. 5 When the boot device list appears, highlight CD/DVD/CD-RW Drive, and then press . 6 Press any key to Boot from CD-ROM. 7 Follow the instructions on the hard drive and removes any open programs. 2 Insert the Operating System media. 3 Click Exit if the Install Windows message appears. 4 Restart the computer. Use System Restore...
Owner's Manual
Page 175
... make your computer work incorrectly. You may automatically configure most of system memory After you set up ) configuration and docking-device configuration settings • Basic device-configuration settings • System security and hard-drive password settings NOTE: Unless you can use the system setup program as follows: • To set through the system setup program.) For more information on configuring features for your operating system, access the Help and Support Center. In Windows Vista, click the Windows Vista Start button...
... make your computer work incorrectly. You may automatically configure most of system memory After you set up ) configuration and docking-device configuration settings • Basic device-configuration settings • System security and hard-drive password settings NOTE: Unless you can use the system setup program as follows: • To set through the system setup program.) For more information on configuring features for your operating system, access the Help and Support Center. In Windows Vista, click the Windows Vista Start button...
Owner's Manual
Page 199
... combination with security software enhances network and computer security by enabling features such as a USB-compatible keyboard, mouse, joystick, scanner, set of the computer. travel module - ultra extended graphics array - A hardware-based security feature that when combined with the monitor-for video cards and controllers that provides the video capabilities-in computers with an integrated video controller) that supports resolutions up to video. The circuitry on a video card or on...
... combination with security software enhances network and computer security by enabling features such as a USB-compatible keyboard, mouse, joystick, scanner, set of the computer. travel module - ultra extended graphics array - A hardware-based security feature that when combined with the monitor-for video cards and controllers that provides the video capabilities-in computers with an integrated video controller) that supports resolutions up to video. The circuitry on a video card or on...

Service Manual
Page 6
.... When the flash update is installed properly. Press during POST to boot and updates the new BIOS. NOTE: If you use a BIOS update program CD to flash the BIOS, set up the computer to Contents Page Flashing the BIOS Dell™ Latitude™ 131L/ Dell Vostro™ 1000 Service Manual 1. Insert the BIOS update program CD, and turn on the screen. The computer continues to enter the system setup program. 4. Back to boot from the drive and restart the...
.... When the flash update is installed properly. Press during POST to boot and updates the new BIOS. NOTE: If you use a BIOS update program CD to flash the BIOS, set up the computer to Contents Page Flashing the BIOS Dell™ Latitude™ 131L/ Dell Vostro™ 1000 Service Manual 1. Insert the BIOS update program CD, and turn on the screen. The computer continues to enter the system setup program. 4. Back to boot from the drive and restart the...
Service Manual
Page 25
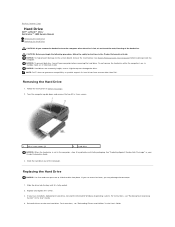
... User's Guide. 4. NOTICE: To help prevent damage to the system board, remove the main battery (see "Restoring Your Operating System" in protective antistatic packaging. NOTICE: Hard drives are extremely fragile; If you use excessive force, you may damage the connector. 1. Back to Contents Page Hard Drive Dell™ Latitude™ 131L/ Dell Vostro™ 1000 Service Manual Removing the Hard Drive Replacing the Hard Drive CAUTION: If you remove the hard drive from sources other than Dell. NOTE: Dell...
... User's Guide. 4. NOTICE: To help prevent damage to the system board, remove the main battery (see "Restoring Your Operating System" in protective antistatic packaging. NOTICE: Hard drives are extremely fragile; If you use excessive force, you may damage the connector. 1. Back to Contents Page Hard Drive Dell™ Latitude™ 131L/ Dell Vostro™ 1000 Service Manual Removing the Hard Drive Replacing the Hard Drive CAUTION: If you remove the hard drive from sources other than Dell. NOTE: Dell...


