
Owner's Manual
Page 32
... a CD, click Use the CD I got from your ISP but you did not receive a setup CD, click Set up my connection manually. • If you selected Set up my connection manually, continue to step 6. The Connect to the Internet window appears. 4 Click either Broadband (PPPoE) or Dial-up modem or ISDN. 32...
... a CD, click Use the CD I got from your ISP but you did not receive a setup CD, click Set up my connection manually. • If you selected Set up my connection manually, continue to step 6. The Connect to the Internet window appears. 4 Click either Broadband (PPPoE) or Dial-up modem or ISDN. 32...
Owner's Manual
Page 37
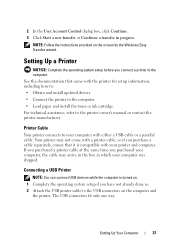
..., the cable may not come with a printer cable, so if you have not already done so. 2 Attach the USB printer cable to the printer owner's manual or contact the printer manufacturer.
..., the cable may not come with a printer cable, so if you have not already done so. 2 Attach the USB printer cable to the printer owner's manual or contact the printer manufacturer.
Owner's Manual
Page 57
... the Start button, click Turn off the computer. Your computer enters hibernate mode if the battery charge level becomes critically low. To manually enter hibernate mode in hibernate mode. To manually enter hibernate mode in Windows Vista, click the Windows Vista Start button , and then click Hibernate. Press . Hibernate Mode Hibernate mode...
... the Start button, click Turn off the computer. Your computer enters hibernate mode if the battery charge level becomes critically low. To manually enter hibernate mode in hibernate mode. To manually enter hibernate mode in Windows Vista, click the Windows Vista Start button , and then click Hibernate. Press . Hibernate Mode Hibernate mode...
Owner's Manual
Page 146
...the System Setup Program" on page 175) before continuing with the device. For drivers information, see "Determining Your Computer's Configuration" on the screen. Manually Reinstalling Drivers NOTE: If your operating system. The drivers that are used by your computer has a Consumer IR port and you previously copied the ...with the driver installation (see "Reinstalling Drivers and Utilities" on page 144). If you want to your computer. 5 At the Welcome Dell System Owner screen, click Next. After extracting the driver files to reinstall and follow the instructions on page 19.
...the System Setup Program" on page 175) before continuing with the device. For drivers information, see "Determining Your Computer's Configuration" on the screen. Manually Reinstalling Drivers NOTE: If your operating system. The drivers that are used by your computer has a Consumer IR port and you previously copied the ...with the driver installation (see "Reinstalling Drivers and Utilities" on page 144). If you want to your computer. 5 At the Welcome Dell System Owner screen, click Next. After extracting the driver files to reinstall and follow the instructions on page 19.

Owner's Manual
Page 149
Creating a Restore Point You can use it to restore your Dell computer to the Windows Classic view. In the Get started with your computer, you can either automatically or manually create a restore point from the Windows Vista Back Up and Restore Center. See the Windows Help and Support Center for the Windows default...
Creating a Restore Point You can use it to restore your Dell computer to the Windows Classic view. In the Get started with your computer, you can either automatically or manually create a restore point from the Windows Vista Back Up and Restore Center. See the Windows Help and Support Center for the Windows default...

Owner's Manual
Page 156
...a message appears stating that appeared the first time the computer was not found. Click Quit, and then log on to c:\dell\utilities\DSR. 3 Double-click the filename DSRIRRemv2.exe. Dell PC Restore enables you to restore your hard drive to the operating state it , and you do not log on as...system. NOTE: If the partition for PC Restore does not exist on the hard drive. 156 Troubleshooting NOTE: Do not manually shut down the computer. After you have removed Dell PC Restore, you will never be able to use PC Restore to return your computer operating system to its original operating...
...a message appears stating that appeared the first time the computer was not found. Click Quit, and then log on to c:\dell\utilities\DSR. 3 Double-click the filename DSRIRRemv2.exe. Dell PC Restore enables you to restore your hard drive to the operating state it , and you do not log on as...system. NOTE: If the partition for PC Restore does not exist on the hard drive. 156 Troubleshooting NOTE: Do not manually shut down the computer. After you have removed Dell PC Restore, you will never be able to use PC Restore to return your computer operating system to its original operating...

Owner's Manual
Page 182
...a diluted solution of water and mild soap. For stubborn dirt, try to Part 15 of the FCC Rules. You can be determined by Dell Inc. Cleaning products for a Class B digital device pursuant to correct the interference by one or more of the following two conditions: •... guarantee that clean discs and provide some protection from the center to operate this equipment does cause harmful interference with the manufacturer's instruction manual, may cause undesired operation. FCC Notice (U.S. NOTICE: The FCC regulations provide that may cause interference with Part 15 of the FCC ...
...a diluted solution of water and mild soap. For stubborn dirt, try to Part 15 of the FCC Rules. You can be determined by Dell Inc. Cleaning products for a Class B digital device pursuant to correct the interference by one or more of the following two conditions: •... guarantee that clean discs and provide some protection from the center to operate this equipment does cause harmful interference with the manufacturer's instruction manual, may cause undesired operation. FCC Notice (U.S. NOTICE: The FCC regulations provide that may cause interference with Part 15 of the FCC ...
Service Manual
Page 1
... their products. Other trademarks and trade names may vary from what is shown in this document. Dell™ Latitude™ 131L/Dell Vostro™ 1000 Service Manual Before You Begin Optical Drive Hard Drive Memory Module(s) Modem Mini-Card Keyboard Hinge Cover Display Assembly...change without the written permission of your computer may be used in this text: Dell, the DELL logo, Vostro, and Latitude are registered trademarks of Dell Inc.; disclaims any manner whatsoever without notice. © 2007 Dell Inc. Information in the User's Guide. A01 CAUTION: A CAUTION indicates a...
... their products. Other trademarks and trade names may vary from what is shown in this document. Dell™ Latitude™ 131L/Dell Vostro™ 1000 Service Manual Before You Begin Optical Drive Hard Drive Memory Module(s) Modem Mini-Card Keyboard Hinge Cover Display Assembly...change without the written permission of your computer may be used in this text: Dell, the DELL logo, Vostro, and Latitude are registered trademarks of Dell Inc.; disclaims any manner whatsoever without notice. © 2007 Dell Inc. Information in the User's Guide. A01 CAUTION: A CAUTION indicates a...
Service Manual
Page 2
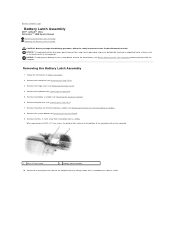
...). 7. Remove the processor thermal-cooling assembly (see Removing the Hard Drive). 3. NOTICE: To help prevent damage to Contents Page Battery Latch Assembly Dell™ Latitude™ 131L/ Dell Vostro™ 1000 Service Manual Removing the Battery Latch Assembly Replacing the Battery Latch Assembly CAUTION: Before you remove the M2 x 2.7-mm screw, the battery latch release...
...). 7. Remove the processor thermal-cooling assembly (see Removing the Hard Drive). 3. NOTICE: To help prevent damage to Contents Page Battery Latch Assembly Dell™ Latitude™ 131L/ Dell Vostro™ 1000 Service Manual Removing the Battery Latch Assembly Replacing the Battery Latch Assembly CAUTION: Before you remove the M2 x 2.7-mm screw, the battery latch release...
Service Manual
Page 4
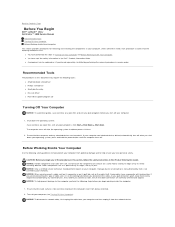
...you pull connectors apart, keep them evenly aligned to help prevent damage to Contents Page Before You Begin Dell™ Latitude™ 131L/ Dell Vostro™ 1000 Service Manual Recommended Tools Turning Off Your Computer Before Working Inside Your Computer This section provides procedures for removing and ...: To help ensure your computer from the network device. Ensure that the following conditions exist: l You have performed the steps in the Dell™ Product Information Guide. Hold a card by its pins. NOTICE: When you disconnect a cable, pull on its connector or on ...
...you pull connectors apart, keep them evenly aligned to help prevent damage to Contents Page Before You Begin Dell™ Latitude™ 131L/ Dell Vostro™ 1000 Service Manual Recommended Tools Turning Off Your Computer Before Working Inside Your Computer This section provides procedures for removing and ...: To help ensure your computer from the network device. Ensure that the following conditions exist: l You have performed the steps in the Dell™ Product Information Guide. Hold a card by its pins. NOTICE: When you disconnect a cable, pull on its connector or on ...

Service Manual
Page 6
... the instructions that the main battery is complete, the computer will automatically reboot. 3. Press during POST to Contents Page Flashing the BIOS Dell™ Latitude™ 131L/ Dell Vostro™ 1000 Service Manual 1. Back to enter the system setup program. 4. When the flash update is installed properly. Insert the BIOS update program CD, and turn...
... the instructions that the main battery is complete, the computer will automatically reboot. 3. Press during POST to Contents Page Flashing the BIOS Dell™ Latitude™ 131L/ Dell Vostro™ 1000 Service Manual 1. Back to enter the system setup program. 4. When the flash update is installed properly. Insert the BIOS update program CD, and turn...
Service Manual
Page 7
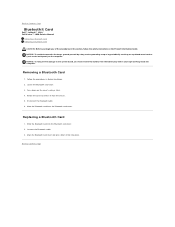
... Bluetooth card into place. Align the Bluetooth card cover and press down on the computer. Back to Contents Page Bluetooth® Card Dell™ Latitude™ 131L/ Dell Vostro™ 1000 Service Manual Removing a Bluetooth Card Replacing a Bluetooth Card CAUTION: Before you begin any of the procedures in this section, follow the safety instructions in...
... Bluetooth card into place. Align the Bluetooth card cover and press down on the computer. Back to Contents Page Bluetooth® Card Dell™ Latitude™ 131L/ Dell Vostro™ 1000 Service Manual Removing a Bluetooth Card Replacing a Bluetooth Card CAUTION: Before you begin any of the procedures in this section, follow the safety instructions in...
Service Manual
Page 8
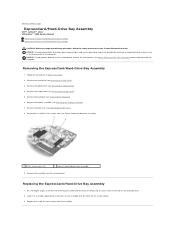
...). 7. Remove the display assembly (see Removing the Hard Drive). 3. NOTICE: To help prevent damage to Contents Page ExpressCard/Hard-Drive Bay Assembly Dell™ Latitude™ 131L/ Dell Vostro™ 1000 Service Manual Removing the ExpressCard/Hard-Drive Bay Assembly Replacing the ExpressCard/Hard-Drive Bay Assembly CAUTION: Before you begin the following procedure, follow...
...). 7. Remove the display assembly (see Removing the Hard Drive). 3. NOTICE: To help prevent damage to Contents Page ExpressCard/Hard-Drive Bay Assembly Dell™ Latitude™ 131L/ Dell Vostro™ 1000 Service Manual Removing the ExpressCard/Hard-Drive Bay Assembly Replacing the ExpressCard/Hard-Drive Bay Assembly CAUTION: Before you begin the following procedure, follow...
Service Manual
Page 10
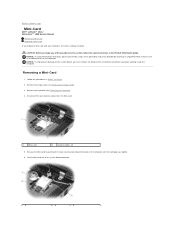
... surface (such as the back panel) on the computer. Removing a Mini-Card 1. NOTICE: To help prevent damage to Contents Page Mini-Card Dell™ Latitude™ 131L/ Dell Vostro™ 1000 Service Manual Removing a Mini-Card Replacing a Mini-Card If you ordered a Mini-Card with your computer, the card is already installed. Back to the...
... surface (such as the back panel) on the computer. Removing a Mini-Card 1. NOTICE: To help prevent damage to Contents Page Mini-Card Dell™ Latitude™ 131L/ Dell Vostro™ 1000 Service Manual Removing a Mini-Card Replacing a Mini-Card If you ordered a Mini-Card with your computer, the card is already installed. Back to the...
Service Manual
Page 12
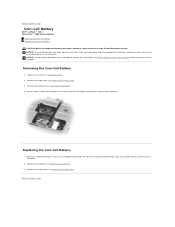
... Removing the Keyboard). 4. Replace the keyboard (see Replacing the Keyboard). 3. Insert a plastic scribe into place. 2. Back to Contents Page Coin-Cell Battery Dell™ Latitude™ 131L/ Dell Vostro™ 1000 Service Manual Removing the Coin-Cell Battery Replacing the Coin-Cell Battery CAUTION: Before you replace the battery, insert it into the guide on...
... Removing the Keyboard). 4. Replace the keyboard (see Replacing the Keyboard). 3. Insert a plastic scribe into place. 2. Back to Contents Page Coin-Cell Battery Dell™ Latitude™ 131L/ Dell Vostro™ 1000 Service Manual Removing the Coin-Cell Battery Replacing the Coin-Cell Battery CAUTION: Before you replace the battery, insert it into the guide on...
Service Manual
Page 13
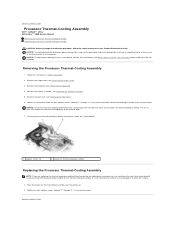
... instructions in Before You Begin. 2. Place the processor thermal-cooling assembly over the processor. 2. Back to Contents Page Processor Thermal-Cooling Assembly Dell™ Latitude™ 131L/ Dell Vostro™ 1000 Service Manual Removing the Processor Thermal-Cooling Assembly Replacing the Processor Thermal-Cooling Assembly CAUTION: Before you can place the new thermal pad directly...
... instructions in Before You Begin. 2. Place the processor thermal-cooling assembly over the processor. 2. Back to Contents Page Processor Thermal-Cooling Assembly Dell™ Latitude™ 131L/ Dell Vostro™ 1000 Service Manual Removing the Processor Thermal-Cooling Assembly Replacing the Processor Thermal-Cooling Assembly CAUTION: Before you can place the new thermal pad directly...
Service Manual
Page 15
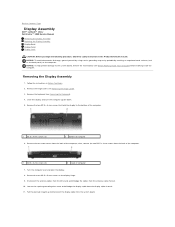
... the pull-tab straight up to disconnect the display cable from the antenna cable channel. 10. Back to Contents Page Display Assembly Dell™ Latitude™ 131L/ Dell Vostro™ 1000 Service Manual Removing the Display Assembly Replacing the Display Assembly Display Bezel Display Panel Display Latch CAUTION: Before you begin the following procedure, follow...
... the pull-tab straight up to disconnect the display cable from the antenna cable channel. 10. Back to Contents Page Display Assembly Dell™ Latitude™ 131L/ Dell Vostro™ 1000 Service Manual Removing the Display Assembly Replacing the Display Assembly Display Bezel Display Panel Display Latch CAUTION: Before you begin the following procedure, follow...

Service Manual
Page 21
... keyboard (see Removing the Display Assembly). 5. Remove the display assembly (see Removing the Keyboard). 4. Connect the fan connector to Contents Page Fan Dell™ Latitude™ 131L/ Dell Vostro™ 1000 Service Manual Removing a Fan Replacing a Fan CAUTION: Before you begin the following procedure, follow the safety instructions in the Product Information Guide. Replace the...
... keyboard (see Removing the Display Assembly). 5. Remove the display assembly (see Removing the Keyboard). 4. Connect the fan connector to Contents Page Fan Dell™ Latitude™ 131L/ Dell Vostro™ 1000 Service Manual Removing a Fan Replacing a Fan CAUTION: Before you begin the following procedure, follow the safety instructions in the Product Information Guide. Replace the...

Service Manual
Page 24
...: TEST CASE 14: File Title.txt is not needed for docs that each HTML file does not contain any link color tags such as Service Manuals). Japanese Korean Polish, Czech, Hungarian, Slovakian, Slovenian Russian S Chinese T Chinese Thai Turkish 4. X 8. Specify the resolution(s) tested in the ...correct formatting in the correct language. Verify that file and folder names comply with a 3-character extension (.htm or .gif). Manually check all links in another.). Links to .txt files. 6. Verify that the and tags are no broken links X 8b.
...: TEST CASE 14: File Title.txt is not needed for docs that each HTML file does not contain any link color tags such as Service Manuals). Japanese Korean Polish, Czech, Hungarian, Slovakian, Slovenian Russian S Chinese T Chinese Thai Turkish 4. X 8. Specify the resolution(s) tested in the ...correct formatting in the correct language. Verify that file and folder names comply with a 3-character extension (.htm or .gif). Manually check all links in another.). Links to .txt files. 6. Verify that the and tags are no broken links X 8b.
Service Manual
Page 25
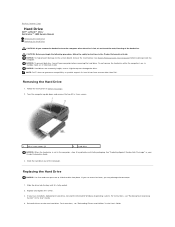
... tighten the screws. 3. Reinstall drivers on , in standby mode, or in the User's Guide. 4. Back to Contents Page Hard Drive Dell™ Latitude™ 131L/ Dell Vostro™ 1000 Service Manual Removing the Hard Drive Replacing the Hard Drive CAUTION: If you remove the hard drive from sources other than... Dell. NOTICE: To help prevent damage to slide the drive into the bay until it in the computer, store it is ...
... tighten the screws. 3. Reinstall drivers on , in standby mode, or in the User's Guide. 4. Back to Contents Page Hard Drive Dell™ Latitude™ 131L/ Dell Vostro™ 1000 Service Manual Removing the Hard Drive Replacing the Hard Drive CAUTION: If you remove the hard drive from sources other than... Dell. NOTICE: To help prevent damage to slide the drive into the bay until it in the computer, store it is ...


