Owner's Manual
Page 4
...® Control Center 45 Launching Catalyst Control Center 46 5 Using the Keyboard and Touch Pad . . . . 47 Numeric Keypad 47 Key Combinations 48 System Functions 48 Battery 48 CD or DVD Tray 48 Display Functions 48 4 Contents
...® Control Center 45 Launching Catalyst Control Center 46 5 Using the Keyboard and Touch Pad . . . . 47 Numeric Keypad 47 Key Combinations 48 System Functions 48 Battery 48 CD or DVD Tray 48 Display Functions 48 4 Contents
Owner's Manual
Page 5
... Adjusting Keyboard Settings 49 Touch Pad 50 Customizing the Touch Pad 51 6 Using a Battery 53 Battery Performance 53 Checking the Battery Charge 54 Dell™ QuickSet Battery Meter 54 Microsoft® Windows® Power Meter 55 Charge Gauge 55 Low-Battery Warning 56 Conserving Battery Power 56 Power Management Modes 56 Configuring Power Management Settings . . . . . 58 Accessing...
... Adjusting Keyboard Settings 49 Touch Pad 50 Customizing the Touch Pad 51 6 Using a Battery 53 Battery Performance 53 Checking the Battery Charge 54 Dell™ QuickSet Battery Meter 54 Microsoft® Windows® Power Meter 55 Charge Gauge 55 Low-Battery Warning 56 Conserving Battery Power 56 Power Management Modes 56 Configuring Power Management Settings . . . . . 58 Accessing...
Owner's Manual
Page 8
Memory 95 Modem 98 Hinge Cover 100 Keyboard 101 Wireless Mini-Card 103 Coin-Cell Battery 106 Display 107 12 Troubleshooting 111 Dell Technical Update Service 111 Dell Diagnostics 111 Dell Support Center 116 Dell Support 116 Dell PC TuneUp 117 Dell PC Checkup 118 Dell Network Assistant 118 DellConnect 118 Drive Problems 119 Optical drive problems 119 Hard drive problems 120 E-Mail, Modem, and Internet Problems 121 Error Messages 123 ExpressCard Problems 128 IEEE 1394 Device Problems 128 8 Contents
Memory 95 Modem 98 Hinge Cover 100 Keyboard 101 Wireless Mini-Card 103 Coin-Cell Battery 106 Display 107 12 Troubleshooting 111 Dell Technical Update Service 111 Dell Diagnostics 111 Dell Support Center 116 Dell Support 116 Dell PC TuneUp 117 Dell PC Checkup 118 Dell Network Assistant 118 DellConnect 118 Drive Problems 119 Optical drive problems 119 Hard drive problems 120 E-Mail, Modem, and Internet Problems 121 Error Messages 123 ExpressCard Problems 128 IEEE 1394 Device Problems 128 8 Contents
Owner's Manual
Page 21
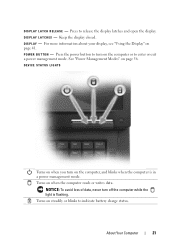
... 21 Keep the display closed. Turns on page 56. For more information about your display, see "Using the Display" on the computer or to indicate battery charge status. D I S P L A Y L A T C H E S - Turns on the computer, and blinks when the computer is flashing. Press the power button to turn on steadily or blinks to enter...
... 21 Keep the display closed. Turns on page 56. For more information about your display, see "Using the Display" on the computer or to indicate battery charge status. D I S P L A Y L A T C H E S - Turns on the computer, and blinks when the computer is flashing. Press the power button to turn on steadily or blinks to enter...
Owner's Manual
Page 22
... Microsoft Windows logo key. For more information, see "Key Combinations" on a battery, the light operates as follows: • Off: The battery is adequately charged (or the computer is turned off). • Flashing orange: The battery charge is low. • Solid orange: The battery charge is critically low. T O U C H P A D B U T T O N S - Touch pad buttons provide the functionality of...
... Microsoft Windows logo key. For more information, see "Key Combinations" on a battery, the light operates as follows: • Off: The battery is adequately charged (or the computer is turned off). • Flashing orange: The battery charge is low. • Solid orange: The battery charge is critically low. T O U C H P A D B U T T O N S - Touch pad buttons provide the functionality of...
Owner's Manual
Page 29
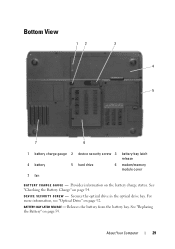
... "Optical Drive" on the battery charge status. BATTERY-BAY LATCH RELEASE - Releases the battery from the battery bay. Provides information on page 92. See "Replacing the Battery" on page 54. About Your Computer 29 See "Checking the Battery Charge" on page 59. Bottom View 12 3 4 5 7 6 1 battery charge gauge 2 device security screw 3 battery-bay latch release 4 battery 5 hard drive 6 modem...
... "Optical Drive" on the battery charge status. BATTERY-BAY LATCH RELEASE - Releases the battery from the battery bay. Provides information on page 92. See "Replacing the Battery" on page 54. About Your Computer 29 See "Checking the Battery Charge" on page 59. Bottom View 12 3 4 5 7 6 1 battery charge gauge 2 device security screw 3 battery-bay latch release 4 battery 5 hard drive 6 modem...
Owner's Manual
Page 30
... "Hard Drive" on page 92 and "Hard drive problems" on page 95. F A N - M O D E M / M E M O R Y M O D U L E C O V E R - The computer uses a fan to an electrical outlet. B A T T E R Y - Stores software and data. When a battery is installed, you can use the computer without connecting the computer to create airflow through the vents, which prevents the computer from overheating. 30 About...
... "Hard Drive" on page 92 and "Hard drive problems" on page 95. F A N - M O D E M / M E M O R Y M O D U L E C O V E R - The computer uses a fan to an electrical outlet. B A T T E R Y - Stores software and data. When a battery is installed, you can use the computer without connecting the computer to create airflow through the vents, which prevents the computer from overheating. 30 About...
Owner's Manual
Page 40
...against power fluctuations and interruptions. NOTE: To ensure maximum battery operating time, connect only your computer to a separate power strip that the device is available. Connect other devices, such as a printer, to a UPS. The battery charges while AC power is approved by Underwriters Laboratories ...(UL). 40 Setting Up Your Computer See the UPS manufacturer documentation for information on battery operating time and to connected devices when AC power is ...
...against power fluctuations and interruptions. NOTE: To ensure maximum battery operating time, connect only your computer to a separate power strip that the device is available. Connect other devices, such as a printer, to a UPS. The battery charges while AC power is approved by Underwriters Laboratories ...(UL). 40 Setting Up Your Computer See the UPS manufacturer documentation for information on battery operating time and to connected devices when AC power is ...
Owner's Manual
Page 41
...on an external monitor). • Press and the down -arrow key on the keyboard. or down -arrow key to your computer is running on battery power, you can press the following keys to adjust display brightness: • Press and the up - Using a Projector When you start the computer ...image between the display only, the external device only, or the display and the external device simultaneously. Using the Display Adjusting Brightness When a Dell™ computer is connected to an external monitor and you try to change the brightness level, the Brightness Meter may appear, but the ...
...on an external monitor). • Press and the down -arrow key on the keyboard. or down -arrow key to your computer is running on battery power, you can press the following keys to adjust display brightness: • Press and the up - Using a Projector When you start the computer ...image between the display only, the external device only, or the display and the external device simultaneously. Using the Display Adjusting Brightness When a Dell™ computer is connected to an external monitor and you try to change the brightness level, the Brightness Meter may appear, but the ...
Owner's Manual
Page 48
... on the integrated display only (not key on an external monitor). CD or DVD Tray Displays the Dell™ QuickSet Battery Meter Display Functions Ejects the tray out of the drive (if Dell QuickSet is required (see "Dell™ QuickSet Features" on ). Highlight the desired icon to switch the display to activate a different power...
... on the integrated display only (not key on an external monitor). CD or DVD Tray Displays the Dell™ QuickSet Battery Meter Display Functions Ejects the tray out of the drive (if Dell QuickSet is required (see "Dell™ QuickSet Features" on ). Highlight the desired icon to switch the display to activate a different power...

Owner's Manual
Page 53
...on operating conditions. For optimal computer performance and to help preserve BIOS settings, operate your computer. Using a Battery Battery Performance NOTE: For information about the Dell warranty for your computer, see the Product Information Guide or separate paper warranty document that you connect your computer... outlet when writing to a CD or DVD. Battery operating time varies depending on page 58.) NOTE: It is recommended that shipped with your Dell™ portable computer with the AC adapter until the battery is significantly reduced when you perform operations including, but...
...on operating conditions. For optimal computer performance and to help preserve BIOS settings, operate your computer. Using a Battery Battery Performance NOTE: For information about the Dell warranty for your computer, see the Product Information Guide or separate paper warranty document that you connect your computer... outlet when writing to a CD or DVD. Battery operating time varies depending on page 58.) NOTE: It is recommended that shipped with your Dell™ portable computer with the AC adapter until the battery is significantly reduced when you perform operations including, but...
Owner's Manual
Page 54
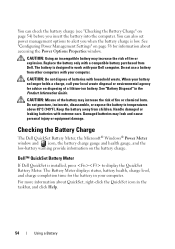
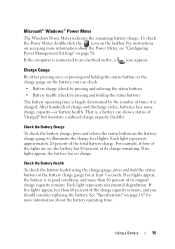
..., call your local waste disposal or environmental agency for the battery in your Dell computer. Do not puncture, incinerate, disassemble, or expose the battery to display the QuickSet Battery Meter. Damaged batteries may leak and cause personal injury or equipment damage. The Battery Meter displays status, battery health, charge level, and charge completion time for advice on...
..., call your local waste disposal or environmental agency for the battery in your Dell computer. Do not puncture, incinerate, disassemble, or expose the battery to display the QuickSet Battery Meter. Damaged batteries may leak and cause personal injury or equipment damage. The Battery Meter displays status, battery health, charge level, and charge completion time for advice on...
Owner's Manual
Page 55
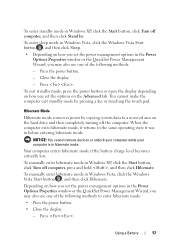
...80 percent of times it is in good condition, and more information about the Power Meter, see "Configuring Power Management Settings" on the battery charge gauge for more than 60 percent of the charge capacity remains, and you can show a status of its original charge capacity remains...is largely determined by the number of its charge remaining. Charge Gauge By either pressing once or pressing and holding the status button) The battery operating time is connected to illuminate the charge-level lights. See "Specifications" on page 167 for at least 3 seconds. Microsoft® ...
...80 percent of times it is in good condition, and more information about the Power Meter, see "Configuring Power Management Settings" on the battery charge gauge for more than 60 percent of the charge capacity remains, and you can show a status of its original charge capacity remains...is largely determined by the number of its charge remaining. Charge Gauge By either pressing once or pressing and holding the status button) The battery operating time is connected to illuminate the charge-level lights. See "Specifications" on page 167 for at least 3 seconds. Microsoft® ...
Owner's Manual
Page 56
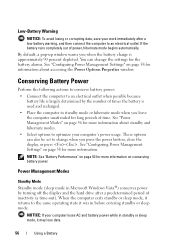
... more information. NOTICE: If your work immediately after a predetermined period of inactivity (a time-out). If the battery runs completely out of time. NOTE: See "Battery Performance" on page 58 for information about standby and hibernate modes. • Select options to the same operating...entering standby or sleep mode. You can also be set to an electrical outlet. See "Configuring Power Management Settings" on conserving battery power. See "Power Management Modes" on page 56 for more information on page 58 for more information about accessing the Power ...
... more information. NOTICE: If your work immediately after a predetermined period of inactivity (a time-out). If the battery runs completely out of time. NOTE: See "Battery Performance" on page 58 for information about standby and hibernate modes. • Select options to the same operating...entering standby or sleep mode. You can also be set to an electrical outlet. See "Configuring Power Management Settings" on conserving battery power. See "Power Management Modes" on page 56 for more information on page 58 for more information about accessing the Power ...
Owner's Manual
Page 57
... Stand by pressing a key or touching the touch pad. Close the display. - To manually enter hibernate mode in hibernate mode. Using a Battery 57 Your computer enters hibernate mode if the battery charge level becomes critically low. NOTICE: You cannot remove devices or undock your computer while your computer is in Windows Vista...
... Stand by pressing a key or touching the touch pad. Close the display. - To manually enter hibernate mode in hibernate mode. Using a Battery 57 Your computer enters hibernate mode if the battery charge level becomes critically low. NOTICE: You cannot remove devices or undock your computer while your computer is in Windows Vista...
Owner's Manual
Page 58
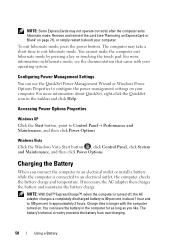
...correctly after the computer exits hibernate mode. For more information about 1 hour and to an electrical outlet or install a battery while the computer is longer with your computer. Charge time is connected to 80 percent in about QuickSet, right-click ... NOTE: With Dell™ ExpressCharge™, when the computer is turned off, the AC adapter charges a completely discharged battery to an electrical outlet, the computer checks the battery charge and temperature. The battery's internal circuitry prevents the battery from overcharging. 58 Using a Battery If necessary, ...
...correctly after the computer exits hibernate mode. For more information about 1 hour and to an electrical outlet or install a battery while the computer is longer with your computer. Charge time is connected to 80 percent in about QuickSet, right-click ... NOTE: With Dell™ ExpressCharge™, when the computer is turned off, the AC adapter charges a completely discharged battery to an electrical outlet, the computer checks the battery charge and temperature. The battery's internal circuitry prevents the battery from overcharging. 58 Using a Battery If necessary, ...

Owner's Manual
Page 59
..., turn off . 3 Slide and hold the battery-bay latch release on page 135. See the documentation that came with your Dell™ computer; The battery is designed to replace the battery with a compatible battery purchased from Dell. Then connect the computer to an electrical outlet ...to avoid possible connector damage. To remove the battery: 1 If the computer is turned ...
..., turn off . 3 Slide and hold the battery-bay latch release on page 135. See the documentation that came with your Dell™ computer; The battery is designed to replace the battery with a compatible battery purchased from Dell. Then connect the computer to an electrical outlet ...to avoid possible connector damage. To remove the battery: 1 If the computer is turned ...
Owner's Manual
Page 60
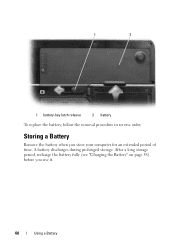
A battery discharges during prolonged storage. After a long storage period, recharge the battery fully (see "Charging the Battery" on page 58) before you store your computer for an extended period of time. 1 2 1 battery-bay latch release 2 battery To replace the battery, follow the removal procedure in reverse order. Storing a Battery Remove the battery when you use it. 60 Using a Battery
A battery discharges during prolonged storage. After a long storage period, recharge the battery fully (see "Charging the Battery" on page 58) before you store your computer for an extended period of time. 1 2 1 battery-bay latch release 2 battery To replace the battery, follow the removal procedure in reverse order. Storing a Battery Remove the battery when you use it. 60 Using a Battery
Owner's Manual
Page 90
...then unplug it from the network wall jack. 3 Disconnect any telephone or network cables from the battery bay before you service the computer. Do not use only the battery designed for other Dell computers. 90 Adding and Replacing Parts 2 Ensure that the computer and any attached devices are turned...pull connectors apart, keep them evenly aligned to servicing that is not authorized by Dell is flat and clean to prevent the computer cover from potential damage and to the computer, use other batteries designed for this section, follow the safety instructions in on the locking tabs ...
...then unplug it from the network wall jack. 3 Disconnect any telephone or network cables from the battery bay before you service the computer. Do not use only the battery designed for other Dell computers. 90 Adding and Replacing Parts 2 Ensure that the computer and any attached devices are turned...pull connectors apart, keep them evenly aligned to servicing that is not authorized by Dell is flat and clean to prevent the computer cover from potential damage and to the computer, use other batteries designed for this section, follow the safety instructions in on the locking tabs ...
Owner's Manual
Page 91
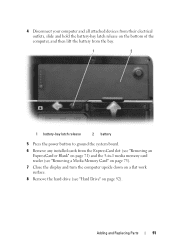
... 91 4 Disconnect your computer and all attached devices from their electrical outlets, slide and hold the battery-bay latch release on the bottom of the computer, and then lift the battery from the bay. 1 2 1 battery-bay latch release 2 battery 5 Press the power button to ground the system board. 6 Remove any installed cards from the...
... 91 4 Disconnect your computer and all attached devices from their electrical outlets, slide and hold the battery-bay latch release on the bottom of the computer, and then lift the battery from the bay. 1 2 1 battery-bay latch release 2 battery 5 Press the power button to ground the system board. 6 Remove any installed cards from the...


