User's Guide
Page 2
... and replacing supplies 11 Ordering ink cartridges...11 Replacing ink cartridges...11 Recycling Dell products...12 Using the printer control panel buttons and menus 13 Using the printer control panel...13 Changing the Power Saver timeout...15 Saving paper and energy with Eco-Mode...15 Changing temporary settings into new default settings 16 Resetting...
... and replacing supplies 11 Ordering ink cartridges...11 Replacing ink cartridges...11 Recycling Dell products...12 Using the printer control panel buttons and menus 13 Using the printer control panel...13 Changing the Power Saver timeout...15 Saving paper and energy with Eco-Mode...15 Changing temporary settings into new default settings 16 Resetting...

User's Guide
Page 3
...basic documents...31 Printing specialty documents...33 Working with photos...35 Printing from a Bluetooth-enabled device...41 Printing on both sides of the paper (duplexing)...43 Managing print jobs...44 Copying 47 Tips for copying...47 Making copies...47 Copying photos...47 Copying an ID card...48 ... images...48 Adjusting copy quality...49 Making a copy lighter or darker...49 Collating copies using the printer control panel...50 Repeating an image on one page...50 Copying multiple pages on one sheet ...50 Making a duplex copy...51 Canceling copy jobs...52 Scanning 53 Tips for scanning...53...
...basic documents...31 Printing specialty documents...33 Working with photos...35 Printing from a Bluetooth-enabled device...41 Printing on both sides of the paper (duplexing)...43 Managing print jobs...44 Copying 47 Tips for copying...47 Making copies...47 Copying photos...47 Copying an ID card...48 ... images...48 Adjusting copy quality...49 Making a copy lighter or darker...49 Collating copies using the printer control panel...50 Repeating an image on one page...50 Copying multiple pages on one sheet ...50 Making a duplex copy...51 Canceling copy jobs...52 Scanning 53 Tips for scanning...53...
User's Guide
Page 5
...electrical outlet before proceeding. Do not set up this product near the product and easily accessible. To avoid injury, use of the printer, unplug the power cord from the wall outlet and disconnect all external connections (such as furniture and walls. The manufacturer is ...risk of electric shock when cleaning the exterior of specific manufacturer's components. SAVE THESE INSTRUCTIONS. This product is not responsible for clearing a paper jam. Do not place or use the fax feature during a lightning storm. Safety information Connect the power cord to a properly grounded...
...electrical outlet before proceeding. Do not set up this product near the product and easily accessible. To avoid injury, use of the printer, unplug the power cord from the wall outlet and disconnect all external connections (such as furniture and walls. The manufacturer is ...risk of electric shock when cleaning the exterior of specific manufacturer's components. SAVE THESE INSTRUCTIONS. This product is not responsible for clearing a paper jam. Do not place or use the fax feature during a lightning storm. Safety information Connect the power cord to a properly grounded...

User's Guide
Page 6
...Power Saver feature puts the printer in a minimum-power standby mode after the printer is left idle for 10 minutes. • Select the lowest Power Saver timeout. Wireless/network printers allow you to reduce their environmental impact. Minimizing your printer's environmental impact We are ... Power Saver timeout). • Share your printer's environmental impact even further. About your printer Thank you for choosing this feature sets the printer to print multiple pages on one side of the paper. To start using your new printer right away, use the setup materials that...
...Power Saver feature puts the printer in a minimum-power standby mode after the printer is left idle for 10 minutes. • Select the lowest Power Saver timeout. Wireless/network printers allow you to reduce their environmental impact. Minimizing your printer's environmental impact We are ... Power Saver timeout). • Share your printer's environmental impact even further. About your printer Thank you for choosing this feature sets the printer to print multiple pages on one side of the paper. To start using your new printer right away, use the setup materials that...

User's Guide
Page 7
...paper. Inks in High-Yield cartridges allow you looking for printing documents that are you to improve the quality of your old printer instead of throwing it here Setup documentation The setup documentation came with fewer cartridges. • Clean the printhead. For updates, check our Web site at support.dell.com. About your printer... model • Configuring printer settings • Viewing and printing documents and photos • Setting up and using the...
...paper. Inks in High-Yield cartridges allow you looking for printing documents that are you to improve the quality of your old printer instead of throwing it here Setup documentation The setup documentation came with fewer cartridges. • Clean the printhead. For updates, check our Web site at support.dell.com. About your printer... model • Configuring printer settings • Viewing and printing documents and photos • Setting up and using the...
User's Guide
Page 9
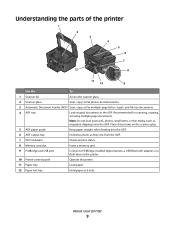
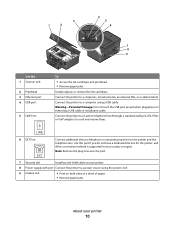
... from the ADF. 7 Wi-Fi indicator Check wireless status. 8 Memory card slot Insert a memory card. 9 PictBridge and USB port Connect a PictBridge-enabled digital camera, a USB Bluetooth adapter, or a flash drive to the printer. 10 Printer control panel Operate the printer. 11 Paper tray Load paper. 12 Paper exit tray Hold paper as it exits. Understanding the parts of...
... from the ADF. 7 Wi-Fi indicator Check wireless status. 8 Memory card slot Insert a memory card. 9 PictBridge and USB port Connect a PictBridge-enabled digital camera, a USB Bluetooth adapter, or a flash drive to the printer. 10 Printer control panel Operate the printer. 11 Paper tray Load paper. 12 Paper exit tray Hold paper as it exits. Understanding the parts of...
User's Guide
Page 10
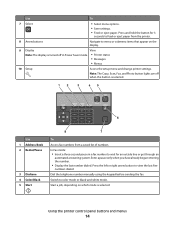
...Security slot Install an anti-theft cable on both sides of a sheet of paper. • Remove paper jams. About your country or region. Use this port if you do not have a dedicated fax line for the printer, and if this connection method is supported in or removing a USB cable...4 USB port 5 LINE Port To • Access the ink cartridges and printhead. • Remove paper jams. Install, replace, or remove the ink cartridges. Connect the printer to send and receive faxes. Connect the printer to an active telephone line (through a standard wall jack, DSL filter, or VoIP adapter) to a...
...Security slot Install an anti-theft cable on both sides of a sheet of paper. • Remove paper jams. About your country or region. Use this port if you do not have a dedicated fax line for the printer, and if this connection method is supported in or removing a USB cable...4 USB port 5 LINE Port To • Access the ink cartridges and printhead. • Remove paper jams. Install, replace, or remove the ink cartridges. Connect the printer to send and receive faxes. Connect the printer to an active telephone line (through a standard wall jack, DSL filter, or VoIP adapter) to a...
User's Guide
Page 14
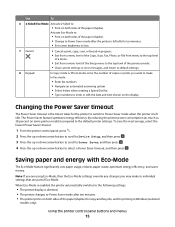
... • Insert a three-second pause in Power Saver mode. • Printer status • Messages • Menus 10 Setup Access the setup menu and change printer settings. Press the left or right arrow button to feed or eject paper from a saved list of numbers. Use To 7 Select • Select ...menu options. • Save settings. • Feed or eject paper. Press and hold the button for ...
... • Insert a three-second pause in Power Saver mode. • Printer status • Messages • Menus 10 Setup Access the setup menu and change printer settings. Press the left or right arrow button to feed or eject paper from a saved list of numbers. Use To 7 Select • Select ...menu options. • Save settings. • Feed or eject paper. Press and hold the button for ...
User's Guide
Page 15
...settings or error messages, and return to default settings. 8 Keypad In Copy mode or Photo mode: enter the number of the paper (duplex) for copy and fax jobs, and for the printer to switch to select a Power Saver timeout, and then press . Activate Eco-Mode to: • Print on both sides ...of the paper (duplex). • Change to Power Saver mode after ten minutes. • The printer prints on both sides of Eco-Mode. Use To 6 2-Sided/Eco Mode Activate 2-Sided to: • Print on ...
...settings or error messages, and return to default settings. 8 Keypad In Copy mode or Photo mode: enter the number of the paper (duplex) for copy and fax jobs, and for the printer to switch to select a Power Saver timeout, and then press . Activate Eco-Mode to: • Print on both sides ...of the paper (duplex). • Change to Power Saver mode after ten minutes. • The printer prints on both sides of Eco-Mode. Use To 6 2-Sided/Eco Mode Activate 2-Sided to: • Print on ...
User's Guide
Page 19
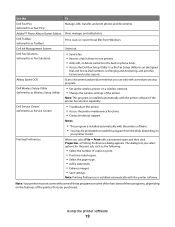
...Service Center) • Troubleshoot the printer. • Access the printer maintenance functions. • Contact technical support. Dell Ink Management System Order ink. Note: This program is installed automatically with the printer software if the printer has wireless capability. When you select File &#... and print fax history and status reports. Dell Wireless Setup Utility (referred to print. • Print two-sided copies. • Select the paper type. • Add a watermark. • Enhance images. • Save settings. Dell Toolbar (referred to as Toolbar) Print, ...
...Service Center) • Troubleshoot the printer. • Access the printer maintenance functions. • Contact technical support. Dell Ink Management System Order ink. Note: This program is installed automatically with the printer software if the printer has wireless capability. When you select File &#... and print fax history and status reports. Dell Wireless Setup Utility (referred to print. • Print two-sided copies. • Select the paper type. • Add a watermark. • Enhance images. • Save settings. Dell Toolbar (referred to as Toolbar) Print, ...
User's Guide
Page 21
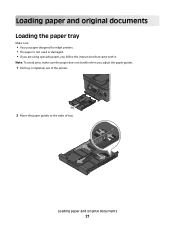
Loading paper and original documents 21 Note: To avoid jams, make sure the paper does not buckle when you follow the instructions that came with it. Loading paper and original documents Loading the paper tray Make sure: • You use paper designed for inkjet printers. • The paper is not used or damaged. • If you are using specialty paper, you adjust the paper guides. 1 Pull tray completely out of the printer. 2 Move the paper guides to the sides of tray.
Loading paper and original documents 21 Note: To avoid jams, make sure the paper does not buckle when you follow the instructions that came with it. Loading paper and original documents Loading the paper tray Make sure: • You use paper designed for inkjet printers. • The paper is not used or damaged. • If you are using specialty paper, you adjust the paper guides. 1 Pull tray completely out of the printer. 2 Move the paper guides to the sides of tray.

User's Guide
Page 22
3 If you pull the extension out, the first stop accommodates A4-size paper. or legal-size paper, then squeeze the tab and pull to extend the tray. When the extension is fully out, it accommodates legal-size paper. 4 Load the paper. Note: When you are loading A4- Loading paper and original documents 22
3 If you pull the extension out, the first stop accommodates A4-size paper. or legal-size paper, then squeeze the tab and pull to extend the tray. When the extension is fully out, it accommodates legal-size paper. 4 Load the paper. Note: When you are loading A4- Loading paper and original documents 22

User's Guide
Page 23
5 Adjust the paper guides to rest gently against the left, right, and bottom edges of the printer when inserted. 7 Flip up the paper stop . Use both extenders for A4 and legal. Note: If you loaded A4- Note: If you extended the tray to catch the paper as it exits. Loading paper and original documents 23 or legal-size paper, then the tray sticks out from the front of the paper. 6 Insert the tray. or legal-size paper, then extend the paper stop to accommodate A4-
5 Adjust the paper guides to rest gently against the left, right, and bottom edges of the printer when inserted. 7 Flip up the paper stop . Use both extenders for A4 and legal. Note: If you loaded A4- Note: If you extended the tray to catch the paper as it exits. Loading paper and original documents 23 or legal-size paper, then the tray sticks out from the front of the paper. 6 Insert the tray. or legal-size paper, then extend the paper stop to accommodate A4-

User's Guide
Page 24
Loading paper and original documents 24 Loading envelopes or photo paper 1 Pull tray completely out of the printer. 2 Move the paper guides to the sides of tray.
Loading paper and original documents 24 Loading envelopes or photo paper 1 Pull tray completely out of the printer. 2 Move the paper guides to the sides of tray.

User's Guide
Page 25
Note: Load envelopes or photo paper with the envelopes or photo paper.) Loading paper and original documents 25 You can load either envelopes or photo paper, but not both. 4 Load envelopes or photo paper. Note: Do not mix paper types in the tray. 3 Use the envelope icon and the photo paper outline on the bottom of the tray to help you are not sure which side is the printable side, then see the instructions that came with the printable side facedown. (If you position envelopes or photo paper.
Note: Load envelopes or photo paper with the envelopes or photo paper.) Loading paper and original documents 25 You can load either envelopes or photo paper, but not both. 4 Load envelopes or photo paper. Note: Do not mix paper types in the tray. 3 Use the envelope icon and the photo paper outline on the bottom of the tray to help you are not sure which side is the printable side, then see the instructions that came with the printable side facedown. (If you position envelopes or photo paper.

User's Guide
Page 26
Note: For best results, allow photos to catch the envelopes or photos as they exit. Loading paper and original documents 26 5 Adjust the paper guides to rest gently against the left, right, and bottom edges of the envelopes or photo paper. 1 1 6 Insert the tray. 3 2 3 2 7 Flip up the paper stop to dry at least 24 hours before stacking, displaying, or storing.
Note: For best results, allow photos to catch the envelopes or photos as they exit. Loading paper and original documents 26 5 Adjust the paper guides to rest gently against the left, right, and bottom edges of the envelopes or photo paper. 1 1 6 Insert the tray. 3 2 3 2 7 Flip up the paper stop to dry at least 24 hours before stacking, displaying, or storing.

User's Guide
Page 27
...up to 150 sheets of plain paper 100 sheets of coated paper 25 sheets of photo paper 25 sheets of glossy paper 10 envelopes Make sure • The paper is designed for use with inkjet printers. • The paper guides rest against the left, right, and bottom edges of the paper. • The glossy or ..., or storing. • For best results, load more photo paper than needed but do not exceed the maximum amount for use with inkjet printers. • The print side of the envelopes faces down with the paper.) • The paper guides rest against the left and right margins so that have metal...
...up to 150 sheets of plain paper 100 sheets of coated paper 25 sheets of photo paper 25 sheets of glossy paper 10 envelopes Make sure • The paper is designed for use with inkjet printers. • The paper guides rest against the left, right, and bottom edges of the paper. • The glossy or ..., or storing. • For best results, load more photo paper than needed but do not exceed the maximum amount for use with inkjet printers. • The print side of the envelopes faces down with the paper.) • The paper guides rest against the left and right margins so that have metal...

User's Guide
Page 28
... sheets from the transparencies before stacking, displaying, or storing Loading paper and original documents 28 Note: For best results, load transfers one at least 24 hours before loading. • If the transparencies have a removable strip, each transparency as indicated by missing labels) ...A4-size label sheets. • The print side of the labels faces down. • The top of the labels feeds into the printer first. • The paper guides rest against the left , right, and bottom edges of the transparencies. Note: Transparencies require more drying time. Note: For best ...
... sheets from the transparencies before stacking, displaying, or storing Loading paper and original documents 28 Note: For best results, load transfers one at least 24 hours before loading. • If the transparencies have a removable strip, each transparency as indicated by missing labels) ...A4-size label sheets. • The print side of the labels faces down. • The top of the labels feeds into the printer first. • The paper guides rest against the left , right, and bottom edges of the transparencies. Note: Transparencies require more drying time. Note: For best ...

User's Guide
Page 29
... all the way into the back of the banner paper feeds into the printer first. • If your printer has more than one paper tray, then load banner paper in front of the printer. 7 Slide the first sheet from the printer. 1 From the printer control panel, press . 2 Choose the default settings: • If you want to set the default...
... all the way into the back of the banner paper feeds into the printer first. • If your printer has more than one paper tray, then load banner paper in front of the printer. 7 Slide the first sheet from the printer. 1 From the printer control panel, press . 2 Choose the default settings: • If you want to set the default...

User's Guide
Page 30
... scanner lid and place the document facedown on the ADF tray to select the default photo print size for scanning, copying, and faxing. Loading paper and original documents 30 You can load up or down arrow button to the width of an original document into the ADF until you hear... of the original document. 2 Load the original document faceup and top edge first into the ADF for the printer, and then press . Loading original documents into the ADF You can load A4-, letter-, or legal-size paper into the ADF. 1 Adjust the paper guide on the scanner glass. 2 Close the scanner lid.
... scanner lid and place the document facedown on the ADF tray to select the default photo print size for scanning, copying, and faxing. Loading paper and original documents 30 You can load up or down arrow button to the width of an original document into the ADF until you hear... of the original document. 2 Load the original document faceup and top edge first into the ADF for the printer, and then press . Loading original documents into the ADF You can load A4-, letter-, or legal-size paper into the ADF. 1 Adjust the paper guide on the scanner glass. 2 Close the scanner lid.


