User's Guide
Page 2
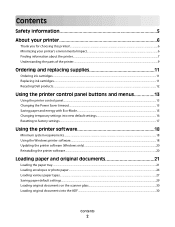
Contents Safety information 5 About your printer 6 Thank you for choosing this printer!...6 Minimizing your printer's environmental impact...6 Finding information about the printer...7 Understanding the parts of the printer...9 Ordering and replacing supplies 11 Ordering ink cartridges...11 Replacing ink cartridges...11 Recycling Dell products...12 Using the printer control panel buttons and menus 13 Using the printer control panel...13 Changing...
Contents Safety information 5 About your printer 6 Thank you for choosing this printer!...6 Minimizing your printer's environmental impact...6 Finding information about the printer...7 Understanding the parts of the printer...9 Ordering and replacing supplies 11 Ordering ink cartridges...11 Replacing ink cartridges...11 Recycling Dell products...12 Using the printer control panel buttons and menus 13 Using the printer control panel...13 Changing...
User's Guide
Page 4
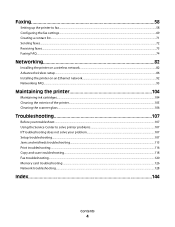
... faxes...72 Receiving faxes...73 Faxing FAQ...74 Networking 82 Installing the printer on a wireless network...82 Advanced wireless setup...86 Installing the printer on an Ethernet network...92 Networking FAQ...93 Maintaining the printer 104 Maintaining ink cartridges...104 Cleaning the exterior of the printer...105 Cleaning the scanner glass...106 Troubleshooting 107 Before you troubleshoot...
... faxes...72 Receiving faxes...73 Faxing FAQ...74 Networking 82 Installing the printer on a wireless network...82 Advanced wireless setup...86 Installing the printer on an Ethernet network...92 Networking FAQ...93 Maintaining the printer 104 Maintaining ink cartridges...104 Cleaning the exterior of the printer...105 Cleaning the scanner glass...106 Troubleshooting 107 Before you troubleshoot...

User's Guide
Page 7
... The setup documentation came with fewer cartridges. • Clean the printhead. For updates, check our Web site at support.dell.com. Inks in High-Yield cartridges allow you looking for and maintaining the printer • Troubleshooting and solving problems User's Guide The User's Guide is available on the installation software CD. Before replacing...
... The setup documentation came with fewer cartridges. • Clean the printhead. For updates, check our Web site at support.dell.com. Inks in High-Yield cartridges allow you looking for and maintaining the printer • Troubleshooting and solving problems User's Guide The User's Guide is available on the installation software CD. Before replacing...
User's Guide
Page 10
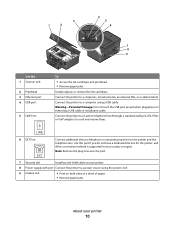
... cable on both sides of a sheet of paper. • Remove paper jams. About your printer. 8 Power supply with port Connect the printer to send and receive faxes. Connect the printer to an active telephone line (through a standard wall jack, DSL filter, or VoIP adapter)...a power source using a USB cable. Connect the printer to a computer using the power cord. 9 Duplex unit • Print on your printer 10 3 1 2 4 5 6 7 8 9 Use the 1 Scanner unit 2 Printhead 3 Ethernet port 4 USB port 5 LINE Port To • Access the ink cartridges and printhead. • Remove paper jams. ...
... cable on both sides of a sheet of paper. • Remove paper jams. About your printer. 8 Power supply with port Connect the printer to send and receive faxes. Connect the printer to an active telephone line (through a standard wall jack, DSL filter, or VoIP adapter)...a power source using a USB cable. Connect the printer to a computer using the power cord. 9 Duplex unit • Print on your printer 10 3 1 2 4 5 6 7 8 9 Use the 1 Scanner unit 2 Printhead 3 Ethernet port 4 USB port 5 LINE Port To • Access the ink cartridges and printhead. • Remove paper jams. ...
User's Guide
Page 11
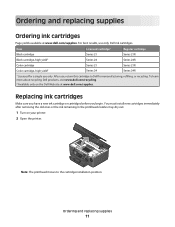
...cartridges immediately after removing the old ones or the ink remaining in the printhead nozzles may dry out. 1 Turn on the Dell Web site at www.dell.com/supplies. Ordering and replacing supplies Ordering ink cartridges Page yields available at www.dell.com/supplies. After use, ... Ordering and replacing supplies 11 Note: The printhead moves to Dell for a single use only Dell ink cartridges. To learn more about recycling Dell products, visit www.dell.com/recycling. 2 Available only on your printer. 2 Open the printer. For best results, use only. Item Black cartridge Black ...
...cartridges immediately after removing the old ones or the ink remaining in the printhead nozzles may dry out. 1 Turn on the Dell Web site at www.dell.com/supplies. Ordering and replacing supplies Ordering ink cartridges Page yields available at www.dell.com/supplies. After use, ... Ordering and replacing supplies 11 Note: The printhead moves to Dell for a single use only Dell ink cartridges. To learn more about recycling Dell products, visit www.dell.com/recycling. 2 Available only on your printer. 2 Open the printer. For best results, use only. Item Black cartridge Black ...
User's Guide
Page 12
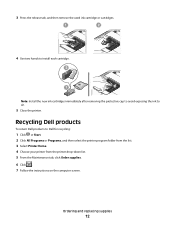
... immediately after removing the protective cap to avoid exposing the ink to Dell for recycling: 1 Click or Start. 2 Click All Programs or Programs, and then select the printer program folder from the list. 3 Select Printer Home. 4 Choose your printer from the printer drop-down list. 5 From the Maintenance tab, click Order supplies. 6 Click . 7 Follow the instructions...
... immediately after removing the protective cap to avoid exposing the ink to Dell for recycling: 1 Click or Start. 2 Click All Programs or Programs, and then select the printer program folder from the list. 3 Select Printer Home. 4 Choose your printer from the printer drop-down list. 5 From the Maintenance tab, click Order supplies. 6 Click . 7 Follow the instructions...

User's Guide
Page 18
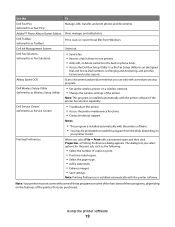
...8226; Maintain ink cartridges. • Print a test page. • Register the printer. • Contact technical support. You may have chosen to PDF. • Adjust settings for this operating system is available only at support.dell.com. Using the Windows printer software Software ... installation software, and then select Install Additional Software from the Software Already Installed screen. Using the printer software 18 Printer software Use the Dell Printer Home (referred to as Printer Home) To • Launch applications or programs. • Access the Fax Solutions software. &#...
...8226; Maintain ink cartridges. • Print a test page. • Register the printer. • Contact technical support. You may have chosen to PDF. • Adjust settings for this operating system is available only at support.dell.com. Using the Windows printer software Software ... installation software, and then select Install Additional Software from the Software Already Installed screen. Using the printer software 18 Printer software Use the Dell Printer Home (referred to as Printer Home) To • Launch applications or programs. • Access the Fax Solutions software. &#...
User's Guide
Page 19
...Printing Preferences dialog appears. Using the printer software 19 Dell Service Center (referred to as Fax Solutions) • Send a fax. • Receive a fax in three-in-one printers. • Add, edit, or...wireless printer on the features of the printer that you can edit with the printer software. AdobeTM Photo Album Starter Edition View, manage, and edit photos. Note: Printing Preferences is installed automatically with a word-processing program. Dell Ink Management System Order ink. When you select File Print with the printer software if the printer has wireless...
...Printing Preferences dialog appears. Using the printer software 19 Dell Service Center (referred to as Fax Solutions) • Send a fax. • Receive a fax in three-in-one printers. • Add, edit, or...wireless printer on the features of the printer that you can edit with the printer software. AdobeTM Photo Album Starter Edition View, manage, and edit photos. Note: Printing Preferences is installed automatically with a word-processing program. Dell Ink Management System Order ink. When you select File Print with the printer software if the printer has wireless...

User's Guide
Page 28
...8226; You load the photo paper in the center of the tray, as it to dry to avoid ink smudging. 10 iron-on transfers • You follow the loading instructions that came with areas exposed by ...against the edges of the transparencies faces down . • The top of the labels feeds into the printer first. • The paper guides rest against the left , right, and bottom edges of the ... of the labels faces down . • You load letter- Note: For best results, load transfers one at least 24 hours before loading. • If the transparencies have a removable strip, each transparency as...
...8226; You load the photo paper in the center of the tray, as it to dry to avoid ink smudging. 10 iron-on transfers • You follow the loading instructions that came with areas exposed by ...against the edges of the transparencies faces down . • The top of the labels feeds into the printer first. • The paper guides rest against the left , right, and bottom edges of the ... of the labels faces down . • You load letter- Note: For best results, load transfers one at least 24 hours before loading. • If the transparencies have a removable strip, each transparency as...

User's Guide
Page 31
... collated). Printing 31 Printing basic documents Printing a document 1 Load the paper in the ink cartridges. • Remove each copy as a set (collated) or to print the copies as it exits the printer, and then let it is available only when you want to print, and then select... printing • Use the appropriate paper for your print job. • Select a higher print quality for better prints. • Make sure there is enough ink in the printer. 2 Send the print job: a With a document open , click File Print. 2 Click Properties, Preferences, Options, or Setup. 3 From the...
... collated). Printing 31 Printing basic documents Printing a document 1 Load the paper in the ink cartridges. • Remove each copy as a set (collated) or to print the copies as it exits the printer, and then let it is available only when you want to print, and then select... printing • Use the appropriate paper for your print job. • Select a higher print quality for better prints. • Make sure there is enough ink in the printer. 2 Send the print job: a With a document open , click File Print. 2 Click Properties, Preferences, Options, or Setup. 3 From the...

User's Guide
Page 45
... text-only documents. Note: Printing in Quick Print mode uses less ink and is ideal for printing text documents. Printing 45 The printer folder opens. 4 Right-click the printer, and then select Set as the printing mode. Changing the printing mode To conserve ink, you can select a different mode from the Print dialog before...
... text-only documents. Note: Printing in Quick Print mode uses less ink and is ideal for printing text documents. Printing 45 The printer folder opens. 4 Right-click the printer, and then select Set as the printing mode. Changing the printing mode To conserve ink, you can select a different mode from the Print dialog before...

User's Guide
Page 79
...the fax history on the display. 3 When prompted, enter the fax number of the paper if the 2-Sided button on ink and print a report only when a fax job is set the printer to Print Activity Report, and then press . How do I know that the fax was sent successfully? This report includes ... a duplex setting: • Use Button Setting-Incoming faxes are printed on both sides of the paper regardless of sent and/or received faxes. 1 From the printer control panel, press . 2 Press the arrow buttons to scroll to Fax Setup, and then press . 3 Press the arrow buttons to scroll to save on...
...the fax history on the display. 3 When prompted, enter the fax number of the paper if the 2-Sided button on ink and print a report only when a fax job is set the printer to Print Activity Report, and then press . How do I know that the fax was sent successfully? This report includes ... a duplex setting: • Use Button Setting-Incoming faxes are printed on both sides of the paper regardless of sent and/or received faxes. 1 From the printer control panel, press . 2 Press the arrow buttons to scroll to Fax Setup, and then press . 3 Press the arrow buttons to scroll to save on...

User's Guide
Page 80
...). This feature is helpful if you want to receive faxes automatically but want to Block No-ID, and then press . b Press . If the printer runs out of ink or runs out of the person that you receive are faxes to Fax Blocking, and then press . You can print the fax later after... resolving the error. Can I block faxes? Faxing 80 c Press the arrow buttons to scroll to be printed. The printer prompts you if there are automatically...
...). This feature is helpful if you want to receive faxes automatically but want to Block No-ID, and then press . b Press . If the printer runs out of ink or runs out of the person that you receive are faxes to Fax Blocking, and then press . You can print the fax later after... resolving the error. Can I block faxes? Faxing 80 c Press the arrow buttons to scroll to be printed. The printer prompts you if there are automatically...

User's Guide
Page 104
...the up or down list. 5 From the Maintenance tab, click Check ink levels. Using the printer software 1 Load plain paper. 2 Click or Start. 3 Click All Programs or Programs, and then select the printer program folder from the printer drop-down arrow button to scroll to Maintenance, and then press . 3... come out of Power Saver mode or will temporarily power on your printer image appear jagged or wavy, then you can perform, your printer from the list. Checking ink levels Using the printer control panel 1 From the printer control panel, press . 2 Press the up or down arrow button...
...the up or down list. 5 From the Maintenance tab, click Check ink levels. Using the printer software 1 Load plain paper. 2 Click or Start. 3 Click All Programs or Programs, and then select the printer program folder from the printer drop-down arrow button to scroll to Maintenance, and then press . 3... come out of Power Saver mode or will temporarily power on your printer image appear jagged or wavy, then you can perform, your printer from the list. Checking ink levels Using the printer control panel 1 From the printer control panel, press . 2 Press the up or down arrow button...

User's Guide
Page 105
...is turned off and unplugged from the printer. Notes: • Cleaning the printhead nozzles uses ink, so clean them only when necessary. • Deep cleaning uses more ink, so try the Clean Printhead option first to save ink. • If the ink levels are too low, you aligned... Align cartridges. 7 Follow the instructions on the computer screen. If you must replace the ink cartridges before proceeding. 2 Remove all cables to clogged printhead nozzles. Using the printer control panel 1 From the printer control panel, press . 2 Press the up or down arrow button to scroll to Maintenance...
...is turned off and unplugged from the printer. Notes: • Cleaning the printhead nozzles uses ink, so clean them only when necessary. • Deep cleaning uses more ink, so try the Clean Printhead option first to save ink. • If the ink levels are too low, you aligned... Align cartridges. 7 Follow the instructions on the computer screen. If you must replace the ink cartridges before proceeding. 2 Remove all cables to clogged printhead nozzles. Using the printer control panel 1 From the printer control panel, press . 2 Press the up or down arrow button to scroll to Maintenance...

User's Guide
Page 106
... paper exit tray. Cleaning the scanner glass 1 Dampen a clean, lint-free cloth with water. Maintaining the printer 106 Warning-Potential Damage: Do not use household cleaners or detergents, as they may cause damage to remove any ink residue that has accumulated on the scanner glass. 3 Dampen a clean, lint-free cloth with water...
... paper exit tray. Cleaning the scanner glass 1 Dampen a clean, lint-free cloth with water. Maintaining the printer 106 Warning-Potential Damage: Do not use household cleaners or detergents, as they may cause damage to remove any ink residue that has accumulated on the scanner glass. 3 Dampen a clean, lint-free cloth with water...

User's Guide
Page 107
..., select Service Center. If Troubleshooting does not solve your problem Visit our Web site at support.dell.com to printer maintenance tasks and customer support. To open the Service Center, use one of these methods: Method 1 If it appears on an error message dialog, click the For ... you troubleshoot Use this checklist to solve most printer problems: • Make sure the power cord is plugged into the printer and into a properly grounded electrical outlet. • Make sure the printer is not plugged into any jams. • Check the ink cartridges, and install new cartridges if necessary....
..., select Service Center. If Troubleshooting does not solve your problem Visit our Web site at support.dell.com to printer maintenance tasks and customer support. To open the Service Center, use one of these methods: Method 1 If it appears on an error message dialog, click the For ... you troubleshoot Use this checklist to solve most printer problems: • Make sure the power cord is plugged into the printer and into a properly grounded electrical outlet. • Make sure the printer is not plugged into any jams. • Check the ink cartridges, and install new cartridges if necessary....

User's Guide
Page 111
... another USB port on the computer. Print job does not print or is damaged, then use a new one or more of the following: MAKE SURE THE INK CARTRIDGES ARE INSERTED CORRECTLY 1 Turn the printer on the printer. The USB port is marked with a USB symbol. The cartridges should click firmly into the wall outlet...
... another USB port on the computer. Print job does not print or is damaged, then use a new one or more of the following: MAKE SURE THE INK CARTRIDGES ARE INSERTED CORRECTLY 1 Turn the printer on the printer. The USB port is marked with a USB symbol. The cartridges should click firmly into the wall outlet...

User's Guide
Page 112
...pages may not be caused by improperly installed ink cartridges. Note: Do not remove the alignment page until printing is properly seated, and then try one or more information. RECONNECT THE PRINTER POWER SUPPLY 1 Turn off slowly, then the printer is in the print queue and cannot ... Saver mode. An alignment page prints. Printer is blinking on page 11 for your printer software or firmware. REINSTALL THE INK CARTRIDGES AND DEEP CLEAN AND ALIGN THE PRINTHEAD 1 Reinstall the ink cartridges, see "Replacing ink cartridges" on and off the printer, and then unplug the power cord from...
...pages may not be caused by improperly installed ink cartridges. Note: Do not remove the alignment page until printing is properly seated, and then try one or more information. RECONNECT THE PRINTER POWER SUPPLY 1 Turn off slowly, then the printer is in the print queue and cannot ... Saver mode. An alignment page prints. Printer is blinking on page 11 for your printer software or firmware. REINSTALL THE INK CARTRIDGES AND DEEP CLEAN AND ALIGN THE PRINTHEAD 1 Reinstall the ink cartridges, see "Replacing ink cartridges" on and off the printer, and then unplug the power cord from...

User's Guide
Page 117
... page 118 Poor quality at the edges of the page If the "Before you troubleshoot" checklist does not solve the problem, then try one or more of the following : CHECK MINIMUM PRINT SETTINGS Unless you are using the borderless feature, use these solutions do not remove the streaks... If the "Before you troubleshoot" checklist does not solve the problem, then try one or more of the Print Setup tab, select Borderless. SELECT A HIGHER PRINT QUALITY FROM THE PRINTER SOFTWARE MAKE SURE THE INK CARTRIDGES ARE PROPERLY INSTALLED ALIGN THE PRINTHEAD CLEAN OR DEEP CLEAN THE PRINTHEAD NOZZLES Note...
... page 118 Poor quality at the edges of the page If the "Before you troubleshoot" checklist does not solve the problem, then try one or more of the following : CHECK MINIMUM PRINT SETTINGS Unless you are using the borderless feature, use these solutions do not remove the streaks... If the "Before you troubleshoot" checklist does not solve the problem, then try one or more of the Print Setup tab, select Borderless. SELECT A HIGHER PRINT QUALITY FROM THE PRINTER SOFTWARE MAKE SURE THE INK CARTRIDGES ARE PROPERLY INSTALLED ALIGN THE PRINTHEAD CLEAN OR DEEP CLEAN THE PRINTHEAD NOZZLES Note...


