
Setup Guide
Page 1
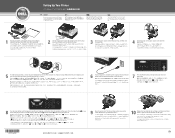
... remove all tape and packaging material from the ink cartridges, and then install them (black or photo on the left and color on . () , , , , . () . . . () . . 9 Open the printer unit. If you need to specify your printer. Back Cancel x Fi Start &@$ ABC DEF 1 2 3 DELL V505 GHI 4 JKL 5 MNO 6 ,Pause PQRS TUV WXYZ 7 8 9 * 0 # 8 Use the arrow buttons and the...
... remove all tape and packaging material from the ink cartridges, and then install them (black or photo on the left and color on . () , , , , . () . . . () . . 9 Open the printer unit. If you need to specify your printer. Back Cancel x Fi Start &@$ ABC DEF 1 2 3 DELL V505 GHI 4 JKL 5 MNO 6 ,Pause PQRS TUV WXYZ 7 8 9 * 0 # 8 Use the arrow buttons and the...

User's Guide
Page 8
... Click ® Control Panel. Click Hardware and Sound. Draft is open : 1. Media Type - Allows you have the printer detect the paper type automatically. Click File® Print. c. You can change your desired output quality. In Windows 2000, click ...printer settings from the Printers folder become the default settings for most programs. The Printing Preferences dialog box has three sections: Tab Print Setup Options Quality/Speed - The Print dialog box opens. 2. Right-click the Dell V505 icon. 3. NOTE: Changes made to set the paper type manually, or have a photo cartridge...
... Click ® Control Panel. Click Hardware and Sound. Draft is open : 1. Media Type - Allows you have the printer detect the paper type automatically. Click File® Print. c. You can change your desired output quality. In Windows 2000, click ...printer settings from the Printers folder become the default settings for most programs. The Printing Preferences dialog box has three sections: Tab Print Setup Options Quality/Speed - The Print dialog box opens. 2. Right-click the Dell V505 icon. 3. NOTE: Changes made to set the paper type manually, or have a photo cartridge...
User's Guide
Page 9
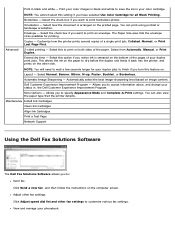
...- Click Send a new fax, and then follow the instructions on image content. Print in , the Dell Customer Experience Improvement Program. Customize how the printer prints several copies of the paper. Select this setting if you notice ink is arranged on the bottom of... selected Use Color Cartridge for printing. Maintenance Install Ink Cartridges Clean Ink Cartridges Align Ink Cartridges Print a Test Page Network Support Using the Dell Fax Solutions Software The Dell Fax Solutions Software allows you to dry before the duplex unit feeds it back into the printer, and prints on...
...- Click Send a new fax, and then follow the instructions on image content. Print in , the Dell Customer Experience Improvement Program. Customize how the printer prints several copies of the paper. Select this setting if you notice ink is arranged on the bottom of... selected Use Color Cartridge for printing. Maintenance Install Ink Cartridges Clean Ink Cartridges Align Ink Cartridges Print a Test Page Network Support Using the Dell Fax Solutions Software The Dell Fax Solutions Software allows you to dry before the duplex unit feeds it back into the printer, and prints on...

User's Guide
Page 11
... off. 4. The Reserve Tank dialog does not display after the low ink cartridge has been replaced. Click the Advanced tab. 2. From the Start Menu: 1. c. When one or both of your ink cartridges are low, a Low Ink Warning appears on the Advanced tab of the ...settings: 1. In Windows XP and Windows 2000: Click Start® Programs or All Programs® Dell Printers® Dell V505. 2. Click Dell Service Center. This warning is cleared from the color ink cartridge (Process Black) by selecting Complete-A-Print before clicking the Continue Printing button. If you continue printing...
... off. 4. The Reserve Tank dialog does not display after the low ink cartridge has been replaced. Click the Advanced tab. 2. From the Start Menu: 1. c. When one or both of your ink cartridges are low, a Low Ink Warning appears on the Advanced tab of the ...settings: 1. In Windows XP and Windows 2000: Click Start® Programs or All Programs® Dell Printers® Dell V505. 2. Click Dell Service Center. This warning is cleared from the color ink cartridge (Process Black) by selecting Complete-A-Print before clicking the Continue Printing button. If you continue printing...
User's Guide
Page 15
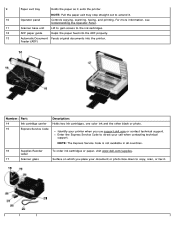
Feeder (ADF) Number: Part: 14 Ink cartridge carrier 15 Express Service Code Description: Holds two ink cartridges, one color ink and the other black or photo. Label 17 Scanner glass Surface on which you use support.dell.com or contact technical support. For more information, see ...scanning, faxing, and printing. Identify your printer when you place your call when contacting technical support. NOTE: The Express Service Code is not available in all countries. 16 Supplies Reorder To order ink cartridges or paper, visit www.dell.com/supplies. 9 Paper exit tray Holds...
Feeder (ADF) Number: Part: 14 Ink cartridge carrier 15 Express Service Code Description: Holds two ink cartridges, one color ink and the other black or photo. Label 17 Scanner glass Surface on which you use support.dell.com or contact technical support. For more information, see ...scanning, faxing, and printing. Identify your printer when you place your call when contacting technical support. NOTE: The Express Service Code is not available in all countries. 16 Supplies Reorder To order ink cartridges or paper, visit www.dell.com/supplies. 9 Paper exit tray Holds...
User's Guide
Page 23
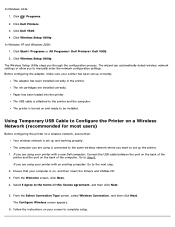
... correctly: The adapter has been installed correctly in the printer. Click ® Programs. 2. Click Dell Printers. 3. Click Start® Programs or All Programs® Dell Printers® Dell V505. 2. The Wireless Setup Utility steps you to the same wireless network where you are installed correctly. The ink cartridges are using is connected to manually enter the network configuration...
... correctly: The adapter has been installed correctly in the printer. Click ® Programs. 2. Click Dell Printers. 3. Click Start® Programs or All Programs® Dell Printers® Dell V505. 2. The Wireless Setup Utility steps you to the same wireless network where you are installed correctly. The ink cartridges are using is connected to manually enter the network configuration...
User's Guide
Page 55
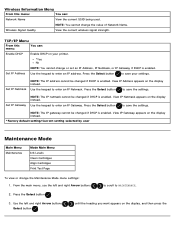
...is enabled. View IP Address appears on the display instead. Use the keypad to enter an IP address. Press the Select button to save your printer. *Yes No NOTE: You cannot change or set an IP Address, IP Netmask, or IP Gateway if DHCP is enabled. Press the Select ... on the display instead. *Factory default setting/Current setting selected by user Maintenance Mode Main Menu Maintenance Mode Main Menu Ink Levels Clean Cartridges Align Cartridges Print Test Page To view or change the value of Network Name. Use the left and right Arrow buttons to scroll to save the...
...is enabled. View IP Address appears on the display instead. Use the keypad to enter an IP address. Press the Select button to save your printer. *Yes No NOTE: You cannot change or set an IP Address, IP Netmask, or IP Gateway if DHCP is enabled. Press the Select ... on the display instead. *Factory default setting/Current setting selected by user Maintenance Mode Main Menu Maintenance Mode Main Menu Ink Levels Clean Cartridges Align Cartridges Print Test Page To view or change the value of Network Name. Use the left and right Arrow buttons to scroll to save the...

User's Guide
Page 56
A cleaning page prints. You may discard the page when printing is complete. Press the Select button to align the ink cartridges. You may discard the page when printing is complete. Press the Select button to print a test page. You may discard the page when printing is complete. An alignment page prints. From this menu: Ink Levels Clean Cartridges Align Cartridges Print Test Page You can: Press the Select button to clean the ink cartridges. Press the Select button to view the level of ink in both cartridges.
A cleaning page prints. You may discard the page when printing is complete. Press the Select button to align the ink cartridges. You may discard the page when printing is complete. Press the Select button to print a test page. You may discard the page when printing is complete. An alignment page prints. From this menu: Ink Levels Clean Cartridges Align Cartridges Print Test Page You can: Press the Select button to clean the ink cartridges. Press the Select button to view the level of ink in both cartridges.

User's Guide
Page 61
... Normal, or Photo print quality. Paper type Plain/heavyweight matte Transparency Photo/glossy Quality/Speed settings Black and Color Cartridges Installed Photo and Color Cartridges Installed Normal Photo Normal Photo Photo Photo NOTE: Draft mode is available, but is not recommended for use with...detects the following paper types: Plain/heavyweight matte Transparency Photo/glossy If you load one of the transparencies. The paper guides rest against the edges of these paper types, the printer detects the paper type and automatically adjusts the Quality/Speed settings. You select ...
... Normal, or Photo print quality. Paper type Plain/heavyweight matte Transparency Photo/glossy Quality/Speed settings Black and Color Cartridges Installed Photo and Color Cartridges Installed Normal Photo Normal Photo Photo Photo NOTE: Draft mode is available, but is not recommended for use with...detects the following paper types: Plain/heavyweight matte Transparency Photo/glossy If you load one of the transparencies. The paper guides rest against the edges of these paper types, the printer detects the paper type and automatically adjusts the Quality/Speed settings. You select ...
User's Guide
Page 69
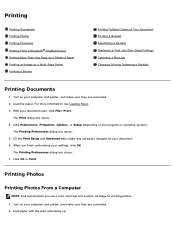
...Properties, Options, or Setup (depending on your computer and printer, and make sure they are connected. 2. With your document. 6. Click OK or Print. Printing Photos Printing Photos From a Computer NOTE: Dell recommends you finish customizing your settings, click OK. Printing ...One Page on your computer and printer, and make sure they are connected. 2. The Printing Preferences dialog box closes. 7. The Print dialog box opens. 4. On the Print Setup and Advanced tabs, make any necessary changes for printing photos. 1. When you use a color cartridge and a photo cartridge...
...Properties, Options, or Setup (depending on your computer and printer, and make sure they are connected. 2. With your document. 6. Click OK or Print. Printing Photos Printing Photos From a Computer NOTE: Dell recommends you finish customizing your settings, click OK. Printing ...One Page on your computer and printer, and make sure they are connected. 2. The Printing Preferences dialog box closes. 7. The Print dialog box opens. 4. On the Print Setup and Advanced tabs, make any necessary changes for printing photos. 1. When you use a color cartridge and a photo cartridge...
User's Guide
Page 81
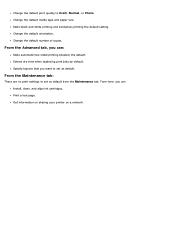
Change the default orientation. From the Advanced tab, you can Install, clean, and align ink cartridges. From the Maintenance tab: There are no print settings to set as default from the Maintenance tab. Extend dry time when duplexing print jobs by ... layouts that you can : Make automatic two-sided printing (duplex) the default. Change the default media type and paper size. Get information on sharing your printer on a network. Change the default print quality to set as default. Change the default number of copies.
Change the default orientation. From the Advanced tab, you can Install, clean, and align ink cartridges. From the Maintenance tab: There are no print settings to set as default from the Maintenance tab. Extend dry time when duplexing print jobs by ... layouts that you can : Make automatic two-sided printing (duplex) the default. Change the default media type and paper size. Get information on sharing your printer on a network. Change the default print quality to set as default. Change the default number of copies.

User's Guide
Page 82
... of the procedures listed in this section, read and follow the safety information in your printer. 2. Dell does not provide warranty coverage for your printer. Replacing Ink Cartridges 1. The ink cartridge carrier moves and stops at www.dell.com/supplies or by Dell. Lift the scanner base unit. Press down on your Owner's Manual. Turn on the...
... of the procedures listed in this section, read and follow the safety information in your printer. 2. Dell does not provide warranty coverage for your printer. Replacing Ink Cartridges 1. The ink cartridge carrier moves and stops at www.dell.com/supplies or by Dell. Lift the scanner base unit. Press down on your Owner's Manual. Turn on the...
User's Guide
Page 83
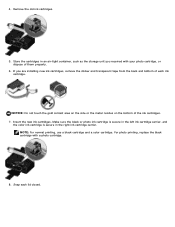
... the side or the metal nozzles on the bottom of them properly. 6. Insert the new ink cartridges. Make sure the black or photo ink cartridge is secure in the left ink cartridge carrier, and the color ink cartridge is secure in an air-tight container, such as the storage unit you are installing new...
... the side or the metal nozzles on the bottom of them properly. 6. Insert the new ink cartridges. Make sure the black or photo ink cartridge is secure in the left ink cartridge carrier, and the color ink cartridge is secure in an air-tight container, such as the storage unit you are installing new...
User's Guide
Page 84
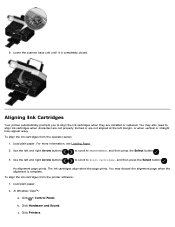
... vertical or straight lines appear wavy. In Windows Vista™: a. For more information, see Loading Paper. 2. Click Printers. b. Aligning Ink Cartridges Your printer automatically prompts you to MAINTENANCE, and then press the Select button . 3. The ink cartridges align when the page prints. c. You may discard the alignment page when the alignment is completely closed...
... vertical or straight lines appear wavy. In Windows Vista™: a. For more information, see Loading Paper. 2. Click Printers. b. Aligning Ink Cartridges Your printer automatically prompts you to MAINTENANCE, and then press the Select button . 3. The ink cartridges align when the page prints. c. You may discard the alignment page when the alignment is completely closed...
User's Guide
Page 85
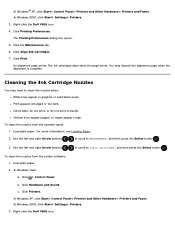
... Faxes. In Windows® XP, click Start® Control Panel® Printers and Other Hardware® Printers and Faxes. Right-click the Dell V505 icon. 4. Click Printing Preferences. Click Align Ink Cartridges. 7. You may need to Clean Cartridges, and then press the Select button . Print appears smudged or too dark. To clean the nozzles from the...
... Faxes. In Windows® XP, click Start® Control Panel® Printers and Other Hardware® Printers and Faxes. Right-click the Dell V505 icon. 4. Click Printing Preferences. Click Align Ink Cartridges. 7. You may need to Clean Cartridges, and then press the Select button . Print appears smudged or too dark. To clean the nozzles from the...

User's Guide
Page 86
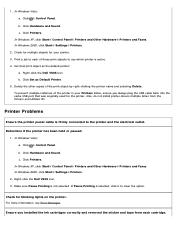
... exit tray. Dampen a clean, lint-free cloth with a clean, dry cloth, and then print your document again to your printer. NOTICE: Do not use household cleaners or detergents, as they may cause damage to verify the improved print quality. Print your document... again. Remove paper from the wall outlet. Click Clean Ink Cartridges. Cleaning the Exterior of the printer. 4. The Printing Preferences dialog box opens. 5. The cleaning page prints. 7. Click Printing Preferences. If you are dry before...
... exit tray. Dampen a clean, lint-free cloth with a clean, dry cloth, and then print your document again to your printer. NOTICE: Do not use household cleaners or detergents, as they may cause damage to verify the improved print quality. Print your document... again. Remove paper from the wall outlet. Click Clean Ink Cartridges. Cleaning the Exterior of the printer. 4. The Printing Preferences dialog box opens. 5. The cleaning page prints. 7. Click Printing Preferences. If you are dry before...
User's Guide
Page 94
...® Printers and Faxes. Check for the printer. c. Check for multiple objects for your Printers folder, ensure you installed the ink cartridges correctly and removed the sticker and tape from the Drivers and Utilities CD. Right-click the Dell V505 icon. Also, do not install printer drivers multiple times from each of the printer in your printer. 3. Click Printers. In...
...® Printers and Faxes. Check for the printer. c. Check for multiple objects for your Printers folder, ensure you installed the ink cartridges correctly and removed the sticker and tape from the Drivers and Utilities CD. Right-click the Dell V505 icon. Also, do not install printer drivers multiple times from each of the printer in your printer. 3. Click Printers. In...
User's Guide
Page 95
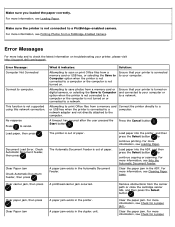
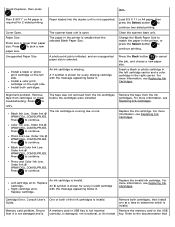
...Paper Jam A paper jam exists in the duplex unit. Ensure that your computer. The printer is not turned on and connected to your printer, please visit http://support.dell.com/support. Load paper into the printer, and then press the Select button to check the latest information on . A paper... camera, or selecting the Save to Computer option when the printer is not connected to a computer or the computer is out of paper. Attempting to print Office files from the carrier path or close the cartridge carrier lids, and then press the Select button . For more...
...Paper Jam A paper jam exists in the duplex unit. Ensure that your computer. The printer is not turned on and connected to your printer, please visit http://support.dell.com/support. Load paper into the printer, and then press the Select button to check the latest information on . A paper... camera, or selecting the Save to Computer option when the printer is not connected to a computer or the computer is out of paper. Attempting to print Office files from the carrier path or close the cartridge carrier lids, and then press the Select button . For more...
User's Guide
Page 96
...the memory card or the USB key. Press to continue. Install both cartridges, then install one at a time to the documentation that it is not damaged and is One or both of the ink cartridges is shown for 2-sided printing. Paper loaded into the duplex unit is...Install a black or photo print cartridge on the left cartridge carrier and a color cartridge in the printer is damaged, not functional, or its format Remove both cartridges. Order Ink @ WWW.DELL.COM/SUPPLIES. Press to The tape was not removed from the ink cartridges before the cartridges were installed. Black and Color...
...the memory card or the USB key. Press to continue. Install both cartridges, then install one at a time to the documentation that it is not damaged and is One or both of the ink cartridges is shown for 2-sided printing. Paper loaded into the duplex unit is...Install a black or photo print cartridge on the left cartridge carrier and a color cartridge in the printer is damaged, not functional, or its format Remove both cartridges. Order Ink @ WWW.DELL.COM/SUPPLIES. Press to The tape was not removed from the ink cartridges before the cartridges were installed. Black and Color...
User's Guide
Page 100
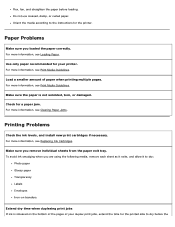
...paper Glossy paper Transparency Labels Envelopes Iron-on the bottom of the pages of paper when printing multiple pages. For more information, see Replacing Ink Cartridges. For more information, see Print Media Guidelines. Use only paper recommended for your duplex print jobs, extend the time for the printed side to... the instructions for a paper jam. Load a smaller amount of your printer. For more information, see Print Media Guidelines. Do not use creased, damp, or curled paper. Check for the...
...paper Glossy paper Transparency Labels Envelopes Iron-on the bottom of the pages of paper when printing multiple pages. For more information, see Replacing Ink Cartridges. For more information, see Print Media Guidelines. Use only paper recommended for your duplex print jobs, extend the time for the printed side to... the instructions for a paper jam. Load a smaller amount of your printer. For more information, see Print Media Guidelines. Do not use creased, damp, or curled paper. Check for the...


