User Guide
Page 1
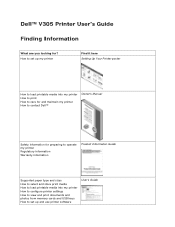
... Dell™ V305 Printer User's Guide Finding Information What are you looking for preparing to operate my printer Regulatory information Warranty information Product Information Guide Supported paper type and sizes How to select and store print media How to load printable media into my printer How to configure printer settings... How to view and print documents and photos from memory cards and USB keys How to set up my printer Find it here Setting Up Your Printer poster How to load printable media into my printer How to print ...
... Dell™ V305 Printer User's Guide Finding Information What are you looking for preparing to operate my printer Regulatory information Warranty information Product Information Guide Supported paper type and sizes How to select and store print media How to load printable media into my printer How to configure printer settings... How to view and print documents and photos from memory cards and USB keys How to set up my printer Find it here Setting Up Your Printer poster How to load printable media into my printer How to print ...
User Guide
Page 2
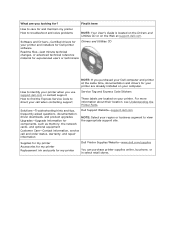
...Drivers and Utilities CD or on the Web at the same time, documentation and drivers for your printer are already installed on your printer and installers for Dell printer software Readme files-Last minute technical changes, or advanced technical reference material for experienced users or ... If you looking for and maintain my printer How to view the appropriate support site. Find it here How to care for ? Software and Drivers-Certified drivers for my printer Dell Printer Supplies Website-www.dell.com/supplies You can purchase printer supplies online, by phone, or in ...
...Drivers and Utilities CD or on the Web at the same time, documentation and drivers for your printer are already installed on your printer and installers for Dell printer software Readme files-Last minute technical changes, or advanced technical reference material for experienced users or ... If you looking for and maintain my printer How to view the appropriate support site. Find it here How to care for ? Software and Drivers-Certified drivers for my printer Dell Printer Supplies Website-www.dell.com/supplies You can purchase printer supplies online, by phone, or in ...
User Guide
Page 3
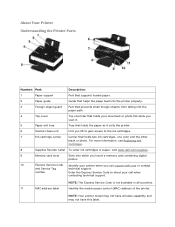
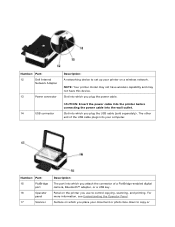
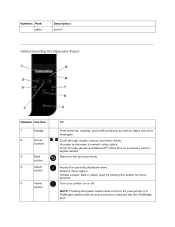
...or paper, visit www.dell.com/supplies. 9 Memory card slots Slots into the paper path. 4 Top cover Top of the printer. number Enter the Express Service Code to the ink cartridges. 7 Ink cartridge carrier Carrier that holds two ink cartridges, one color and the other black or...the paper as it exits the printer. 6 Scanner base unit Unit you use support.dell.com or contact and Service Tag technical support. NOTE: Your printer model may not have wireless capability and may not have this label. About Your Printer Understanding the Printer Parts Number: Part: Description: ...
...or paper, visit www.dell.com/supplies. 9 Memory card slots Slots into the paper path. 4 Top cover Top of the printer. number Enter the Express Service Code to the ink cartridges. 7 Ink cartridge carrier Carrier that holds two ink cartridges, one color and the other black or...the paper as it exits the printer. 6 Scanner base unit Unit you use support.dell.com or contact and Service Tag technical support. NOTE: Your printer model may not have wireless capability and may not have this label. About Your Printer Understanding the Printer Parts Number: Part: Description: ...
User Guide
Page 4
... connecting the power cable into your document or photo face down to copy or Surface on a wireless network. NOTE: Your printer model may not have wireless capability and may not have this device. The other end of a PictBridge-enabled digital camera, Bluetooth™ adapter, or a ...USB key. Slot into which you use to control copying, scanning, and printing. Number: Part: 12 Dell Internal Network Adapter...
... connecting the power cable into your document or photo face down to copy or Surface on a wireless network. NOTE: Your printer model may not have wireless capability and may not have this device. The other end of a PictBridge-enabled digital camera, Bluetooth™ adapter, or a ...USB key. Slot into which you use to control copying, scanning, and printing. Number: Part: 12 Dell Internal Network Adapter...
User Guide
Page 5
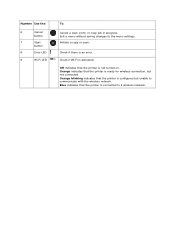
...menu. NOTE: Pressing the power button does not turn off . Scroll through photos and Microsoft® Office files on or off your printer if a PictBridge camera with an active session is inserted into the PictBridge port. Initiate a paper feed or paper eject by holding ...the button for three seconds. Turn your printer on a memory card or digital camera. Select a menu option. Understanding the Operator Panel Number Use the: 1 Display 2 Arrow buttons 3 Back ...
...menu. NOTE: Pressing the power button does not turn off . Scroll through photos and Microsoft® Office files on or off your printer if a PictBridge camera with an active session is inserted into the PictBridge port. Initiate a paper feed or paper eject by holding ...the button for three seconds. Turn your printer on a memory card or digital camera. Select a menu option. Understanding the Operator Panel Number Use the: 1 Display 2 Arrow buttons 3 Back ...
User Guide
Page 6
Check if there is not turned on. Check if Wi-Fi is activated: Off indicates that the printer is connected to a wireless network. Orange blinking indicates that the printer is an error. Number Use the: 6 Cancel button 7 Start button 8 Error LED 9 Wi-Fi LED To: Cancel a scan,... print, or copy job in progress. Blue indicates that the printer is ready for wireless connection, but unable to the menu settings. Orange indicates that the printer is configured but not connected. Initiate a copy or scan. Exit a menu without saving changes to ...
Check if there is not turned on. Check if Wi-Fi is activated: Off indicates that the printer is connected to a wireless network. Orange blinking indicates that the printer is an error. Number Use the: 6 Cancel button 7 Start button 8 Error LED 9 Wi-Fi LED To: Cancel a scan,... print, or copy job in progress. Blue indicates that the printer is ready for wireless connection, but unable to the menu settings. Orange indicates that the printer is configured but not connected. Initiate a copy or scan. Exit a menu without saving changes to ...
User Guide
Page 9
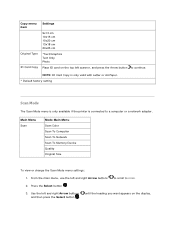
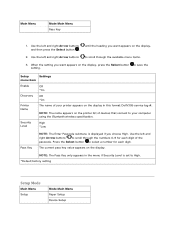
From the main menu, use the left and right Arrow buttons to scroll to continue. Main Menu Scan Mode Main Menu Scan Color Scan To Computer Scan To Network Scan To Memory Device Quality Original Size To view or change the Scan Mode menu settings: 1. Press the Select ...: ID Card Copy is only valid with Letter or A4 Paper. * Default factory setting Scan Mode The Scan Mode menu is only available if the printer is connected to a computer or a network adapter.
From the main menu, use the left and right Arrow buttons to scroll to continue. Main Menu Scan Mode Main Menu Scan Color Scan To Computer Scan To Network Scan To Memory Device Quality Original Size To view or change the Scan Mode menu settings: 1. Press the Select ...: ID Card Copy is only valid with Letter or A4 Paper. * Default factory setting Scan Mode The Scan Mode menu is only available if the printer is connected to a computer or a network adapter.
User Guide
Page 11
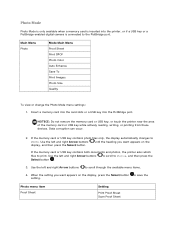
... PHOTO. Photo menu item Proof Sheet Setting Print Proof Sheet Scan Proof Sheet Insert a memory card into the card slots or a USB key into the printer, or if a USB key or a PictBridge-enabled digital camera is connected to scroll through the available menu items. 4. If the memory card or USB...Use the left and right Arrow buttons display, and then press the Select button. Main Menu Photo Mode Main Menu Proof Sheet Print DPOF Photo Color Auto Enhance Save To Print Images Photo Size Quality To view or change the Photo Mode menu settings: 1. Photo Mode Photo Mode is only available...
... PHOTO. Photo menu item Proof Sheet Setting Print Proof Sheet Scan Proof Sheet Insert a memory card into the card slots or a USB key into the printer, or if a USB key or a PictBridge-enabled digital camera is connected to scroll through the available menu items. 4. If the memory card or USB...Use the left and right Arrow buttons display, and then press the Select button. Main Menu Photo Mode Main Menu Proof Sheet Print DPOF Photo Color Auto Enhance Save To Print Images Photo Size Quality To view or change the Photo Mode menu settings: 1. Photo Mode Photo Mode is only available...
User Guide
Page 12
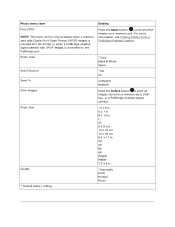
...item Print DPOF NOTE: This menu item is only available when a memory card with Digital Print Order Format (DPOF) images is inserted into the printer or when a PictBridge-enabled digital camera with DPOF images is connected to print all DPOF images on a memory card, USB key, or a ...-enabled digital camera. *4 x 6 in. 5 x 7 in. 8 x 10 in. L 2L 6 x 8 cm 10 x 15 cm 13 x 18 cm 8.5 x 11 in . *Automatic Draft Normal Photo Photo Color Auto Enhance Save To Print Images Photo Size Quality * Default factory setting Setting Press the Start button to print all images stored on a memory card...
...item Print DPOF NOTE: This menu item is only available when a memory card with Digital Print Order Format (DPOF) images is inserted into the printer or when a PictBridge-enabled digital camera with DPOF images is connected to print all DPOF images on a memory card, USB key, or a ...-enabled digital camera. *4 x 6 in. 5 x 7 in. 8 x 10 in. L 2L 6 x 8 cm 10 x 15 cm 13 x 18 cm 8.5 x 11 in . *Automatic Draft Normal Photo Photo Color Auto Enhance Save To Print Images Photo Size Quality * Default factory setting Setting Press the Start button to print all images stored on a memory card...

User Guide
Page 13
... Menu. Main Menu PictBridge Mode Main Menu Paper Setup Photo Size Layout Quality 1. When the setting you connect a PictBridge-enabled camera. When your printer changes to PictBridge mode, use the left and right Arrow buttons to scroll through the available menu items. 3. You can print pictures using the... controls of the camera. PictBridge Mode Your printer automatically switches to PictBridge mode when you want appears on the display, press the Select button to save the setting.
... Menu. Main Menu PictBridge Mode Main Menu Paper Setup Photo Size Layout Quality 1. When the setting you connect a PictBridge-enabled camera. When your printer changes to PictBridge mode, use the left and right Arrow buttons to scroll through the available menu items. 3. You can print pictures using the... controls of the camera. PictBridge Mode Your printer automatically switches to PictBridge mode when you want appears on the display, press the Select button to save the setting.
User Guide
Page 14
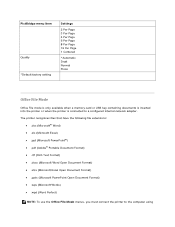
... File Mode Office File mode is only available when a memory card or USB key containing documents is inserted into the printer or when the printer is connected to the computer using The printer recognizes files that have the following file extensions: .doc (Microsoft® Word) .xls (Microsoft Excel) .ppt (Microsoft... (Microsoft PowerPoint Open Document Format) .wps (Microsoft Works) .wpd (Word Perfect) NOTE: To use the Office File Mode menus, you must connect the printer to a configured internal network adapter.
... File Mode Office File mode is only available when a memory card or USB key containing documents is inserted into the printer or when the printer is connected to the computer using The printer recognizes files that have the following file extensions: .doc (Microsoft® Word) .xls (Microsoft Excel) .ppt (Microsoft... (Microsoft PowerPoint Open Document Format) .wps (Microsoft Works) .wpd (Word Perfect) NOTE: To use the Office File Mode menus, you must connect the printer to a configured internal network adapter.
User Guide
Page 15
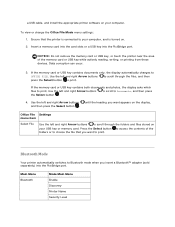
...display, Office File Settings menu item Select File Use the left and right Arrow buttons and then press the Select button . Bluetooth Mode Your printer automatically switches to access the contents of the memory card or USB key while actively reading, writing, or printing from these devices. Main ...the memory card or USB key contains both documents and photos, the display asks which files to OFFICE FILE. a USB cable, and install the appropriate printer software on your computer, and is turned on. 2. Insert a memory card into the card slots or a USB key into the PictBridge port. ...
...display, Office File Settings menu item Select File Use the left and right Arrow buttons and then press the Select button . Bluetooth Mode Your printer automatically switches to access the contents of the memory card or USB key while actively reading, writing, or printing from these devices. Main ...the memory card or USB key contains both documents and photos, the display asks which files to OFFICE FILE. a USB cable, and install the appropriate printer software on your computer, and is turned on. 2. Insert a memory card into the card slots or a USB key into the PictBridge port. ...
User Guide
Page 16
NOTE: The name appears on the display. The current pass key value appears on the printer list of devices that connect to your printer appears on the display in the menu if Security Level is displayed if you want appears on the display, press the Select button to...button . Press the Select button to scroll through the numbers 0-9 for each digit of your computer using the Bluetooth wireless specification. Setup Settings menu item Enable Off *On Discovery Off *On Printer Name The name of the passcode. Main Menu Mode Main Menu Pass Key 1. Use the left and right Arrow...
NOTE: The name appears on the display. The current pass key value appears on the printer list of devices that connect to your printer appears on the display in the menu if Security Level is displayed if you want appears on the display, press the Select button to...button . Press the Select button to scroll through the numbers 0-9 for each digit of your computer using the Bluetooth wireless specification. Setup Settings menu item Enable Off *On Discovery Off *On Printer Name The name of the passcode. Main Menu Mode Main Menu Pass Key 1. Use the left and right Arrow...

User Guide
Page 19
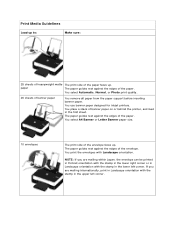
.... The paper should be flat against the paper support surface, and the edges should be flush against the edges of the letterhead going into the printer. When one paper guide is moved, the other adjusts accordingly. NOTE: Do not pull on the paper support. 3. Print Media Guidelines Load up and the top...
.... The paper should be flat against the paper support surface, and the edges should be flush against the edges of the letterhead going into the printer. When one paper guide is moved, the other adjusts accordingly. NOTE: Do not pull on the paper support. 3. Print Media Guidelines Load up and the top...
User Guide
Page 20
...edges of the paper. You print the envelopes with Landscape orientation. The paper guides rest against the edges of banner paper on or behind the printer, and feed in the upper left corner. The paper guides rest against the edges of the envelope faces up. You select Automatic, Normal, or... Photo print quality. 20 sheets of the paper faces up. You use banner paper designed for inkjet printers. Print Media Guidelines Load up to: Make sure: 25 sheets of heavyweight matte paper The print side of banner paper You remove all paper from...
...edges of the paper. You print the envelopes with Landscape orientation. The paper guides rest against the edges of banner paper on or behind the printer, and feed in the upper left corner. The paper guides rest against the edges of the envelope faces up. You select Automatic, Normal, or... Photo print quality. 20 sheets of the paper faces up. You use banner paper designed for inkjet printers. Print Media Guidelines Load up to: Make sure: 25 sheets of heavyweight matte paper The print side of banner paper You remove all paper from...
User Guide
Page 22
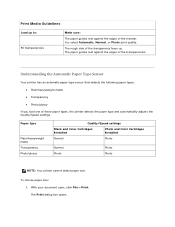
... Print. Understanding the Automatic Paper Type Sensor Your printer has an automatic paper type sensor that detects the following paper types: Plain/heavyweight matte Transparency Photo/glossy If you load one of the transfer. Paper type Plain/heavyweight matte... Transparency Photo/glossy Quality/Speed settings Black and Color Cartridges Installed Photo and Color Cartridges Installed Normal Photo Normal Photo Photo Photo NOTE: Your printer cannot detect paper size. The ...
... Print. Understanding the Automatic Paper Type Sensor Your printer has an automatic paper type sensor that detects the following paper types: Plain/heavyweight matte Transparency Photo/glossy If you load one of the transfer. Paper type Plain/heavyweight matte... Transparency Photo/glossy Quality/Speed settings Black and Color Cartridges Installed Photo and Color Cartridges Installed Normal Photo Normal Photo Photo Photo NOTE: Your printer cannot detect paper size. The ...

User Guide
Page 23
... Options, or Setup (depending on the program or operating system). Click OK. In Windows 2000, click Start Settings Printers. 2. Right-click the printer icon. 3. Click OK. The Printing Preferences dialog box opens. 3. Click Preferences, Properties, Options, or Setup (depending on the program... In Windows® XP, click Start Control Panel Printers and Other Hardware Printers and Faxes. On the Print Setup tab, select the paper type. 5. In Windows Vista™: a. Click Printers. On the Print Setup tab, select the paper size. 4. Click ...
... Options, or Setup (depending on the program or operating system). Click OK. In Windows 2000, click Start Settings Printers. 2. Right-click the printer icon. 3. Click OK. The Printing Preferences dialog box opens. 3. Click Preferences, Properties, Options, or Setup (depending on the program... In Windows® XP, click Start Control Panel Printers and Other Hardware Printers and Faxes. On the Print Setup tab, select the paper type. 5. In Windows Vista™: a. Click Printers. On the Print Setup tab, select the paper size. 4. Click ...
User Guide
Page 24
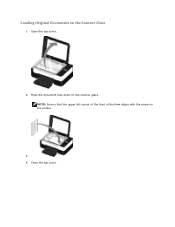
Open the top cover. 2. NOTE: Ensure that the upper left corner of the front of the item aligns with the arrow on the Scanner Glass 1. Loading Original Documents on the printer. 3. 4. Place the document face down on the scanner glass. Close the top cover.
Open the top cover. 2. NOTE: Ensure that the upper left corner of the front of the item aligns with the arrow on the Scanner Glass 1. Loading Original Documents on the printer. 3. 4. Place the document face down on the scanner glass. Close the top cover.

User Guide
Page 25
Click Preferences, Properties, Options, or Setup (depending on your computer and printer, and make any necessary changes for your document. 6. After customizing your document open, click File Print. Load the paper. With your settings, click OK. ...
Click Preferences, Properties, Options, or Setup (depending on your computer and printer, and make any necessary changes for your document. 6. After customizing your document open, click File Print. Load the paper. With your settings, click OK. ...
User Guide
Page 26
...all sides. 6. Click OK or Print. 9. Remove each photo after it exits the printer to prevent your prints in a nonadhesive photo album or frame, allow sufficient time for printing photos. 1. Printing Photos Printing Photos NOTE: Dell recommends you use a color cartridge and a photo cartridge for The Print dialog box opens. 4. The Printing Preferences... photo from the drop-down menu on your document open, click File Print. The Printing Preferences dialog box closes. 8. With your computer and printer, and make any necessary changes for your settings, click OK.
...all sides. 6. Click OK or Print. 9. Remove each photo after it exits the printer to prevent your prints in a nonadhesive photo album or frame, allow sufficient time for printing photos. 1. Printing Photos Printing Photos NOTE: Dell recommends you use a color cartridge and a photo cartridge for The Print dialog box opens. 4. The Printing Preferences... photo from the drop-down menu on your document open, click File Print. The Printing Preferences dialog box closes. 8. With your computer and printer, and make any necessary changes for your settings, click OK.


