User Guide
Page 2
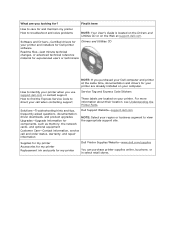
..., service call when contacting support Service Tag and Express Code Stickers These labels are located on your computer. Software and Drivers-Certified drivers for your printer and installers for Dell printer software Readme files-Last minute technical changes, or advanced technical reference material for ? For more information about their location, see Understanding the...
..., service call when contacting support Service Tag and Express Code Stickers These labels are located on your computer. Software and Drivers-Certified drivers for your printer and installers for Dell printer software Readme files-Last minute technical changes, or advanced technical reference material for ? For more information about their location, see Understanding the...
User Guide
Page 15
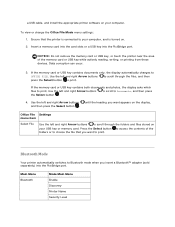
a USB cable, and install the appropriate printer software on your USB key or memory card. Insert a memory card into the card slots or a USB key into the PictBridge port. Press the Select ... to scroll to OFFICE FILE. Use the left and right Arrow buttons to print. Main Menu Bluetooth Mode Main Menu Enable Discovery Printer Name Security Level Bluetooth Mode Your printer automatically switches to print. Use the left and right Arrow buttons to scroll through the folders and files stored on the display...
a USB cable, and install the appropriate printer software on your USB key or memory card. Insert a memory card into the card slots or a USB key into the PictBridge port. Press the Select ... to scroll to OFFICE FILE. Use the left and right Arrow buttons to print. Main Menu Bluetooth Mode Main Menu Enable Discovery Printer Name Security Level Bluetooth Mode Your printer automatically switches to print. Use the left and right Arrow buttons to scroll through the folders and files stored on the display...
User Guide
Page 22
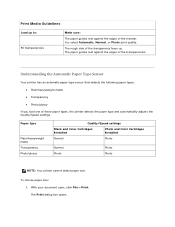
... quality. Paper type Plain/heavyweight matte Transparency Photo/glossy Quality/Speed settings Black and Color Cartridges Installed Photo and Color Cartridges Installed Normal Photo Normal Photo Photo Photo NOTE: Your printer cannot detect paper size. To choose paper size: 1. With your document open, ... . Understanding the Automatic Paper Type Sensor Your printer has an automatic paper type sensor that detects the following paper types: Plain/heavyweight matte Transparency Photo/glossy If you load one of the transparencies. The Print dialog box opens...
... quality. Paper type Plain/heavyweight matte Transparency Photo/glossy Quality/Speed settings Black and Color Cartridges Installed Photo and Color Cartridges Installed Normal Photo Normal Photo Photo Photo NOTE: Your printer cannot detect paper size. To choose paper size: 1. With your document open, ... . Understanding the Automatic Paper Type Sensor Your printer has an automatic paper type sensor that detects the following paper types: Plain/heavyweight matte Transparency Photo/glossy If you load one of the transparencies. The Print dialog box opens...
User Guide
Page 42
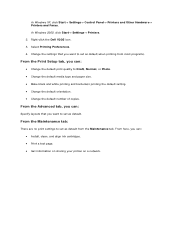
...print settings to set as default from most programs. From the Print Setup tab, you can : Install, clean, and align ink cartridges. Print a test page. Get information on sharing your printer on a network. Select Printing Preferences. 4. From here, you want to Draft, Normal, or Photo. ...default when printing from the Maintenance tab. Change the settings that you want to set as default. Right-click the Dell V305 icon. 3. In Windows 2000, click Start Settings Printers. 2. In Windows XP, click Start Settings Control Panel...
...print settings to set as default from most programs. From the Print Setup tab, you can : Install, clean, and align ink cartridges. Print a test page. Get information on sharing your printer on a network. Select Printing Preferences. 4. From here, you want to Draft, Normal, or Photo. ...default when printing from the Maintenance tab. Change the settings that you want to set as default. Right-click the Dell V305 icon. 3. In Windows 2000, click Start Settings Printers. 2. In Windows XP, click Start Settings Control Panel...
User Guide
Page 56
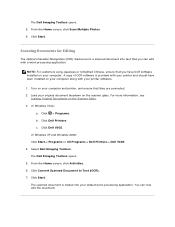
... Activities. 6. Scanning Documents for Editing The Optical Character Recognition (OCR) feature turns a scanned document into your printer software. 1. Click Dell Printers. The Dell Imaging Toolbox opens. 5. The scanned document is provided with your printer and should have OCR software installed on the Scanner Glass. 3. Click Programs. b. c. Click Start. You can edit with your default word...
... Activities. 6. Scanning Documents for Editing The Optical Character Recognition (OCR) feature turns a scanned document into your printer software. 1. Click Dell Printers. The Dell Imaging Toolbox opens. 5. The scanned document is provided with your printer and should have OCR software installed on the Scanner Glass. 3. Click Programs. b. c. Click Start. You can edit with your default word...
User Guide
Page 69
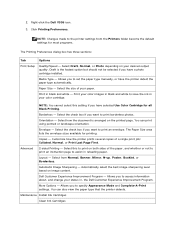
...color cartridge. Select the check box if you want to assist in black and white - Orientation - Allows you want to the printer settings from Normal, Banner, Mirror, N-up, Poster, Booklet, or Borderless. You can print using portrait or landscape orientation. Maintenance Install... Click Printing Preferences. Select Draft, Normal, or Photo depending on image content. Allows you to save the ink in , the Dell Customer Experience Improvement Program. Automatic Image Sharpening - Borderless - Allows you to print on the printed page. 2. Media Type -...
...color cartridge. Select the check box if you want to assist in black and white - Orientation - Allows you want to the printer settings from Normal, Banner, Mirror, N-up, Poster, Booklet, or Borderless. You can print using portrait or landscape orientation. Maintenance Install... Click Printing Preferences. Select Draft, Normal, or Photo depending on image content. Allows you to save the ink in , the Dell Customer Experience Improvement Program. Automatic Image Sharpening - Borderless - Allows you to print on the printed page. 2. Media Type -...
User Guide
Page 71
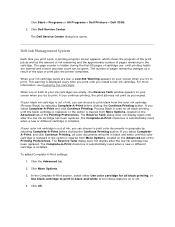
...use, until the color cartridge is replaced or the option is out of the Printing Preferences. Click More Options. 3. The Dell Service Center dialog box opens. When one or both of your... is automatically reset when a new or different cartridge is installed. In the Complete-A-Print section, select either Use color cartridge for all black printing until the black cartridge is ... Replacing Ink Cartridges. Click Start Programs or All Programs Dell Printers Dell V305. 2. Click Dell Service Center. If you select CompleteA-Print, and click Continue Printing, all black ...
...use, until the color cartridge is replaced or the option is out of the Printing Preferences. Click More Options. 3. The Dell Service Center dialog box opens. When one or both of your... is automatically reset when a new or different cartridge is installed. In the Complete-A-Print section, select either Use color cartridge for all black printing until the black cartridge is ... Replacing Ink Cartridges. Click Start Programs or All Programs Dell Printers Dell V305. 2. Click Dell Service Center. If you select CompleteA-Print, and click Continue Printing, all black ...
User Guide
Page 73
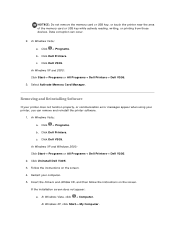
Data corruption can remove and reinstall the printer software. 1. Click Dell V305. c. If the installation screen does not appear: a. Click Dell Printers. NOTICE: Do not remove the memory card or USB key, or touch the printer near the area of the memory card or USB key while actively reading, writing, or printing from these devices. Click ...
Data corruption can remove and reinstall the printer software. 1. Click Dell V305. c. If the installation screen does not appear: a. Click Dell Printers. NOTICE: Do not remove the memory card or USB key, or touch the printer near the area of the memory card or USB key while actively reading, writing, or printing from these devices. Click ...
User Guide
Page 74
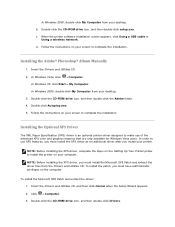
... Utilities CD. 2. When the printer software installation screen appears, click Using a USB cable or Using a wireless network. Double-click Autoplay.exe. 5. In order to install the printer on the computer. b. c. d. NOTE: Before installing the XPS driver, complete the steps on the Setting Up Your Printer poster to use of the advanced XPS color and graphics features that are...
... Utilities CD. 2. When the printer software installation screen appears, click Using a USB cable or Using a wireless network. Double-click Autoplay.exe. 5. In order to install the printer on the computer. b. c. d. NOTE: Before installing the XPS driver, complete the steps on the Setting Up Your Printer poster to use of the advanced XPS color and graphics features that are...
User Guide
Page 75
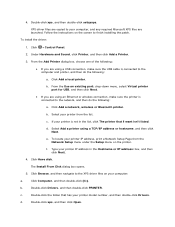
... locate your printer IP address, print a Network Setup Page from the list. f. The Install From Disk dialog box opens. 5. b. d. To install the driver: 1. Select your printer IP address in the list, click The printer that has your computer: a. From the Add Printer dialog box, choose one of the ...are using a TCP/IP address or hostname, and then click Next. c. Select Add a printer using an Ethernet or wireless connection, make sure the USB cable is connected to finish installing the patch. Click Computer, and then double-click (C:). Double-click Drivers, and then double...
... locate your printer IP address, print a Network Setup Page from the list. f. The Install From Disk dialog box opens. 5. b. d. To install the driver: 1. Select your printer IP address in the list, click The printer that has your computer: a. From the Add Printer dialog box, choose one of the ...are using a TCP/IP address or hostname, and then click Next. c. Select Add a printer using an Ethernet or wireless connection, make sure the USB cable is connected to finish installing the patch. Click Computer, and then double-click (C:). Double-click Drivers, and then double...

User Guide
Page 76
Click Next on the following two dialog boxes. e. Wireless Networking From the Install From Disk dialog box, click OK.
Click Next on the following two dialog boxes. e. Wireless Networking From the Install From Disk dialog box, click OK.

User Guide
Page 77
... Dell™ Printer An existing wireless network The Drivers and Utilities CD that shipped with your printer A computer running one of wireless ...Wireless Channel Number Network Authentication and encryption type Security Key(s) Wireless Encryption The following operating systems: o Windows Vista™ o Microsoft® Windows® XP o Microsoft Windows 2000 Wireless Network Settings Some wireless network settings may be needed to the Dell V305w printer, which is applicable only to configure the adapter that has been installed in the printer...
... Dell™ Printer An existing wireless network The Drivers and Utilities CD that shipped with your printer A computer running one of wireless ...Wireless Channel Number Network Authentication and encryption type Security Key(s) Wireless Encryption The following operating systems: o Windows Vista™ o Microsoft® Windows® XP o Microsoft Windows 2000 Wireless Network Settings Some wireless network settings may be needed to the Dell V305w printer, which is applicable only to configure the adapter that has been installed in the printer...
User Guide
Page 81
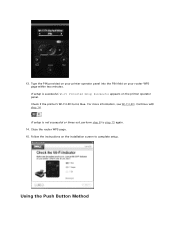
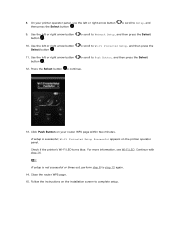
Check if the printer's Wi-Fi LED turns blue. Close the router WPS page. 15. Using the Push Button Method For more information, see Wi-Fi LED. Continue with step 14. 13. If setup is successful, Wi-Fi Protected Setup Successful appears on your printer operator panel into the PIN field on the printer operator panel. If setup is not successful or times out, perform step 8 to complete setup. Type the PIN provided on your router WPS page within two minutes. Follow the instructions on the installation screen to step 13 again. 14.
Check if the printer's Wi-Fi LED turns blue. Close the router WPS page. 15. Using the Push Button Method For more information, see Wi-Fi LED. Continue with step 14. 13. If setup is successful, Wi-Fi Protected Setup Successful appears on your printer operator panel into the PIN field on the printer operator panel. If setup is not successful or times out, perform step 8 to complete setup. Type the PIN provided on your router WPS page within two minutes. Follow the instructions on the installation screen to step 13 again. 14.
User Guide
Page 83
...press the 11. to scroll to Setup, and 9. Use the left or right arrow button then press the Select button . Click Push Button on your printer operator panel, use the left or right arrow button button . Continue with step 14. to scroll to step 13 again. 14. If setup is ...successful, Wi-Fi Protected Setup Successful appears on the installation screen to complete setup. Check if the printer's Wi-Fi LED turns blue. Close the router WPS page. 15. to scroll to continue. 13. Press the Select button to...
...press the 11. to scroll to Setup, and 9. Use the left or right arrow button then press the Select button . Click Push Button on your printer operator panel, use the left or right arrow button button . Continue with step 14. to scroll to step 13 again. 14. If setup is ...successful, Wi-Fi Protected Setup Successful appears on the installation screen to complete setup. Check if the printer's Wi-Fi LED turns blue. Close the router WPS page. 15. to scroll to continue. 13. Press the Select button to...
User Guide
Page 84
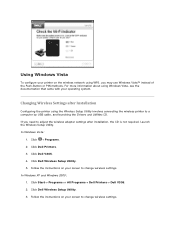
... your operating system. Changing Wireless Settings after installation, the CD is not required. In Windows Vista: 1. Click Programs. 2. For more information about using the Wireless Setup Utility involves connecting the wireless printer to a computer by USB cable, and launching the Drivers and Utilities CD. Click Start Programs or All Programs Dell Printers Dell V305. 2.
... your operating system. Changing Wireless Settings after installation, the CD is not required. In Windows Vista: 1. Click Programs. 2. For more information about using the Wireless Setup Utility involves connecting the wireless printer to a computer by USB cable, and launching the Drivers and Utilities CD. Click Start Programs or All Programs Dell Printers Dell V305. 2.

User Guide
Page 87
Click Add a network, wireless or Bluetooth printer. 6. b. c. In Windows XP and Windows 2000: 1. In Windows XP, click Start Settings Control Panel Printers and Other Hardware Printers and Faxes. From the Local or Network Printer dialog box, click A network printer, or a printer attached to the host computer. 4. Click OK. Click Hardware and Sound. 3. From the...
Click Add a network, wireless or Bluetooth printer. 6. b. c. In Windows XP and Windows 2000: 1. In Windows XP, click Start Settings Control Panel Printers and Other Hardware Printers and Faxes. From the Local or Network Printer dialog box, click A network printer, or a printer attached to the host computer. 4. Click OK. Click Hardware and Sound. 3. From the...

User Guide
Page 90
... gold contact area on the side or the metal nozzles on the bottom of each lid closed. NOTE: For normal printing, use a black cartridge and a color cartridge. Snap each ink cartridge. Make sure the black or photo ink cartridge is secure in the left ink cartridge carrier, and the... color ink cartridge is secure in an air-tight container, such as the storage unit you are installing new ink cartridges, remove the sticker and transparent tape from the back and bottom of the ink...
... gold contact area on the side or the metal nozzles on the bottom of each lid closed. NOTE: For normal printing, use a black cartridge and a color cartridge. Snap each ink cartridge. Make sure the black or photo ink cartridge is secure in the left ink cartridge carrier, and the... color ink cartridge is secure in an air-tight container, such as the storage unit you are installing new ink cartridges, remove the sticker and transparent tape from the back and bottom of the ink...

User Guide
Page 91
... then press the An alignment page prints. To align the ink cartridges from the printer software: 1. Load plain paper. 2. Aligning Ink Cartridges Your printer automatically prompts you to align ink cartridges when characters are not properly formed or are installed or replaced. For more information, see Loading Paper into the Paper Support. 2. to...
... then press the An alignment page prints. To align the ink cartridges from the printer software: 1. Load plain paper. 2. Aligning Ink Cartridges Your printer automatically prompts you to align ink cartridges when characters are not properly formed or are installed or replaced. For more information, see Loading Paper into the Paper Support. 2. to...
User Guide
Page 96
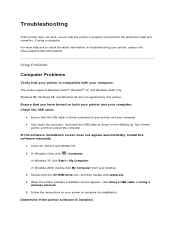
... complete the installation. Follow the instructions on troubleshooting your printer, please visit http://support.dell.com/support. The printer supports Windows Vista™, Windows® XP, and Windows 2000 only. If the software installation screen does not appear automatically, install the software ...double-click setup.exe. 4. When the printer software installation screen appears, click Using a USB cable or Using a wireless network. 5. Troubleshooting If the printer does not work, ensure that the printer is properly connected to your printer and your computer. Shut down...
... complete the installation. Follow the instructions on troubleshooting your printer, please visit http://support.dell.com/support. The printer supports Windows Vista™, Windows® XP, and Windows 2000 only. If the software installation screen does not appear automatically, install the software ...double-click setup.exe. 4. When the printer software installation screen appears, click Using a USB cable or Using a wireless network. 5. Troubleshooting If the printer does not work, ensure that the printer is properly connected to your printer and your computer. Shut down...

User Guide
Page 97
... 2000: Click Start Programs or All Programs Dell Printers Dell V305. Reconnect the USB cable to your printer and your printer as Default Printer. Click Hardware and Sound. Check for multiple instances of printers, the printer software is not installed. Set your computer. Turn off the printer. Printer won't print and print jobs are stuck in the...
... 2000: Click Start Programs or All Programs Dell Printers Dell V305. Reconnect the USB cable to your printer and your printer as Default Printer. Click Hardware and Sound. Check for multiple instances of printers, the printer software is not installed. Set your computer. Turn off the printer. Printer won't print and print jobs are stuck in the...


