Dell Users Guide
Page 3
... 7 Identifying Parts and Controls 8 Monitor Specifications 12 Plug and Play Capability 26 Universal Serial Bus (USB) Interface 27 LCD Monitor Quality and Pixel Policy 28 Maintenance Guidelines 29 2 Setting Up the Monitor 31 Attaching the Stand 31 Connecting Your Monitor 31 Organizing Your Cables 35 Removing the Monitor Stand 35 Wall Mounting (Optional 36 3 Operating the Monitor 37 Power On the Monitor 37 Using the Front Panel Controls 37 Using the On-Screen Display (OSD) Menu 41 Setting the Maximum Resolution 55 Using Tilt (For UZ2215H...
... 7 Identifying Parts and Controls 8 Monitor Specifications 12 Plug and Play Capability 26 Universal Serial Bus (USB) Interface 27 LCD Monitor Quality and Pixel Policy 28 Maintenance Guidelines 29 2 Setting Up the Monitor 31 Attaching the Stand 31 Connecting Your Monitor 31 Organizing Your Cables 35 Removing the Monitor Stand 35 Wall Mounting (Optional 36 3 Operating the Monitor 37 Power On the Monitor 37 Using the Front Panel Controls 37 Using the On-Screen Display (OSD) Menu 41 Setting the Maximum Resolution 55 Using Tilt (For UZ2215H...
Dell Users Guide
Page 7
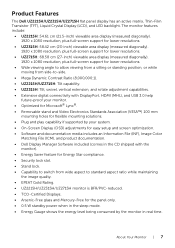
... Contrast Ratio (8,000,000:1). • UZ2215H/UZ2715H: Tilt capability. • UZ2315H: Tilt, swivel, vertical extension, and rotate adjustment capabilities. • Extensive digital connectivity with DisplayPort, HDMI (MHL), and USB 3.0 help future-proof your monitor. • Optimized for Microsoft® Lync®. • Removable stand and Video Electronics Standards Association (VESA™) 100 mm mounting holes for flexible mounting solutions. • Plug and play capability if supported by your system. • On-Screen Display (OSD) adjustments...
... Contrast Ratio (8,000,000:1). • UZ2215H/UZ2715H: Tilt capability. • UZ2315H: Tilt, swivel, vertical extension, and rotate adjustment capabilities. • Extensive digital connectivity with DisplayPort, HDMI (MHL), and USB 3.0 help future-proof your monitor. • Optimized for Microsoft® Lync®. • Removable stand and Video Electronics Standards Association (VESA™) 100 mm mounting holes for flexible mounting solutions. • Plug and play capability if supported by your system. • On-Screen Display (OSD) adjustments...

Dell Users Guide
Page 21
... use. Inactive - Video Active Blanked - Power Indicator White White (Breathing) Off Power Consumption 70 W (maximum)** 18 W (typical) Less than 1.2 W Less than 0.5 W UZ2315H VESA Modes Horizontal Vertical Sync Sync Normal operation Active Active Active-off mode Switch off Inactive - Inactive - The following table shows the power consumption and signaling of this automatic power saving feature. Video Active Blanked - Inactive - Power Management Modes If you have VESA's DPM™ compliance display card or software installed in your PC, the monitor...
... use. Inactive - Video Active Blanked - Power Indicator White White (Breathing) Off Power Consumption 70 W (maximum)** 18 W (typical) Less than 1.2 W Less than 0.5 W UZ2315H VESA Modes Horizontal Vertical Sync Sync Normal operation Active Active Active-off mode Switch off Inactive - Inactive - The following table shows the power consumption and signaling of this automatic power saving feature. Video Active Blanked - Inactive - Power Management Modes If you have VESA's DPM™ compliance display card or software installed in your PC, the monitor...

Dell Users Guide
Page 33
...) cable Connecting the USB 3.0 cable After you have completed connecting the VGA/DP/HDMI cable, follow the procedures below to connect the USB 3.0 cable to the computer and complete your monitor displays an image, installation is complete. If it does not display an image, see Universal Serial Bus (USB) Specific Problems. 5. If your monitor setup: 1. Use the cable slot on the monitor. 3. Plug the power cables for your computer. (See Bottom View for details.) 2. Setting Up the Monitor | 33 Connect the upstream USB 3.0 port (cable supplied) to...
...) cable Connecting the USB 3.0 cable After you have completed connecting the VGA/DP/HDMI cable, follow the procedures below to connect the USB 3.0 cable to the computer and complete your monitor displays an image, installation is complete. If it does not display an image, see Universal Serial Bus (USB) Specific Problems. 5. If your monitor setup: 1. Use the cable slot on the monitor. 3. Plug the power cables for your computer. (See Bottom View for details.) 2. Setting Up the Monitor | 33 Connect the upstream USB 3.0 port (cable supplied) to...

Dell Users Guide
Page 34
... that support MHL output. NOTE: Some MHL source devices may take more than a few seconds or longer to HDMI (MHL) 1 or HDMI (MHL) 2 by using OSD Menu (See Using the On-Screen Display (OSD) Menu for details) 3. Select input source on monitor to output an image, depending on MHL source device's output. NOTE: When the connected MHL source device enters Standby mode, the monitor displays a black screen or the message below steps: 1. Connect the (micro) USB port...
... that support MHL output. NOTE: Some MHL source devices may take more than a few seconds or longer to HDMI (MHL) 1 or HDMI (MHL) 2 by using OSD Menu (See Using the On-Screen Display (OSD) Menu for details) 3. Select input source on monitor to output an image, depending on MHL source device's output. NOTE: When the connected MHL source device enters Standby mode, the monitor displays a black screen or the message below steps: 1. Connect the (micro) USB port...

Dell Users Guide
Page 44
... source. Use to select the VGA input source. Use to your monitor. Input Source Use the Input Source menu to select between the different video signals that may be connected to select the HDMI (MHL) 1 or HDMI (MHL) 2 input source. HDMI (MHL) 1 Select the HDMI (MHL) 1 or HDMI (MHL) 2 input when you are using the DisplayPort (DP) connector. DisplayPort Select the DisplayPort input when you are using HDMI (MHL) 2 the HDMI connectors. VGA Select the VGA input when you are using the analog (VGA) connector. Color Settings Use Color Settings to adjust the color setting mode...
... source. Use to select the VGA input source. Use to your monitor. Input Source Use the Input Source menu to select between the different video signals that may be connected to select the HDMI (MHL) 1 or HDMI (MHL) 2 input source. HDMI (MHL) 1 Select the HDMI (MHL) 1 or HDMI (MHL) 2 input when you are using the DisplayPort (DP) connector. DisplayPort Select the DisplayPort input when you are using HDMI (MHL) 2 the HDMI connectors. VGA Select the VGA input when you are using the analog (VGA) connector. Color Settings Use Color Settings to adjust the color setting mode...
Dell Users Guide
Page 46
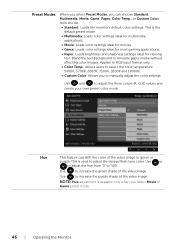
...: Loads color settings ideal for movies. • Game: Loads color settings ideal for most gaming applications. • Paper: Loads brightness and sharpness settings ideal for viewing text. Hue This feature can choose Standard, Multimedia, Movie, Game, Paper, Color Temp., or Custom Color from '0' to increase the green shade of the video image. Use to '100'. Applies to RGB input format only. • Color Temp.: Allows users to...
...: Loads color settings ideal for movies. • Game: Loads color settings ideal for most gaming applications. • Paper: Loads brightness and sharpness settings ideal for viewing text. Hue This feature can choose Standard, Multimedia, Movie, Game, Paper, Color Temp., or Custom Color from '0' to increase the green shade of the video image. Use to '100'. Applies to RGB input format only. • Color Temp.: Allows users to...

Dell Users Guide
Page 47
Horizontal Position Use or to increase the colorful appearance of the video image. Use to adjust the image left or right. Aspect Ratio Adjusts the image ratio to '100'. If satisfactory results are only available for "VGA" input. Use or to adjust the saturation from '0' to the factory settings. NOTE: Saturation adjustment is available only when you to adjust your monitor to adjust for best image quality. Sharpness This feature can adjust the color saturation of...
Horizontal Position Use or to increase the colorful appearance of the video image. Use to adjust the image left or right. Aspect Ratio Adjusts the image ratio to '100'. If satisfactory results are only available for "VGA" input. Use or to adjust the saturation from '0' to the factory settings. NOTE: Saturation adjustment is available only when you to adjust your monitor to adjust for best image quality. Sharpness This feature can adjust the color saturation of...

Dell Users Guide
Page 49
... the eight languages (English, Spanish, French, German, Brazilian Portuguese, Russian, Simplified Chinese, or Japanese). When Lock is selected, no user adjustments are locked. Only hard unlock (press and hold the button beside the power button for 10 seconds) Reset all OSD settings to one of time the menu remains on screen, and so on. Controls user access to 60 seconds. Language Transparency Language options set the OSD display to the factory preset values...
... the eight languages (English, Spanish, French, German, Brazilian Portuguese, Russian, Simplified Chinese, or Japanese). When Lock is selected, no user adjustments are locked. Only hard unlock (press and hold the button beside the power button for 10 seconds) Reset all OSD settings to one of time the menu remains on screen, and so on. Controls user access to 60 seconds. Language Transparency Language options set the OSD display to the factory preset values...
Dell Users Guide
Page 55
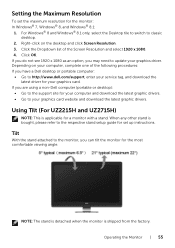
... the support site for set the maximum resolution for the most comfortable viewing angle. Tilt With the stand attached to your computer, complete one of the Screen Resolution and select 1920 x 1080. 4. For Windows® 8 and Windows® 8.1 only, select the Desktop tile to switch to the respective stand setup guide for your computer and download the latest graphic drivers. • Go to the monitor, you have a Dell...
... the support site for set the maximum resolution for the most comfortable viewing angle. Tilt With the stand attached to your computer, complete one of the Screen Resolution and select 1920 x 1080. 4. For Windows® 8 and Windows® 8.1 only, select the Desktop tile to switch to the respective stand setup guide for your computer and download the latest graphic drivers. • Go to the monitor, you have a Dell...
Dell Users Guide
Page 58
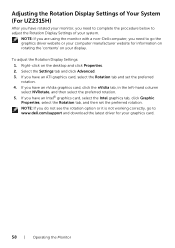
... or it is not working correctly, go the graphics driver website or your graphics card. 58 | Operating the Monitor To adjust the Rotation Display Settings: 1. NOTE: If you have an ATI graphics card, select the Rotation tab and set the preferred rotation. If you need to complete the procedure below to www.dell.com/support and download the latest driver for your computer manufacturer...
... or it is not working correctly, go the graphics driver website or your graphics card. 58 | Operating the Monitor To adjust the Rotation Display Settings: 1. NOTE: If you have an ATI graphics card, select the Rotation tab and set the preferred rotation. If you need to complete the procedure below to www.dell.com/support and download the latest driver for your computer manufacturer...

Dell Users Guide
Page 59
... computer and the monitor. 2. or Troubleshooting | 59 Turn off both your monitor and computer are properly connected but the monitor screen remains dark, run the monitor self-test by performing the following steps: 1. Unplug the video cable from the back of the procedures in self-test mode, the power LED remains white. To ensure proper Self-Test operation, remove all Digital and the Analog cables from the back...
... computer and the monitor. 2. or Troubleshooting | 59 Turn off both your monitor and computer are properly connected but the monitor screen remains dark, run the monitor self-test by performing the following steps: 1. Unplug the video cable from the back of the procedures in self-test mode, the power LED remains white. To ensure proper Self-Test operation, remove all Digital and the Analog cables from the back...

Dell Users Guide
Page 60
... the video cable is unplugged and the monitor is functioning properly. Turn Off your computer and the monitor. NOTE: You can run the built-in self-test mode. 60 | Troubleshooting Built-in Diagnostics Your monitor has a built-in diagnostic tool that helps you determine if the screen abnormality you use the previous procedure, check your video controller and computer, because your computer and video card. This...
... the video cable is unplugged and the monitor is functioning properly. Turn Off your computer and the monitor. NOTE: You can run the built-in self-test mode. 60 | Troubleshooting Built-in Diagnostics Your monitor has a built-in diagnostic tool that helps you determine if the screen abnormality you use the previous procedure, check your video controller and computer, because your computer and video card. This...

Dell Users Guide
Page 61
... the video cable connecting the monitor and the computer is properly connected and secure. • Verify that the power outlet is functioning properly using the built-in green, blue, black, white and text screens. No Video/Power No picture or no dust particles on the surface of the computer or monitor. Ensure that the screen is selected via OSD. • Eliminate video extension cables. • Reset the monitor to Factory Settings. • Change the video resolution to...
... the video cable connecting the monitor and the computer is properly connected and secure. • Verify that the power outlet is functioning properly using the built-in green, blue, black, white and text screens. No Video/Power No picture or no dust particles on the surface of the computer or monitor. Ensure that the screen is selected via OSD. • Eliminate video extension cables. • Reset the monitor to Factory Settings. • Change the video resolution to...

Dell Users Guide
Page 62
... mode. • Check for bent or broken pins in the video cable connector. • Run the built-in diagnostics. Brightness Problems Picture too dim or too bright • Reset the monitor to Factory Settings. • Auto Adjust via OSD. • Adjust horizontal & vertical controls via OSD. NOTE: When using DP/HDMI input, the positioning adjustments are not available. Shaky/Jittery Video Wavy picture or fine movement • Perform Auto Adjust via OSD. • Adjust the Phase and Pixel Clock controls via OSD. • Reset the monitor to Factory Settings...
... mode. • Check for bent or broken pins in the video cable connector. • Run the built-in diagnostics. Brightness Problems Picture too dim or too bright • Reset the monitor to Factory Settings. • Auto Adjust via OSD. • Adjust horizontal & vertical controls via OSD. NOTE: When using DP/HDMI input, the positioning adjustments are not available. Shaky/Jittery Video Wavy picture or fine movement • Perform Auto Adjust via OSD. • Adjust the Phase and Pixel Clock controls via OSD. • Reset the monitor to Factory Settings...

Dell Users Guide
Page 63
... Lock). No Input Signal No picture, the when user LED light is not in the power saving mode by moving the mouse or pressing any key on the a long period of screen time • Use the Power Management feature to turn On the monitor. • Check whether the OSD menu is locked. Intermittent Problems Monitor malfunctions on the screen • Turn Off the monitor, unplug the monitor power cable, plug it back, and then turn off . • Change the Input Color Format...
... Lock). No Input Signal No picture, the when user LED light is not in the power saving mode by moving the mouse or pressing any key on the a long period of screen time • Use the Power Management feature to turn On the monitor. • Check whether the OSD menu is locked. Intermittent Problems Monitor malfunctions on the screen • Turn Off the monitor, unplug the monitor power cable, plug it back, and then turn off . • Change the Input Color Format...

Dell Users Guide
Page 65
...® Lync® Specific Problems Specific Symptoms What You Experience Possible Solutions The Hook button is not working The Lync main window doe not display • Ensure that the USB upstream cable is connected between the monitor and the computer or notebook. • Ensure that you have signed in Standby mode. • Check physical MHL cable connection is corresponding to input source selected on OSD Menu i.e., HDMI (MHL) 1 or HDMI (MHL) 2. •...
...® Lync® Specific Problems Specific Symptoms What You Experience Possible Solutions The Hook button is not working The Lync main window doe not display • Ensure that the USB upstream cable is connected between the monitor and the computer or notebook. • Ensure that you have signed in Standby mode. • Check physical MHL cable connection is corresponding to input source selected on OSD Menu i.e., HDMI (MHL) 1 or HDMI (MHL) 2. •...

Dell Users Guide
Page 68
..., select the Desktop tile to switch to www.dell.com/support, enter your service tag, and download the latest driver for example, http://www.ATI.com OR http://www.NVIDIA.com). 68 | Appendix If you have a Dell™ desktop or a Dell™ portable computer with Microsoft® Windows® operating systems, set the display resolution to update your graphics driver. Click Change Display Settings. 4. Identify your graphics...
..., select the Desktop tile to switch to www.dell.com/support, enter your service tag, and download the latest driver for example, http://www.ATI.com OR http://www.NVIDIA.com). 68 | Appendix If you have a Dell™ desktop or a Dell™ portable computer with Microsoft® Windows® operating systems, set the display resolution to update your graphics driver. Click Change Display Settings. 4. Identify your graphics...
Dell - Dell Display Manager Users Guide
Page 1
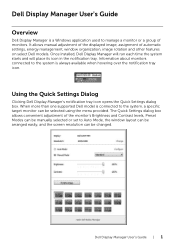
... one supported Dell model is connected to the system, a specific target monitor can be selected using the menu provided. The Quick Settings dialog box allows convenient adjustment of the monitor's Brightness and Contrast levels, Preset Modes can be manually selected or set to Auto Mode, the window layout can be arranged easily, and the screen resolution can be changed. It allows manual adjustment of the displayed image, assignment of monitors. Dell Display Manager User's Guide Overview Dell Display Manager is a Windows application used to manage a monitor or...
... one supported Dell model is connected to the system, a specific target monitor can be selected using the menu provided. The Quick Settings dialog box allows convenient adjustment of the monitor's Brightness and Contrast levels, Preset Modes can be manually selected or set to Auto Mode, the window layout can be arranged easily, and the screen resolution can be changed. It allows manual adjustment of the displayed image, assignment of monitors. Dell Display Manager User's Guide Overview Dell Display Manager is a Windows application used to manage a monitor or...
Dell - Dell Display Manager Users Guide
Page 2
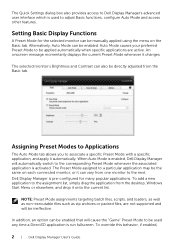
..., if enabled, 2 | Dell Display Manager User's Guide Assigning Preset Modes to Applications The Auto Mode tab allows you to be ineffective. The Quick Settings dialog box also provides access to Dell Display Manager's advanced user interface which is used any time a Direct3D application is run fullscreen. The selected monitor's Brightness and Contrast can be enabled that will be applied automatically when specific applications are not supported and will...
..., if enabled, 2 | Dell Display Manager User's Guide Assigning Preset Modes to Applications The Auto Mode tab allows you to be ineffective. The Quick Settings dialog box also provides access to Dell Display Manager's advanced user interface which is used any time a Direct3D application is run fullscreen. The selected monitor's Brightness and Contrast can be enabled that will be applied automatically when specific applications are not supported and will...


