
User's Guide
Page 3
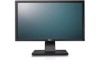
... the monitor) l Drivers and Documentation media l Quick Setup Guide l Product and Safety Information Guide Product Features The U2211H / U2311H flat panel display has an active matrix, thin-film transistor (TFT), liquid crystal display (LCD). Identifying Parts and Controls Front View l VGA Cable (attached to standard aspect ratio while maintaining the image quality. ■...
... the monitor) l Drivers and Documentation media l Quick Setup Guide l Product and Safety Information Guide Product Features The U2211H / U2311H flat panel display has an active matrix, thin-film transistor (TFT), liquid crystal display (LCD). Identifying Parts and Controls Front View l VGA Cable (attached to standard aspect ratio while maintaining the image quality. ■...
User's Guide
Page 6
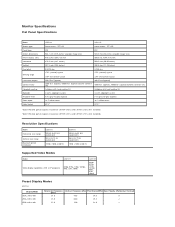
...typical) is based on CIE1976 (82%) and CIE1931 (72%) test standards. *[U2311H] color gamut (typical) is based on CIE1976 (82%) and CIE1931 (72%) test standards. TFT LCD Active matrix - TFT LCD IPS IPS 546.1 mm (21.5-inches viewable image size) 584.2 mm (...Polarity (Horizontal/Vertical) 70.0 28.3 -/+ 31.5 60.0 25.2 -/- 37.5 75.0 31.5 -/- Monitor Specifications Flat Panel Specifications Model Screen type Panel type Screen dimensions Preset display area: Horizontal Vertical Pixel pitch Viewing angle Luminance output Contrast ratio Faceplate coating Backlight Response Time ...
...typical) is based on CIE1976 (82%) and CIE1931 (72%) test standards. *[U2311H] color gamut (typical) is based on CIE1976 (82%) and CIE1931 (72%) test standards. TFT LCD Active matrix - TFT LCD IPS IPS 546.1 mm (21.5-inches viewable image size) 584.2 mm (...Polarity (Horizontal/Vertical) 70.0 28.3 -/+ 31.5 60.0 25.2 -/- 37.5 75.0 31.5 -/- Monitor Specifications Flat Panel Specifications Model Screen type Panel type Screen dimensions Preset display area: Horizontal Vertical Pixel pitch Viewing angle Luminance output Contrast ratio Faceplate coating Backlight Response Time ...

User's Guide
Page 34
(Screw dimension: M4 x 10 mm). Mount the LCD on a stable flat table. 2. Place the monitor panel on a soft cloth or cushion on the wall by following the instructions that come with the VESA-compatible base mounting kit. 1. Remove the stand. 3. NOTE: ... the mounting bracket from the wall mounting kit to the instructions that came with minimum weight/load bearing capacity of 4.52 kg. Refer to the LCD. 5.
(Screw dimension: M4 x 10 mm). Mount the LCD on a stable flat table. 2. Place the monitor panel on a soft cloth or cushion on the wall by following the instructions that come with the VESA-compatible base mounting kit. 1. Remove the stand. 3. NOTE: ... the mounting bracket from the wall mounting kit to the instructions that came with minimum weight/load bearing capacity of 4.52 kg. Refer to the LCD. 5.
User's Guide
Page 36
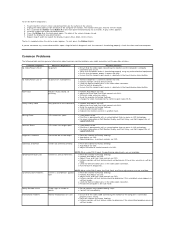
...off . l Check for 2 seconds. l Change the video resolution to Factory Settings. l Check environmental factors. Missing Pixels LCD screen has spots l Cycle power on the front panel again. l Pixel that is properly connected and secure. l Auto Adjust via OSD. l Check for abnormalities. 5. l ...are also in self-test mode. Screen is complete when the white screen appears. l Perform Auto Adjust via OSD. l Contact Dell immediately. If you might encounter and the possible solutions. l Verify that the correct input source is depressed fully. No Video/Power...
...off . l Check for 2 seconds. l Change the video resolution to Factory Settings. l Check environmental factors. Missing Pixels LCD screen has spots l Cycle power on the front panel again. l Pixel that is properly connected and secure. l Auto Adjust via OSD. l Check for abnormalities. 5. l ...are also in self-test mode. Screen is complete when the white screen appears. l Perform Auto Adjust via OSD. l Contact Dell immediately. If you might encounter and the possible solutions. l Verify that the correct input source is depressed fully. No Video/Power...


